K8s基础
部署方式演变
随着互联网的发展,在应用程序部署方式上主要经历了三个时代:
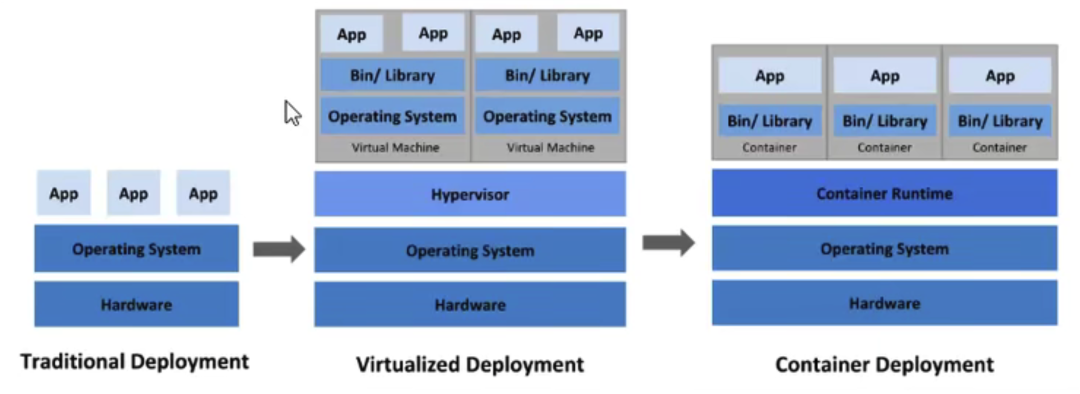
- 1.传统部署:互联网早期,会直接将应用程序部署在物理机上
优点:简单,不需要其它技术的参与
缺点:不能为应用程序定义资源使用边界,很难合理地分配计算资源,而且程序之间容易产生影响
- 2.虚拟化部署:可以在一台物理机上运行多个虚拟机,每个虚拟机都是独立的一个环境
优点:程序环境不会相互产生影响,提供了一定程度的安全性
缺点:增加了操作系统,浪费了部分资源
- 3.容器化部署:与虚拟化类似,但是共享了操作系统
优点:
可以保证每个容器拥有自己的文件系统、CPU、内存、进程空间等
运行应用程序所需要的资源都被容器包装,并和底层基础架构解耦
容器化的应用程序可以跨云服务商、跨Linux操作系统发行版进行部署
容器化部署方式给带来很多的便利,但是也会出现一些问题,比如说:
- 一个容器故障停机了,怎么样让另外一个容器立刻启动去替补停机的容器
- 当并发访问量变大的时候,怎么样做到横向扩展容器数量
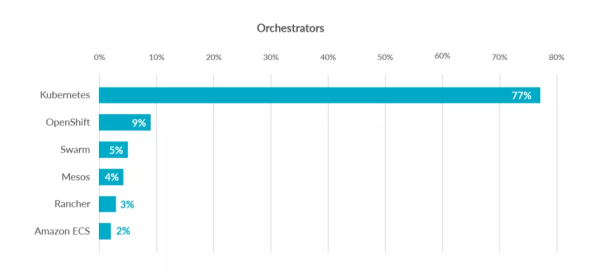
这些容器管理的问题统称为**容器编排**问题,为了解决这些容器编排问题,就产生了一些容器编排的软件:
- Swarm:Docker自己的容器编排工具
- Mesos:Apache的一个资源统一管控的工具,需要和Marathon结合使用
- Kubernetes:Google开源的的容器编排工具
k8s简要
因为英文单词 K 和 S 中间包含 8 个字母,所以简称 K8S, 是一个全新的基于**容器技术**的分布式架构领先方案,是谷歌严格保密十几年的秘密武器----Borg 系统的一个开源版本,于 2014 年 9 月发布第一个版本,2015年 7 月发布第一个正式版本。
kubernetes 的本质是**一组服务器集群**,它可以在集群的每个节点上运行特定的程序,来对节点中的容器进行管理。目的是实现资源管理的自动化,主要提供了如下的主要功能:
- 自我修复:一旦某一个容器崩溃,能够在1秒中左右迅速启动新的容器
- 弹性伸缩:可以根据需要,自动对集群中正在运行的容器数量进行调整
- 服务发现:服务可以通过自动发现的形式找到它所依赖的服务
- 负载均衡:如果一个服务起动了多个容器,能够自动实现请求的负载均衡
- 版本回退:如果发现新发布的程序版本有问题,可以立即回退到原来的版本
- 存储编排:可以根据容器自身的需求自动创建存储卷
k8s组件
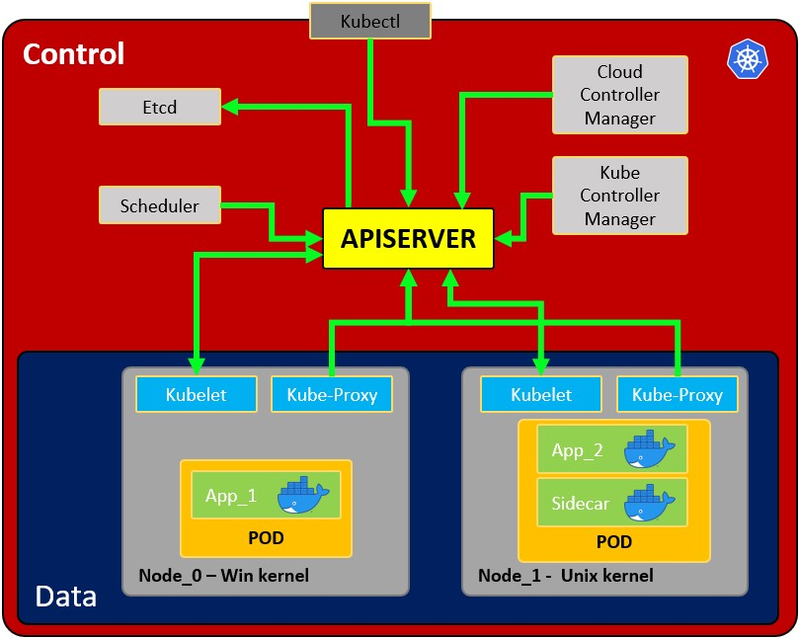
一个 kubernetes 集群主要是由**控制节点 master**、**工作节点 node**构成,每个节点上都会安装不同的组件。
master:集群的控制平面,负责集群的决策 ( 管理 )
Master 节点上会安装四个重要组件,分别如下:
ApiServer : 资源操作的唯一入口,接收用户输入的命令,提供认证、授权、API注册和发现等机制
Scheduler : 负责集群资源调度,按照预定的调度策略将 Pod 调度到相应的 node 节点上
ControllerManager : 负责维护集群的状态,比如程序部署安排、故障检测、自动扩展、滚动更新等
Etcd :负责存储集群中各种资源对象的信息,相当于 K8S 的数据库
node:集群的数据平面,负责为容器提供运行环境 ( 干活 )
node 节点上会安装三个重要组件,分别如下:
Kubelet : 负责维护容器的生命周期,即通过控制docker,来创建、更新、销毁容器
KubeProxy : 负责提供集群内部的服务发现和负载均衡
Docker : 负责节点上容器的各种操作
除了核心组件,还有一些推荐的Add-ons:
- kube-dns负责为整个集群提供DNS服务
- Ingress Controller为服务提供外网入口
- Heapster提供资源监控
- Dashboard提供GUI
- Federation提供跨可用区的集群
- Fluentd-elasticsearch提供集群日志采集、存储与查询
如下图所示:为 K8S 的原理架构图

下面,以部署一个 nginx 服务来说明 kubernetes 系统各个组件调用关系:
- 首先要明确,一旦 kubernetes 环境启动之后,master 和 node 都会将自身的信息存储到 etcd 数据库中;
- 一个 nginx 服务的安装请求会首先被发送到 master 节点的 apiServer 组件;
- apiServer 组件会调用 scheduler 组件来决定到底应该把这个服务安装到哪个 node 节点上,在此时,它会从 etcd 中读取各个 node 节点的信息,然后按照一定的算法进行选择,并将结果告知 apiServer;
- apiServer 调用 controller-manager 去调度 Node 节点安装 nginx 服务;
- kubelet 接收到指令后,会通知 docker,然后由 docker 来启动一个 nginx 的 pod,pod 是 kubernetes 的最小操作单元,容器必须跑在 pod 中;
- 当Pod启动后,一个 nginx 服务就运行了,如果需要访问 nginx,就需要通过 kube-proxy 来对 pod 产生访问的代理
这样,外界用户就可以访问集群中的 nginx 服务了
Note
k8s组成如下:
Master:集群控制节点,每个集群需要至少一个 master 节点负责集群的管控
Node:工作负载节点,由 master 分配容器到这些 node 工作节点上,然后 node 节点上的 docker 负责容器的运行
Pod:kubernetes 的最小控制单元,容器都是运行在 pod 中的,一个 pod 中可以有 1 个或者多个容器
Controller:控制器,通过它来实现对 pod 的管理,比如启动 pod、停止 pod、伸缩 pod 的数量等等
Service:pod 对外服务的统一入口,下面可以维护着同一类的多个 pod
Label:标签,用于对 pod 进行分类,同一类 pod 会拥有相同的标签
NameSpace:命名空间,用来隔离 pod 的运行环境
- Node: operating system with pod or pods.
- Pod: Wrapper around a container or multiple containers with. A pod should only contain one application (so usually, a pod run just 1 container). The pod is the way kubernetes abstracts the container technology running.
- Service: Each pod has 1 internal IP address from the internal range of the node. However, it can be also exposed via a service. The service has also an IP address and its goal is to maintain the communication between pods so if one dies the new replacement (with a different internal IP) will be accessible exposed in the same IP of the service. It can be configured as internal or external. The service also actuates as a load balancer when 2 pods are connected to the same service. When a service is created you can find the endpoints of each service running
kubectl get endpoints
- Service: Each pod has 1 internal IP address from the internal range of the node. However, it can be also exposed via a service. The service has also an IP address and its goal is to maintain the communication between pods so if one dies the new replacement (with a different internal IP) will be accessible exposed in the same IP of the service. It can be configured as internal or external. The service also actuates as a load balancer when 2 pods are connected to the same service. When a service is created you can find the endpoints of each service running
- Kubelet: Primary node agent. The component that establishes communication between node and kubectl, and only can run pods (through API server). The kubelet doesn’t manage containers that were not created by Kubernetes.
- Kube-proxy: is the service in charge of the communications (services) between the apiserver and the node. The base is an IPtables for nodes. Most experienced users could install other kube-proxies from other vendors.
- Sidecar container: Sidecar containers are the containers that should run along with the main container in the pod. This sidecar pattern extends and enhances the functionality of current containers without changing them. Nowadays, We know that we use container technology to wrap all the dependencies for the application to run anywhere. A container does only one thing and does that thing very well.
- Master process:
- Api Server: Is the way the users and the pods use to communicate with the master process. Only authenticated request should be allowed.
- Scheduler: Scheduling refers to making sure that Pods are matched to Nodes so that Kubelet can run them. It has enough intelligence to decide which node has more available resources the assign the new pod to it. Note that the scheduler doesn't start new pods, it just communicate with the Kubelet process running inside the node, which will launch the new pod.
- Kube Controller manager: It checks resources like replica sets or deployments to check if, for example, the correct number of pods or nodes are running. In case a pod is missing, it will communicate with the scheduler to start a new one. It controls replication, tokens, and account services to the API.
- etcd: Data storage, persistent, consistent, and distributed. Is Kubernetes’s database and the key-value storage where it keeps the complete state of the clusters (each change is logged here). Components like the Scheduler or the Controller manager depends on this date to know which changes have occurred (available resourced of the nodes, number of pods running...)
- Cloud controller manager: Is the specific controller for flow controls and applications, i.e: if you have clusters in AWS or OpenStack.
Note that as the might be several nodes (running several pods), there might also be several master processes which their access to the Api server load balanced and their etcd synchronized.
Volumes:
When a pod creates data that shouldn't be lost when the pod disappear it should be stored in a physical volume. Kubernetes allow to attach a volume to a pod to persist the data. The volume can be in the local machine or in a remote storage. If you are running pods in different physical nodes you should use a remote storage so all the pods can access it.
Other configurations:
- ConfigMap: You can configure URLs to access services. The pod will obtain data from here to know how to communicate with the rest of the services (pods). Note that this is not the recommended place to save credentials!
- Secret: This is the place to store secret data like passwords, API keys... encoded in B64. The pod will be able to access this data to use the required credentials.
- Deployments: This is where the components to be run by kubernetes are indicated. A user usually won't work directly with pods, pods are abstracted in ReplicaSets (number of same pods replicated), which are run via deployments. Note that deployments are for stateless applications. The minimum configuration for a deployment is the name and the image to run.
- StatefulSet: This component is meant specifically for applications like databases which needs to access the same storage.
- Ingress: This is the configuration that is use to expose the application publicly with an URL. Note that this can also be done using external services, but this is the correct way to expose the application.
- If you implement an Ingress you will need to create Ingress Controllers. The Ingress Controller is a pod that will be the endpoint that will receive the requests and check and will load balance them to the services. the ingress controller will send the request based on the ingress rules configured. Note that the ingress rules can point to different paths or even subdomains to different internal kubernetes services.
- A better security practice would be to use a cloud load balancer or a proxy server as entrypoint to don't have any part of the Kubernetes cluster exposed.
- When request that doesn't match any ingress rule is received, the ingress controller will direct it to the "Default backend". You can
describethe ingress controller to get the address of this parameter. minikube addons enable ingress
PKI infrastructure - Certificate Authority CA
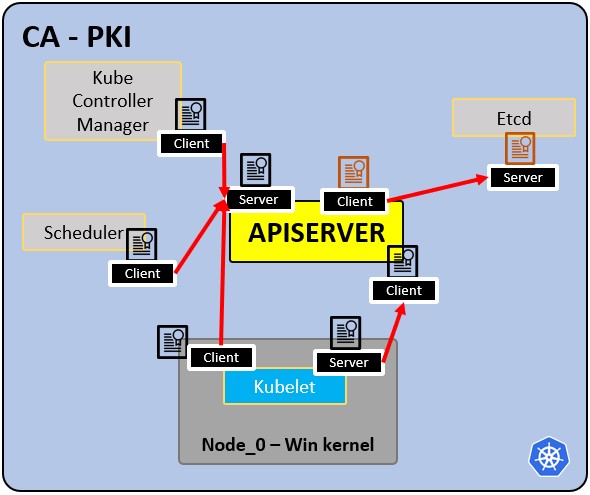
- CA is the trusted root for all certificates inside the cluster.
- Allows components to validate to each other.
- All cluster certificates are signed by the CA.
- ETCd has its own certificate.
- types:
- apiserver cert.
- kubelet cert.
- scheduler cert.
YAML configuration files examples
Each configuration file has 3 parts: metadata, specification (what need to be launch), status (desired state). Inside the specification of the deployment configuration file you can find the template defined with a new configuration structure defining the image to run:
Example of Deployment + Service declared in the same configuration file (from here)
As a service usually is related to one deployment it's possible to declare both in the same configuration file (the service declared in this config is only accessible internally):
apiVersion: apps/v1
kind: Deployment
metadata:
  name: mongodb-deployment
  labels:
    app: mongodb
spec:
  replicas: 1
  selector:
    matchLabels:
      app: mongodb
  template:
    metadata:
      labels:
        app: mongodb
    spec:
      containers:
      - name: mongodb
        image: mongo
        ports:
        - containerPort: 27017
        env:
        - name: MONGO_INITDB_ROOT_USERNAME
          valueFrom:
            secretKeyRef:
              name: mongodb-secret
              key: mongo-root-username
        - name: MONGO_INITDB_ROOT_PASSWORD
          valueFrom:
            secretKeyRef:
              name: mongodb-secret
              key: mongo-root-password
---
apiVersion: v1
kind: Service
metadata:
  name: mongodb-service
spec:
  selector:
    app: mongodb
  ports:
    - protocol: TCP
      port: 27017
      targetPort: 27017
Example of external service config
This service will be accessible externally (check the nodePort and type: LoadBlancer attributes):
---
apiVersion: v1
kind: Service
metadata:
  name: mongo-express-service
spec:
  selector:
    app: mongo-express
  type: LoadBalancer
  ports:
    - protocol: TCP
      port: 8081
      targetPort: 8081
      nodePort: 30000
This is useful for testing but for production you should have only internal services and an Ingress to expose the application.
Example of Ingress config file
This will expose the application in http://dashboard.com.
apiVersion: networking.k8s.io/v1
kind: Ingress
metadata:
  name: dashboard-ingress
  namespace: kubernetes-dashboard
spec:
  rules:
  - host: dashboard.com
    http:
      paths:
      - backend:
          serviceName: kubernetes-dashboard
          servicePort: 80
Example of secrets config file
Note how the password are encoded in B64 (which isn't secure!)
apiVersion: v1
kind: Secret
metadata:
    name: mongodb-secret
type: Opaque
data:
    mongo-root-username: dXNlcm5hbWU=
    mongo-root-password: cGFzc3dvcmQ=
Example of ConfigMap
A ConfigMap is the configuration that is given to the pods so they know how to locate and access other services. In this case, each pod will know that the name mongodb-service is the address of a pod that they can communicate with (this pod will be executing a mongodb):
apiVersion: v1
kind: ConfigMap
metadata:
  name: mongodb-configmap
data:
  database_url: mongodb-service
Then, inside a deployment config this address can be specified in the following way so it's loaded inside the env of the pod:
[...]
spec:
  [...]
  template:
    [...]
    spec:
      containers:
      - name: mongo-express
        image: mongo-express
        ports:
        - containerPort: 8081
        env:
        - name: ME_CONFIG_MONGODB_SERVER
          valueFrom:
            configMapKeyRef:
              name: mongodb-configmap
              key: database_url
[...]
Example of volume config
You can find different example of storage configuration yaml files in https://gitlab.com/nanuchi/youtube-tutorial-series/-/tree/master/kubernetes-volumes. Note that volumes aren't inside namespaces
Namespaces
Kubernetes supports multiple virtual clusters backed by the same physical cluster. These virtual clusters are called namespaces. These are intended for use in environments with many users spread across multiple teams, or projects. For clusters with a few to tens of users, you should not need to create or think about namespaces at all. You only should start using namespaces to have a better control and organization of each part of the application deployed in kubernetes.
Namespaces provide a scope for names. Names of resources need to be unique within a namespace, but not across namespaces. Namespaces cannot be nested inside one another and each Kubernetes resource can only be in one namespace.
There are 4 namespaces by default if you are using minikube:
kubectl get namespace
NAME              STATUS   AGE
default           Active   1d
kube-node-lease   Active   1d
kube-public       Active   1d
kube-system       Active   1d
- kube-system: It's not meant or the users use and you shouldn't touch it. It's for master and kubectl processes.
- kube-public: Publicly accessible date. Contains a configmap which contains cluster information
- kube-node-lease: Determines the availability of a node
- default: The namespace the user will use to create resources
Note that most Kubernetes resources (e.g. pods, services, replication controllers, and others) are in some namespaces. However, other resources like namespace resources and low-level resources, such as nodes and persistenVolumes are not in a namespace. To see which Kubernetes resources are and aren’t in a namespace:
kubectl api-resources --namespaced=true #In a namespace
kubectl api-resources --namespaced=false #Not in a namespace
You can save the namespace for all subsequent kubectl commands in that context.
Kubernetes secrets
A Secret is an object that contains sensitive data such as a password, a token or a key. Such information might otherwise be put in a Pod specification or in an image. Users can create Secrets and the system also creates Secrets. The name of a Secret object must be a valid DNS subdomain name. Read here the official documentation.
Secrets might be things like:
- API, SSH Keys.
- OAuth tokens.
- Credentials, Passwords (plain text or b64 + encryption).
- Information or comments.
- Database connection code, strings… .
There are different types of secrets in Kubernetes
| Builtin Type | Usage |
|---|---|
| Opaque | arbitrary user-defined data (Default) |
| kubernetes.io/service-account-token | service account token |
| kubernetes.io/dockercfg | serialized ~/.dockercfg file |
| kubernetes.io/dockerconfigjson | serialized ~/.docker/config.json file |
| kubernetes.io/basic-auth | credentials for basic authentication |
| kubernetes.io/ssh-auth | credentials for SSH authentication |
| kubernetes.io/tls | data for a TLS client or server |
| bootstrap.kubernetes.io/token | bootstrap token data |
The Opaque type is the default one, the typical key-value pair defined by users.
How secrets works:
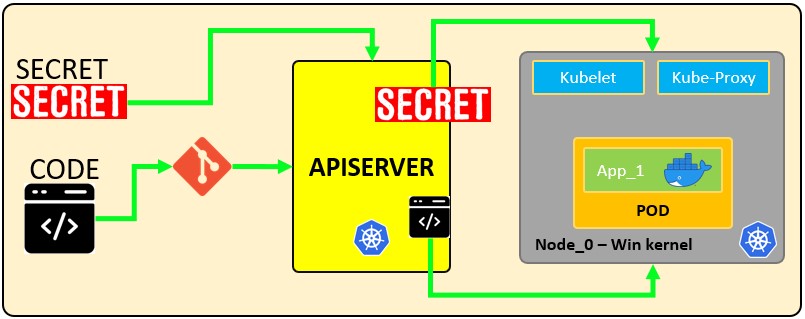
The following configuration file defines a secret called mysecret with 2 key-value pairs username: YWRtaW4= and password: MWYyZDFlMmU2N2Rm. It also defines a pod called secretpod that will have the username and password defined in mysecret exposed in the environment variables SECRET_USERNAME __ and __ SECRET_PASSWOR. It will also mount the username secret inside mysecret in the path /etc/foo/my-group/my-username with 0640 permissions.
- secretpod.yaml
apiVersion: v1
kind: Secret
metadata:
  name: mysecret
type: Opaque
data:
  username: YWRtaW4=
  password: MWYyZDFlMmU2N2Rm
---
apiVersion: v1
kind: Pod
metadata:
  name: secretpod
spec:
  containers:
  - name: secretpod
    image: nginx
    env:
      - name: SECRET_USERNAME
        valueFrom:
          secretKeyRef:
            name: mysecret
            key: username
      - name: SECRET_PASSWORD
        valueFrom:
          secretKeyRef:
            name: mysecret
            key: password
    volumeMounts:
    - name: foo
      mountPath: "/etc/foo"
  restartPolicy: Never
  volumes:
  - name: foo
    secret:
      secretName: mysecret
      items:
      - key: username
        path: my-group/my-username
        mode: 0640
kubectl apply -f <secretpod.yaml>
kubectl get pods #Wait until the pod secretpod is running
kubectl exec -it  secretpod -- bash
env | grep SECRET && cat /etc/foo/my-group/my-username && echo
Secrets in etcd
etcd is a consistent and highly-available key-value store used as Kubernetes backing store for all cluster data. Let’s access to the secrets stored in etcd:
You will see certs, keys and url’s were are located in the FS. Once you get it, you would be able to connect to etcd.
#ETCDCTL_API=3 etcdctl --cert <path to client.crt> --key <path to client.ket> --cacert <path to CA.cert> endpoint=[<ip:port>] health

ETCDCTL_API=3 etcdctl --cert /etc/kubernetes/pki/apiserver-etcd-client.crt --key /etc/kubernetes/pki/apiserver-etcd-client.key --cacert /etc/kubernetes/pki/etcd/etcd/ca.cert endpoint=[127.0.0.1:1234] health
Once you achieve establish communication you would be able to get the secrets:
#ETCDCTL_API=3 etcdctl --cert <path to client.crt> --key <path to client.ket> --cacert <path to CA.cert> endpoint=[<ip:port>] get <path/to/secret>

ETCDCTL_API=3 etcdctl --cert /etc/kubernetes/pki/apiserver-etcd-client.crt --key /etc/kubernetes/pki/apiserver-etcd-client.key --cacert /etc/kubernetes/pki/etcd/etcd/ca.cert endpoint=[127.0.0.1:1234] get /registry/secrets/default/secret_02
Adding encryption to the ETCD
By default all the secrets are stored in plain text inside etcd unless you apply an encryption layer. The following example is based on https://kubernetes.io/docs/tasks/administer-cluster/encrypt-data/
- encryption.yaml
apiVersion: apiserver.config.k8s.io/v1
kind: EncryptionConfiguration
resources:
  - resources:
    - secrets
    providers:
    - aescbc:
        keys:
        - name: key1
          secret: cjjPMcWpTPKhAdieVtd+KhG4NN+N6e3NmBPMXJvbfrY= #Any random key
    - identity: {}
After that, you need to set the --encryption-provider-config flag on the kube-apiserver to point to the location of the created config file. You can modify /etc/kubernetes/manifest/kube-apiserver.yaml and add the following lines:
  containers:
  - command:
    - kube-apiserver
    - --encriyption-provider-config=/etc/kubernetes/etcd/<configFile.yaml>
Scroll down in the volumeMounts:
Scroll down in the volumeMounts to hostPath:
Verifying that data is encrypted
Data is encrypted when written to etcd. After restarting your kube-apiserver, any newly created or updated secret should be encrypted when stored. To check, you can use the etcdctl command line program to retrieve the contents of your secret.
- Create a new secret called
secret1in thedefaultnamespace:
- Using the etcdctl commandline, read that secret out of etcd:
ETCDCTL_API=3 etcdctl get /registry/secrets/default/secret1 [...] | hexdump -C
where [...] must be the additional arguments for connecting to the etcd server.
-
Verify the stored secret is prefixed with
k8s:enc:aescbc:v1:which indicates theaescbcprovider has encrypted the resulting data. -
Verify the secret is correctly decrypted when retrieved via the API:
should match mykey: bXlkYXRh, mydata is encoded, check decoding a secret to completely decode the secret.
Since secrets are encrypted on write, performing an update on a secret will encrypt that content:
k8s搭建
Basic Actions
Minikube
Minikube can be used to perform some quick tests on kubernetes without needing to deploy a whole kubernetes environment. It will run the master and node processes in one machine. Minikube will use virtualbox to run the node. See here how to install it.
$ minikube start
😄  minikube v1.19.0 on Ubuntu 20.04
✨  Automatically selected the virtualbox driver. Other choices: none, ssh
💿  Downloading VM boot image ...
    > minikube-v1.19.0.iso.sha256: 65 B / 65 B [-------------] 100.00% ? p/s 0s
    > minikube-v1.19.0.iso: 244.49 MiB / 244.49 MiB  100.00% 1.78 MiB p/s 2m17.
👍  Starting control plane node minikube in cluster minikube
💾  Downloading Kubernetes v1.20.2 preload ...
    > preloaded-images-k8s-v10-v1...: 491.71 MiB / 491.71 MiB  100.00% 2.59 MiB
🔥  Creating virtualbox VM (CPUs=2, Memory=3900MB, Disk=20000MB) ...
🐳  Preparing Kubernetes v1.20.2 on Docker 20.10.4 ...
    ▪ Generating certificates and keys ...
    ▪ Booting up control plane ...
    ▪ Configuring RBAC rules ...
🔎  Verifying Kubernetes components...
    ▪ Using image gcr.io/k8s-minikube/storage-provisioner:v5
🌟  Enabled addons: storage-provisioner, default-storageclass
🏄  Done! kubectl is now configured to use "minikube" cluster and "default" namespace by defaul

$ minikube status
host: Running
kubelet: Running
apiserver: Running
kubeconfig: Configured

---- ONCE YOU HAVE A K8 SERVICE RUNNING WITH AN EXTERNAL SERVICE -----
$ minikube service mongo-express-service
(This will open your browser to access the service exposed port)

$ minikube delete
🔥  Deleting "minikube" in virtualbox ...
💀  Removed all traces of the "minikube" cluster
Kubectl Basics
Kubectl is the command line tool for kubernetes clusters. It communicates with the Api server of the master process to perform actions in kubernetes or to ask for data.
kubectl version #Get client and server version
kubectl get pod
kubectl get services
kubectl get deployment
kubectl get replicaset
kubectl get secret
kubectl get all
kubectl get ingress
kubectl get endpoints

#kubectl create deployment <deployment-name> --image=<docker image>
kubectl create deployment nginx-deployment --image=nginx
#Access the configuration of the deployment and modify it
#kubectl edit deployment <deployment-name>
kubectl edit deployment nginx-deployment
#Get the logs of the pod for debbugging (the output of the docker container running)
#kubectl logs <replicaset-id/pod-id>
kubectl logs nginx-deployment-84cd76b964
#kubectl describe pod <pod-id>
kubectl describe pod mongo-depl-5fd6b7d4b4-kkt9q
#kubectl exec -it <pod-id> -- bash
kubectl exec -it mongo-depl-5fd6b7d4b4-kkt9q -- bash
#kubectl describe service <service-name>
kubectl describe service mongodb-service
#kubectl delete deployment <deployment-name>
kubectl delete deployment mongo-depl
#Deploy from config file
kubectl apply -f deployment.yml
Minikube Dashboard
The dashboard allows you to see easier what is minikube running, you can find the URL to access it in:
minikube dashboard --url


🔌  Enabling dashboard ...
    ▪ Using image kubernetesui/dashboard:v2.3.1
    ▪ Using image kubernetesui/metrics-scraper:v1.0.7
🤔  Verifying dashboard health ...
🚀  Launching proxy ...
🤔  Verifying proxy health ...
http://127.0.0.1:50034/api/v1/namespaces/kubernetes-dashboard/services/http:kubernetes-dashboard:/proxy/
参考:https://www.cnblogs.com/xuweiweiwoaini/p/13884112.html#:~:text=1%20%E6%90%AD%E5%BB%BAK8s%E7%8E%AF%E5%A2%83%E5%B9%B3
Final tips:
- Try not to keep secrets in the FS, get them from other places.
- Check out https://www.vaultproject.io/ for add more protection to your secrets.
- https://kubernetes.io/docs/concepts/configuration/secret/#risks
- https://docs.cyberark.com/Product-Doc/OnlineHelp/AAM-DAP/11.2/en/Content/Integrations/Kubernetes_deployApplicationsConjur-k8s-Secrets.htm