Burp联动其他工具
xray基础配置
xray配置文件为同目录下的config.yaml
YAML
version: 4.0

parallel: 30                      # 漏洞探测的 worker 数量,可以简单理解为同时有 30 个 POC 在运行

# 全局 http 发包配置
# 更多解释见 https://docs.xray.cool/#/configration/http
http:
  proxy: ""                             # 漏洞扫描时使用的代理,如: http://127.0.0.1:8080。 如需设置多个代理,请使用 proxy_rule 或自行创建上层代理
  proxy_rule: []                        # 漏洞扫描使用多个代理的配置规则, 具体请参照文档
  dial_timeout: 5                       # 建立 tcp 连接的超时时间
  read_timeout: 10                      # 读取 http 响应的超时时间,不可太小,否则会影响到 sql 时间盲注的判断
  max_conns_per_host: 50                # 同一 host 最大允许的连接数,可以根据目标主机性能适当增大
  enable_http2: false                   # 是否启用 http2, 开启可以提升部分网站的速度,但目前不稳定有崩溃的风险
  fail_retries: 0                       # 请求失败的重试次数,0 则不重试
  max_redirect: 5                       # 单个请求最大允许的跳转数
  max_resp_body_size: 2097152           # 最大允许的响应大小, 默认 2M
  max_qps: 500                          # 每秒最大请求数
  allow_methods:                        # 允许的请求方法
  - HEAD
  - GET
  - POST
  - PUT
  - PATCH
  - DELETE
  - OPTIONS
  - CONNECT
  - TRACE
  - MOVE
  - PROPFIND
  headers:
    User-Agent: Mozilla/5.0 (Windows NT 10.0; rv:78.0) Gecko/20100101 Firefox/78.0
    # Cookie: key=value

# 漏洞探测的插件配置
# 更多解释见 https://docs.xray.cool/#/configration/plugins
plugins:
  baseline:
    enabled: true
    detect_cors_header_config: true     # 检查 cors 相关配置
    detect_server_error_page: true      # 检查服务器错误信息
    detect_phpinfo: true                # 检查响应是否包含phpinfo
    detect_system_path_leak: true      # 检查响应是否包含系统路径泄露
    detect_outdated_ssl_version: false  # 检查 ssl 版本问题
    detect_http_header_config: false    # 检查 http 安全相关 header 是否配置
    detect_cookie_httponly: true       # 检查 set-cookie 时是否设置 http only
    detect_china_id_card_number: false  # 检查响应是否存在身份证号
    detect_china_phone_number: false    # 检查响应是否存在电话号码
    detect_china_bank_card: false       # 检查响应是否存在银行卡号
    detect_private_ip: false            # 检查响应是否包含内网 ip
  brute-force:
    enabled: true
    username_dictionary: ""             # 自定义用户名字典, 为空将使用内置 TOP10, 配置后将与内置字典**合并**
    password_dictionary: ""             # 自定义密码字典,为空将使用内置 TOP100, 配置后将与内置字典**合并**
  cmd-injection:
    enabled: true
  crlf-injection:
    enabled: true
  dirscan:
    enabled: true
    depth: 1                            # 检测深度,定义 http://t.com/a/ 深度为 1, http://t.com/a 深度为 0
    dictionary: ""                      # 自定义检测字典, 配置后将与内置字典**合并**
    exclude_dir: []                     # 想要排除的内部的扫描category,例如["sensitive/crossdomain","system/key"]
  fastjson:
    enabled: true
  jsonp:
    enabled: true
  path-traversal:
    enabled: true
  phantasm:                             # poc 插件
    enabled: true
    depth: 1
    auto_load_poc: false                # 除内置 poc 外,额外自动加载当前目录以 "poc-" 为文件名前缀的POC文件,等同于在 include_poc 中增加 "./poc-*"
    exclude_poc: []                     # 排除哪些 poc, 支持 glob 语法, 如: "/home/poc/*thinkphp*" 或 "poc-yaml-weblogic*"
    include_poc: [./xray_pocs/*]                     # 只使用哪些内置 poc 以及 额外加载哪些本地 poc, 支持 glob 语法, 如:"*weblogic*" 或 "/home/poc/*"
                                        # 也可使用 --poc 仅运行 指定的内置或本地 poc,进行测试。
                                        # 例如,可使用如下命令,仅运行当前目录下的 poc 且 不运行内置 poc 进行测试:
                                        # webscan -poc ./poc-* -url http://example.com
    poc_tags:                           # 为POC添加tag, 然后就可以使用--tags来选择启动哪些POC。poc-yaml-test为poc的name,[]中的内容为该POC对应的标签
      poc-yaml-test: ["HW", "ST"]
      poc-yaml-test-1: ["ST"]
  redirect:
    enabled: true
  shiro:
    enabled: true
    cookie_name: rememberMe             # 默认使用哪个 shiro cookie name
    aes_key: []                         # 自定义 shiro key,配置后将与内置 116 key 做合并
    aes_key_file:                       # 自定义存储 shiro key 的文件路径,配置后将自动加载文件中的key
  sqldet:
    enabled: true
    boolean_based_detection: true       # 是否检测布尔盲注
    error_based_detection: true         # 是否检测报错注入
    time_based_detection: true          # 是否检测时间盲注
    use_comment_in_payload: false       # 是否在时间盲注中使用 comment 关键字, 有风险, 建议不开
    detect_sqli_in_cookie: true         # 是否检查在 cookie 中的注入
  ssrf:
    enabled: true
  struts:
    enabled: true
  thinkphp:
    enabled: true
    detect_thinkphp_sqli: true          # 检查 thinkphp 特定语法的 sqli 注入漏洞
  upload:
    enabled: true
  xss:
    enabled: true
    detect_xss_in_cookie: true          # 是否探测入口点在 cookie 中的 xss
    ie_feature: false                   # 是否扫描仅能在 ie 下利用的 xss
  xxe:
    enabled: true
  xstream:
    enabled: true
    full: false                         # 是否完全扫描,一般情况下只通过post请求body发post
                                        # 如果开启完全扫描,则会有大量请求对每一个参数进行测试

# 反连平台配置,更多解释见 https://docs.xray.cool/#/configration/reverse
# 注意: 默认配置为禁用反连平台,这是无法扫描出依赖反连平台的漏洞,这些漏洞包括 fastjson,ssrf 以及 poc 中依赖反连的情况等
reverse:
  db_file_path: ""                      # 反连平台数据库文件位置, 这是一个 KV 数据库
  token: ""                             # 反连平台认证的 Token, 独立部署时不能为空
  http:
    enabled: false
    listen_ip: 0.0.0.0
    listen_port: ""
    ip_header: ""                       # 在哪个 http header 中取 ip,为空代表从 REMOTE_ADDR 中取
  dns:
    enabled: false
    listen_ip: 0.0.0.0
    domain: ""                          # DNS 域名配置
    is_domain_name_server: false        # 是否修改了域名的 ns 为反连平台,如果是,那 nslookup 等就不需要指定 dns 了
    resolve:                            # DNS 静态解析规则
    - type: A                           # A, AAAA, TXT 三种
      record: localhost
      value: 127.0.0.1
      ttl: 60
  client:
    remote_server: false                # 是否是独立的远程 server,如果是要在下面配置好远程的服务端地址
    http_base_url: ""                   # 默认将根据 ListenIP 和 ListenPort 生成,该地址是存在漏洞的目标反连回来的地址, 当反连平台前面有反代、绑定域名、端口映射时需要自行配置
    dns_server_ip: ""                   # 和 http_base_url 类似,实际用来访问 dns 服务器的地址

# 被动代理配置
# 更多解释见 https://docs.xray.cool/#/configration/mitm
mitm:
  ca_cert: ./ca.crt                     # CA 根证书路径
  ca_key: ./ca.key                      # CA 私钥路径
  basic_auth:                           # 基础认证的用户名密码
    username: ""
    password: ""
  allow_ip_range: []                    # 允许的 ip,可以是 ip 或者 cidr 字符串
  restriction:                          # 代理能够访问的资源限制, 以下各项为空表示不限制
    hostname_allowed: []                # 允许访问的 Hostname,支持格式如 t.com、*.t.com、1.1.1.1、1.1.1.1/24、1.1-4.1.1-8
    hostname_disallowed:                # 不允许访问的 Hostname,支持格式如 t.com、*.t.com、1.1.1.1、1.1.1.1/24、1.1-4.1.1-8
    - '*google*'
    - '*github*'
    - '*.gov.cn'
    - '*.edu.cn'
    - '*chaitin*'
    - '*.xray.cool'
    port_allowed: []                    # 允许访问的端口, 支持的格式如: 80、80-85
    port_disallowed: []                 # 不允许访问的端口, 支持的格式如: 80、80-85
    path_allowed: []                    # 允许访问的路径,支持的格式如: test、*test*
    path_disallowed: []                 # 不允许访问的路径, 支持的格式如: test、*test*
    query_key_allowed: []               # 允许访问的 Query Key,支持的格式如: test、*test*
    query_key_disallowed: []            # 不允许访问的 Query Key, 支持的格式如: test、*test*
    fragment_allowed: []                # 允许访问的 Fragment, 支持的格式如: test、*test*
    fragment_disallowed: []             # 不允许访问的 Fragment, 支持的格式如: test、*test*
    post_key_allowed: []                # 允许访问的 Post Body 中的参数, 支持的格式如: test、*test*
    post_key_disallowed: []             # 不允许访问的 Post Body 中的参数, 支持的格式如: test、*test*
  queue:
    max_length: 3000                    # 队列长度限制, 也可以理解为最大允许多少等待扫描的请求, 请根据内存大小自行调整
  proxy_header:
    via: ""                             # 是否为代理自动添加 Via 头
    x_forwarded: false                  # 是否为代理自动添加 X-Forwarded-{For,Host,Proto,Url} 四个 http 头
  upstream_proxy: "http://127.0.0.1:2453"                    # 为 mitm 本身配置独立的代理

# 基础爬虫配置
# 更多解释见 https://docs.xray.cool/#/configration/basic-crawler
basic-crawler:
  max_depth: 0                          # 最大爬取深度, 0 为无限制
  max_count_of_links: 0                 # 本次爬取收集的最大链接数, 0 为无限制
  allow_visit_parent_path: false        # 是否允许爬取父目录, 如果扫描目标为 t.com/a/且该项为 false, 那么就不会爬取 t.com/ 这级的内容
  restriction:                          # 爬虫的允许爬取的资源限制, 为空表示不限制。爬虫会自动添加扫描目标到 Hostname_allowed。
    hostname_allowed: []                # 允许访问的 Hostname,支持格式如 t.com、*.t.com、1.1.1.1、1.1.1.1/24、1.1-4.1.1-8
    hostname_disallowed:                # 不允许访问的 Hostname,支持格式如 t.com、*.t.com、1.1.1.1、1.1.1.1/24、1.1-4.1.1-8
    - '*google*'
    - '*github*'
    - '*.gov.cn'
    - '*.edu.cn'
    - '*chaitin*'
    - '*.xray.cool'
    port_allowed: []                    # 允许访问的端口, 支持的格式如: 80、80-85
    port_disallowed: []                 # 不允许访问的端口, 支持的格式如: 80、80-85
    path_allowed: []                    # 允许访问的路径,支持的格式如: test、*test*
    path_disallowed: []                 # 不允许访问的路径, 支持的格式如: test、*test*
    query_key_allowed: []               # 允许访问的 Query Key,支持的格式如: test、*test*
    query_key_disallowed: []            # 不允许访问的 Query Key, 支持的格式如: test、*test*
    fragment_allowed: []                # 允许访问的 Fragment, 支持的格式如: test、*test*
    fragment_disallowed: []             # 不允许访问的 Fragment, 支持的格式如: test、*test*
    post_key_allowed: []                # 允许访问的 Post Body 中的参数, 支持的格式如: test、*test*
    post_key_disallowed: []             # 不允许访问的 Post Body 中的参数, 支持的格式如: test、*test*
  basic_auth:                           # 基础认证信息
    username: ""
    password: ""

# 子域名扫描配置,配置解释见 https://docs.xray.cool/#/configration/subdomain
# 注意:该功能仅限高级版用户使用
subdomain:
  max_parallel: 500                     # 子域名探测的并发度
  allow_recursion: false                # 是否允许递归探测, 开启后,扫描完一级域名后,会自动将一级的每个域名作为新的目标
  max_recursion_depth: 3                # 最大允许的递归深度, 3 表示 3 级子域名 仅当 allow_recursion 开启时才有意义
  web_only: false                       # 结果中仅显示有 web 应用的, 没有 web 应用的将被丢弃
  ip_only: false                        # 结果中仅展示解析出 IP 的,没有解析成功的将被丢弃
  servers:                              # 子域名扫描过程中使用的 DNS Server
  - 8.8.8.8
  - 8.8.4.4
  - 223.5.5.5
  - 223.6.6.6
  - 114.114.114.114
  sources:
    brute:
      enabled: true
      main_dict: ""                     # 一级大字典路径,为空将使用内置的 TOP 30000 字典
      sub_dict: ""                      # 其他级小字典路径,为空将使用内置过的 TOP 100 字典
    httpfinder:
      enabled: true                     # 使用 http 的一些方式来抓取子域名,包括 js, 配置文件,http header 等等
    dnsfinder:
      enabled: true                     # 使用 dns 的一些错误配置来找寻子域名,如区域传送(zone transfer)
    certspotter:                        # 下面的通过 api 获取的了
      enabled: true
    crt:
      enabled: true
    hackertarget:
      enabled: true
    qianxun:
      enabled: true
    rapiddns:
      enabled: true
    sublist3r:
      enabled: true
    threatminer:
      enabled: true
    virusTotal:
      enabled: true
    alienvault:
      enabled: true
    bufferover:
      enabled: true
    fofa:
      enabled: false
      email: ""
      key: ""
    ip138:
      enabled: true
    myssl:
      enabled: true
    riskiq:
      enabled: false
      user: ""
      key: ""
    quake:
      enabled: false
      key: ""
    baidu:
      enabled: true
      page_limit: 12
    yahoo:
      enabled: true
      page_limit: 12
    sogou:
      enabled: true
      page_limit: 12
    google:
      enabled: true
      page_limit: 12
    bing:
      enabled: true
      page_limit: 12
    ask:
      enabled: true
      page_limit: 12
可根据个人需求配置
burp&xray
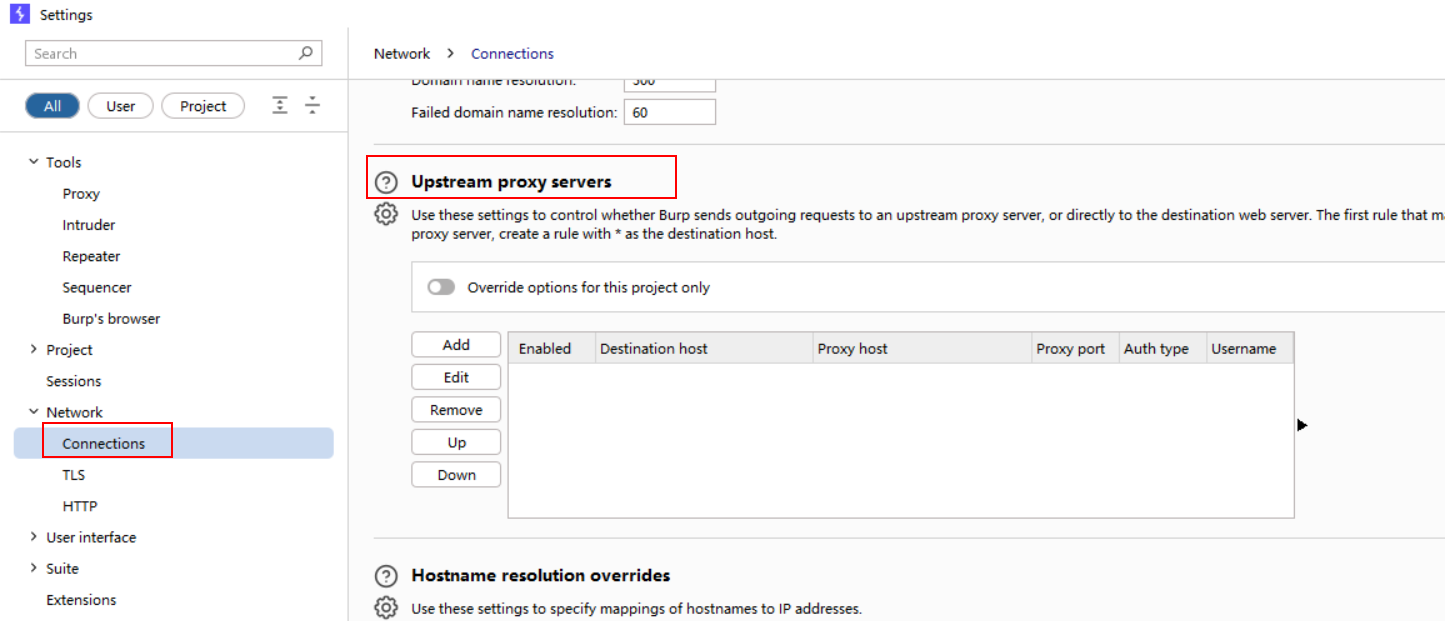
在burp → settings → Network → Connections找到上游代理设置
在点击Add弹出来的窗口中
- 第一项Destination host为走代理的主机地址,我们可以直接用通配符*****来指定所有目的主机。
- 第二项为代理的ip地址,如果是本地程序,填写回环地址127.0.0.1即可,如果是远程的代理服务器,根据实际情况填写即可。
- 第三项为代理的端口,这里的端口填写在“前期操作”中软件或者服务器开放的端口
若上游代理软件**没有特殊设置**(例如需用户名和密码连接),下面的第四项保持None选项即可,剩下的空着即可
xray启动:
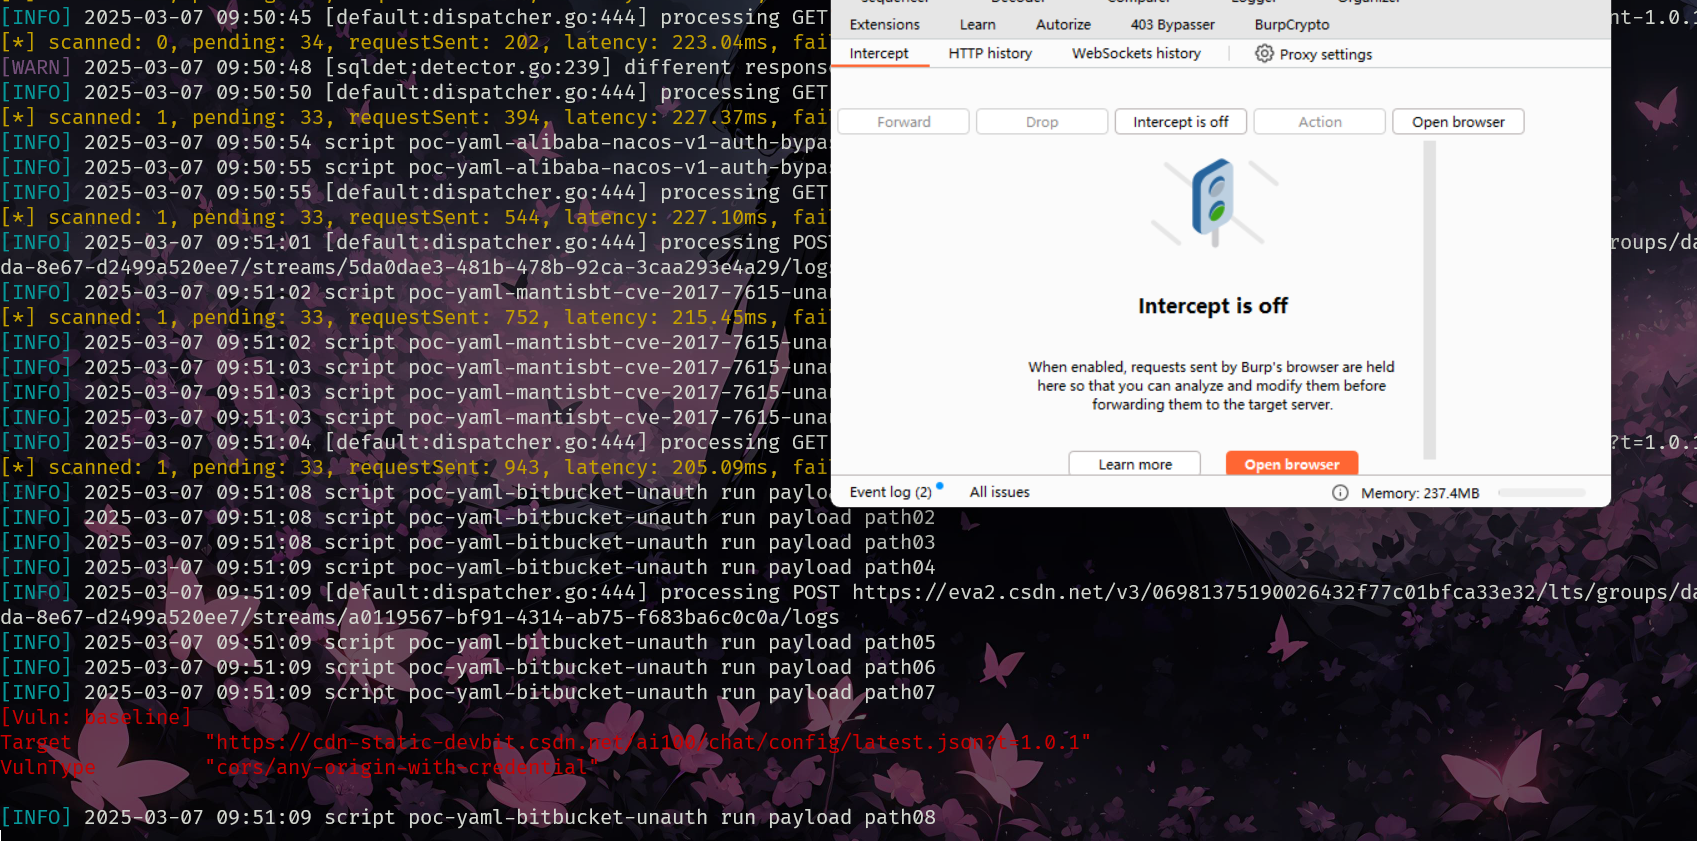
可以看到已经成功联动,此时流量流动方向为:burp → yakit
burp&yakit
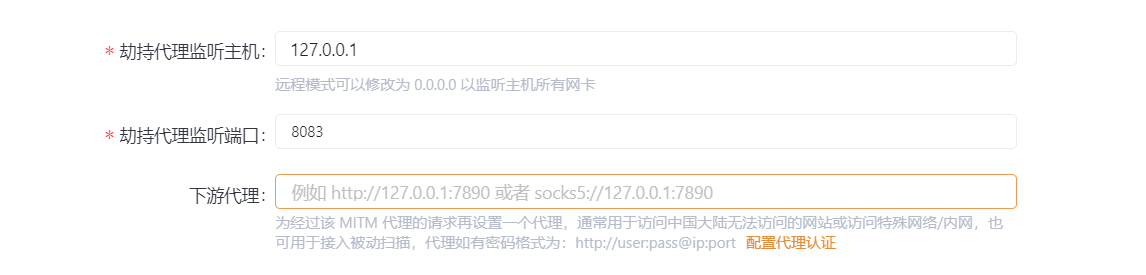
yakit代理地址为127.0.0.1:8083,配置burp的上游代理为yakit代理地址
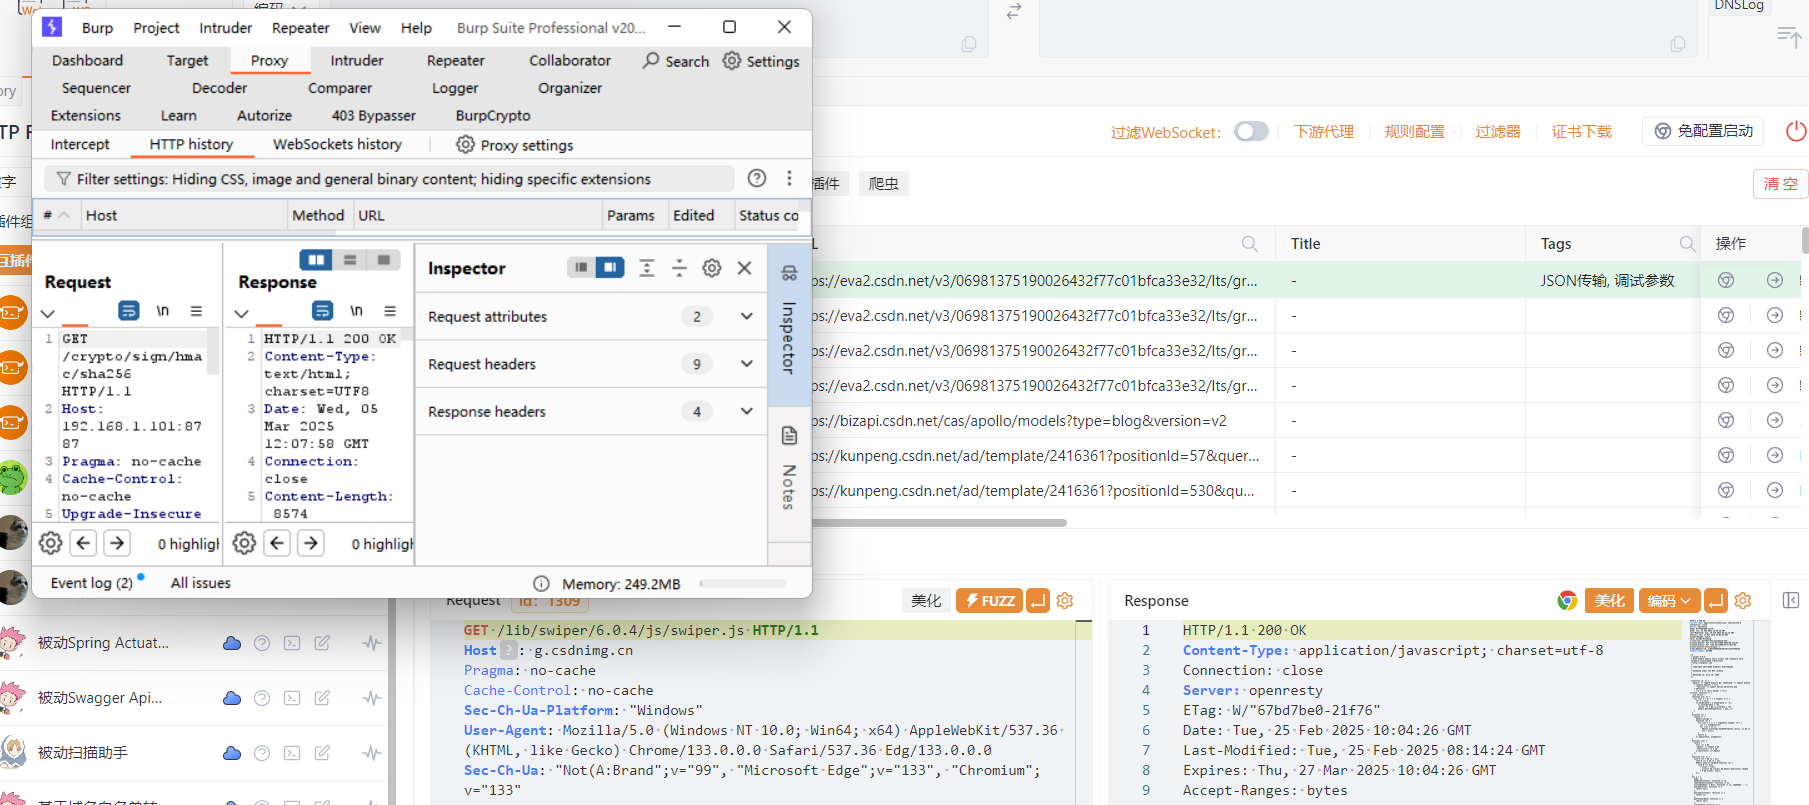
可以看到yakit抓取到流量,此时流量流动方向为:burp → yakit
burp&yakit&xray
- xray
- yakit
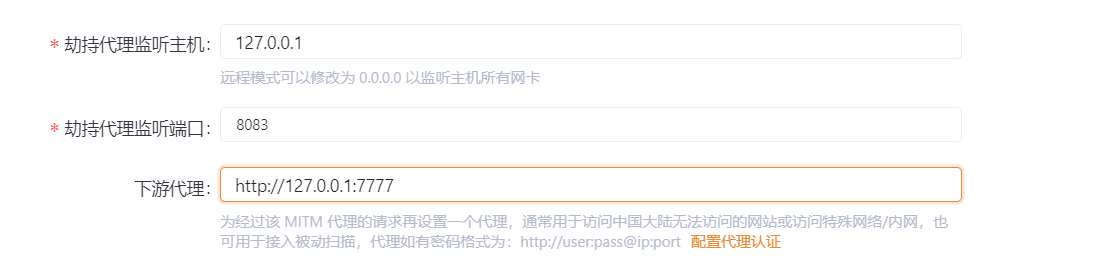
选择下游代理为xray监听地址
- burp
配置上游地址为yakit监听地址
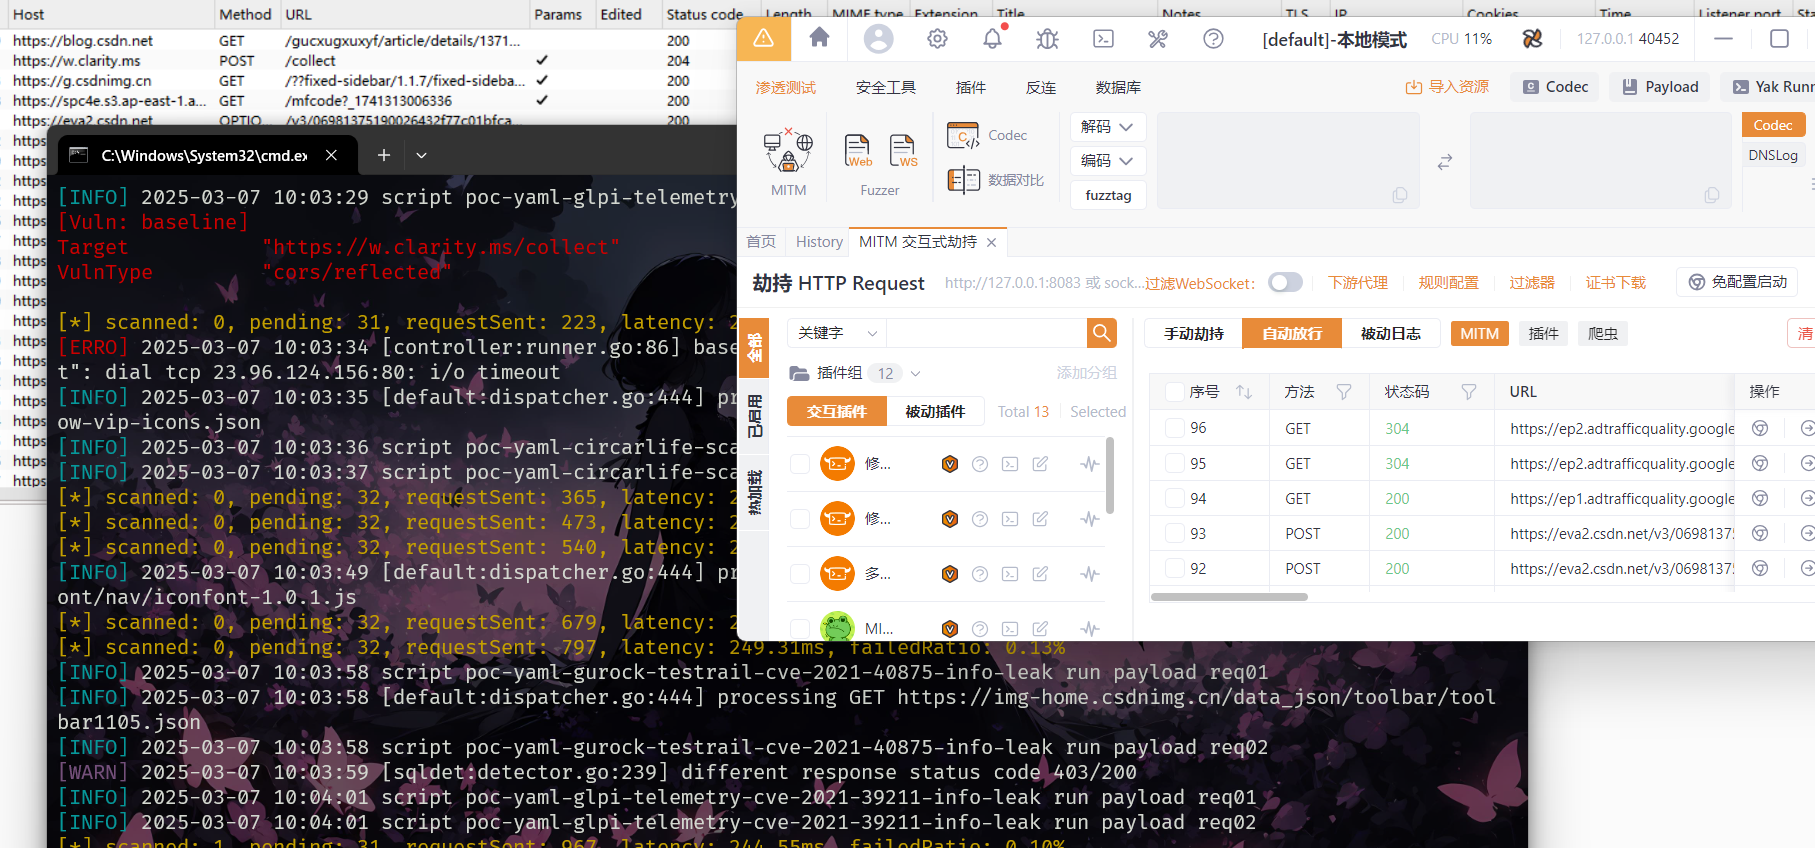
可以看到三个工具都能抓到流量,此时流量流动方向为:burp → yakit → xray
burp&appscan&xray
- appscan
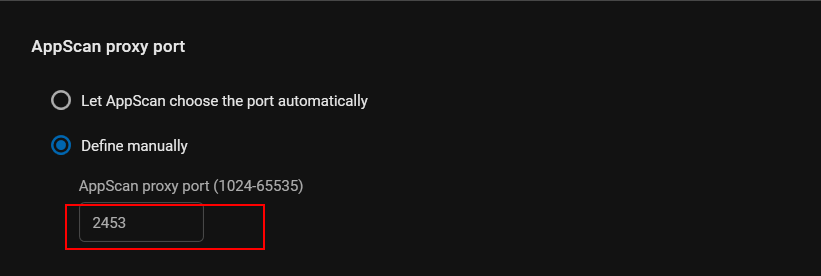
在options中配置监听端口
- xray
编辑xray目录下的config.yaml,该配置文件在初次使用xray后会自动生成

随后启动xray监听
- burp
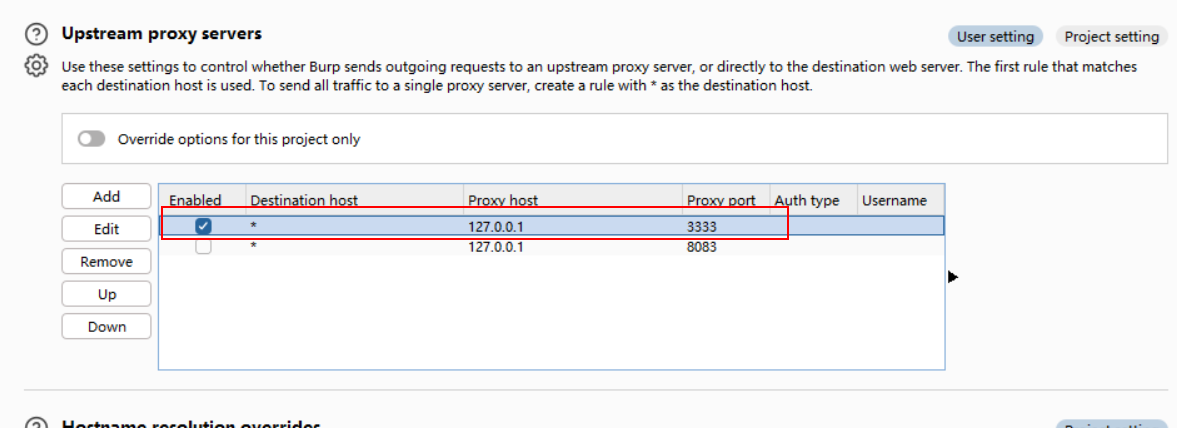
配置为xray监听地址127.0.0.1:3333
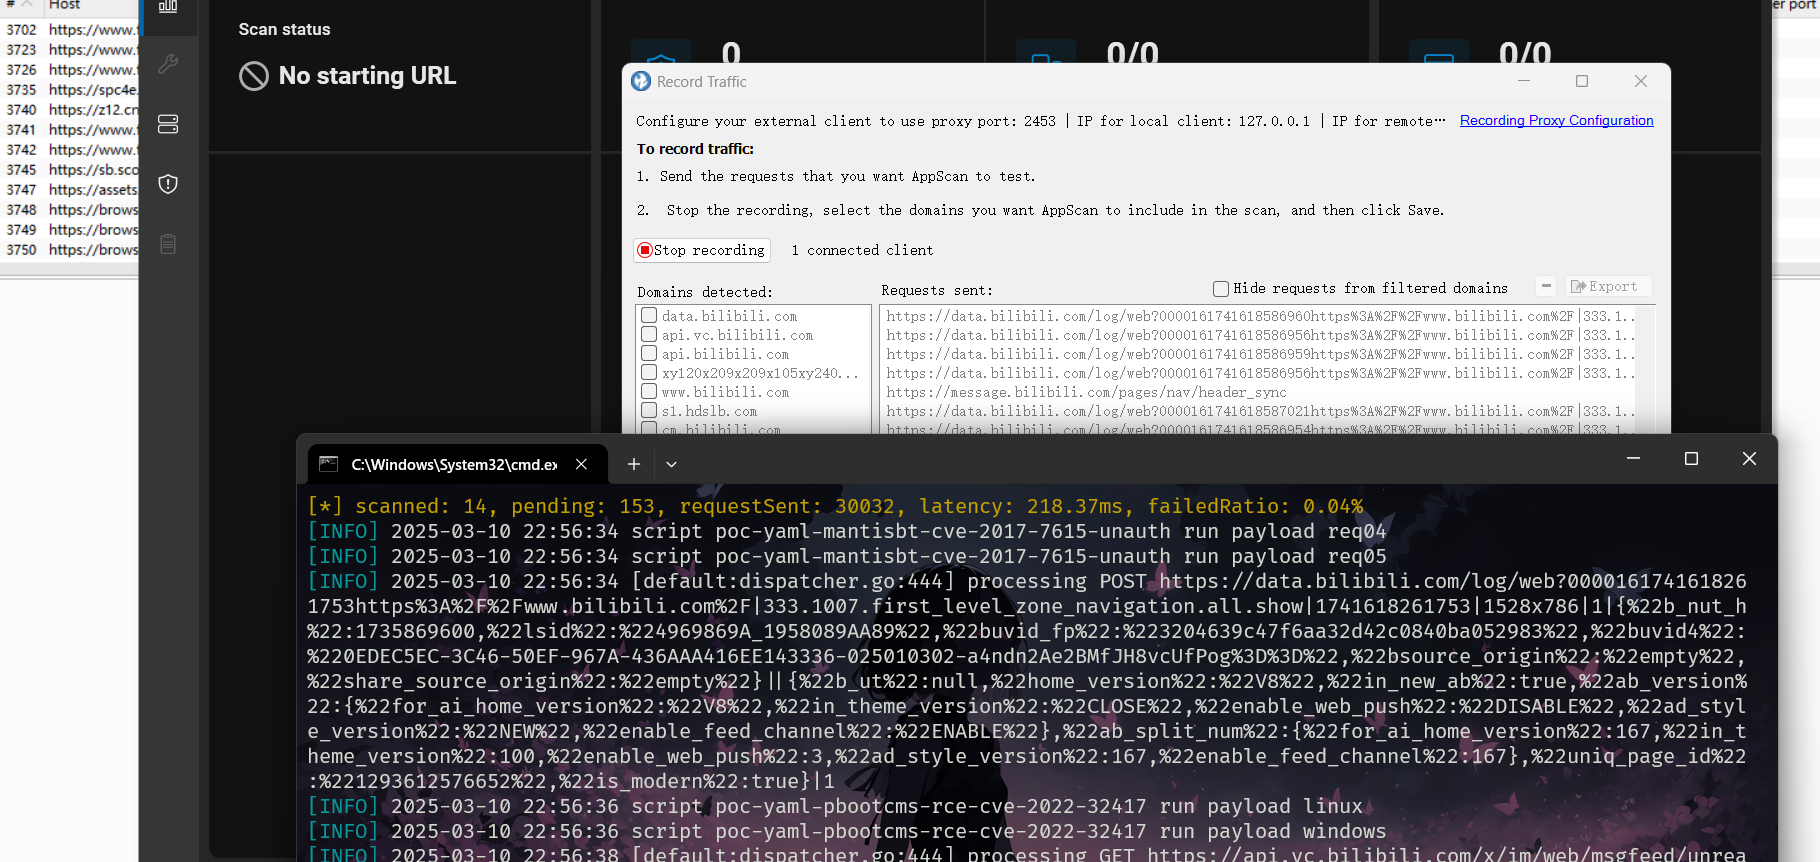
可以看到三个工具都能抓到流量,此时流量流动方向为burp → xray → appscan
burp&JsRpc&MitmProxy
请求响应AES加密
- server
Python
from flask import Flask, request
from flask_cors import CORS  # type: ignore
from Crypto.Cipher import AES
from Crypto.Util.Padding import pad, unpad
import base64
import json

app = Flask(__name__)
CORS(app)  # Enable CORS for all routes

# AES key and IV (must be the same on both client and server)
AES_KEY = b'1234567890123456'  # 16 bytes key
AES_IV = b'1234567890123456'   # 16 bytes IV


# Helper functions for AES encryption and decryption
def aes_encrypt(plaintext):
    cipher = AES.new(AES_KEY, AES.MODE_CBC, AES_IV)
    padded = pad(plaintext.encode('utf-8'), AES.block_size)
    encrypted = cipher.encrypt(padded)
    return base64.b64encode(encrypted).decode('utf-8')


def aes_decrypt(ciphertext):
    cipher = AES.new(AES_KEY, AES.MODE_CBC, AES_IV)
    decrypted = cipher.decrypt(base64.b64decode(ciphertext))
    return unpad(decrypted, AES.block_size).decode('utf-8')


# Dummy user database
USER_DB = {
    "testuser": "password123",
    "admin": "adminpass"
}


@app.route('/login', methods=['POST'])
def login():
    try:
        # Decrypt the incoming request body
        encrypted_data = request.data.decode('utf-8')
        decrypted_data = aes_decrypt(encrypted_data)
        credentials = json.loads(decrypted_data)

        username = credentials.get('username')
        password = credentials.get('password')

        # Validate username and password
        if username in USER_DB and USER_DB[username] == password:
            response = {"status": "success", "message": "Login successful"}
        else:
            response = {"status": "failure",
                        "message": "Invalid username or password"}

        # Encrypt the response
        encrypted_response = aes_encrypt(json.dumps(response))
        return encrypted_response

    except Exception as e:
        error_response = {"status": "error", "message": str(e)}
        encrypted_error_response = aes_encrypt(json.dumps(error_response))
        return encrypted_error_response


if __name__ == '__main__':
    app.run(host='0.0.0.0', port=8080, debug=True)
- client
HTML
<!DOCTYPE html>
<html lang="en">
<head>
    <meta charset="UTF-8">
    <meta name="viewport" content="width=device-width, initial-scale=1.0">
    <title>Client Test</title>
    <script src="https://gcore.jsdelivr.net/npm/crypto-js@4.1.1/crypto-js.min.js"></script>
</head>
<body>
    <h1>Login</h1>
    <form id="loginForm">
        <label for="username">Username:</label>
        <input type="text" id="username" name="username" required>
        <br><br>
        <label for="password">Password:</label>
        <input type="password" id="password" name="password" required>
        <br><br>
        <button type="submit">Login</button>
    </form>
    <p id="response"></p>

    <script>
        // AES key and IV (must match the server)
        const AES_KEY = CryptoJS.enc.Utf8.parse('1234567890123456'); // 16 bytes key
        const AES_IV = CryptoJS.enc.Utf8.parse('1234567890123456');  // 16 bytes IV

        // Helper function for AES encryption
        function aesEncrypt(plaintext) {
            const encrypted = CryptoJS.AES.encrypt(plaintext, AES_KEY, {
                iv: AES_IV,
                mode: CryptoJS.mode.CBC,
                padding: CryptoJS.pad.Pkcs7
            });
            return encrypted.toString();
        }

        // Helper function for AES decryption
        function aesDecrypt(ciphertext) {
            const decrypted = CryptoJS.AES.decrypt(ciphertext, AES_KEY, {
                iv: AES_IV,
                mode: CryptoJS.mode.CBC,
                padding: CryptoJS.pad.Pkcs7
            });
            return decrypted.toString(CryptoJS.enc.Utf8);
        }

        // Handle form submission
        document.getElementById('loginForm').addEventListener('submit', async function(event) {
            event.preventDefault();

            const username = document.getElementById('username').value;
            const password = document.getElementById('password').value;

            // Prepare the credentials
            const credentials = JSON.stringify({ username, password });

            // Encrypt the credentials
            const encryptedData = aesEncrypt(credentials);

            try {
                // Send the POST request
                const response = await fetch('http://192.168.1.102:8080/login', {
                    method: 'POST',
                    headers: { 'Content-Type': 'text/plain' },
                    body: encryptedData
                });

                // Read and decrypt the server response
                const encryptedResponse = await response.text();
                const decryptedResponse = aesDecrypt(encryptedResponse);

                // Display the response
                document.getElementById('response').textContent = decryptedResponse;
            } catch (error) {
                document.getElementById('response').textContent = 'Error: ' + error.message;
            }
        });
    </script>
</body>
</html>
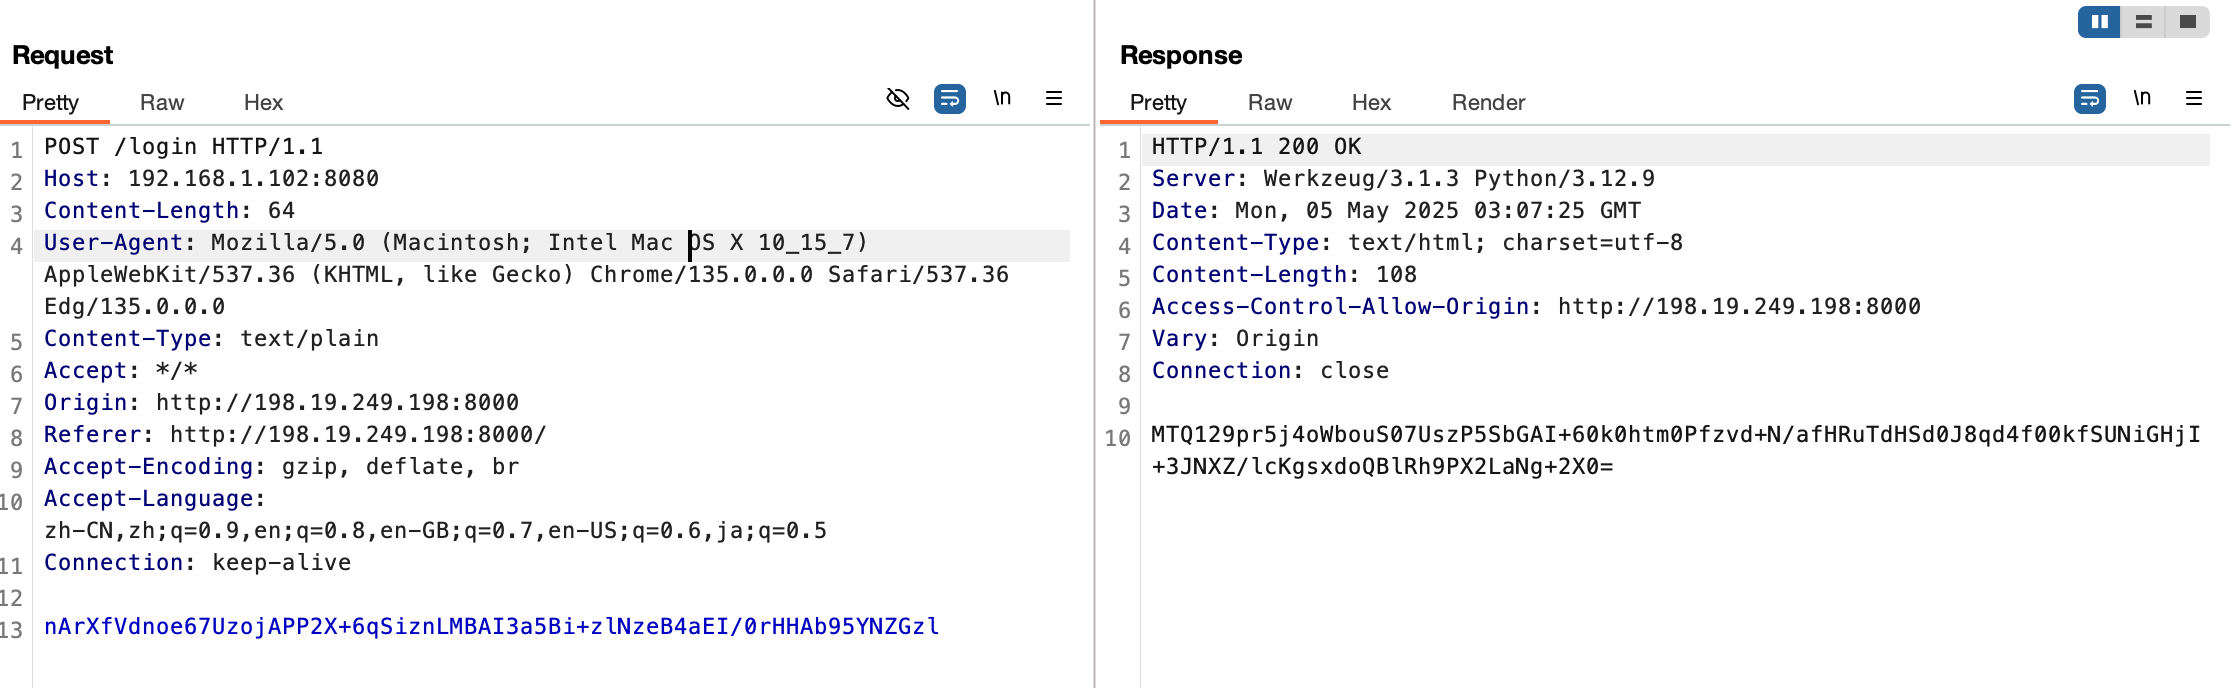
bp抓包发现请求和响应都被加密了
寻找加解密逻辑
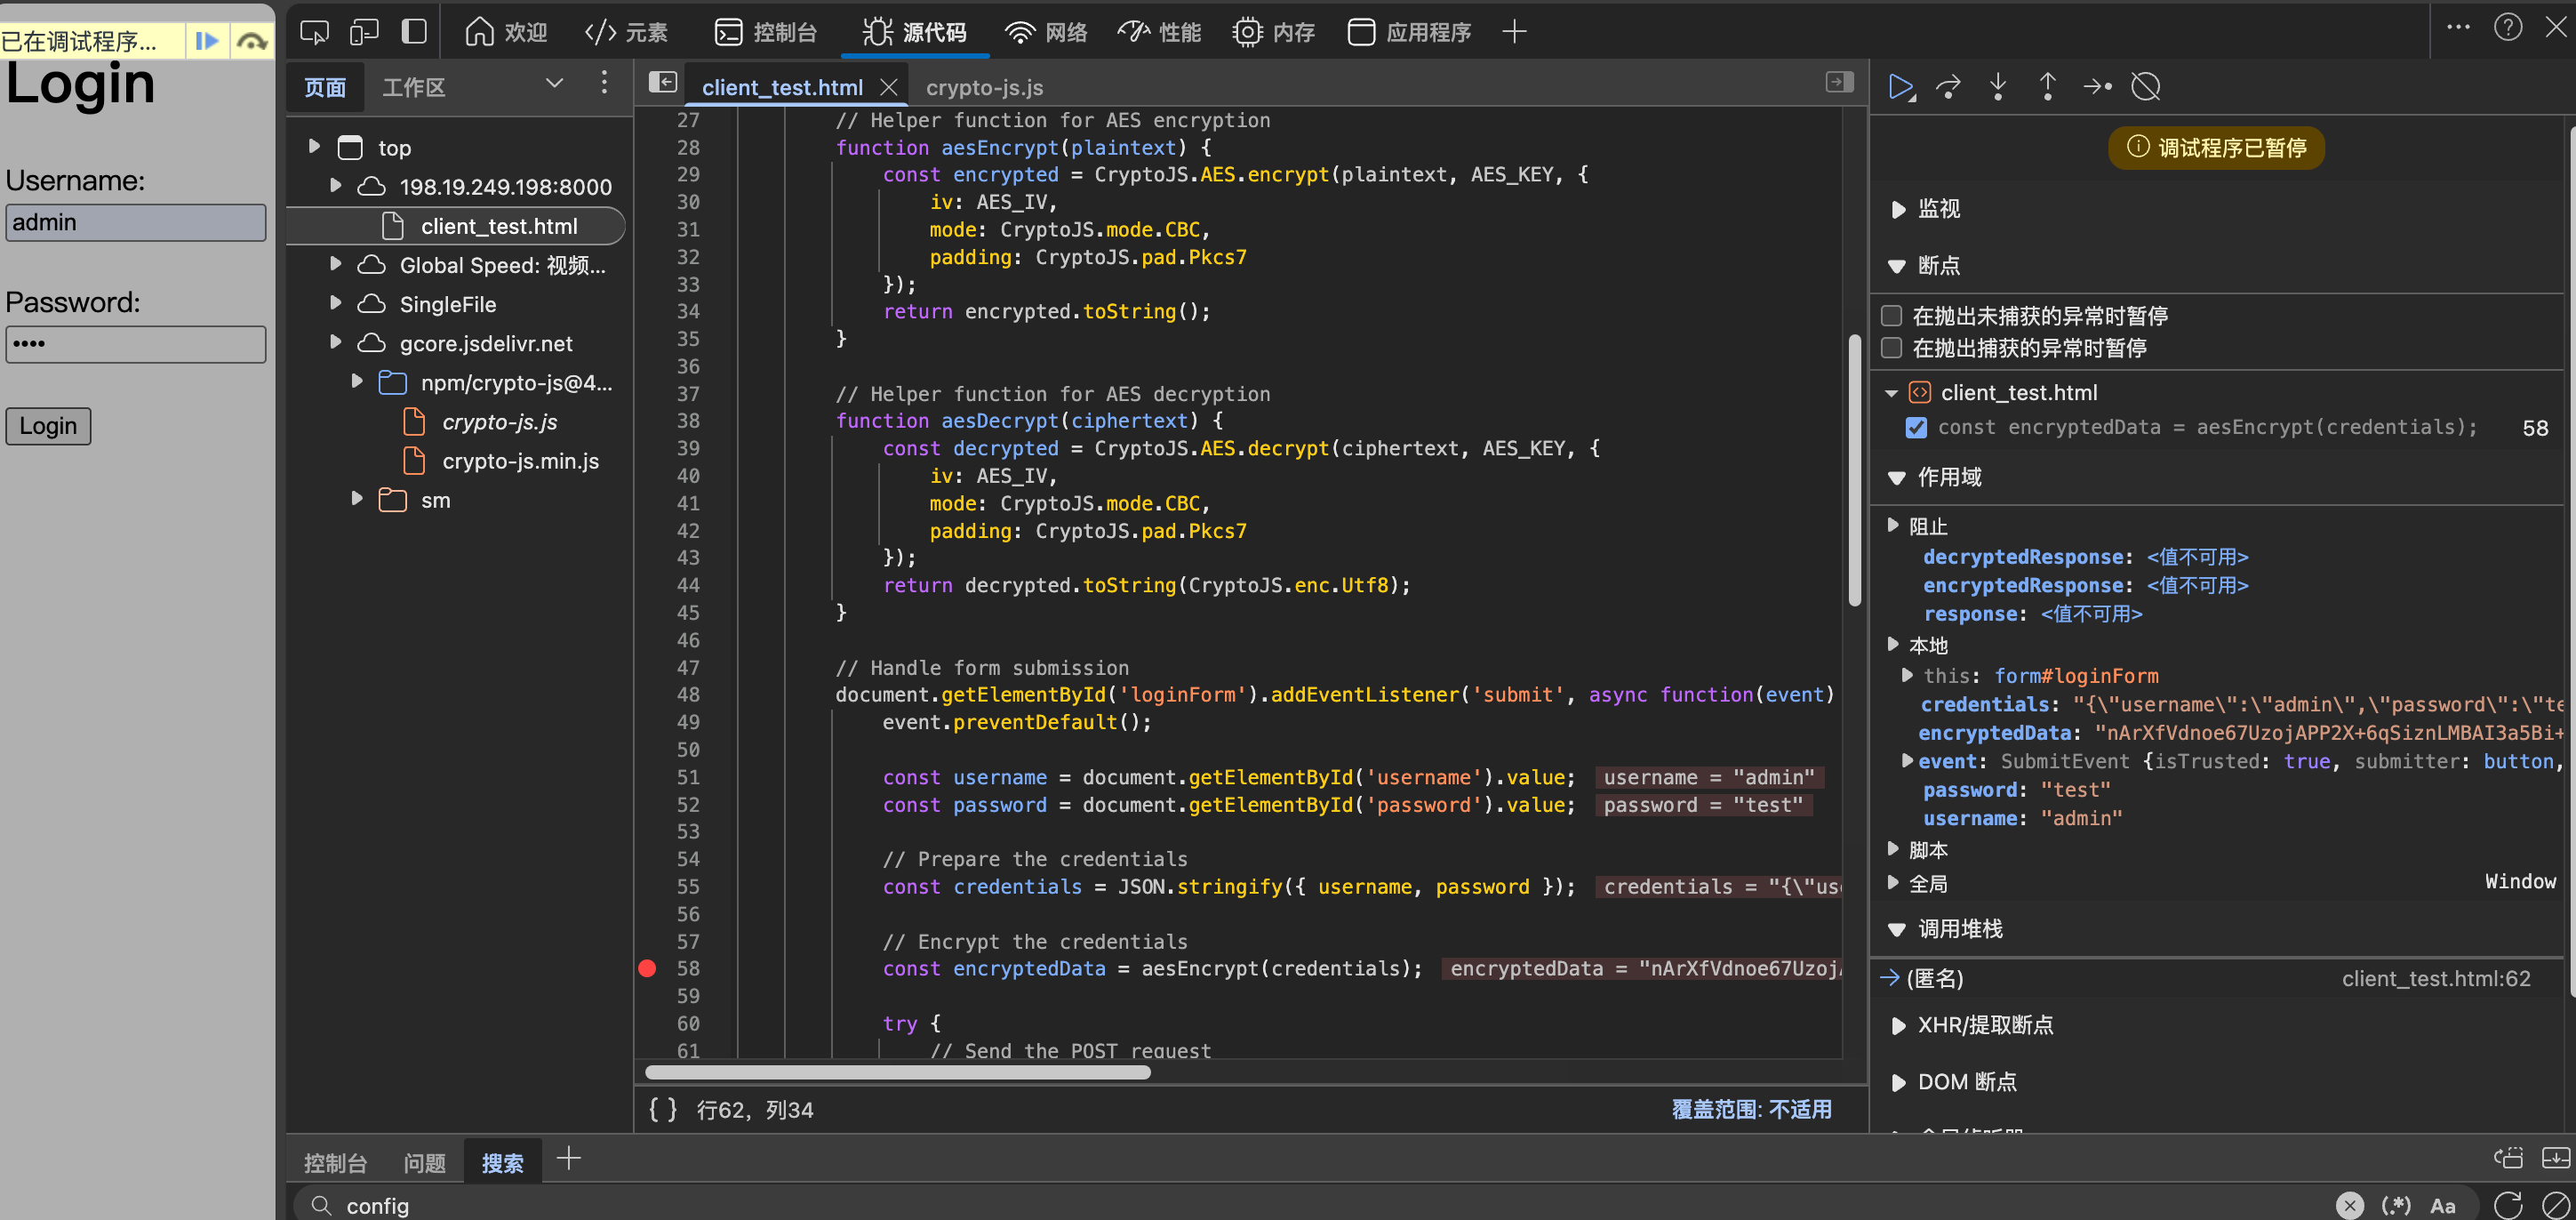
通过调试和查看前端代码可以发现:
- 请求加密逻辑调用了aesEncrypt函数,参数为json后的username和password
- 响应解密逻辑调用了aesDecrypt函数,参数为服务端返回的响应
JsRpc启动和客户端注入
找到加密/解密函数后,我们启动jsrpc服务端
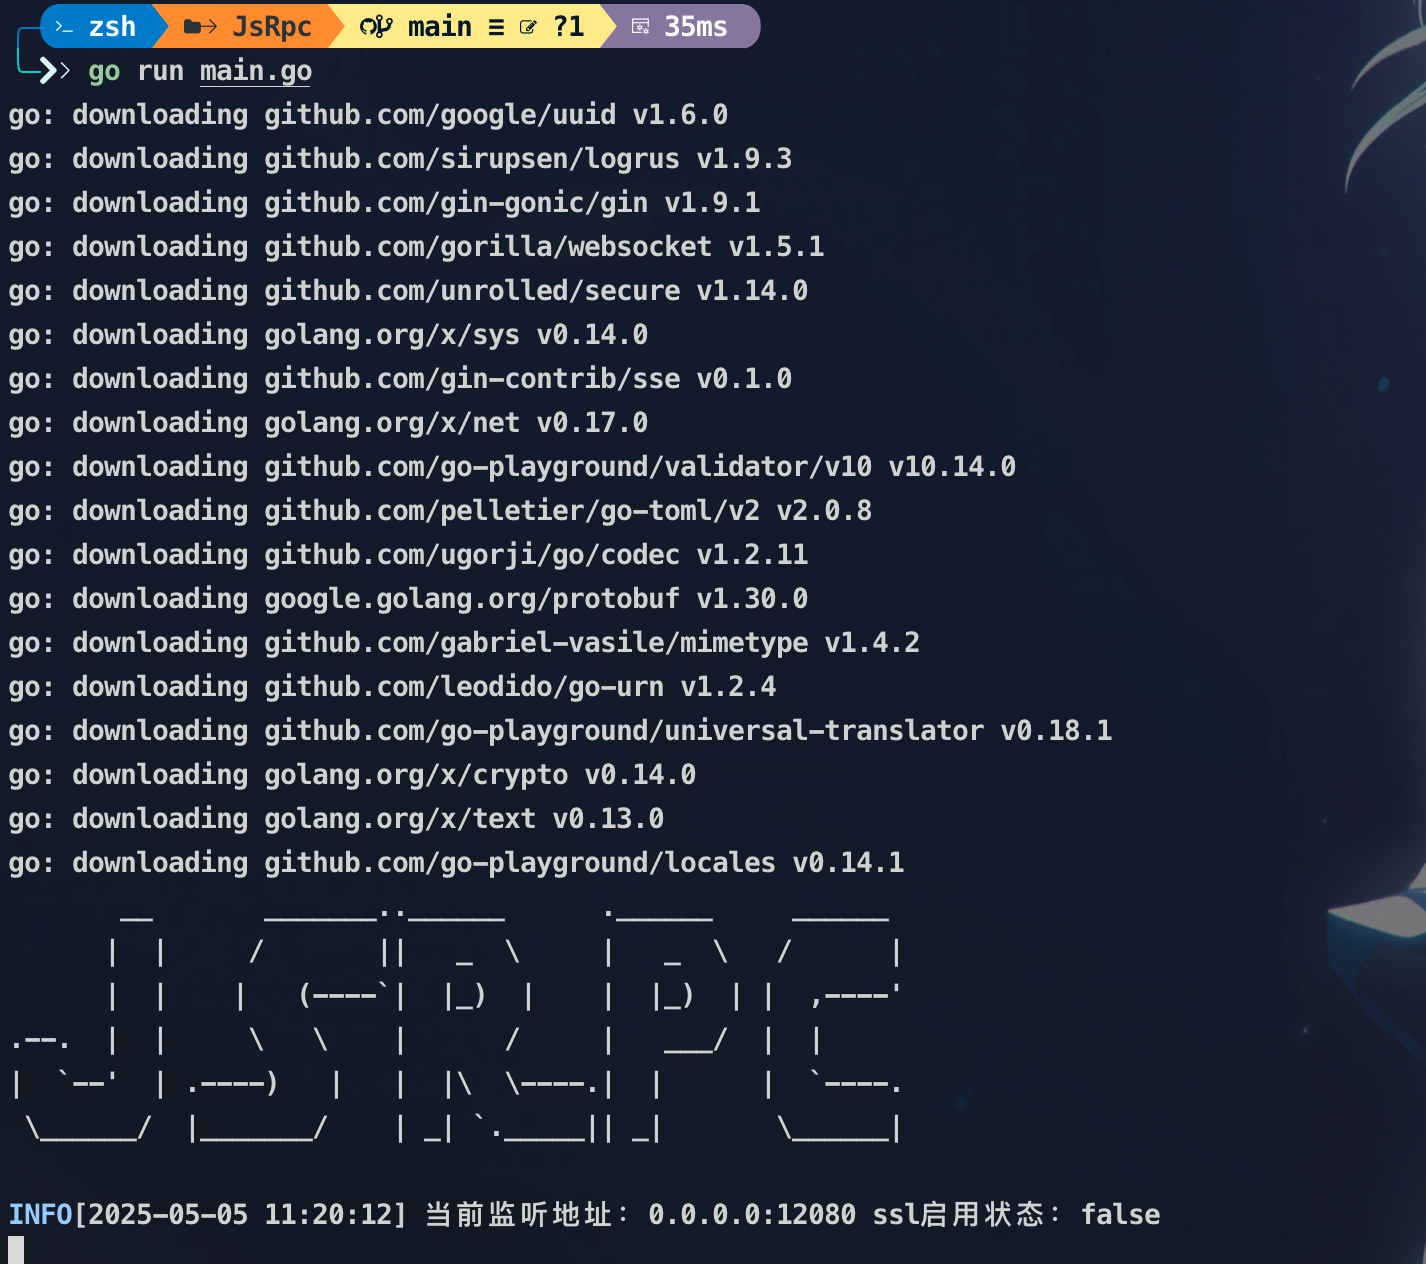
客户端在控制台注入JsEnv_Dev.js文件
JavaScript
var rpc_client_id, Hlclient = function (wsURL) {
    this.wsURL = wsURL;
    this.handlers = {
        _execjs: function (resolve, param) {
            var res = eval(param)
            if (!res) {
                resolve("没有返回值")
            } else {
                resolve(res)
            }
        }
    };
    this.socket = undefined;
    if (!wsURL) {
        throw new Error('wsURL can not be empty!!')
    }
    this.connect()
}
Hlclient.prototype.connect = function () {
    if (this.wsURL.indexOf("clientId=") === -1 && rpc_client_id) {
        this.wsURL += "&clientId=" + rpc_client_id
    }
    console.log('begin of connect to wsURL: ' + this.wsURL);
    var _this = this;
    try {
        this.socket = new WebSocket(this.wsURL);
        this.socket.onmessage = function (e) {
            _this.handlerRequest(e.data)
        }
    } catch (e) {
        console.log("connection failed,reconnect after 10s");
        setTimeout(function () {
            _this.connect()
        }, 10000)
    }
    this.socket.onclose = function () {
        console.log('rpc已关闭');
        setTimeout(function () {
            _this.connect()
        }, 10000)
    }
    this.socket.addEventListener('open', (event) => {
        console.log("rpc连接成功");
    });
    this.socket.addEventListener('error', (event) => {
        console.error('rpc连接出错,请检查是否打开服务端:', event.error);
    })
};
Hlclient.prototype.send = function (msg) {
    this.socket.send(msg)
}
Hlclient.prototype.regAction = function (func_name, func) {
    if (typeof func_name !== 'string') {
        throw new Error("an func_name must be string");
    }
    if (typeof func !== 'function') {
        throw new Error("must be function");
    }
    console.log("register func_name: " + func_name);
    this.handlers[func_name] = func;
    return true
}
Hlclient.prototype.handlerRequest = function (requestJson) {
    var _this = this;
    try {
        var result = JSON.parse(requestJson)
    } catch (error) {
        console.log("请求信息解析错误", requestJson);
        return
    }
    if (result["registerId"]) {
        rpc_client_id = result['registerId']
        return
    }
    if (!result['action'] || !result["message_id"]) {
        console.warn('没有方法或者消息id,不处理');
        return
    }
    var action = result["action"], message_id = result["message_id"]
    var theHandler = this.handlers[action];
    if (!theHandler) {
        this.sendResult(action, message_id, 'action没找到');
        return
    }
    try {
        if (!result["param"]) {
            theHandler(function (response) {
                _this.sendResult(action, message_id, response);
            })
            return
        }
        var param = result["param"]
        try {
            param = JSON.parse(param)
        } catch (e) {
        }
        theHandler(function (response) {
            _this.sendResult(action, message_id, response);
        }, param)
    } catch (e) {
        console.log("error: " + e);
        _this.sendResult(action, message_id, e);
    }
}
Hlclient.prototype.sendResult = function (action, message_id, e) {
    if (typeof e === 'object' && e !== null) {
        try {
            e = JSON.stringify(e)
        } catch (v) {
            console.log(v)//不是json无需操作
        }
    }
    this.send(JSON.stringify({"action": action, "message_id": message_id, "response_data": e}));
}
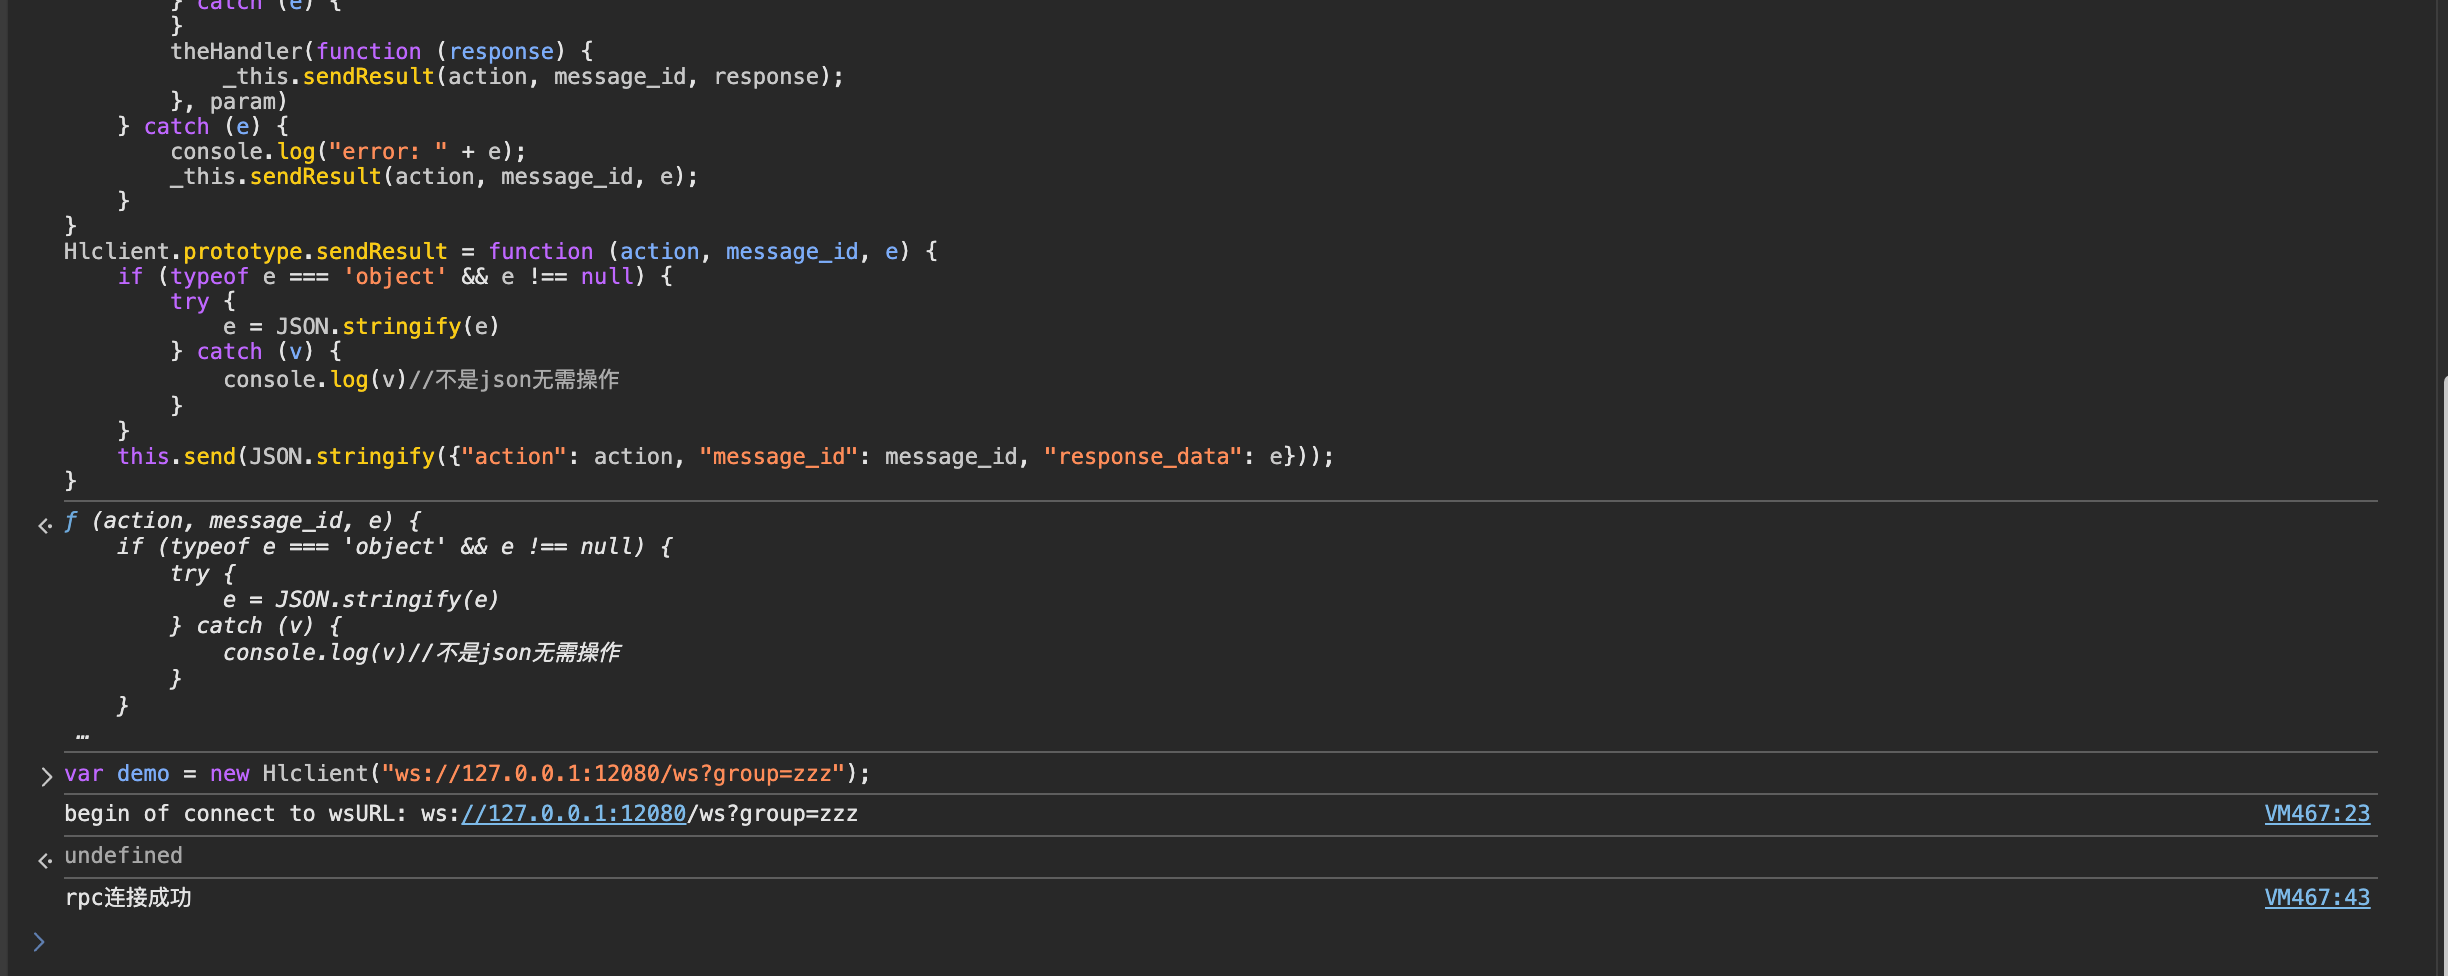
客户端控制台连接服务端
注册全局函数
我们的关注点在请求的加解密上
注册解密方法
JavaScript
// 注册参数函数
window.json_parms = function(){
  // 复制前端相关代码即可
  const username = document.getElementById('username').value;
  const password = document.getElementById('password').value;

  // Prepare the credentials
  const credentials = JSON.stringify({ username, password });
  return credentials;
};

// 注册请求加密全局函数
window.enc_request = function(data){
  return aesEncrypt(data);
};
// 返回找到的对应加密函数结果
注册加密方法
JavaScript
// 注册函数
demo.regAction("req", function(resolve) {
    // 加密请求体
    let encstr = window.enc_request(window.json_parms());
    let res = {
        "encstr": encstr,
    };
    resolve(res);
});
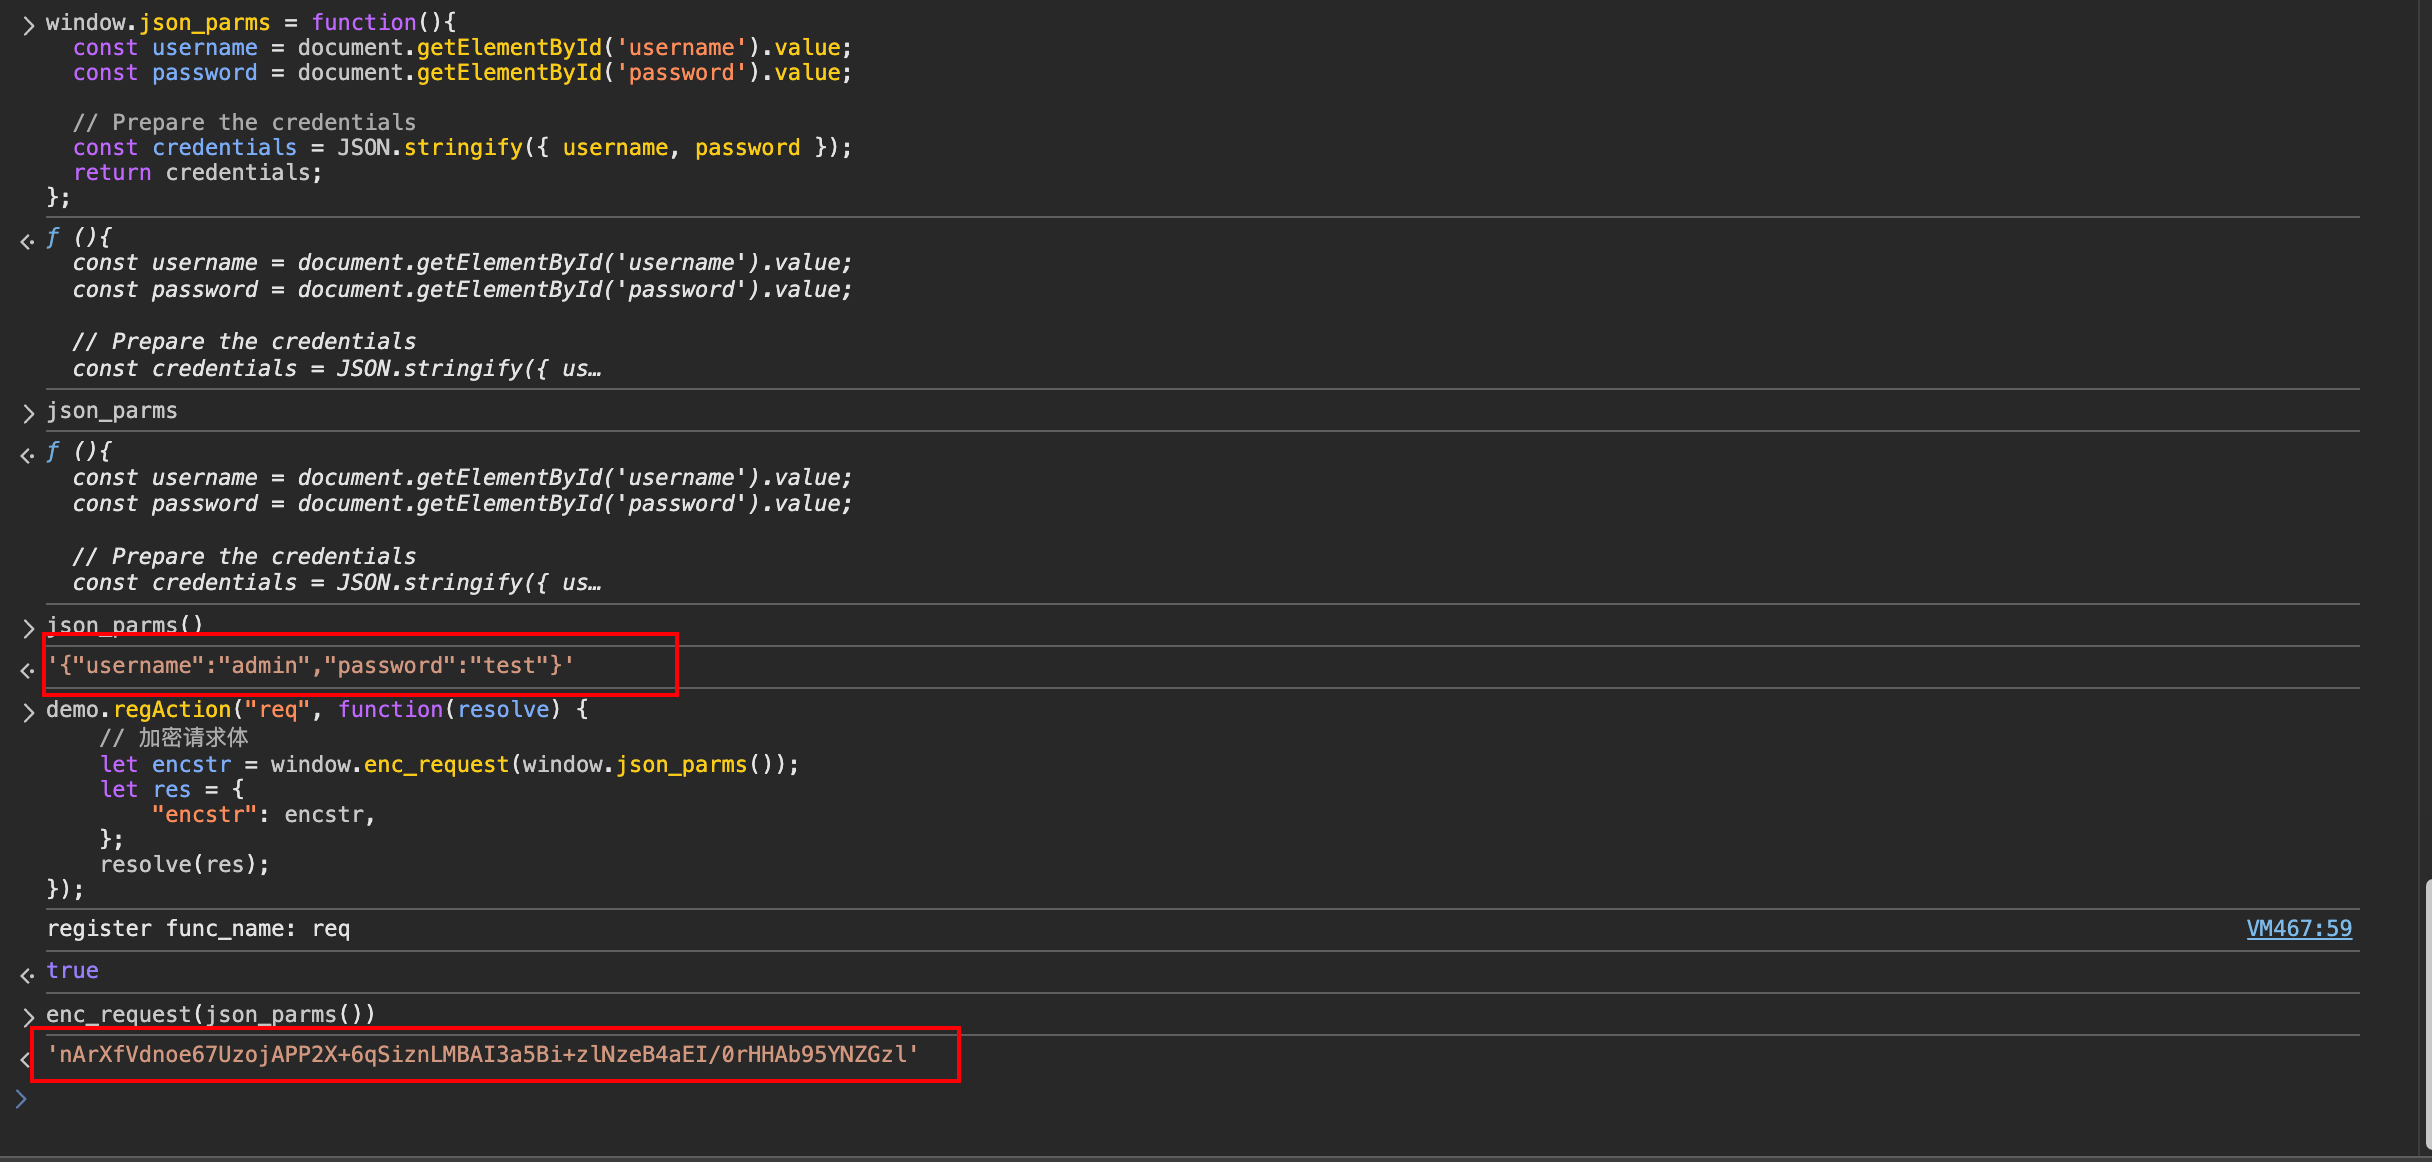
注册解密方法
调用加密函数测试结果正确,接下来注册解密函数
JavaScript
// 注册响应全局解密函数
window.dec_response = function(data){
  return aesDecrypt(data);
};
// 返回找到的对应解密函数结果
注册解密方法
JavaScript
// 注册函数
demo.regAction("res", function(resolve, param) {
    // 解密响应体
    let decstr = window.dec_response(param);
    let res = {
        "decstr": decstr,
    };
    resolve(res);
});
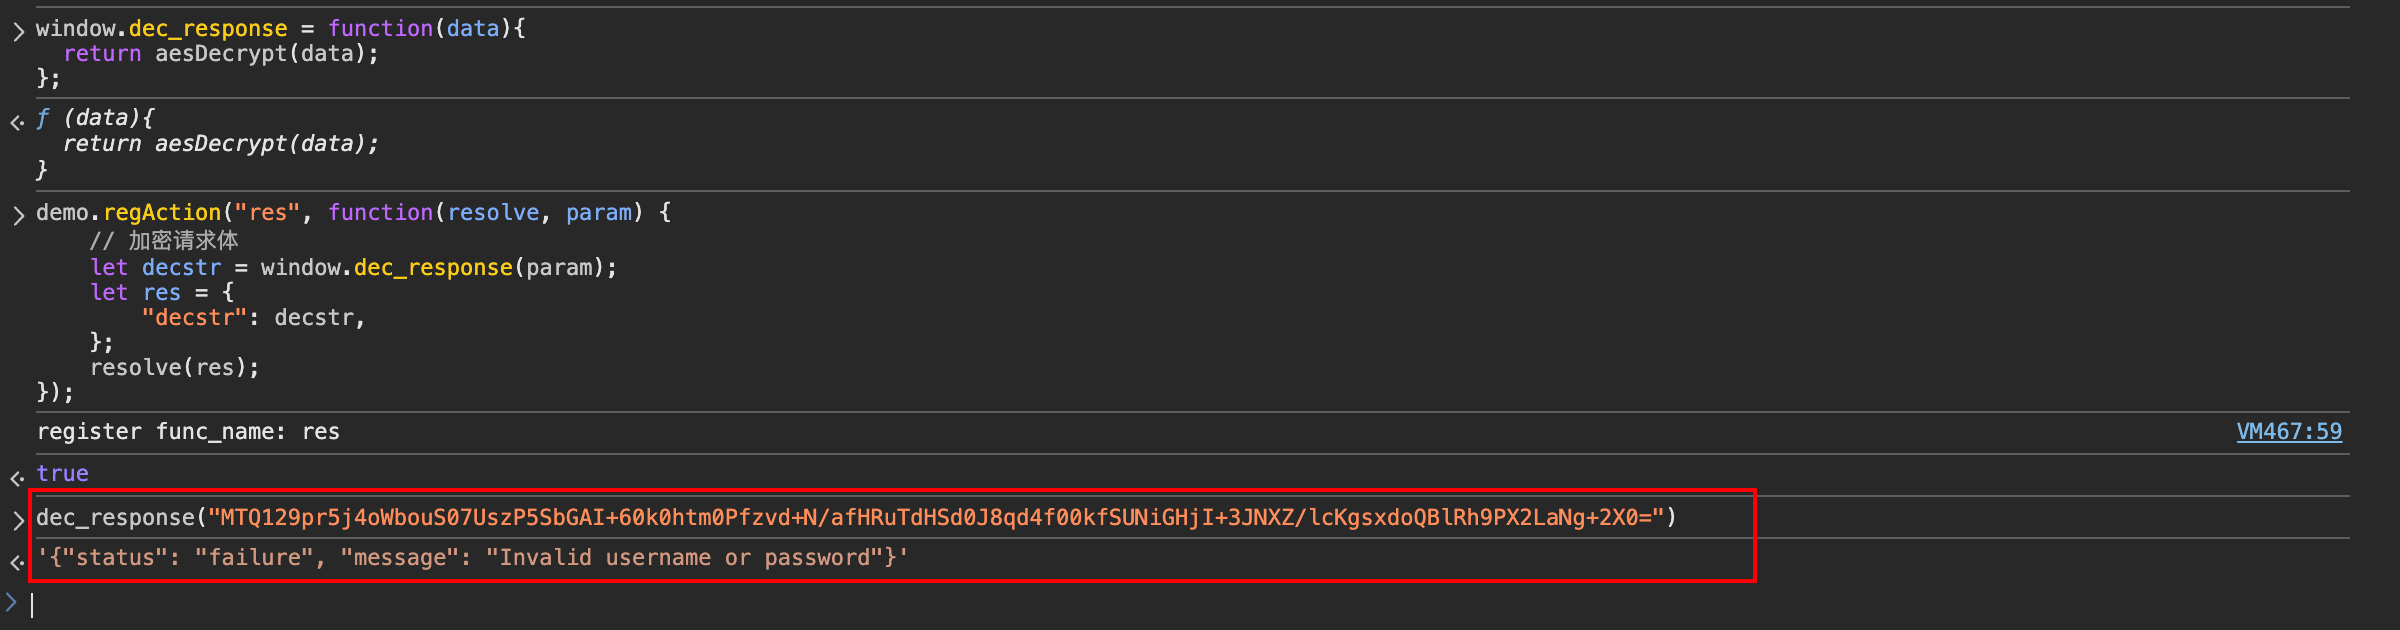
调用解密函数测试结果正确
接口测试
Text Only
# 加密测试
http://127.0.0.1:12080/go?group=zzz&action=req
# 解密测试
http://127.0.0.1:12080/go?group=zzz&action=res¶m="MTQ129pr5j4oWbouS07UszP5SbGAI+60k0htm0Pfzvd+N/afHRuTdHSd0J8qd4f00kfSUNiGHjI+3JNXZ/lcKgsxdoQBlRh9PX2LaNg+2X0="
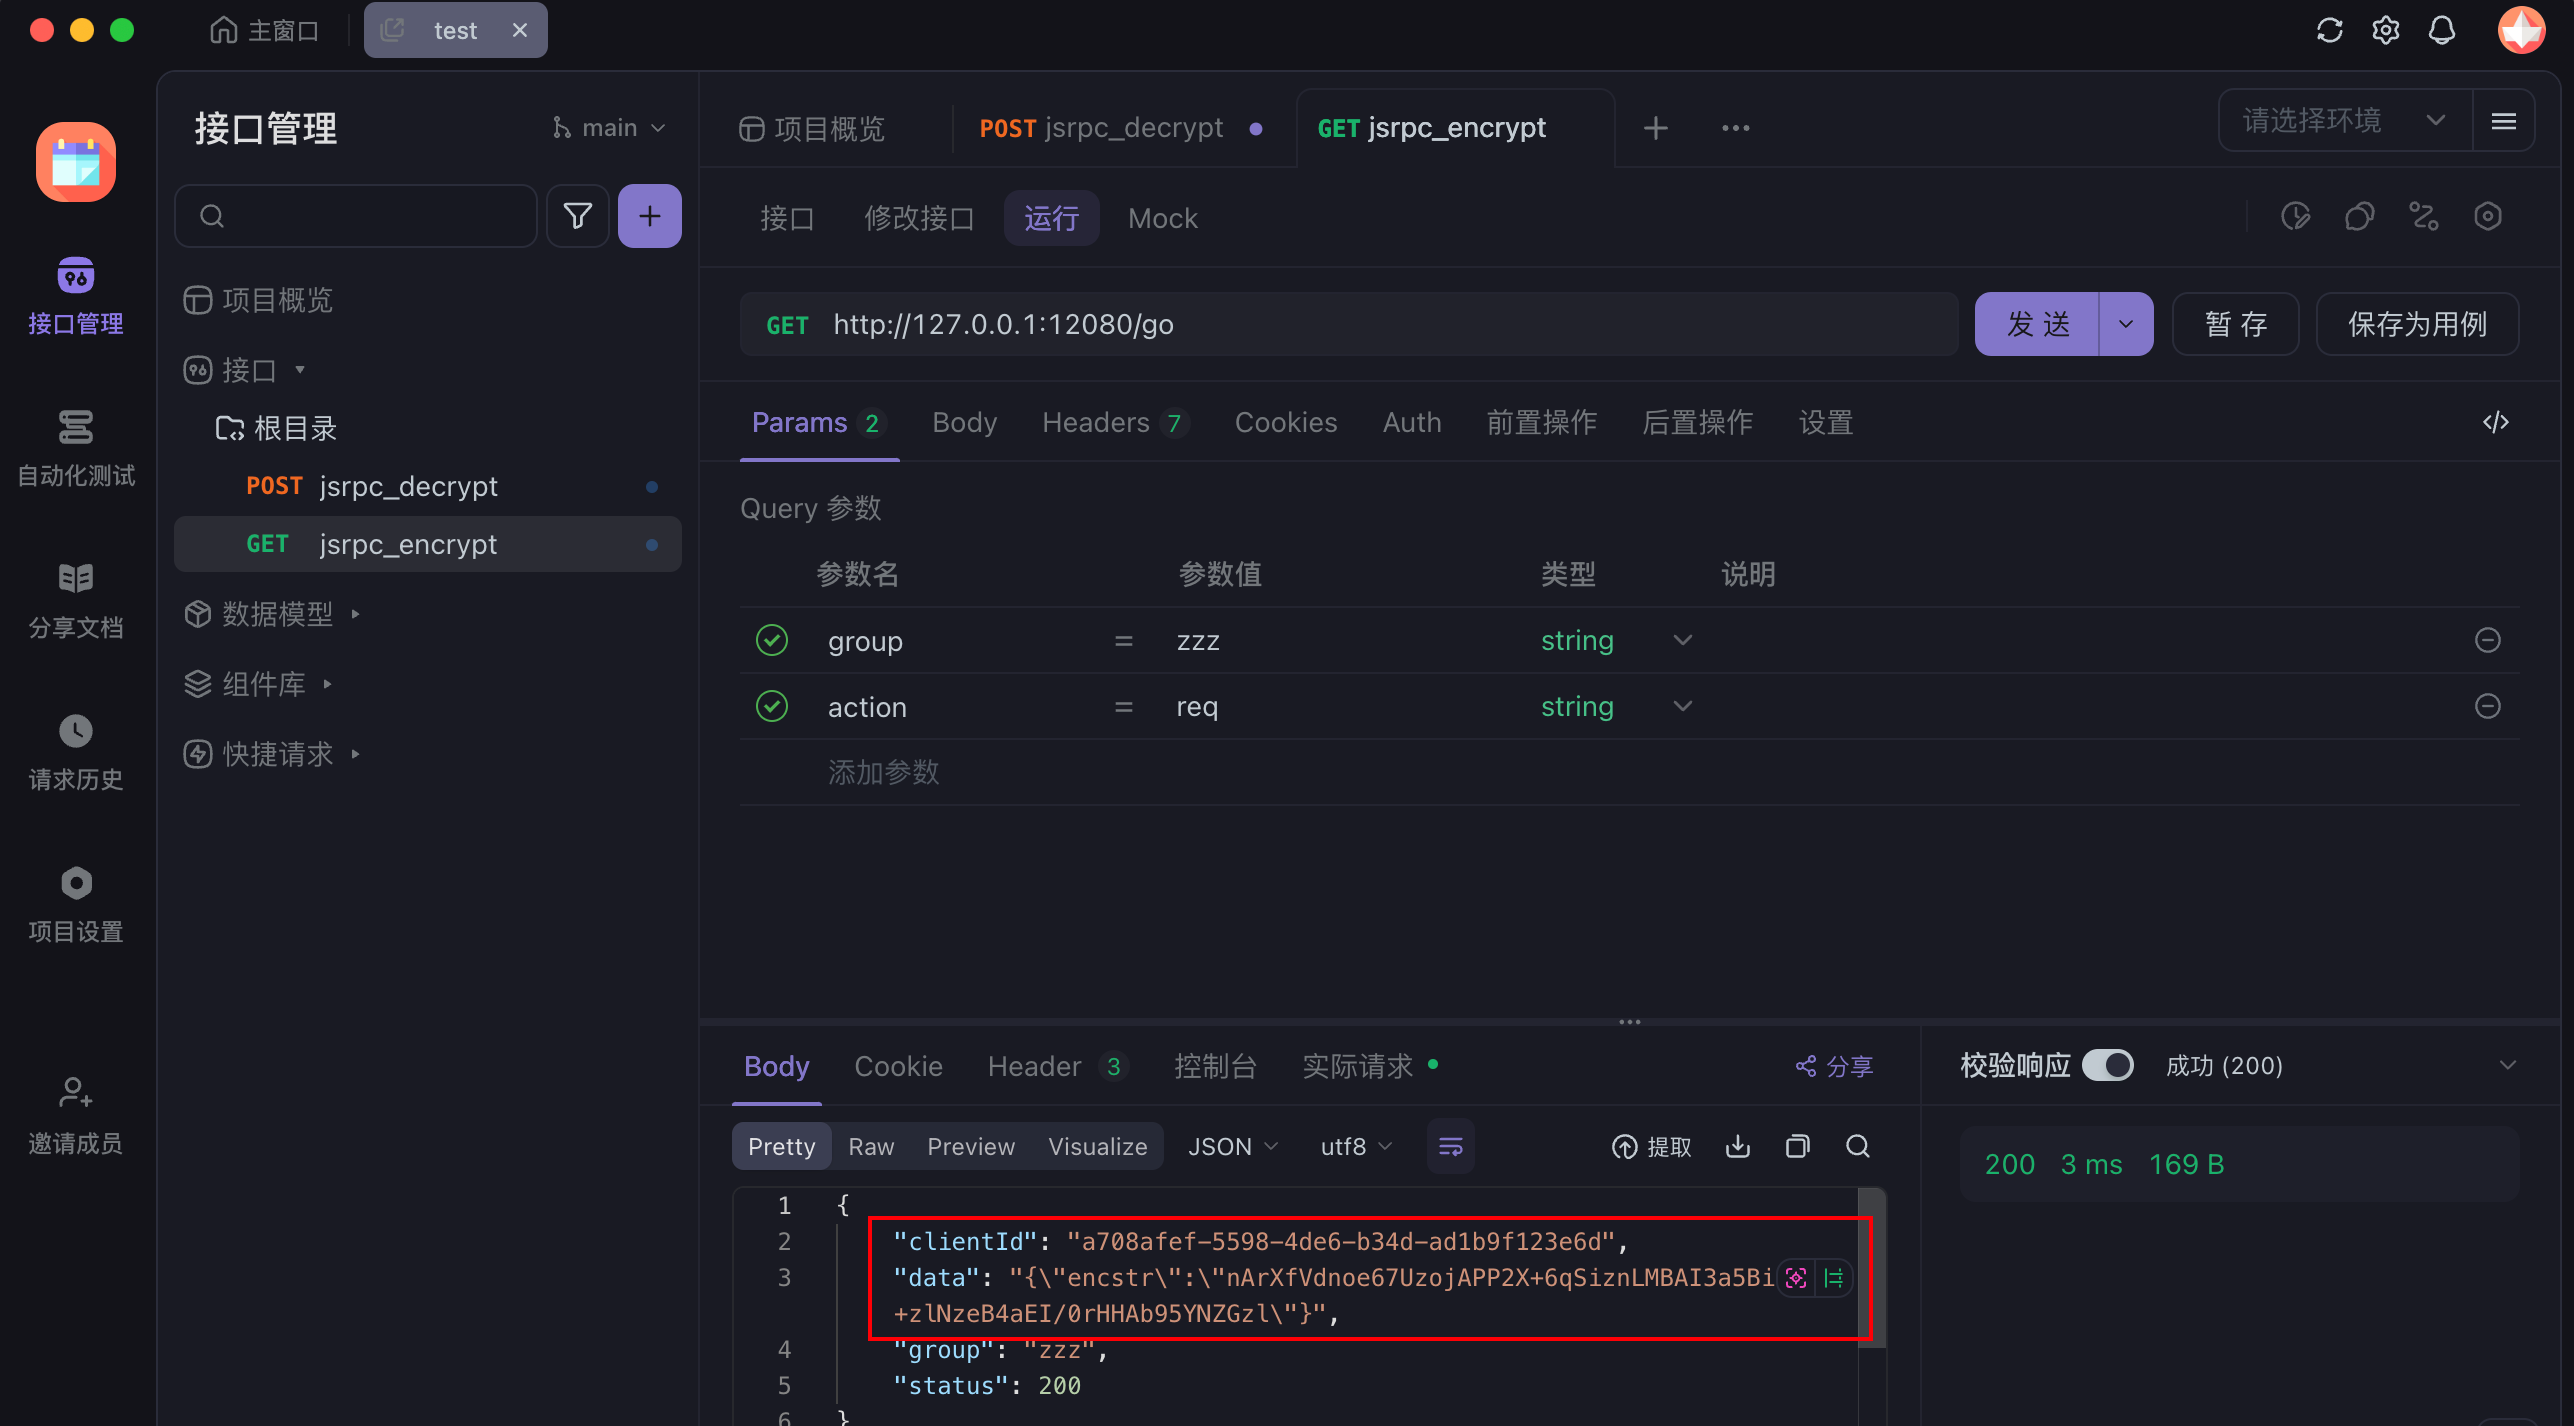
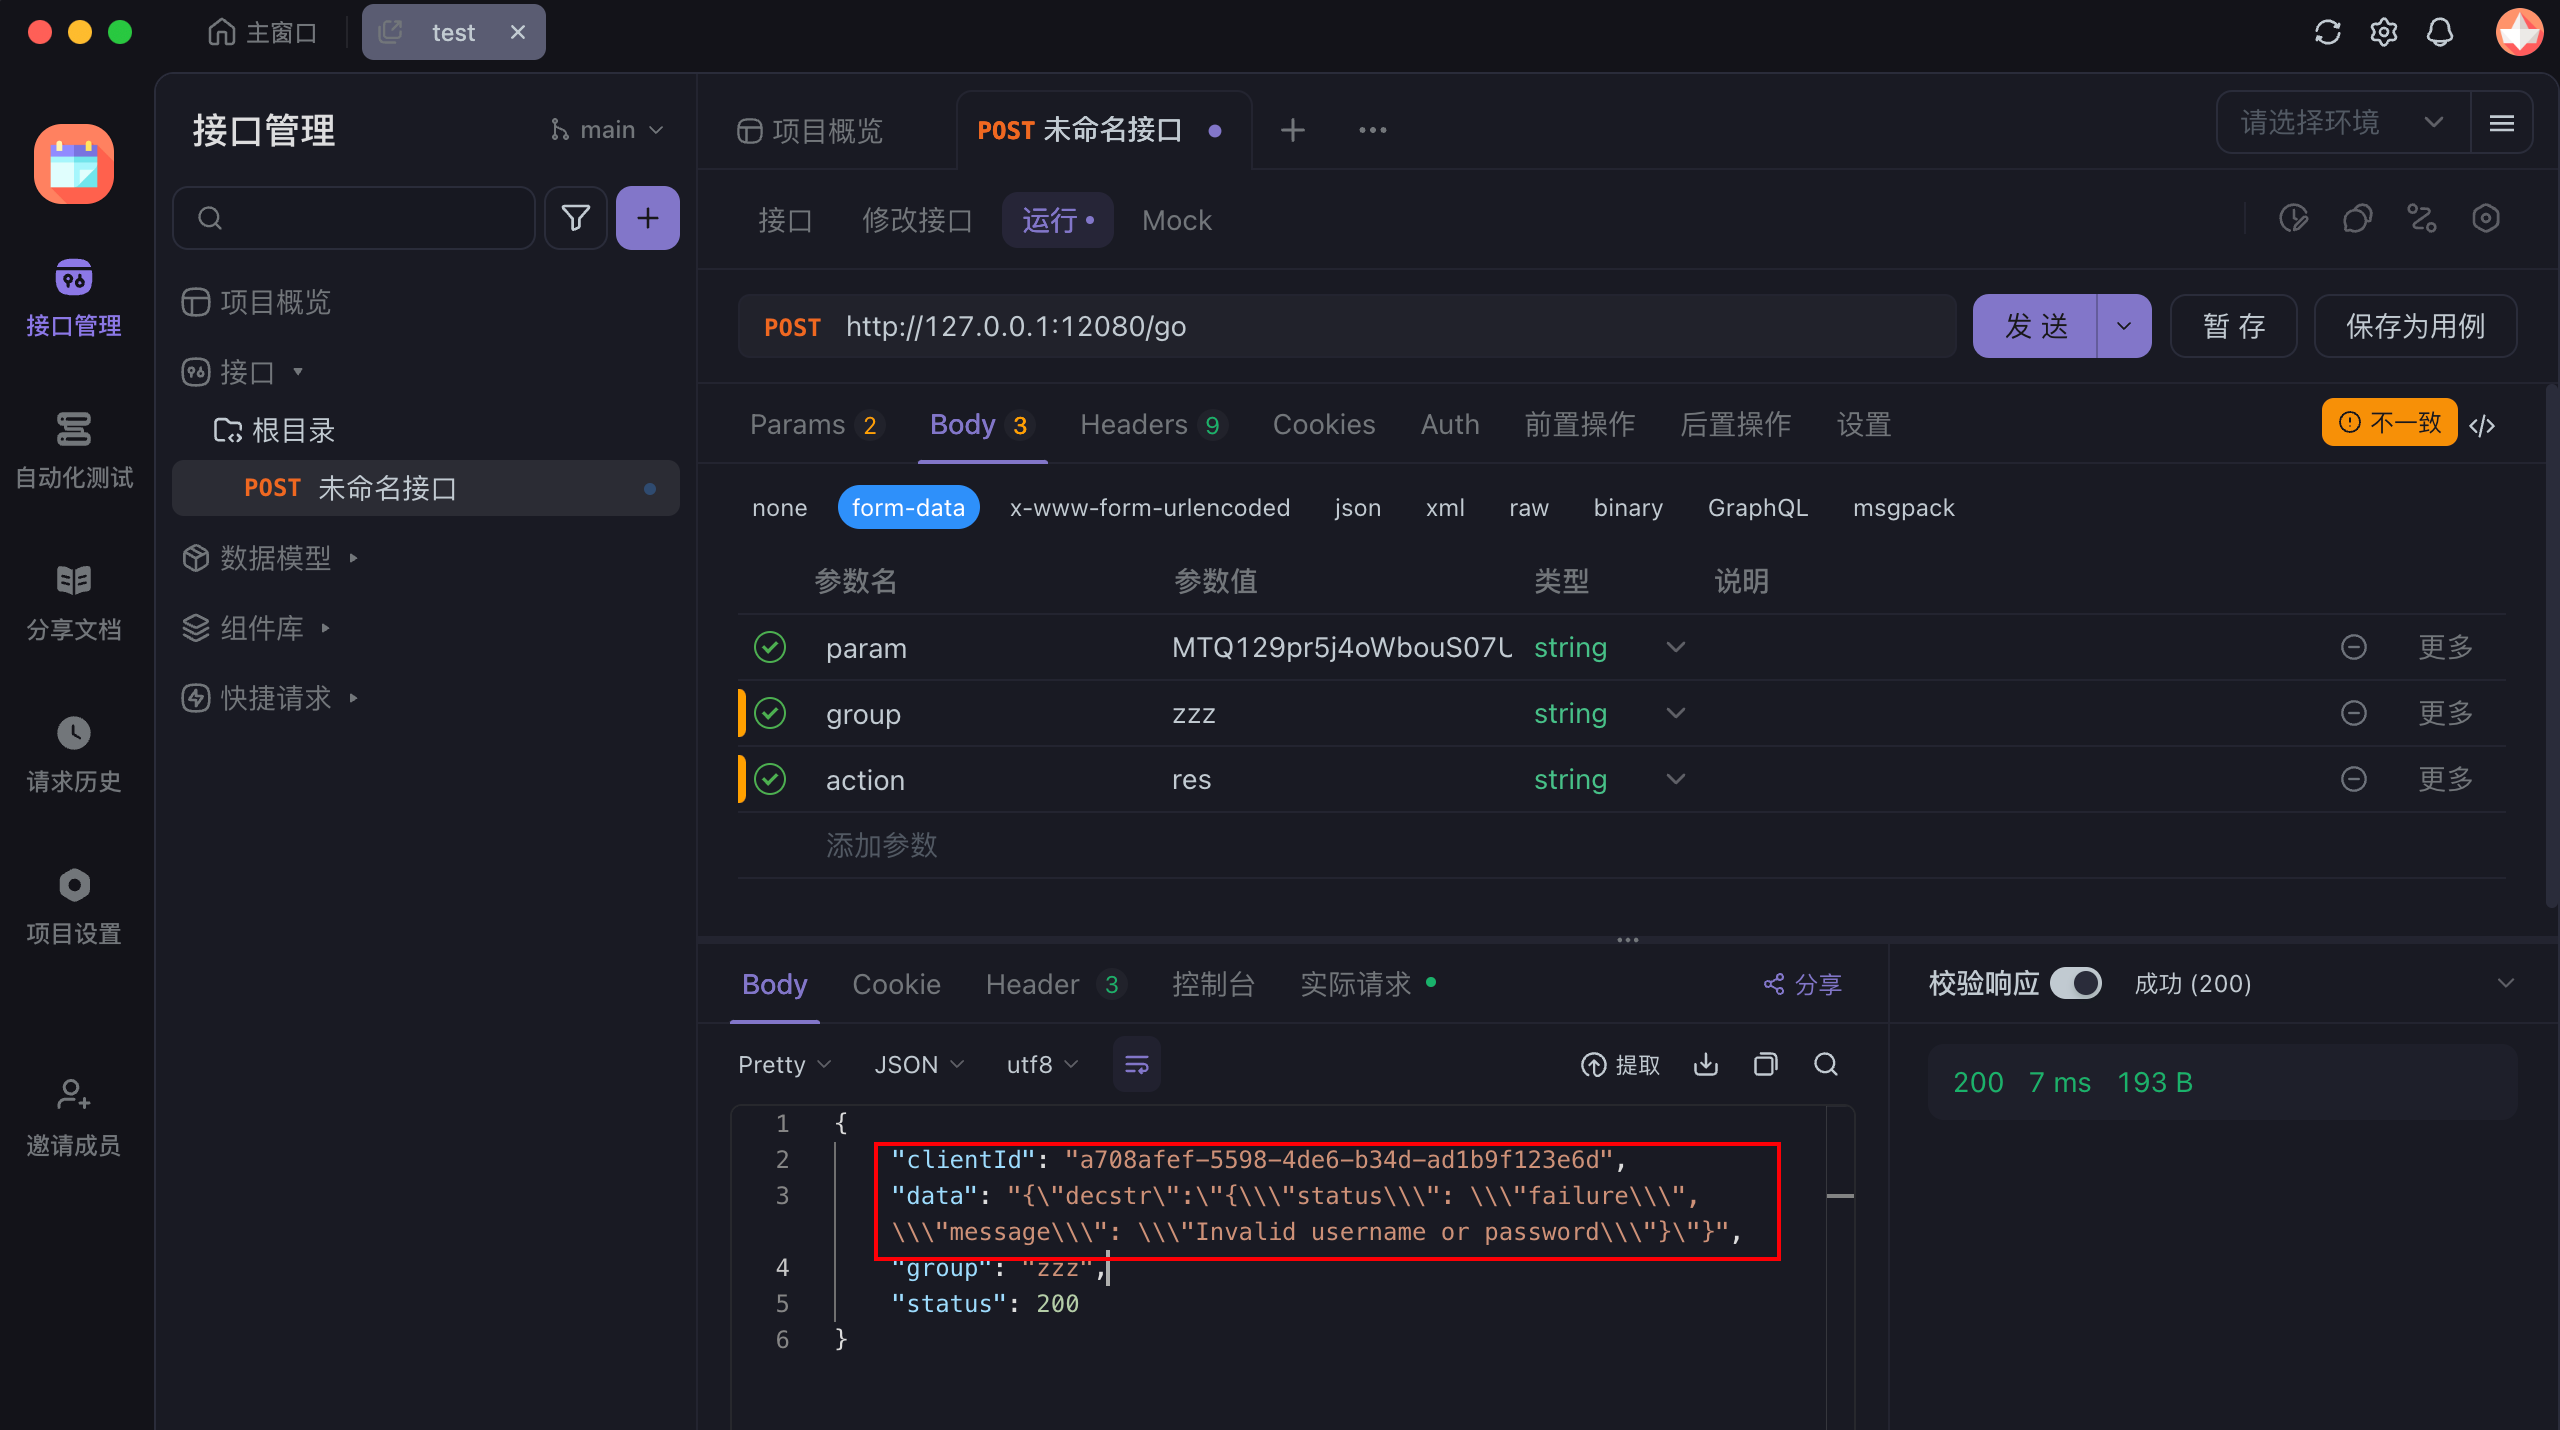
需要注意的是,由于aesDecrypt参数是从响应体中获取的,所以需要POST请求