Apk逆向
Apk介绍
APK是Android application package的缩写,即Android安装包(apk)。APK是类似SymbianSis或Sisx的文件格式。通过将APK文件直接传到Android模拟器或Android手机中执行即可安装。 [2]
apk文件和sis一样,把androidsdk编译的工程打包成一个安装程序文件,格式为apk。 APK文件其实是zip格式,但后缀名被修改为apk,通过UnZip解压后,可以看到Dex文件,Dex是DalvikVM executes的简称,即Android Dalvik执行程序,并非Java ME的字节码而是Dalvik字节码。
一个APK文件通常包含以下文件:
- META-INF文件夹:Jar文件中常见
- MANIFEST.MF:清单文件(Manifest file)
- CERT.RSA: 保存着该应用程序的证书和授权信息。
- CERT.SF: 保存着SHA-1信息资源列表,比如: [3]Signature-Version: 1.0Created-By: 1.0(Android)SHA1-Digest-Manifest : wxqnEAI0UA5nO5QJ8CGMwjkGGWE =... Name: res/ layout/ exchange_ component _back _bottom. xmlSHA1- Digest: eACjMjESj7Zkf0cBFTZ0nqWrt7w = ...Name:res/drawable-hdpi/icon.pngSHA1-Digest: DGEqylP8W0n0iV/ZzBx3MW0WGCA=
- res: APK所需要的资源文件夹。
- AndroidManifest.xml: 一个传统的Android清单文件,用于描述该应用程序的名字、版本号、所需权限、注册的服务、链接的其他应用程序。该文件使用XML文件格式,可以编译为二进制的XML,使用的工具为AXMLPrinter2或apktool 。
- classes.dex: classes文件通过DEX编译后的文件格式,用于在Dalvik虚拟机上运行的主要代码部分。
- resources.arsc:程序的语言文件,可以透过这软件用(AndroidResEdit等工具)来进行翻译,也可以用ApkTool等工具反编译后再开始进行软件修改。
Apk的反编译
unzip和反编译的区别
$ unzip testapp.apk
Archive:  testapp.apk
inflating: AndroidManifest.xml
inflating: classes.dex
extracting: res/drawable-hdpi/ic_launcher.png
inflating: res/xml/literals.xml
inflating: res/xml/references.xml
extracting: resources.arsc
However, at this point you have simply inflated compiled sources. If you tried to view AndroidManifest.xml. You'd be left viewing this.
�����������P��������������4���F���������������������0��\��f��n���v�e�r�s�i�o�n�C�o�d�e����v�e�r�s�i�o�n�N�a�m�e����a�n�d�r�o�i�d���*�h�t�t�p�:�/�/�s�c�h�e�m�a�s�.�a�n�d�r�o�i�d�.�c�o�m�/�a�p�k�/�r�e�s�/�a�n�d�r�o�i�d��������p�a�c�k�a�g�e����p�l�a�t�f�o�r�m�B�u�i�l�d�V�e�r�s�i�o�n�C�o�d�e����p�l�a�t�f�o�r�m�B�u�i�l�d�V�e�r�s�i�o�n�N�a�m�e����m�a�n�i�f�e�s�t����b�r�u�t�.�a�p�k�t�o�o�l�.�t�e�s�t�a�p�p����1�.�0����2�1����A�P�K�T�O�O�L����������������������������������������������������������������������������
Obviously, editing or viewing a compiled file is next to impossible. That is where Apktool comes into play.
$ apktool d testapp.apk
I: Using Apktool 2.0.0 on testapp.apk
I: Loading resource table...
I: Decoding AndroidManifest.xml with resources...
I: Loading resource table from file: 1.apk
I: Regular manifest package...
I: Decoding file-resources...
I: Decoding values */* XMLs...
I: Baksmaling classes.dex...
I: Copying assets and libs...
Viewing AndroidManifest.xml again results in something much more human readable
<?xml version="1.0" encoding="utf-8" standalone="no"?>
<manifest xmlns:android="https://schemas.android.com/apk/res/android" package="brut.apktool.testapp"
          platformBuildVersionCode="21" platformBuildVersionName="APKTOOL" />
In addition to XMLs, resources such as 9 patch images, layouts, strings, and much more are correctly decoded to source form.
Note
直接解压得到的文件为加密状态,不能直接查看,而经apktool等反编译工具反编译后得到的通常是解密后的文件,能够直接查看分析,apktool反编译得到的是smali格式文件
什么是smail格式代码?
我们都知道,Android代码一般是用java编写的,执行java程序一般需要用到java虚拟机,在Android平台上也不例外,但是出于性能上的考虑,并没有使用标准的JVM,而是使用专门的Android虚拟机(5.0以下为Dalvik,5.0以上为ART)。Android虚拟机的可执行文件并不是普通的class文件,而是再重新整合打包后生成的dex文件。dex文件反编译之后就是Smali代码,所以说,Smali语言是Android虚拟机的反汇编语言。
dextools反编译
dextools有许多转换工具,比如dex2jar可以将dex反编译为jar,从而可以以java代码的形式进行审计和分析
- 现在,我们需要做的是,转到命令提示符并访问 dex2jar 所在的文件夹。 接下来,我们需要运行
d2j-dex2jar.bat文件(在 Windows 上)或d2j-dex2jar.sh文件(在 Linux / Mac 上),并提供应用程序名称和路径作为参数。 这里的参数中,我们可以简单地使用.apk文件,或者我们甚至可以解压缩.apk文件,然后传递classes.dex文件,如下面的截图所示:

正如我们在上面截图中看到的,dex2jar 已经成功地将应用程序的.dex文件转换为名为helloworld-dex2jar.jar的.jar文件。 现在,我们可以在任何 Java 图形查看器(如 JD-GUI)中打开此.jar文件,JD-GUI 可以从其官方网站http://jd.benow.ca/下载。
- 一旦我们下载并安装 JD-GUI,我们现在可以继续打开它。 它看起来像下面的截图所示:
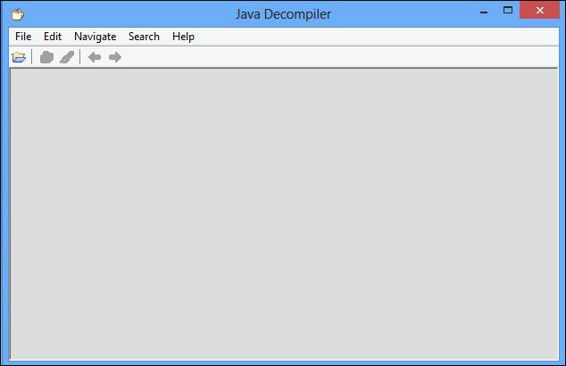
- 在这里,我们现在可以打开之前步骤中转换的
.jar文件,并查看 JD-GUI 中的所有 Java 源代码。 为了打开.jar文件,我们可以简单地访问File | Open。
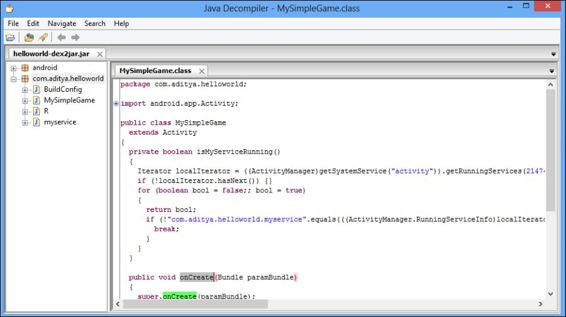
在右侧窗格中,我们可以看到 Java 应用程序的 Java 源代码和所有方法。 请注意,重新编译过程会为你提供原始 Java 源代码的近似版本。 这在大多数情况下无关紧要; 但是,在某些情况下,你可能会看到转换的.jar文件中缺少某些代码。 此外,如果应用程序开发人员使用一些防止反编译的保护,如 proguard 和 dex2jar,当我们使用 dex2jar 或 Apktool 反编译应用程序时,我们不会看到准确的源代码; 相反,我们将看到一堆不同的源文件,这不是原始源代码的准确表示。
Tip
进一步我们在jd-gui内保存代码为class和java格式,从而可以用其他文本编辑器打开,从而更加方便我们进行审计和分析
Apk脱壳
Android上的应用安装文件是apk格式,这个apk文件其实就是个归档文件压缩包,把应用相关的源码、资源文件、配置文件等乱七八糟的东西都简单粗暴的归档打包,其包内文件结构大体如下:
| 文件或目录 | 作用 |
|---|---|
| META-INF/ | 存放签名信息,用来保证apk包的完整性和系统的安全。 |
| res/ | 存放资源文件的目录 |
| libs/ | 若存在,则存放的是ndk编译出来的so文件库 |
| AndroidManifest.xml | 程序全局配置文件 |
| classes.dex | 最终生成的dalvik字节码 |
| resources.ars | 编译后的二进制资源文件。通常本地化、汉化资源存储在该文件文件中。 |
因此,我们将apk后缀改成zip压缩格式并直接解压就能得到app的dalvik指令集dex文件,然后再将其反编译为smali文件,还可以再反编译为java代码文件,这样就几乎等同于拿到了app就能拿到可读性还蛮清晰的源码,导致逆向破解的门槛几乎很低;没有做防范措施的app几乎等同于在裸奔,因此后来演变出来一些保护措施,让apk被反编译后获取的代码难理解。
混淆与加固
混淆和加固是两个非常不同的概念,在对apk进行逆向反编译的过程中,判断一个apk是被混淆了亦或是加固了则是有必要的,而两者的含义也是不同的,下面是两者的区别:
- 混淆
混淆,是一种类似障眼法的作用,让反编译后的代码阅读难度增加,本质上来说,并非是防止了反编译,而是增加了阅读难度,使得阅读的人无法通过名称猜测其用途。例如将要混淆类名和函数名,替换为无意义的短名称(如:OrderUtils. createOrder() -> A.b() )。虽然代码混淆可以提高反编译的门槛,但是对开发者本身也增大了调试除错的难度。开发人员通常需要保留原始未混淆代码用于调试。
- 加固
加固,可以理解为,将APK的外层加了一层壳,把重要数据信息隐藏起来,如果想反编译,必须突破这层壳的保护。加固后的APK,反编译出来,看到的只是外面那层壳的代码,可以防止应用被各类常见破解工具逆向,安全性要远大于单纯的代码混淆。
以上两种方式,混淆用于让apk被反编译后获取的代码难理解,加固用于让apk难于被反编译。两种操作都是对项目的安全措施,两个操作是不冲突的,可以选择其一,也可以两个操作都做。
Apk查壳
注:此处仅针对对apk是否加壳进行分析,对代码混淆判断不做详细介绍,代码混淆最常规的方法就是反编译dex后,使用工具浏览查看其中是否有相关类名或函数名被无意义的短名称替换。
在对apk是否加壳的判断上,我们可以使用以下几种方法:
方法一:判断apk是否加壳,可以先将apk后缀改为zip,再通过解压工具解压该zip文件,查看解压后的文件夹的根目录下是否含有classes.dex或classes2.dex等。若含有,可以通过jadx工具打开是否可以看到对应文件**完整代码**,这个是最简单的情况。
方法二:反编译AndroidManifest.xml 文件,然后遍历里面的activity、service、broadcast、provider等,看这几个class是否都存在于classes.dex文件里面。
方法三:一般做加固的厂商显然也是要在运行时对数据解密的,所以必然会有相应特征的Java代码或者是特征so文件打包在apk文件中,可以通过找这些东西来确定是否加固,而这也是主流加固工具判断的依据。常见的一些厂商加固的特征Java代码或特征so文件简单汇总如下:
| 厂商 | 常见特征so文件或其它文件 | 常见java代码(反编译classes.dex) |
|---|---|---|
| 娜迦 | libchaosvmp.so、libddog.so、libfdog.so | |
| 娜迦企业版 | libedog.so | |
| 爱加密 | libexec.so、libexecmain.so、ijiami.dat | s.h.e.l.l.S |
| 爱加密企业版 | ijiami.ajm | |
| 梆梆免费版 | libsecexe.so、libsecmain.so、libSecShell.so | com.secneo.apkwrapper.ApplicationWrapper、com.SecShell.SecShell.ApplicationWrapper、com.secneo.apkwrapper.AW |
| 梆梆企业版 | libDexHelper.so、libDexHelper-x86.so | |
| 360 | libprotectClass.so、libjiagu.so、libjiagu_art.so、libjiagu_x86.so、libjiagu_x64.so、libjiagu_a64.so | com.stub.StubApp |
| 通付盾 | libegis.so、libNSaferOnly.so | |
| 网秦 | libnqshield.so | |
| 百度 | libbaiduprotect.so | com.baidu.protect.StubApplication |
| 阿里聚安全 | aliprotect.dat、libsgmain.so、libsgsecuritybody.so、libmobisec.so | |
| 腾讯 | libtup.so、libexec.so、libshell.so、mix.dex、lib/armeabi/mix.dex、lib/armeabi/mixz.dex | com.tencent.StubShell.TxAppEntry |
| 腾讯御安全 | libtosprotection.armeabi.so、libtosprotection.armeabi-v7a.so、libtosprotection.x86.so | |
| 网易易盾 | libnesec.so | |
| APKProtect | libAPKProtect.so | |
| 几维安全 | libkwscmm.so、libkwscr.so、libkwslinker.so | |
| 顶像科技 | libx3g.so | |
| 盛大 | libapssec.so | |
| 瑞星 | librsprotect.so |
主流的Android app保护厂商的产品:梆梆、腾讯、爱加密、360、阿里和百度。这些厂商是来实现app的保护的相关原理如下:
360:将原有的dex文件加密后存储在libjiagu.so、libjiagu_art.so,在运行时动态释放并解密。
阿里:将原有的dex文件拆分为两部分,一部分主体保存为libmobisecy.so,另一部分包含了一部分class_data_item和code_item。在运行的时候将两部分释放在内存中,并修复相关的指针,恢复数据之间的连接关系。同时一些annotation_off被设置为无效的值。
百度:将一些class_data_item存储在dex文件的外部,在运行时恢复与主体的dex的连接关系。在dex文件加载后,其头部的魔数,校验和以及签名值会被擦除。同时某些方法被改写,使得其在执行前相关的指令才会被恢复,在执行之后便立即擦除。
梆梆:提前准备了一个odex或oat文件,并加密保存为外部的jar文件,运行时解密;同时hook了libc.so中的一些函数,如read,write,mmap等,监视其操作区域是否包含了dex的头部,保证无法使用这些函数对dex文件进行操作。
爱加密:同样是加密原有的dex文件,在运行时整体释放并解密,只不过其释放的处于固定路径下的临时文件的名字是随机的。
腾讯:提供选项可以指定需要保护的方法。如果某个方法被保护,则在dex文件中的相关class_data_item中无法看到其数据,即为一个假的class_data_item;在运行时释放真正的class_data_item并连接到dex文件上,但是其code_item却一直存在于原有的dex文件中。同样,一些annotation_off和debug_info_off被填充为无效值来阻止静态反编译。只支持在DVM环境下运行。
查壳工具
MT管理器
在左侧菜单栏点击安装包提取功能
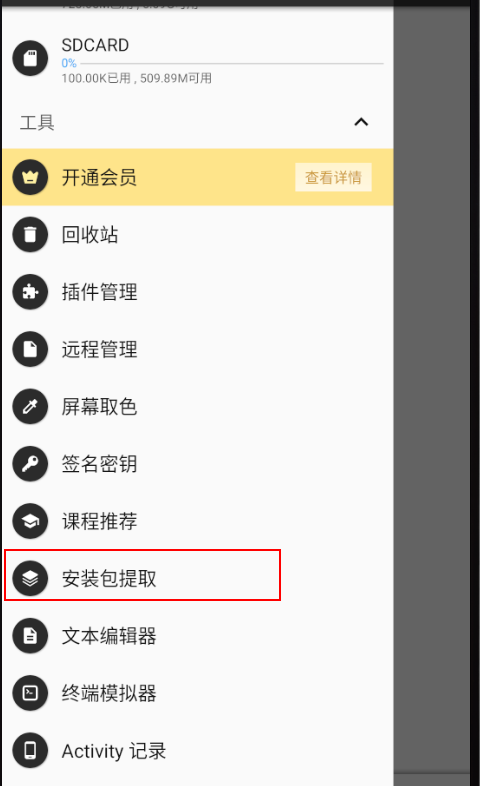
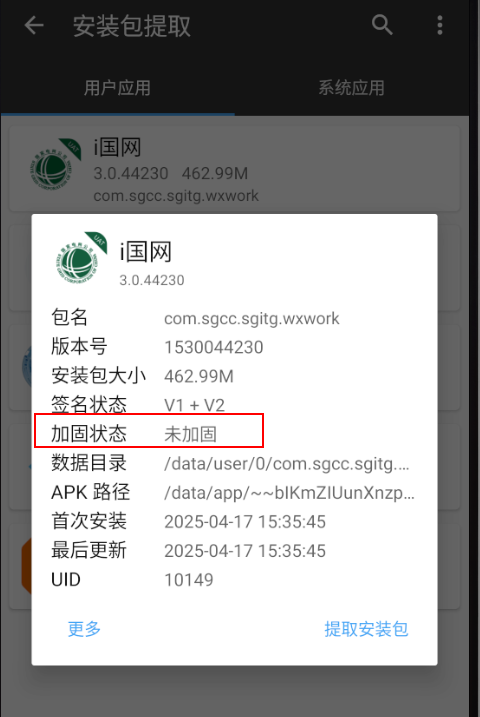
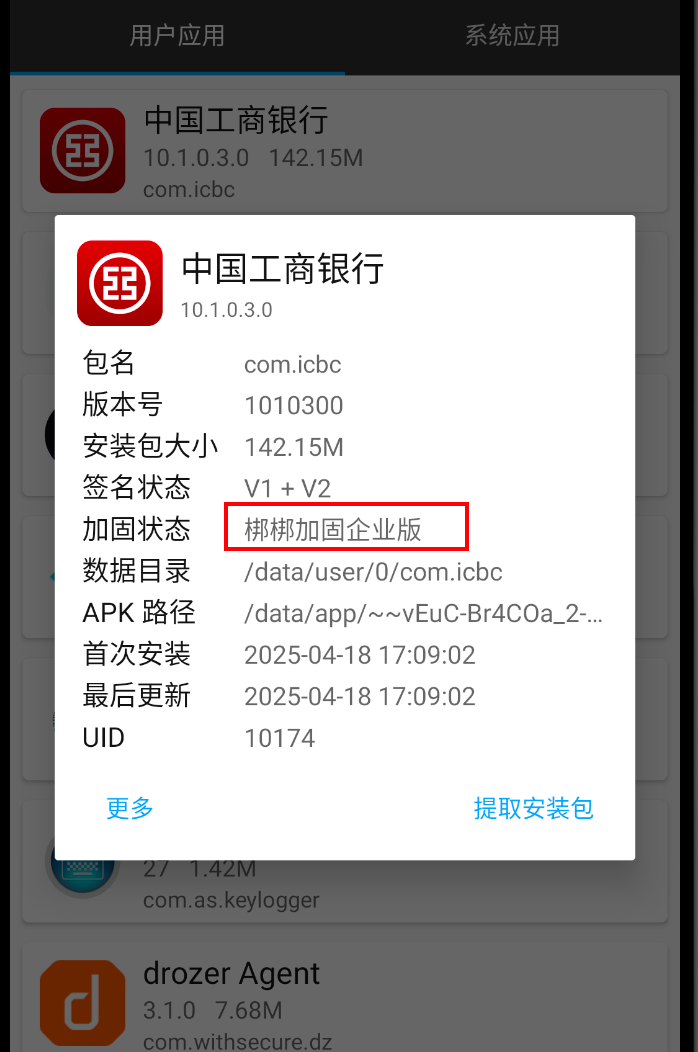
可以看到应用的加固(加壳)状态
Die
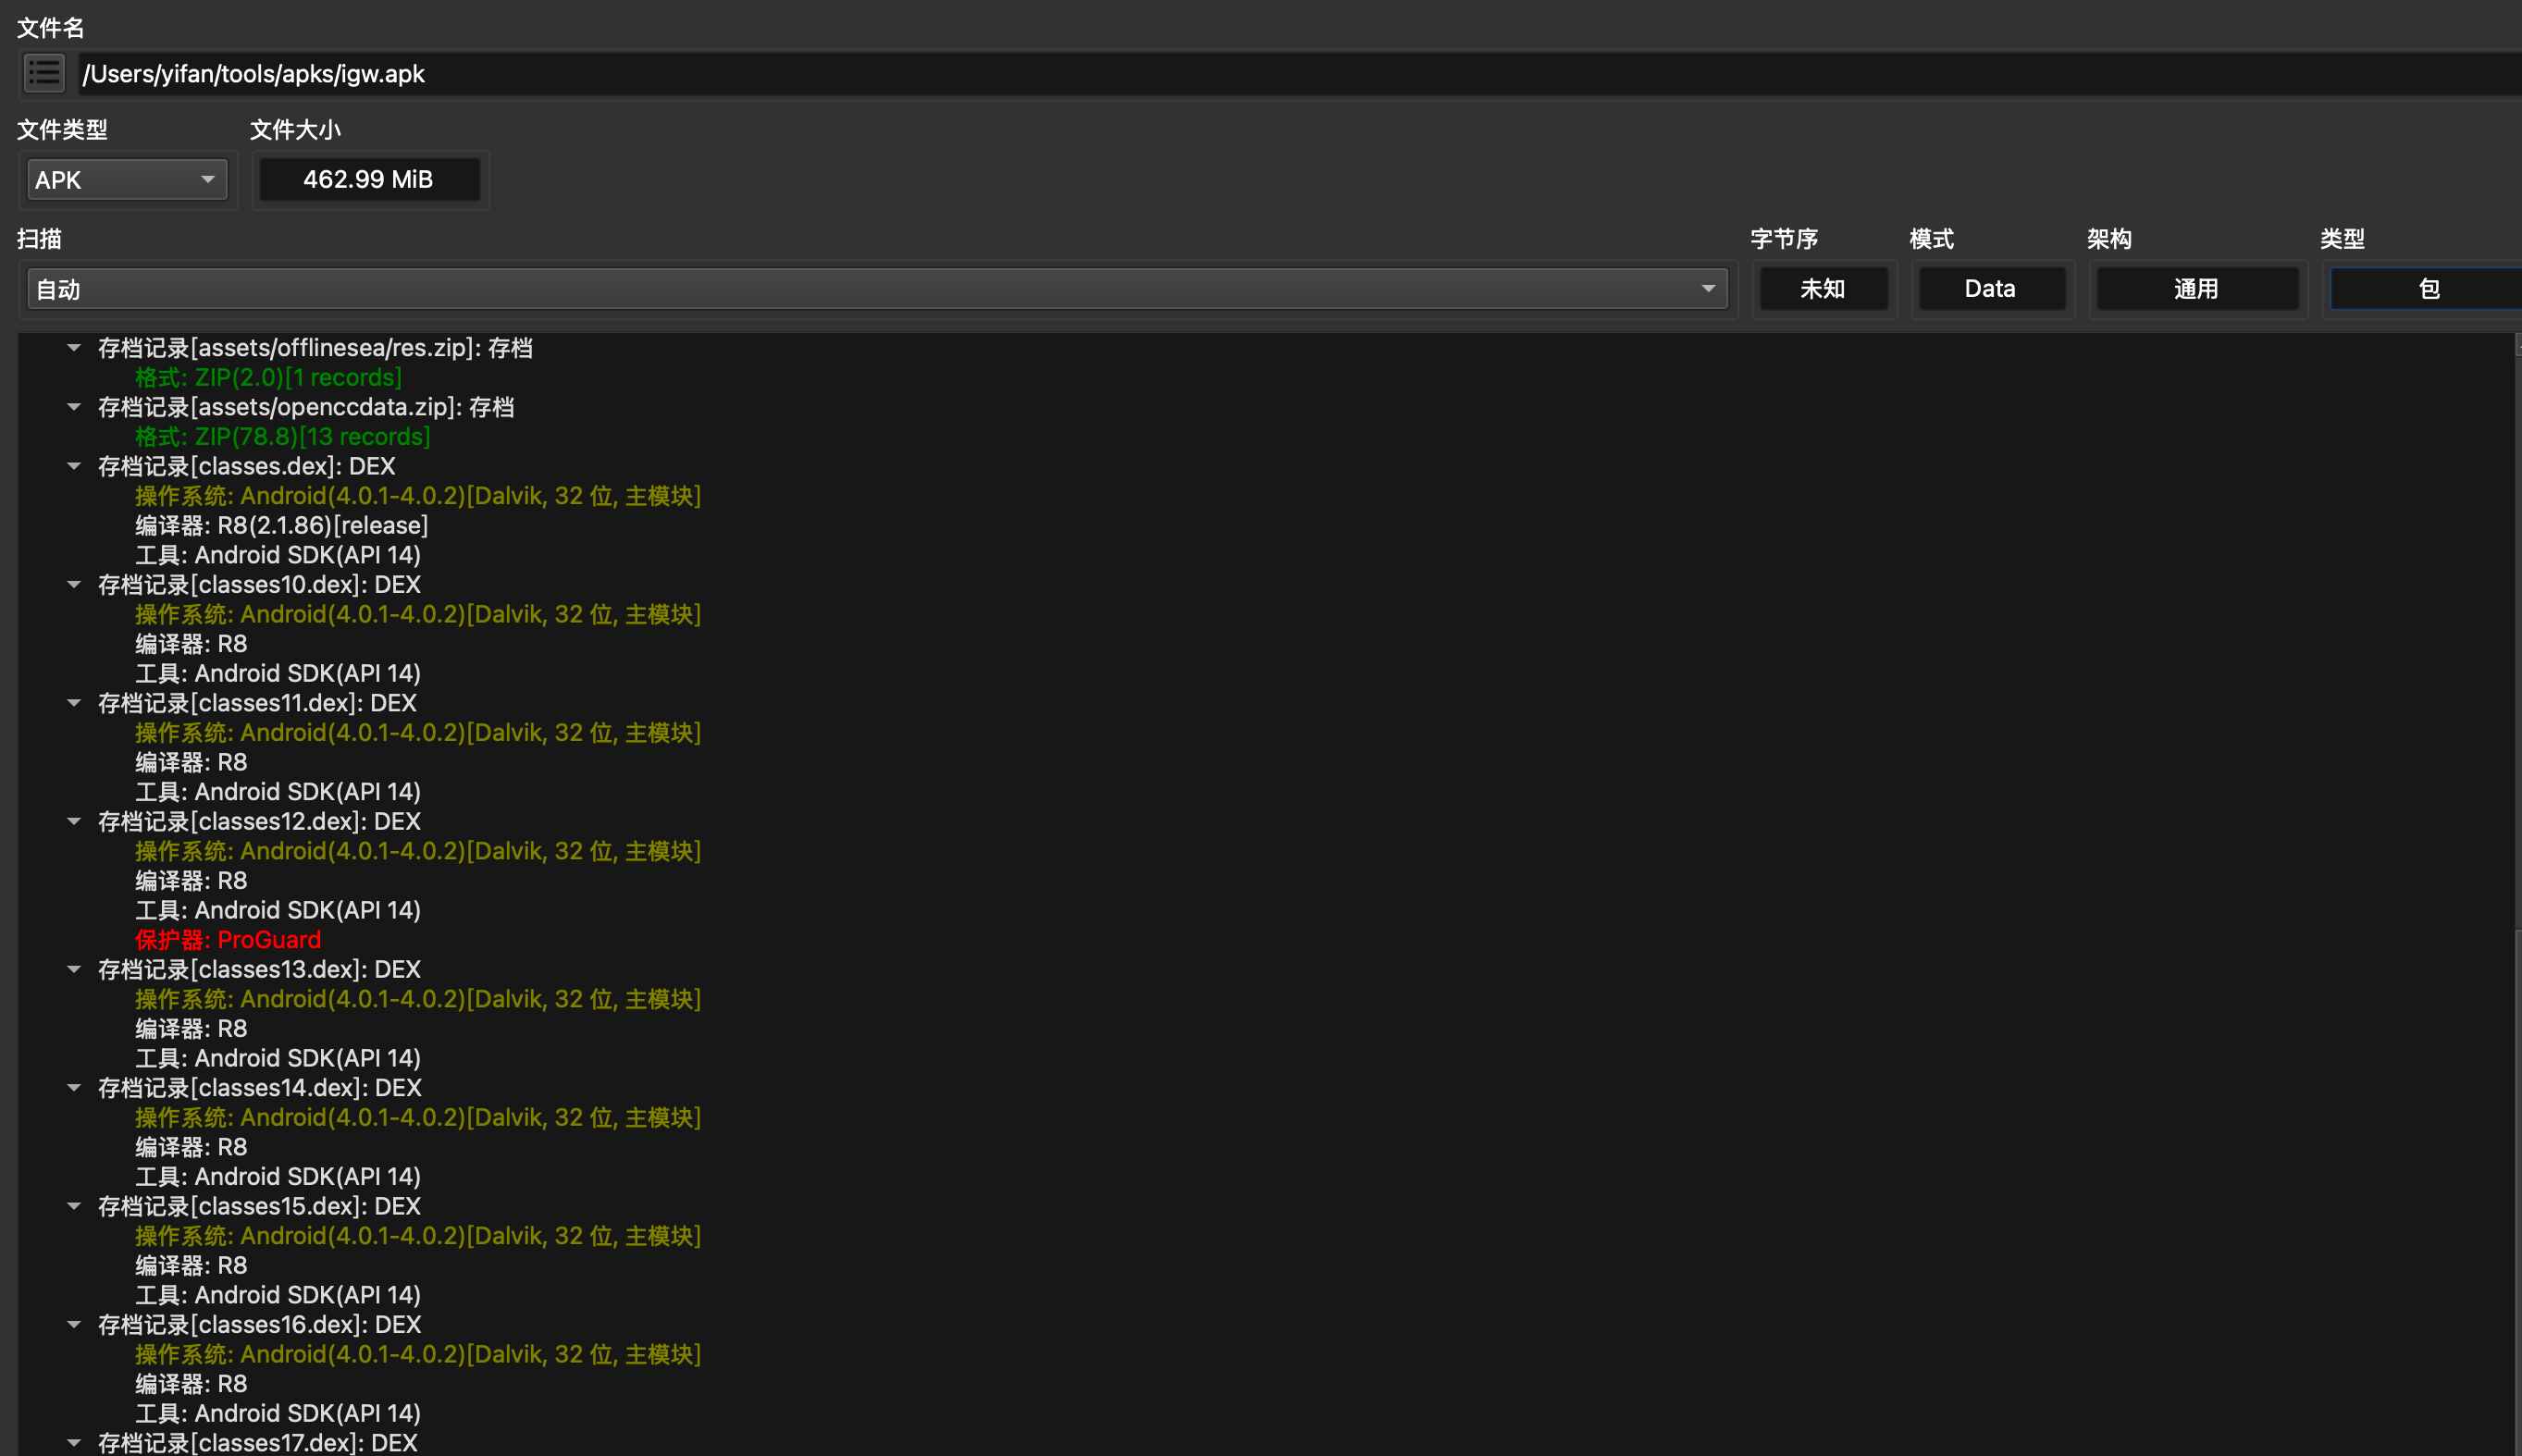
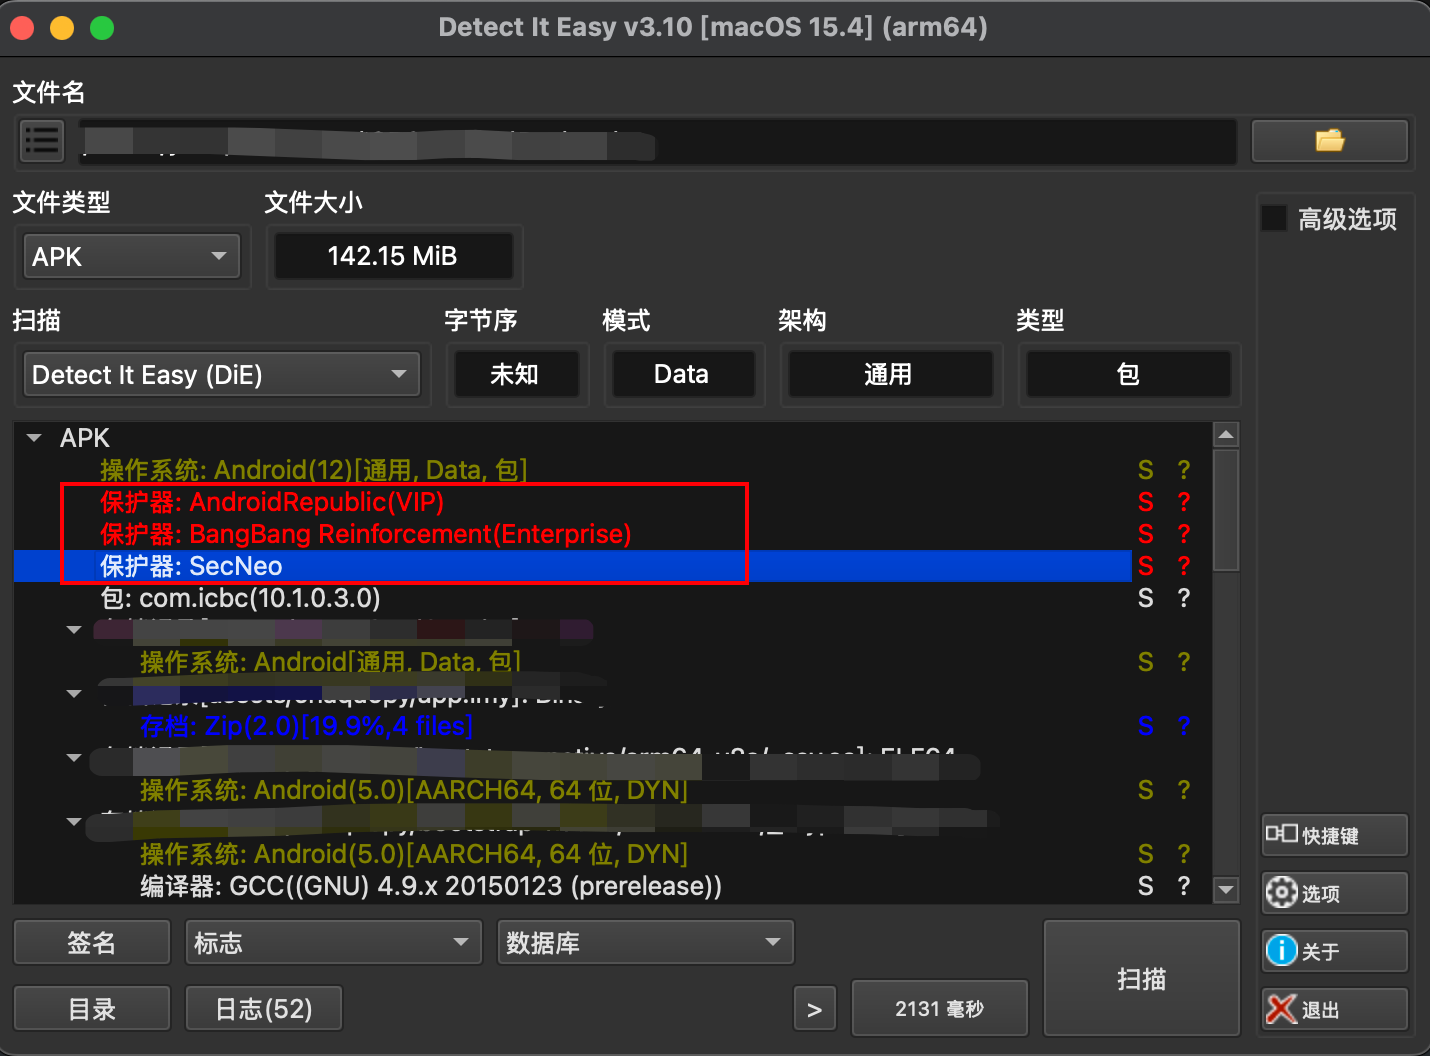
脱壳工具
- drizzleDumper
DrizzleRisk/drizzleDumper: drizzleDumper是一款基于内存搜索的Android脱壳工具。
参考文章
Reverse engineering using JADX
Let’s go ahead and reverse the APK file to examine the source code. Using JADX-GUI, we can directly open the APK file and read the application’s Java pseudocode. You can install this tool via the APT package manager on Linux by typing apt install jadxor downloading it from GitHub. Type jadx-gui to start the program, and load the demo.apk file.
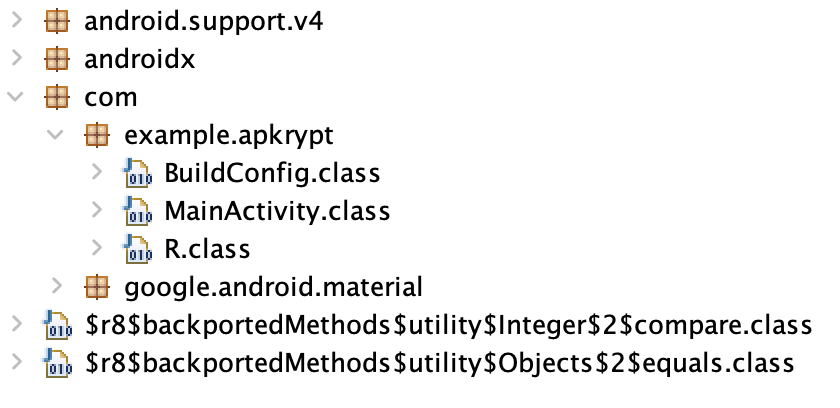
In some cases, source code can be obfuscated. Obfuscation is the process of making the code difficult for humans to read. Android Studio is using ProGuard for code obfuscation.
ProGuard is an open-source command-line tool that shrinks, optimizes, and obfuscates Java code. In a new Android Studio project, under the Grandle Scriptssection, there is a file called proguard-rules.pro where you can specify additional rules. Obfuscating the source code doesn’t mean it’s completely unreadable.
When obfuscating with ProGuard, all method names are replaced with letters like a, b, c, and so on. This way, it will be difficult for someone to understand the functionality of the app, and thus, it will partially protect it from reverse engineering. In Android Studio, code obfuscation is not enabled by default. To enable it you have to set the boolean variable minifyEnabled to true, in the build.gradle file.
ProGuard:
Guardsquare/proguard: ProGuard, Java optimizer and obfuscator (github.com)
.png)
Smail基础语法
https://www.jianshu.com/p/9931a1e77066
https://blog.csdn.net/chenrunhua/article/details/41250613
APK动态调试
动态调试原理
动态调试的原理可以概括为以下几个步骤:
- 启动应用程序进程:使用调试器或其他工具启动应用程序进程,并将其连接到调试器。
- 注入调试代码:在应用程序进程中注入调试代码,以便在应用程序运行时捕获相关信息。通常,调试代码会在应用程序的某些关键点设置断点,并在断点处暂停应用程序的执行。
一种常见的注入调试器代码的方法是使用操作系统提供的动态链接库(DLL)或共享库(SO)机制。在这种情况下,调试器会通过操作系统API加载一个特定的DLL或SO库,并将其注入到目标进程中。这个库可以包含调试器代码,也可以是其他形式的代码(例如钩子或代理),以便在进程运行时进行调试操作。
- 与调试器通信:一旦应用程序暂停,调试代码会与调试器通信,并将应用程序的状态和行为传递给调试器。调试器可以查看应用程序的栈、变量、线程等信息,并执行一些调试操作,例如单步执行、变量修改、内存查看等。
恢复应用程序执行:当调试器完成调试操作时,调试代码会通知应用程序继续执行,并从断点处恢复应用程序的执行。
动态调试前提
debuggable
debuggable是一个Android应用程序的属性,它指定应用程序是否允许调试器连接到应用程序进程。当debuggable属性设置为true时,调试器可以连接到应用程序进程,并且可以查看和修改应用程序的状态和行为。
在开发和测试应用程序时,将debuggable属性设置为true通常很有用,因为它允许开发人员使用调试器来快速定位和解决问题。例如,开发人员可以使用调试器来查看变量的值、执行代码行、设置断点等等。
然而,在将应用程序发布到生产环境之前,应该将debuggable属性设置为false,以提高应用程序的安全性。如果应用程序的debuggable属性设置为true,那么黑客可以使用调试器来查看应用程序的敏感数据、执行恶意代码等等,这将对应用程序的安全性造成极大的威胁。
需要注意的是,如果应用程序被加固或者使用了其他防护技术,可能无法将debuggable属性设置为true。此外,某些Android系统版本可能会限制应用程序的debuggable属性,因此在设置debuggable属性之前,请确保您了解应用程序的环境和限制。
在Android 4.2及更高版本中,Google对debuggable属性进行了限制,只有当应用程序的签名与系统签名相同时,才允许将debuggable属性设置为true。这是为了提高应用程序的安全性,防止黑客利用调试器来窃取应用程序的敏感信息。
在Android 7.0及更高版本中,Google进一步加强了对debuggable属性的限制,只有在应用程序的AndroidManifest.xml文件中显式声明android:debuggable=”true”时,才允许将debuggable属性设置为true。这是为了防止应用程序在生产环境中意外地启用了调试功能,从而降低了应用程序的安全性。
ro.debuggable
ro.debuggable是 Android 系统属性,它表示整个 Android 系统是否处于调试模式下。当设置为 1 时,整个系统可以被调试器连接并进行调试。当设置为 0 时,整个系统不能被调试器连接,这可以增加系统的安全性。
要将整个系统设置为调试模式,需要将系统属性 ro.debuggable 设置为 1。这可以通过在设备的命令行界面上运行以下命令来实现:
通过将 ro.debuggable 设置为 1,整个 Android 系统就可以在调试模式下运行,并允许调试器连接到系统上的所有应用程序进行调试。

但该属性为通常为只读,无法使用命令修改,此时我们需要修改/system/etc/prop.default 或 /default.prop 文件,将 ro.debuggable 的值修改为 0,随后重启设备让其生效
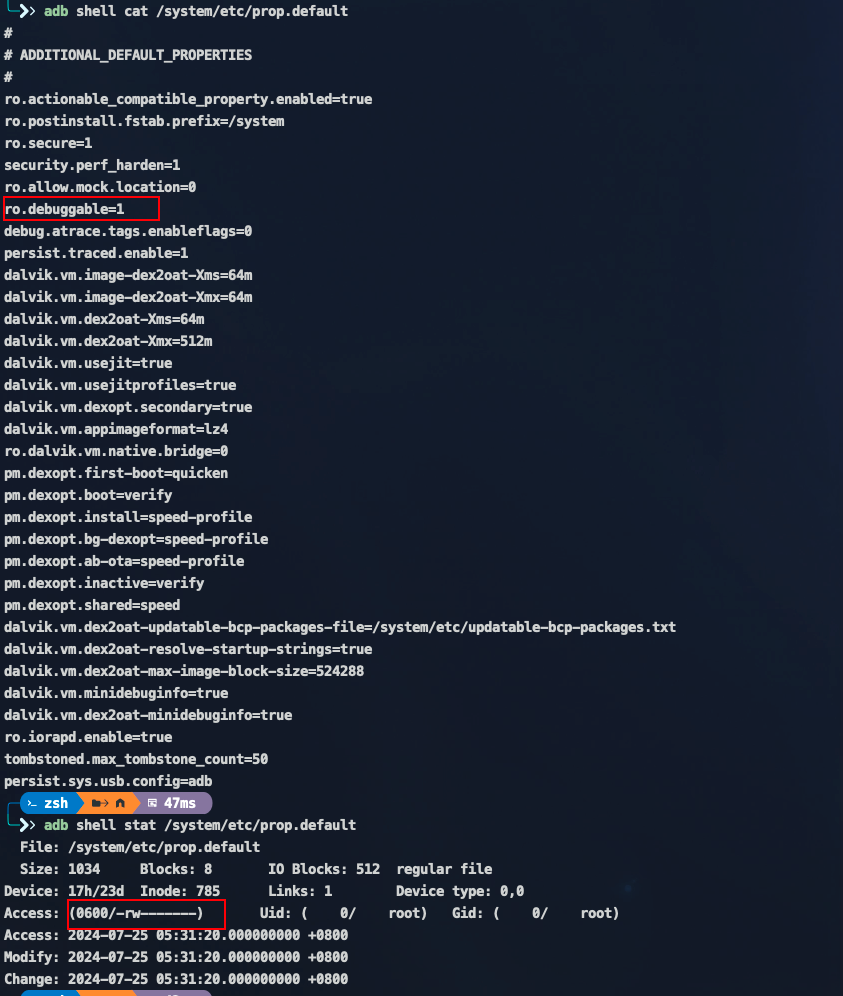
随后以root权限修改即可
sed 's/ro.debuggable=1/ro.debuggable=0/g' /system/etc/prop.default > /system/etc/prop.default.tmp
mv /system/etc/prop.default.tmp /system/etc/prop.default
# 或修改/default.prop
Note
该方法有概率导致模拟器开机卡死,建议使用下面的方法
优先级:ro.debuggable > debuggable,系统debug选项优先级高于应用程序的debug选项
Jadx调试
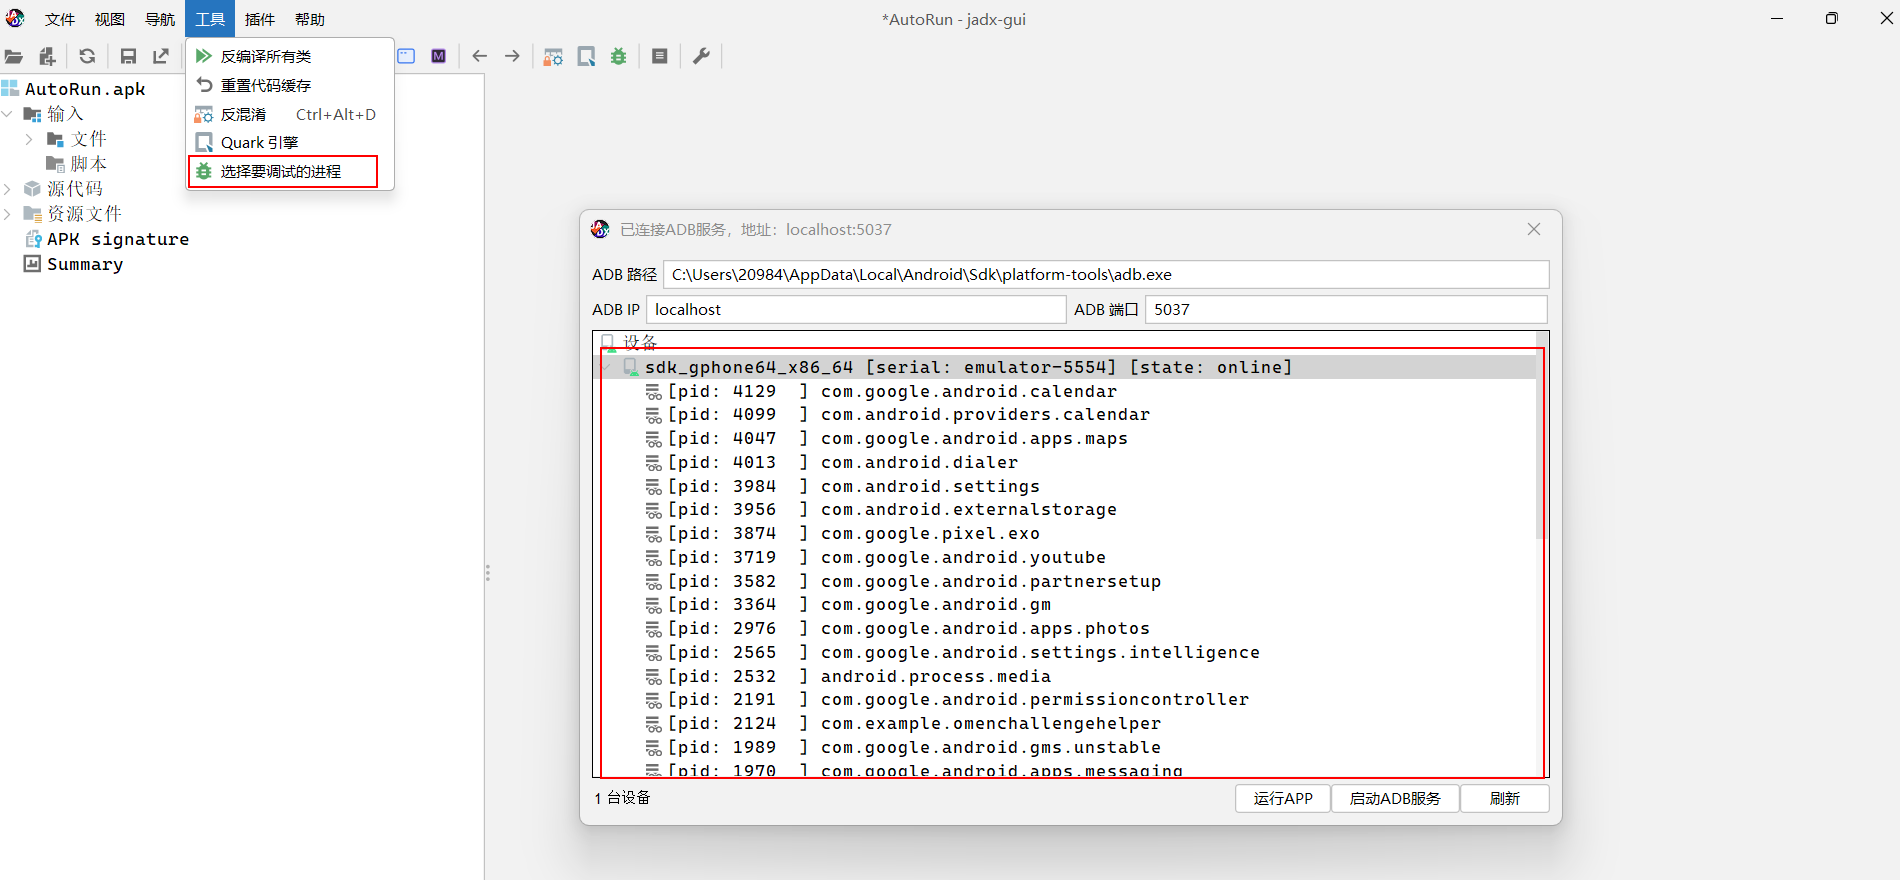
选择要调试的进程
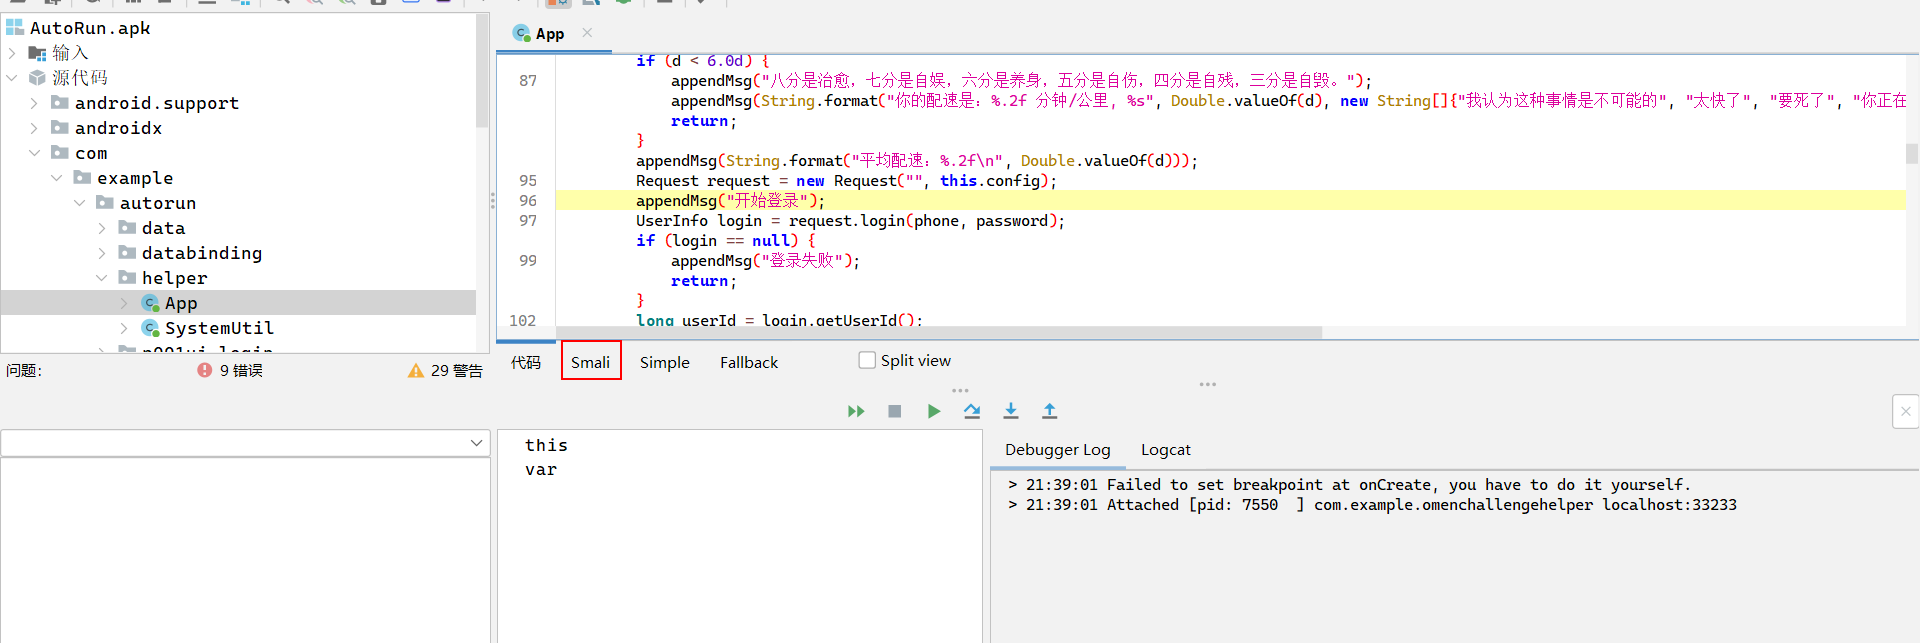
进入调试模式后,在想要打断点的java代码语句的smail代码处打断点(F2)
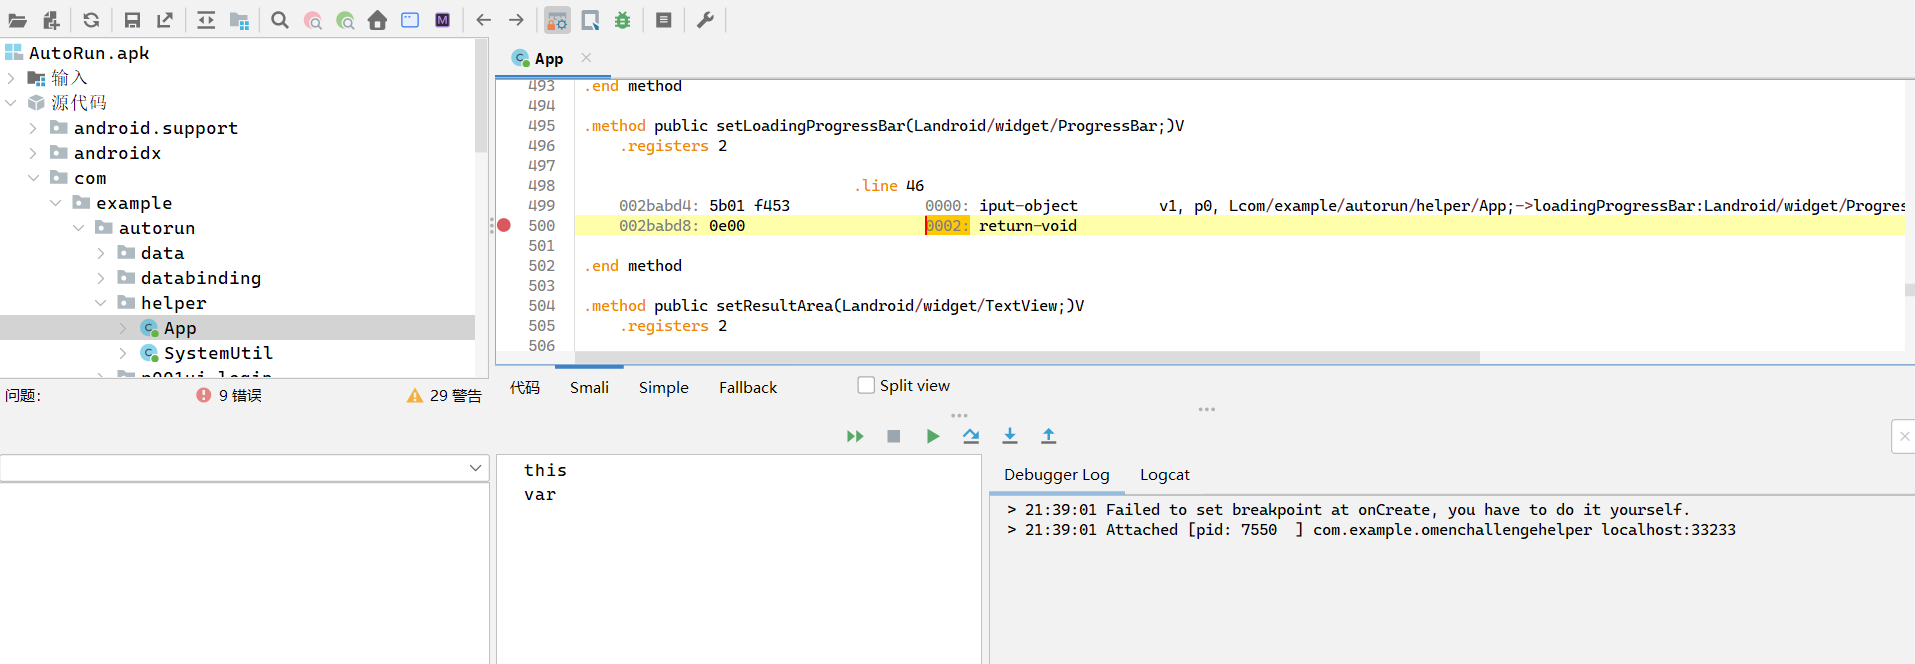
随后点击运行该进程
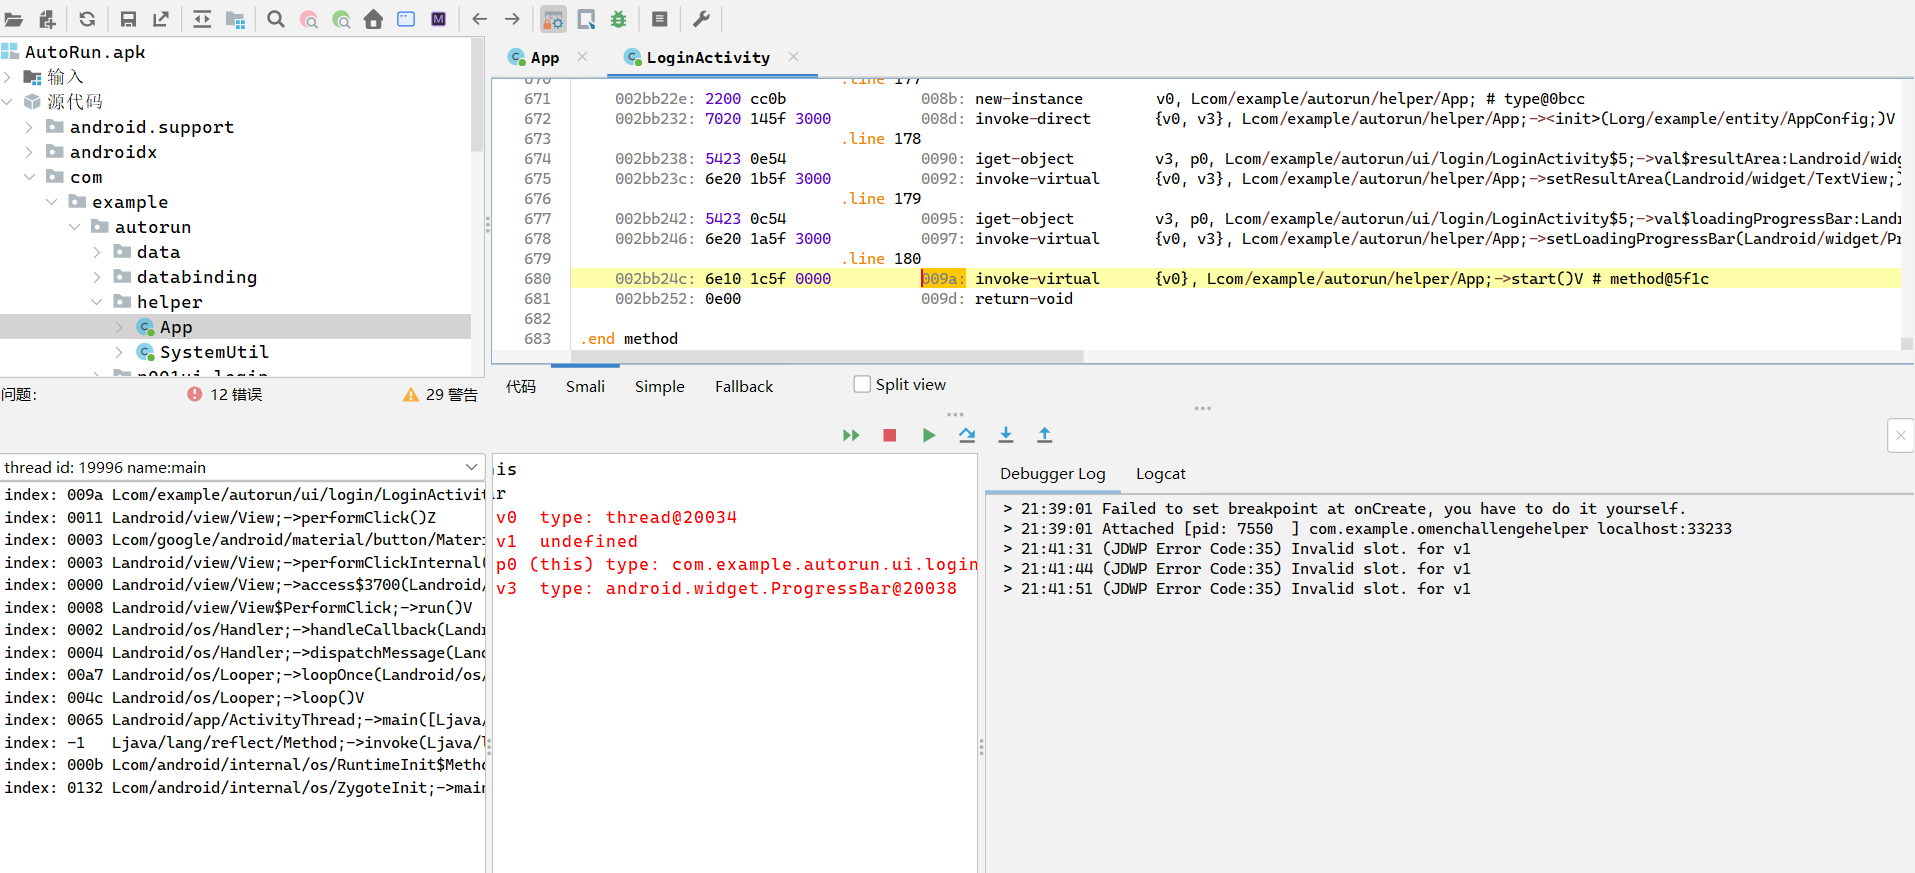
随后在app操作触发调试
Note
需要注意的是,模拟器需要是root权限,否则可选的进程由于权限原因会少很多
Frida+Objection
这里采用frida配合objection的方式
sensepost/objection: 📱 objection - runtime mobile exploration
环境配置
| 工具 | 版本 |
|---|---|
| objection | 1.11.0 |
| frida | 16.2.1 |
| frida-tools | 12.3.0 |
| frida-server | 16.2.1 |
| python | >3 |
Note
注意点:objection不支持最新版本的frida,frida-server的版本要和frida一致,frida-server要下载对应架构的版本(amd、x86_64等),frida-tools版本要和frida版本对应
具体配置
- 移动端
首先将frida-server传输到手机
随后授予frida-server可执行权限
最后手机端执行frida-server
- 主机端
上述步骤完成后,主机端验证
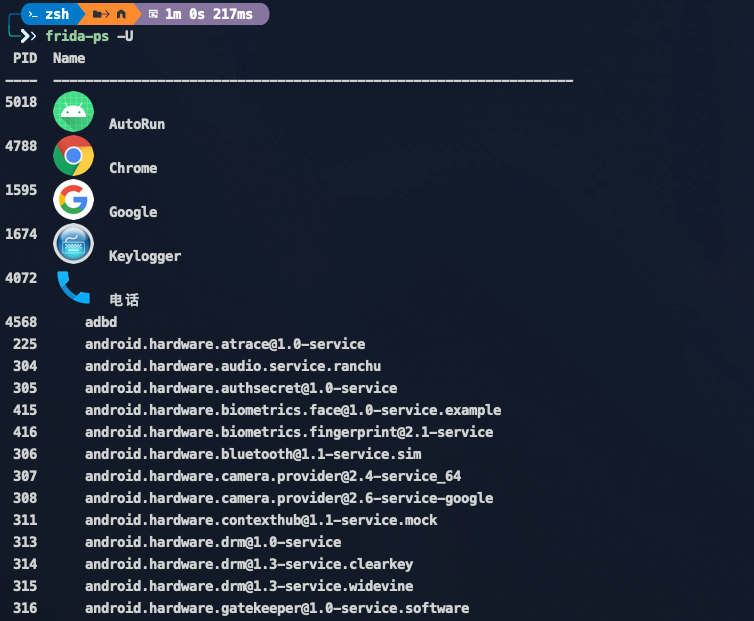
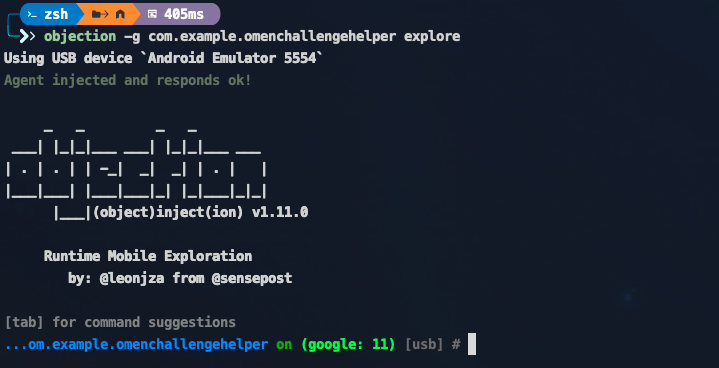
至此所有工具配置完成
参考文章:
[原创]【iOS逆向与安全】frida-trace命令大全-iOS安全-看雪-安全社区|安全招聘|kanxue.com
frida-trace | Frida • A world-class dynamic instrumentation toolkit
Objection常用命令/操作
当不知道命令时,使用空格会出现可以使用的命令提示

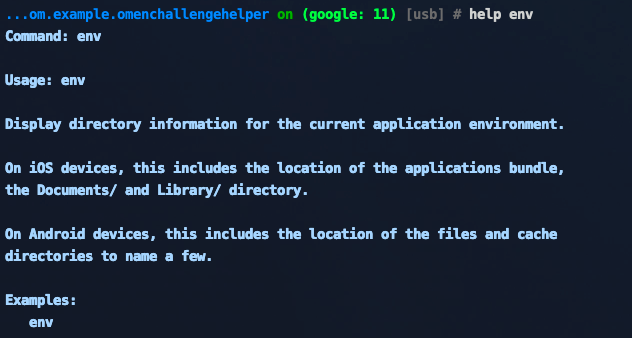
help命令
不知道当前命令效果时,在当前命令前加help(如help env)再回车就会出现当前命令的解释信息
jobs命令
用于查看和管理当前所执行Hook的任务,可以同时运行多项Hook作业。
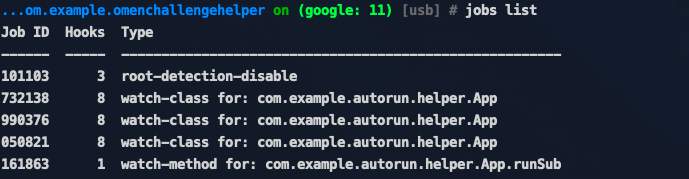
可以通过Job ID来停止Hook事件
内存相关命令
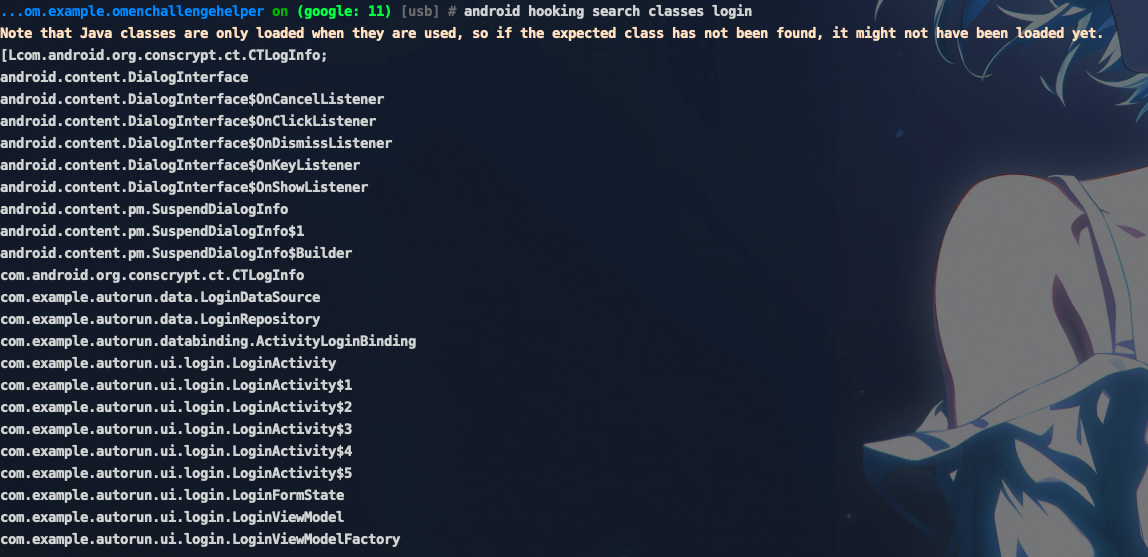
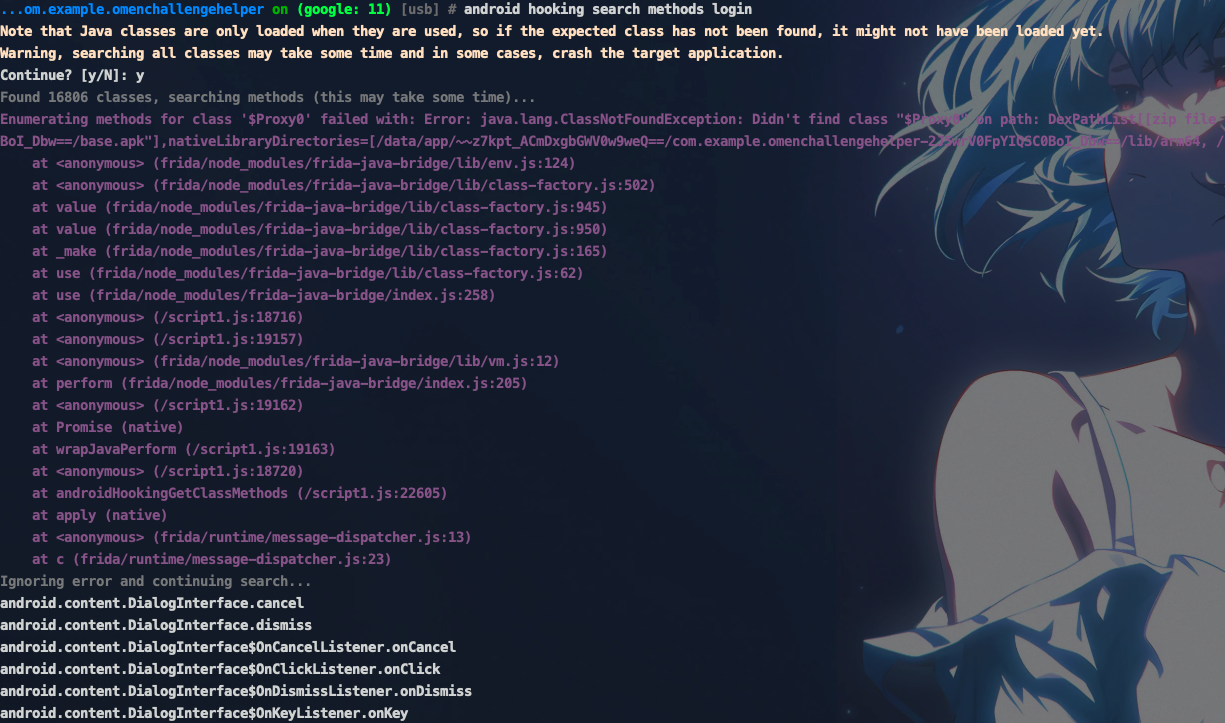

四大组件相关
# 列出所有的activities
android hooking list activities
# 列出所有的services
android hooking list services
# 以此类推,可列出receivers和providers

Hook相关命令
# hook指定的类(包括参数、堆栈和返回值)
android hooking watch class <methodName> --dump-args --dump-backtrace --dump-return

# hook指定的类方法(包括参数、堆栈和返回值)
android hooking watch class_method <class_method> --dump-args --dump-backtrace --dump-return

Hook到了参数
调用实例类或方法

# 调用实例方法(无参数)
android heap execute <hashcode> <method_name>
# 调用实例方法(有参数)
android heap evaluate <hashcode>
APK逆向示例
Demoapp 重打包
Apk下载地址:https://github.com/aszx87410/demo/raw/master/android/demoapp.apk
App页面
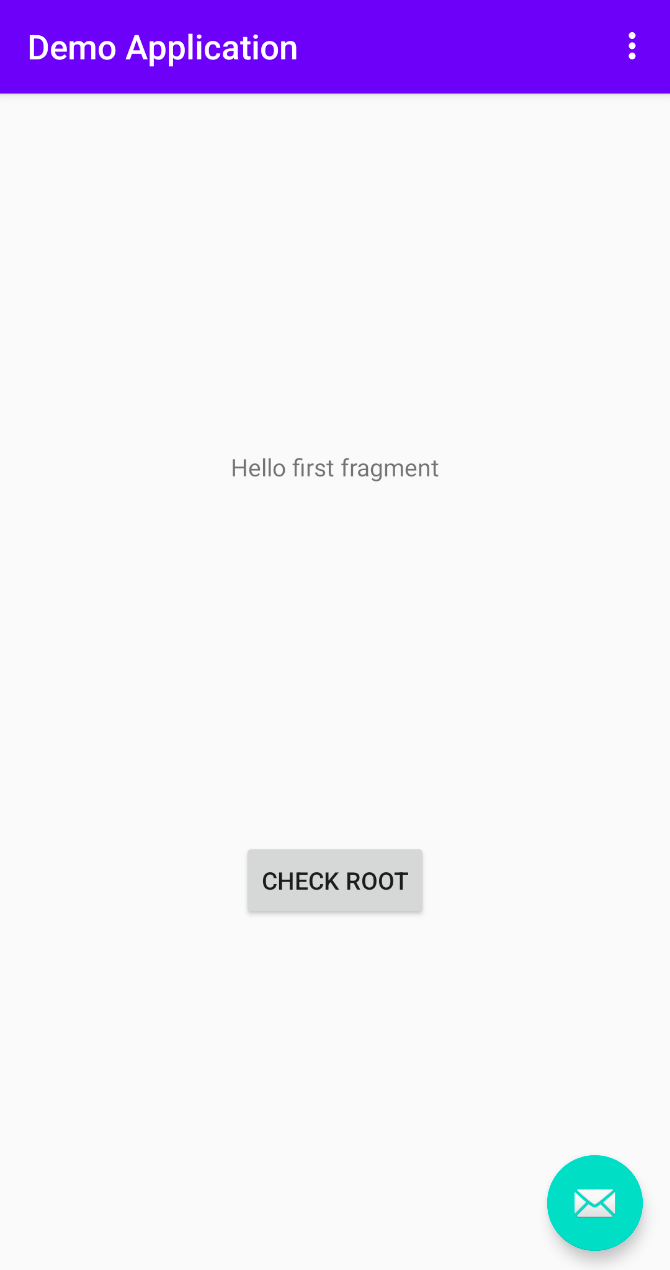
当点击CHECK ROOT按钮后会检测当前环境是否为root,如果是root,会回显Rooted!,点击右下角的邮件按钮,会弹出一行提示"Replace with your own action"
反编译
# d stands for decode
# -f stands for --force, delete demoapp folder first if exists
# -p stands for --output
apktool d demoapp.apk -f -o ./demoapp
首先使用apktool反编译apk
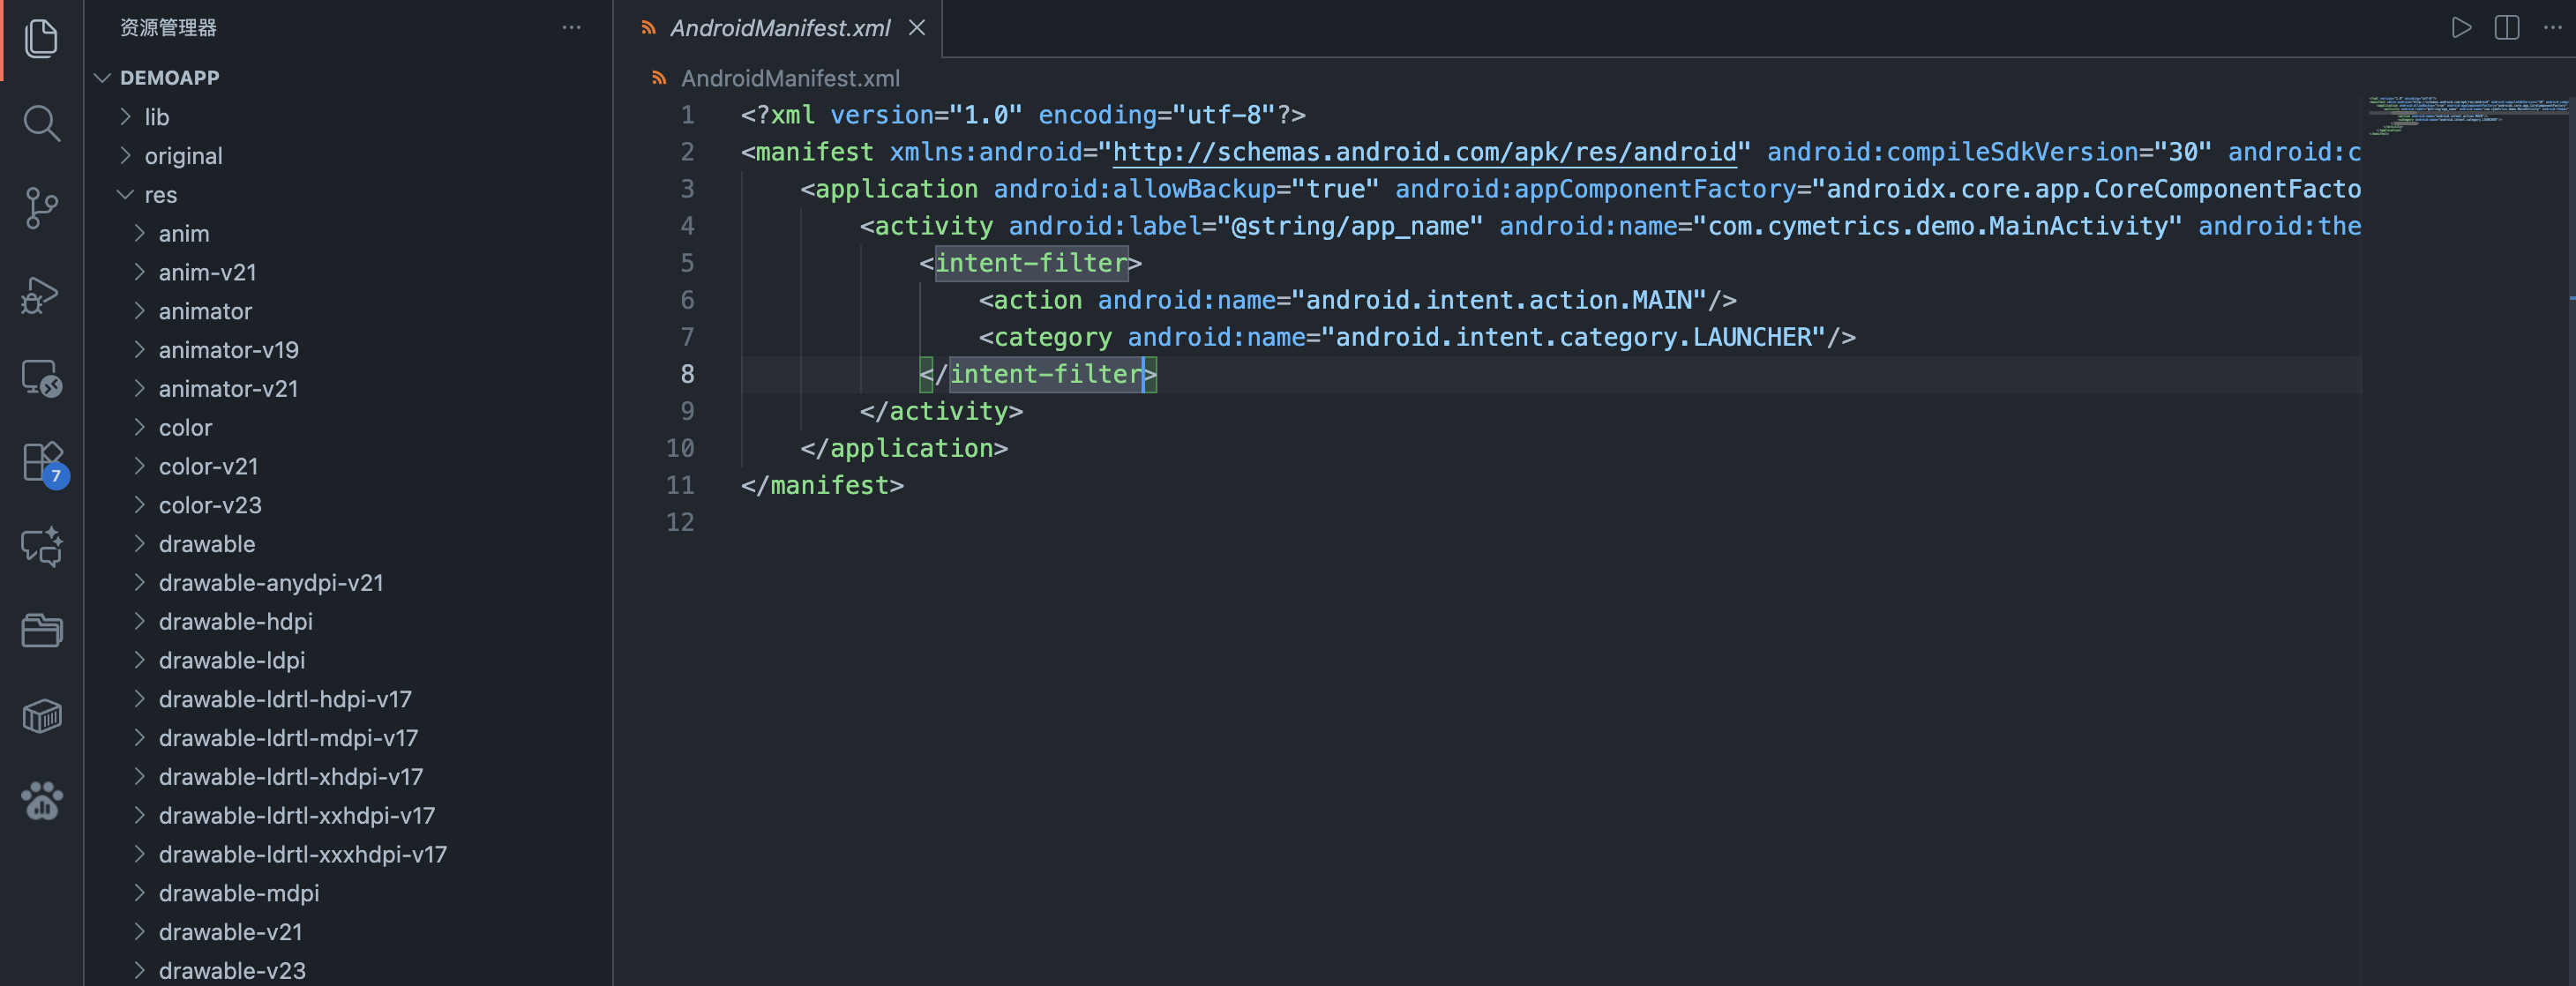
编译完后随意使用一个编辑器打开
修改源文件
静态资源修改
存放静态资源的文件夹为res,app的图片、UI字符串等通常存放在此处,比如我们想将"Check Root"修改为"Check Root Hacked!",只需要全局搜索字符串关键字
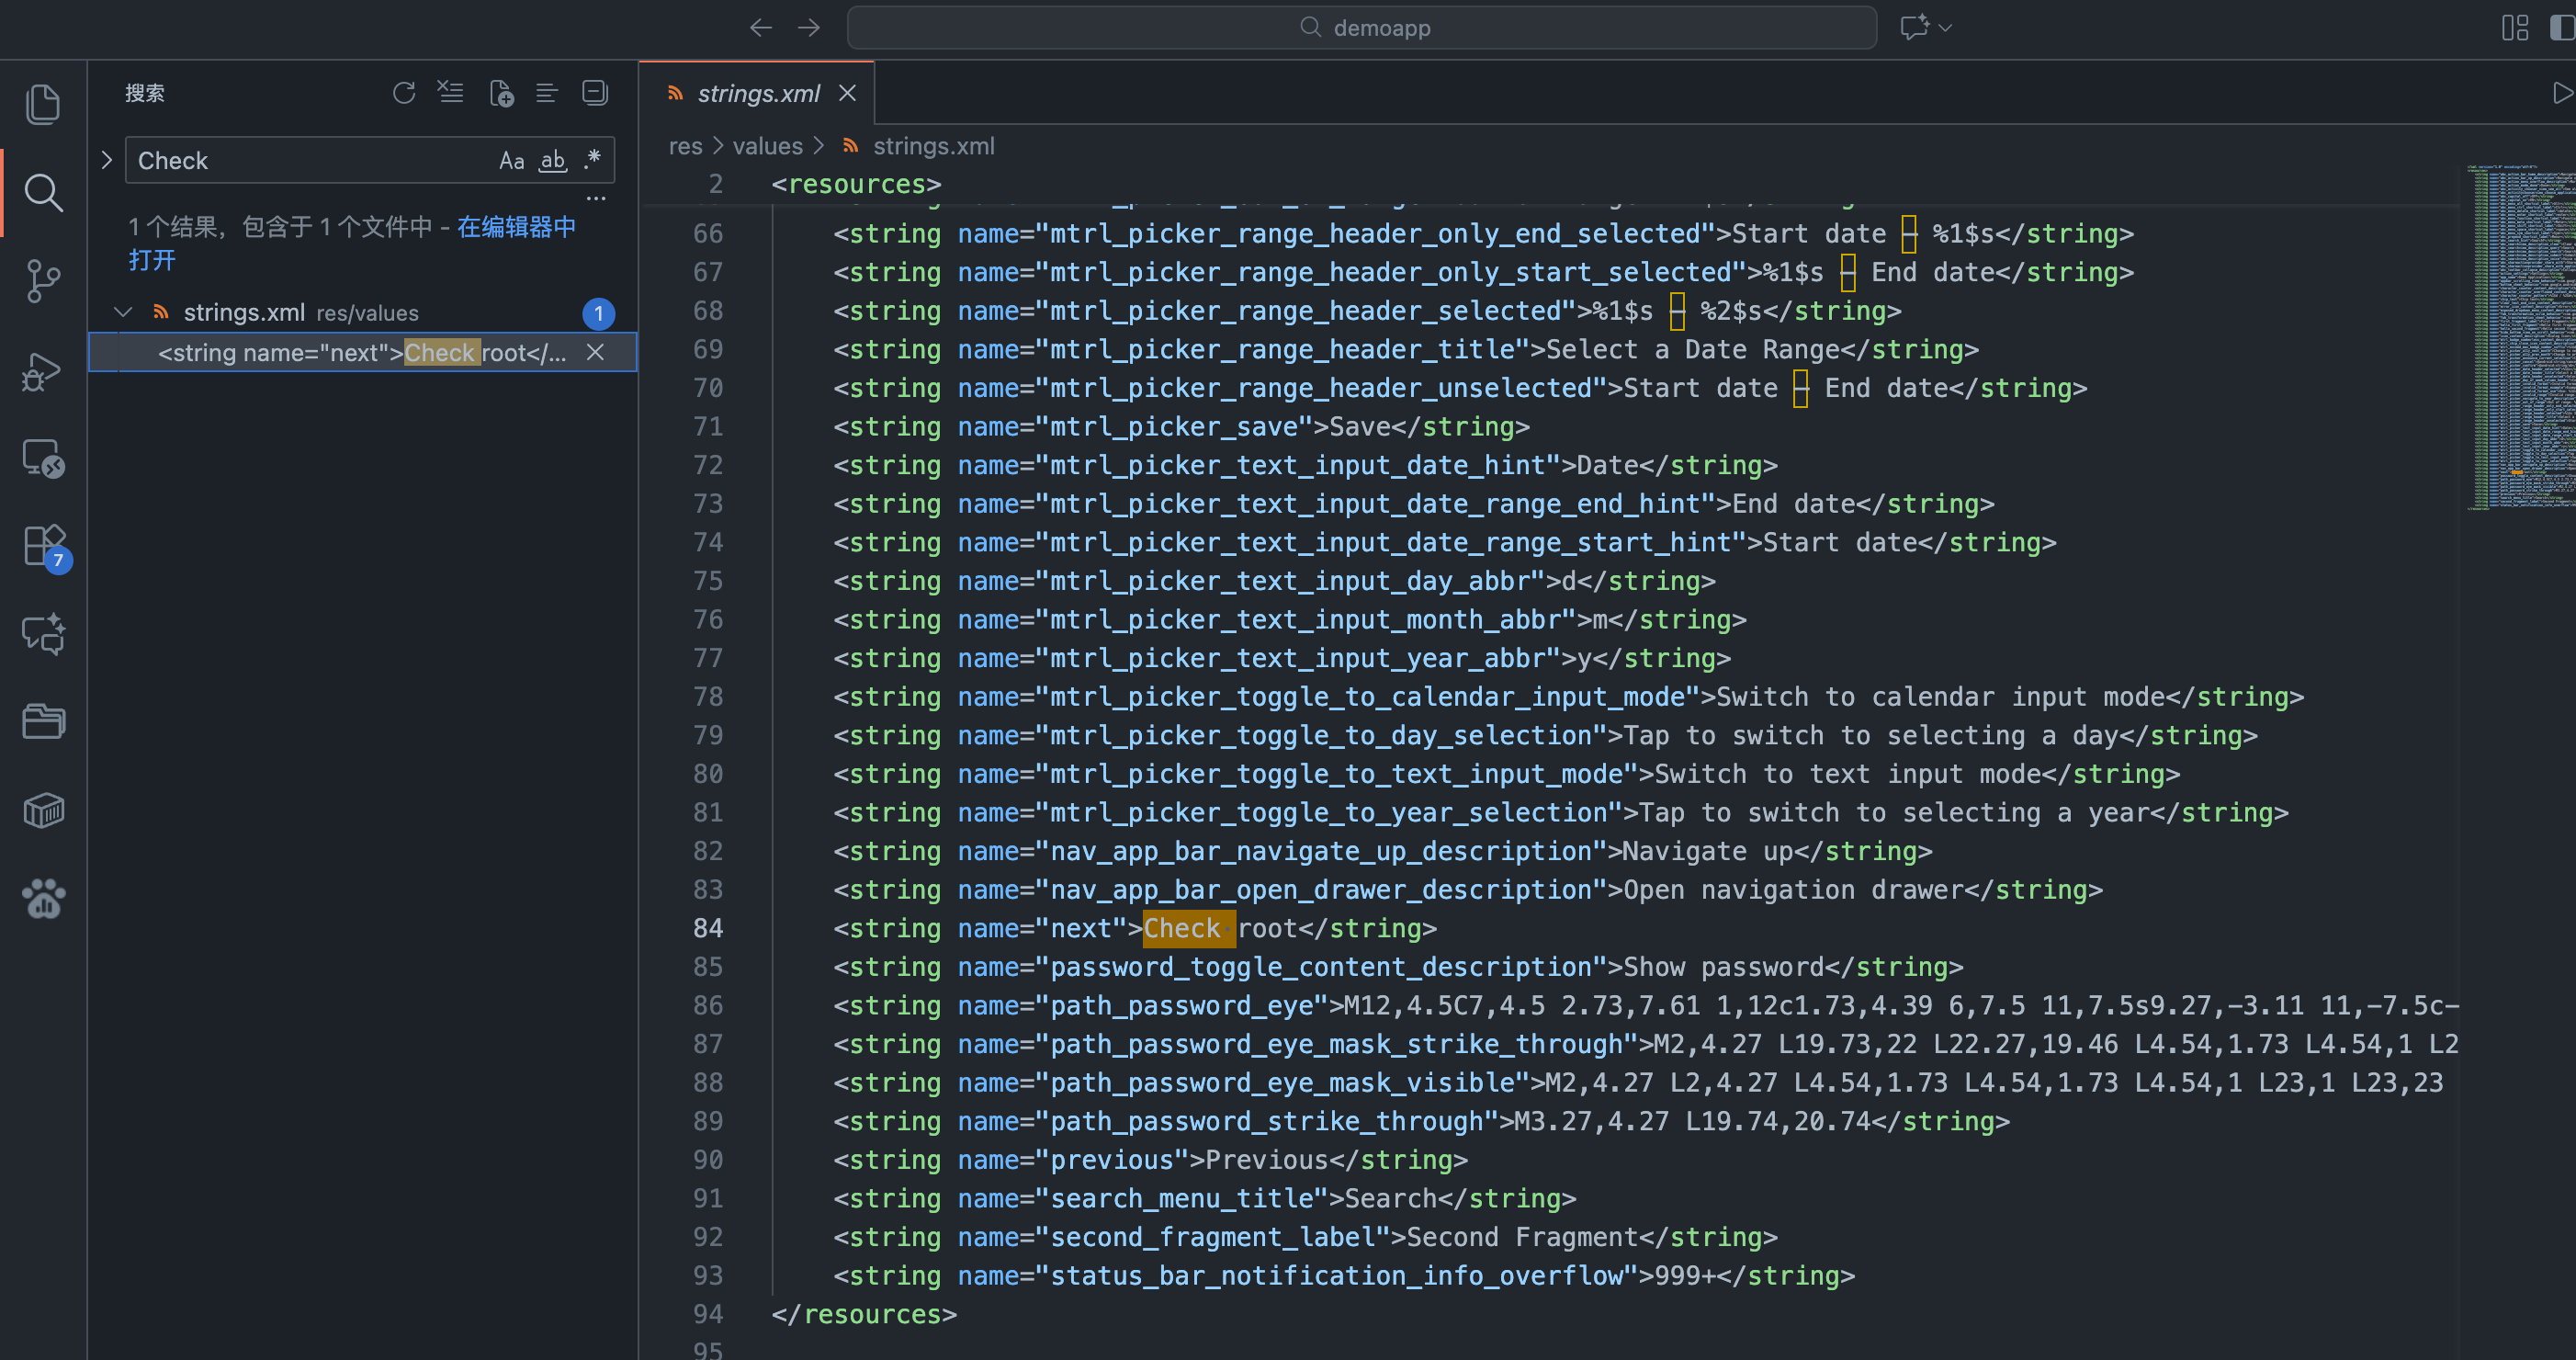
定位到res/values/string.xml文件夹中,事实上该文件夹通常存放静态的字符串,我们将其修改
代码文件修改
要实现代码文件的修改需要修改smail文件,我们进入smail/com/cymetrics/demo/MainActivity.smail,这是主activity组件的smail代码
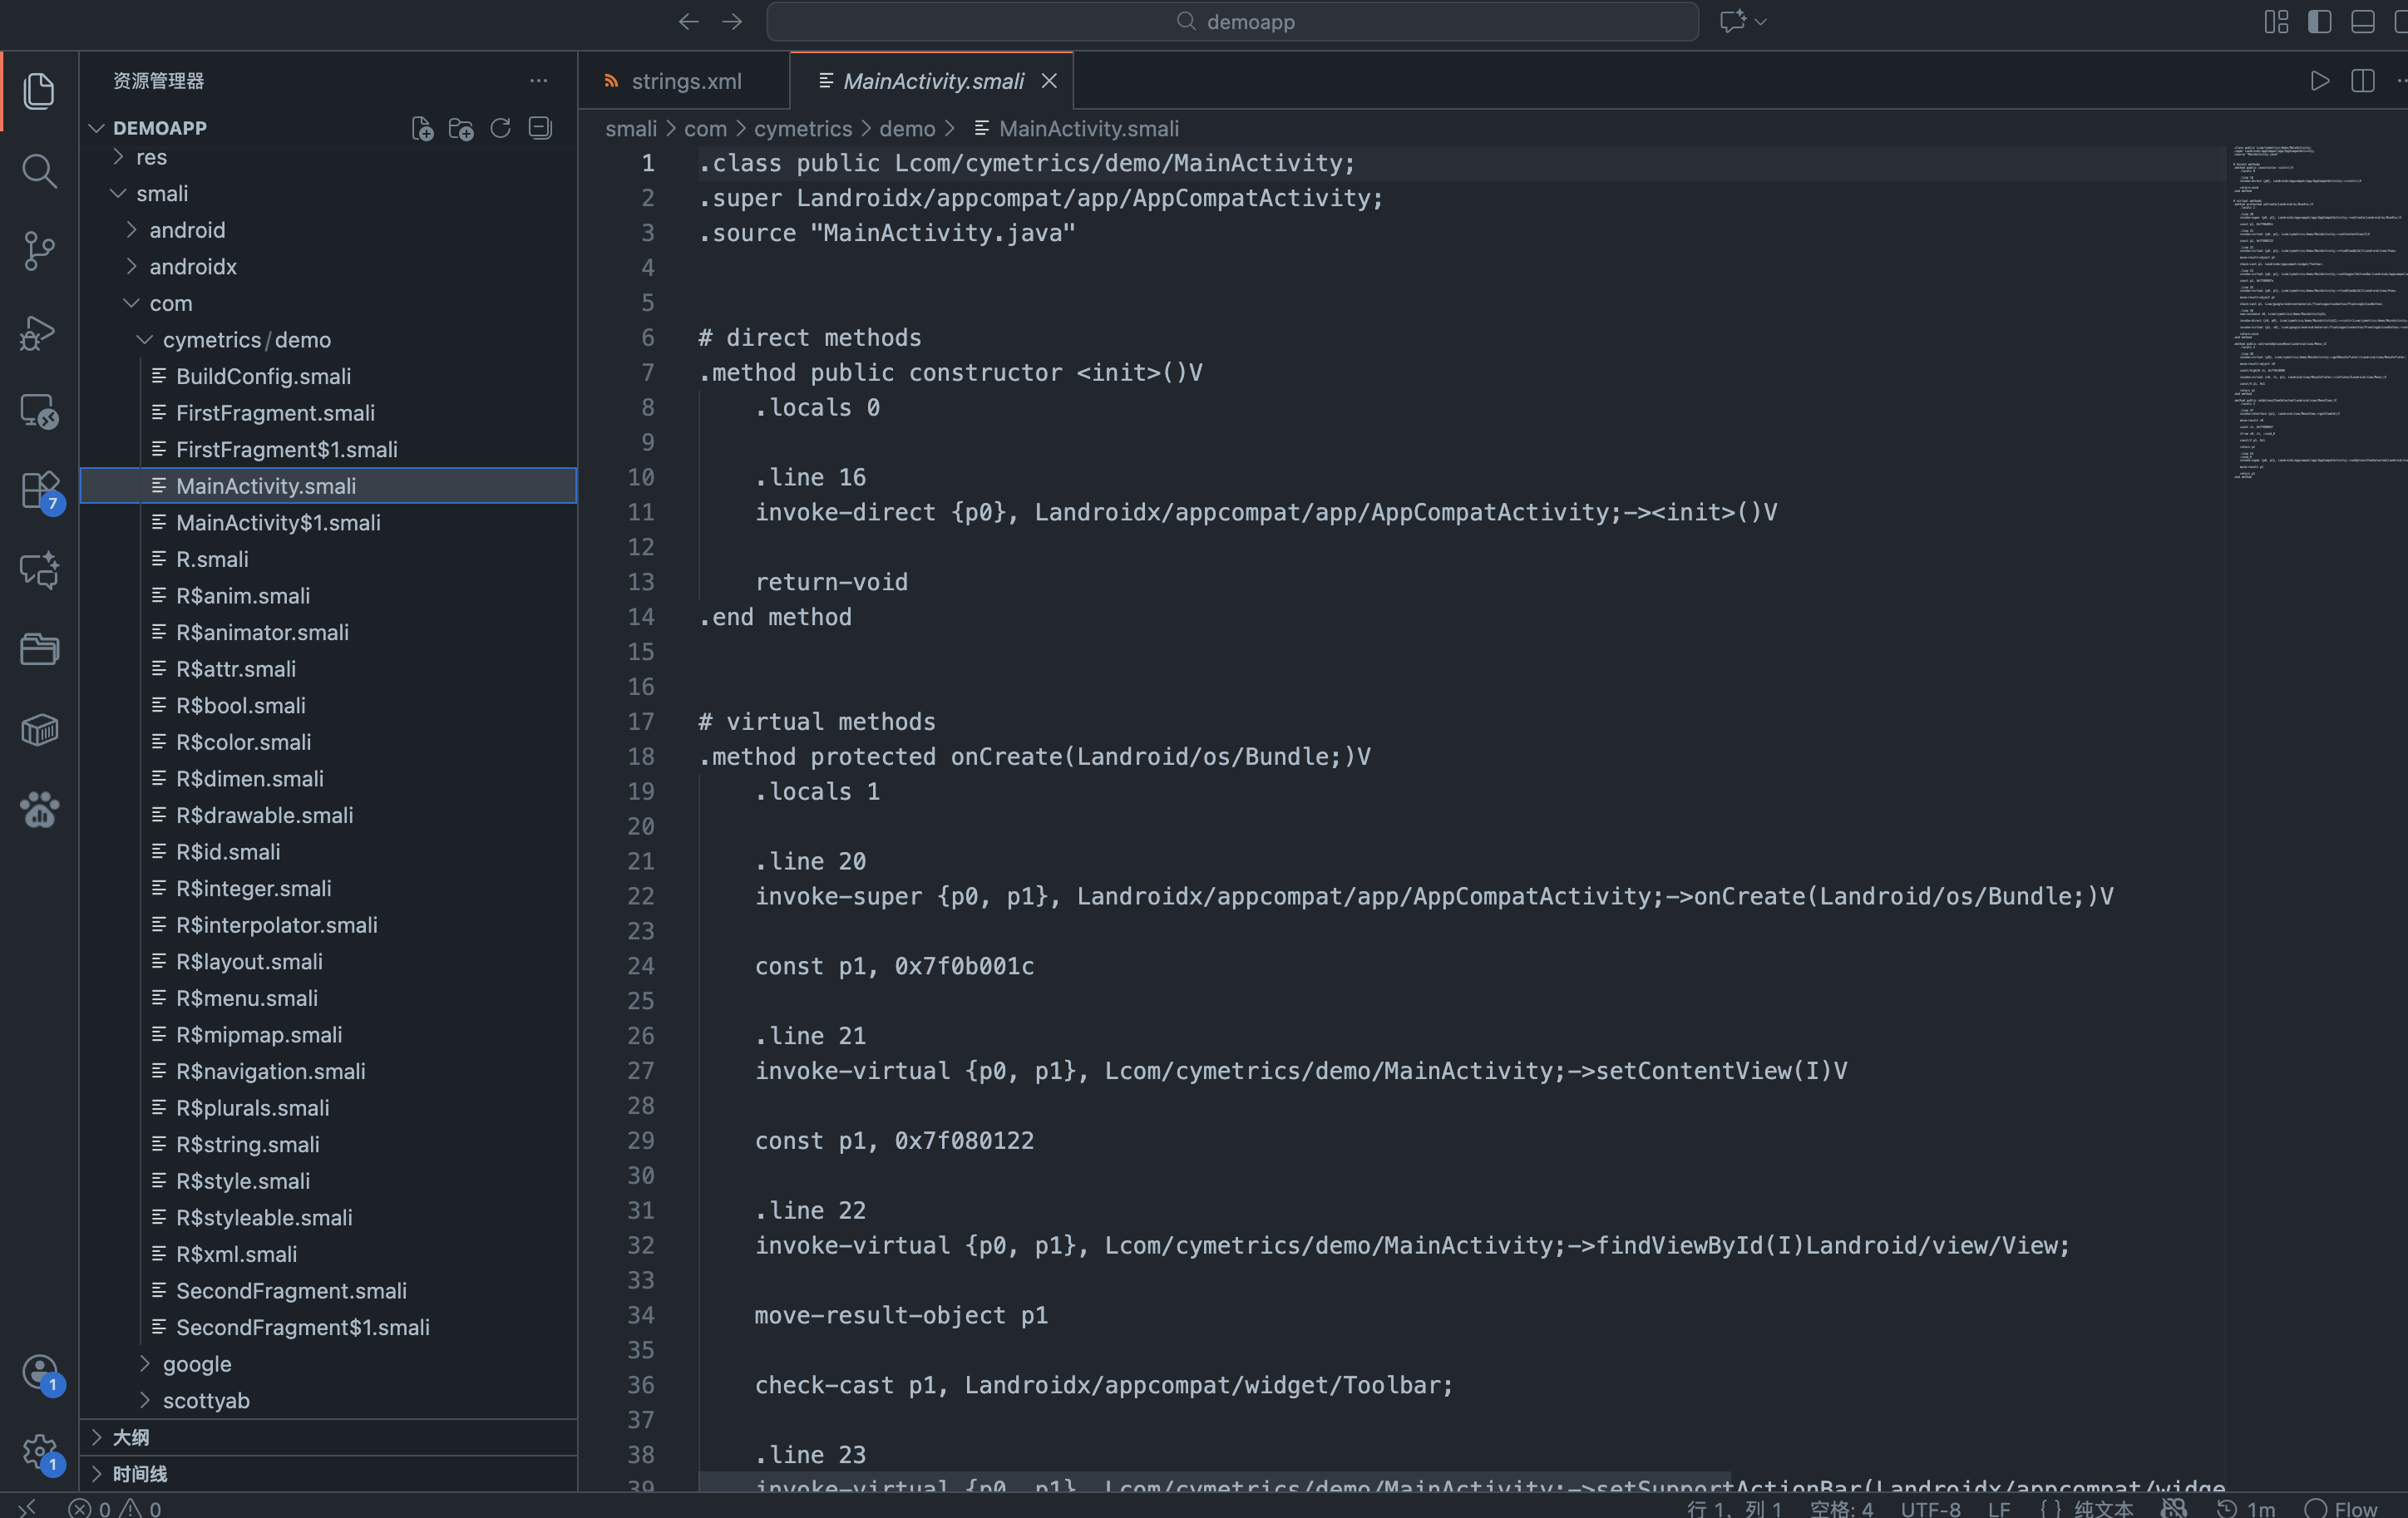
Smali 是跑在 Android Dalvik VM 上的 byte code,有著自己的一套語法規則,如果想要看到我們熟悉的 Java 程式碼,必須要將 smali 還原成 Java。
我们可以使用jadx将smail转化为java代码,当然也可以使用jadx-gui工具
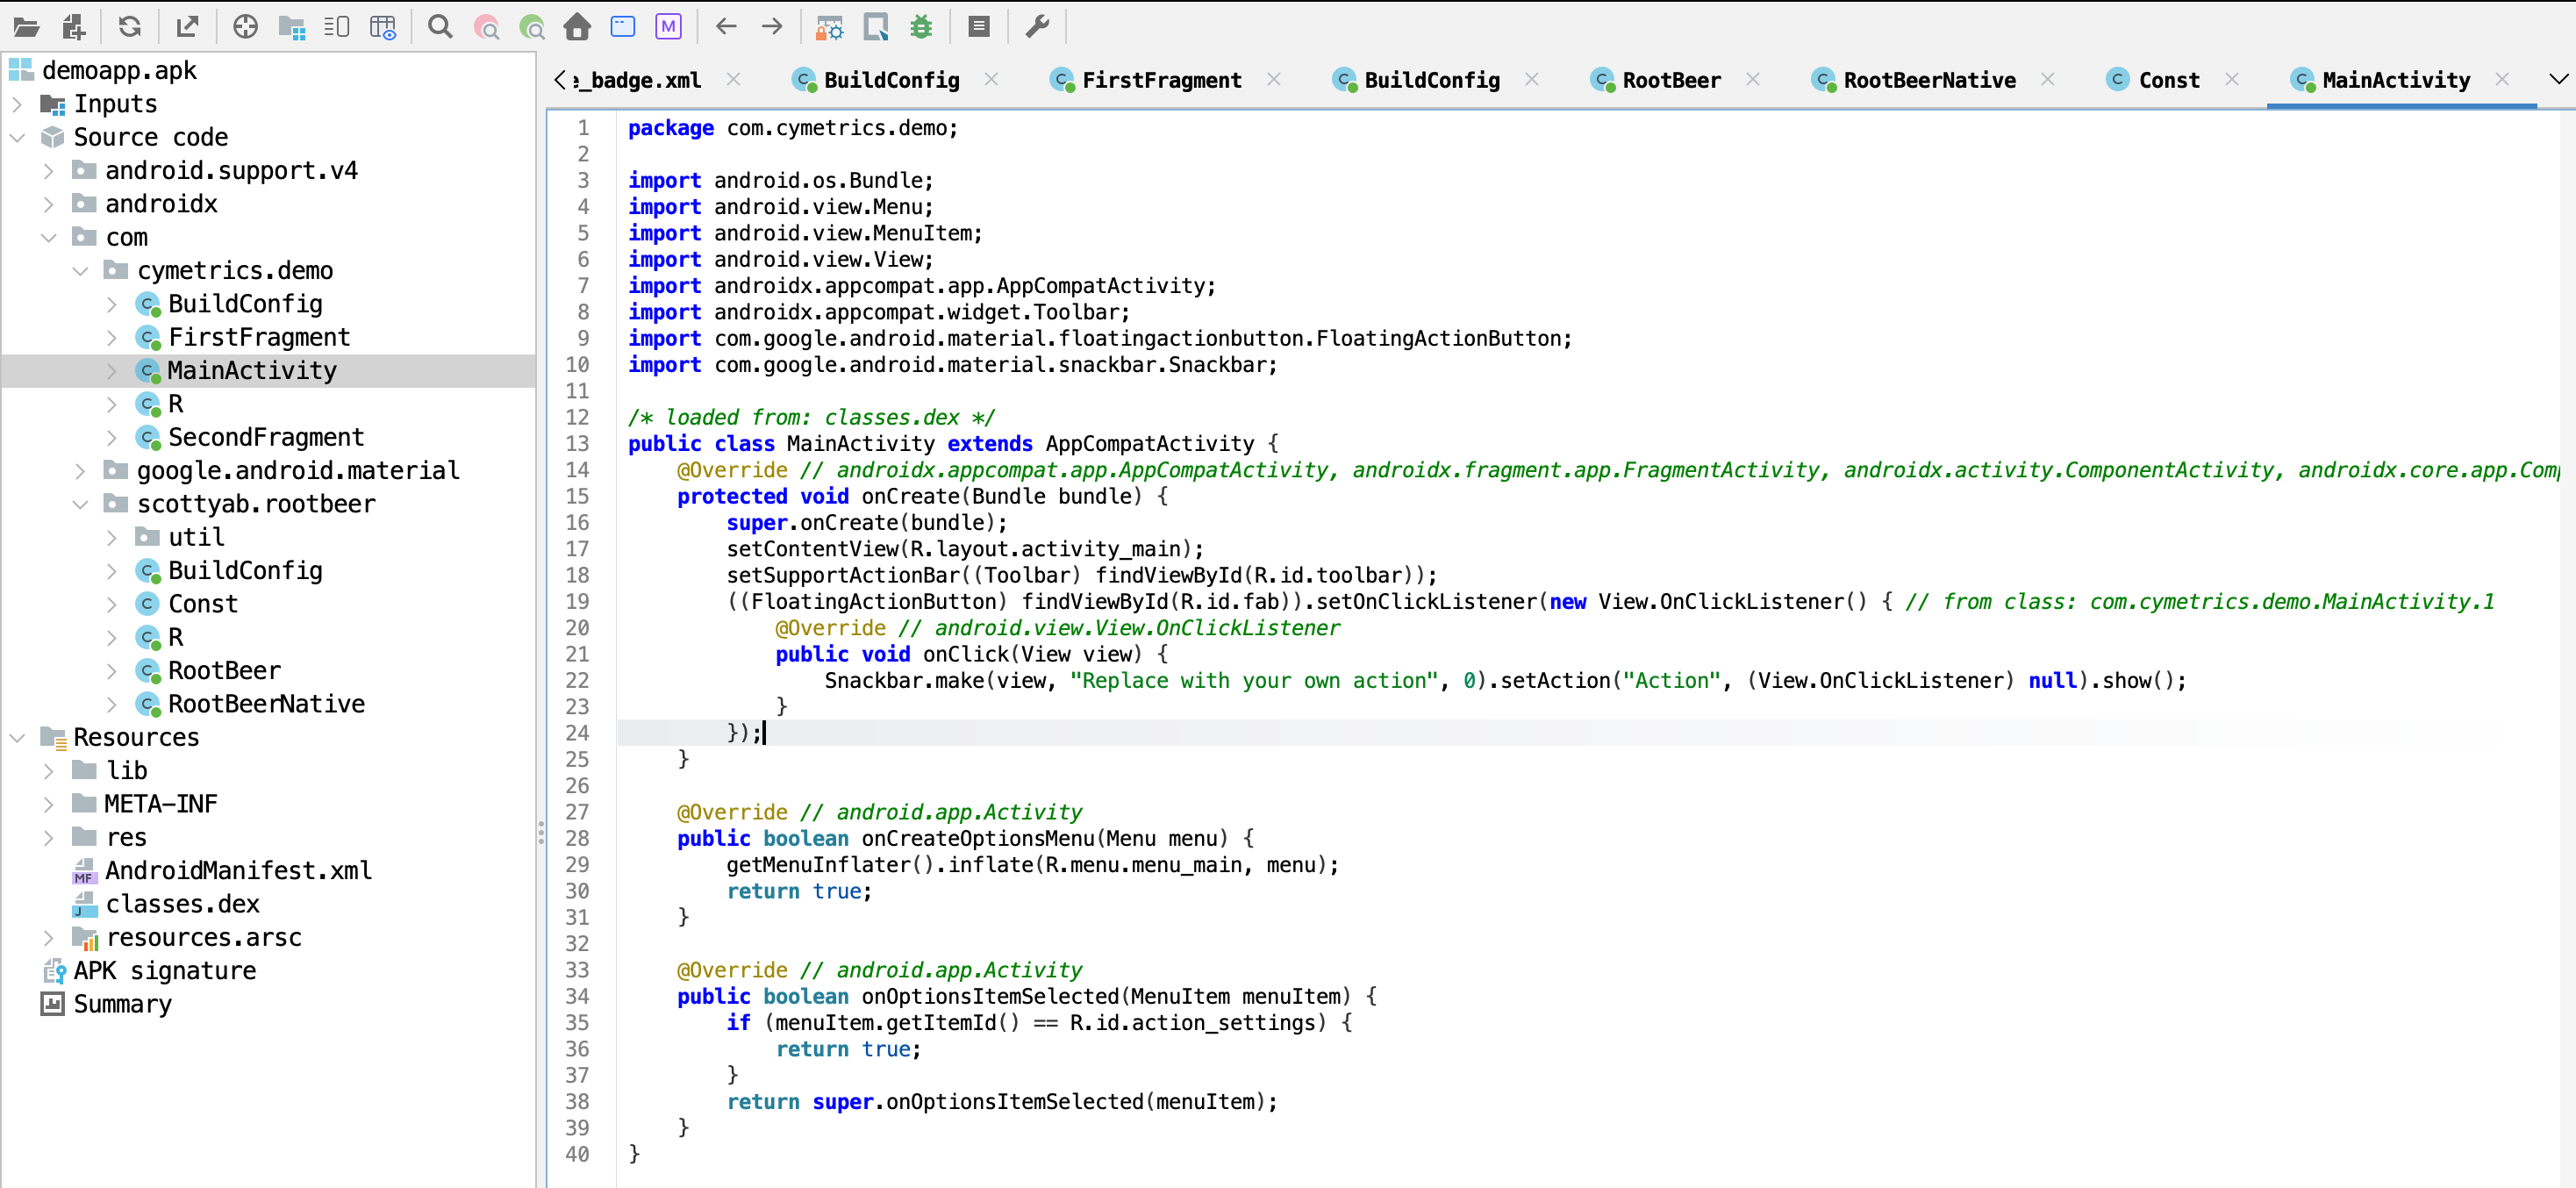
package com.cymetrics.demo;

import android.os.Bundle;
import android.view.Menu;
import android.view.MenuItem;
import android.view.View;
import androidx.appcompat.app.AppCompatActivity;
import androidx.appcompat.widget.Toolbar;
import com.google.android.material.floatingactionbutton.FloatingActionButton;
import com.google.android.material.snackbar.Snackbar;

/* loaded from: classes.dex */
public class MainActivity extends AppCompatActivity {
    @Override // androidx.appcompat.app.AppCompatActivity, androidx.fragment.app.FragmentActivity, androidx.activity.ComponentActivity, androidx.core.app.ComponentActivity, android.app.Activity
    protected void onCreate(Bundle bundle) {
        super.onCreate(bundle);
        setContentView(R.layout.activity_main);
        setSupportActionBar((Toolbar) findViewById(R.id.toolbar));
        ((FloatingActionButton) findViewById(R.id.fab)).setOnClickListener(new View.OnClickListener() { // from class: com.cymetrics.demo.MainActivity.1
            @Override // android.view.View.OnClickListener
            public void onClick(View view) {
                Snackbar.make(view, "Replace with your own action", 0).setAction("Action", (View.OnClickListener) null).show();
            }
        });
    }

    @Override // android.app.Activity
    public boolean onCreateOptionsMenu(Menu menu) {
        getMenuInflater().inflate(R.menu.menu_main, menu);
        return true;
    }

    @Override // android.app.Activity
    public boolean onOptionsItemSelected(MenuItem menuItem) {
        if (menuItem.getItemId() == R.id.action_settings) {
            return true;
        }
        return super.onOptionsItemSelected(menuItem);
    }
}
本次我们想修改检测root的逻辑,让检测已Root设备时显示未Root,我们先找到相关逻辑
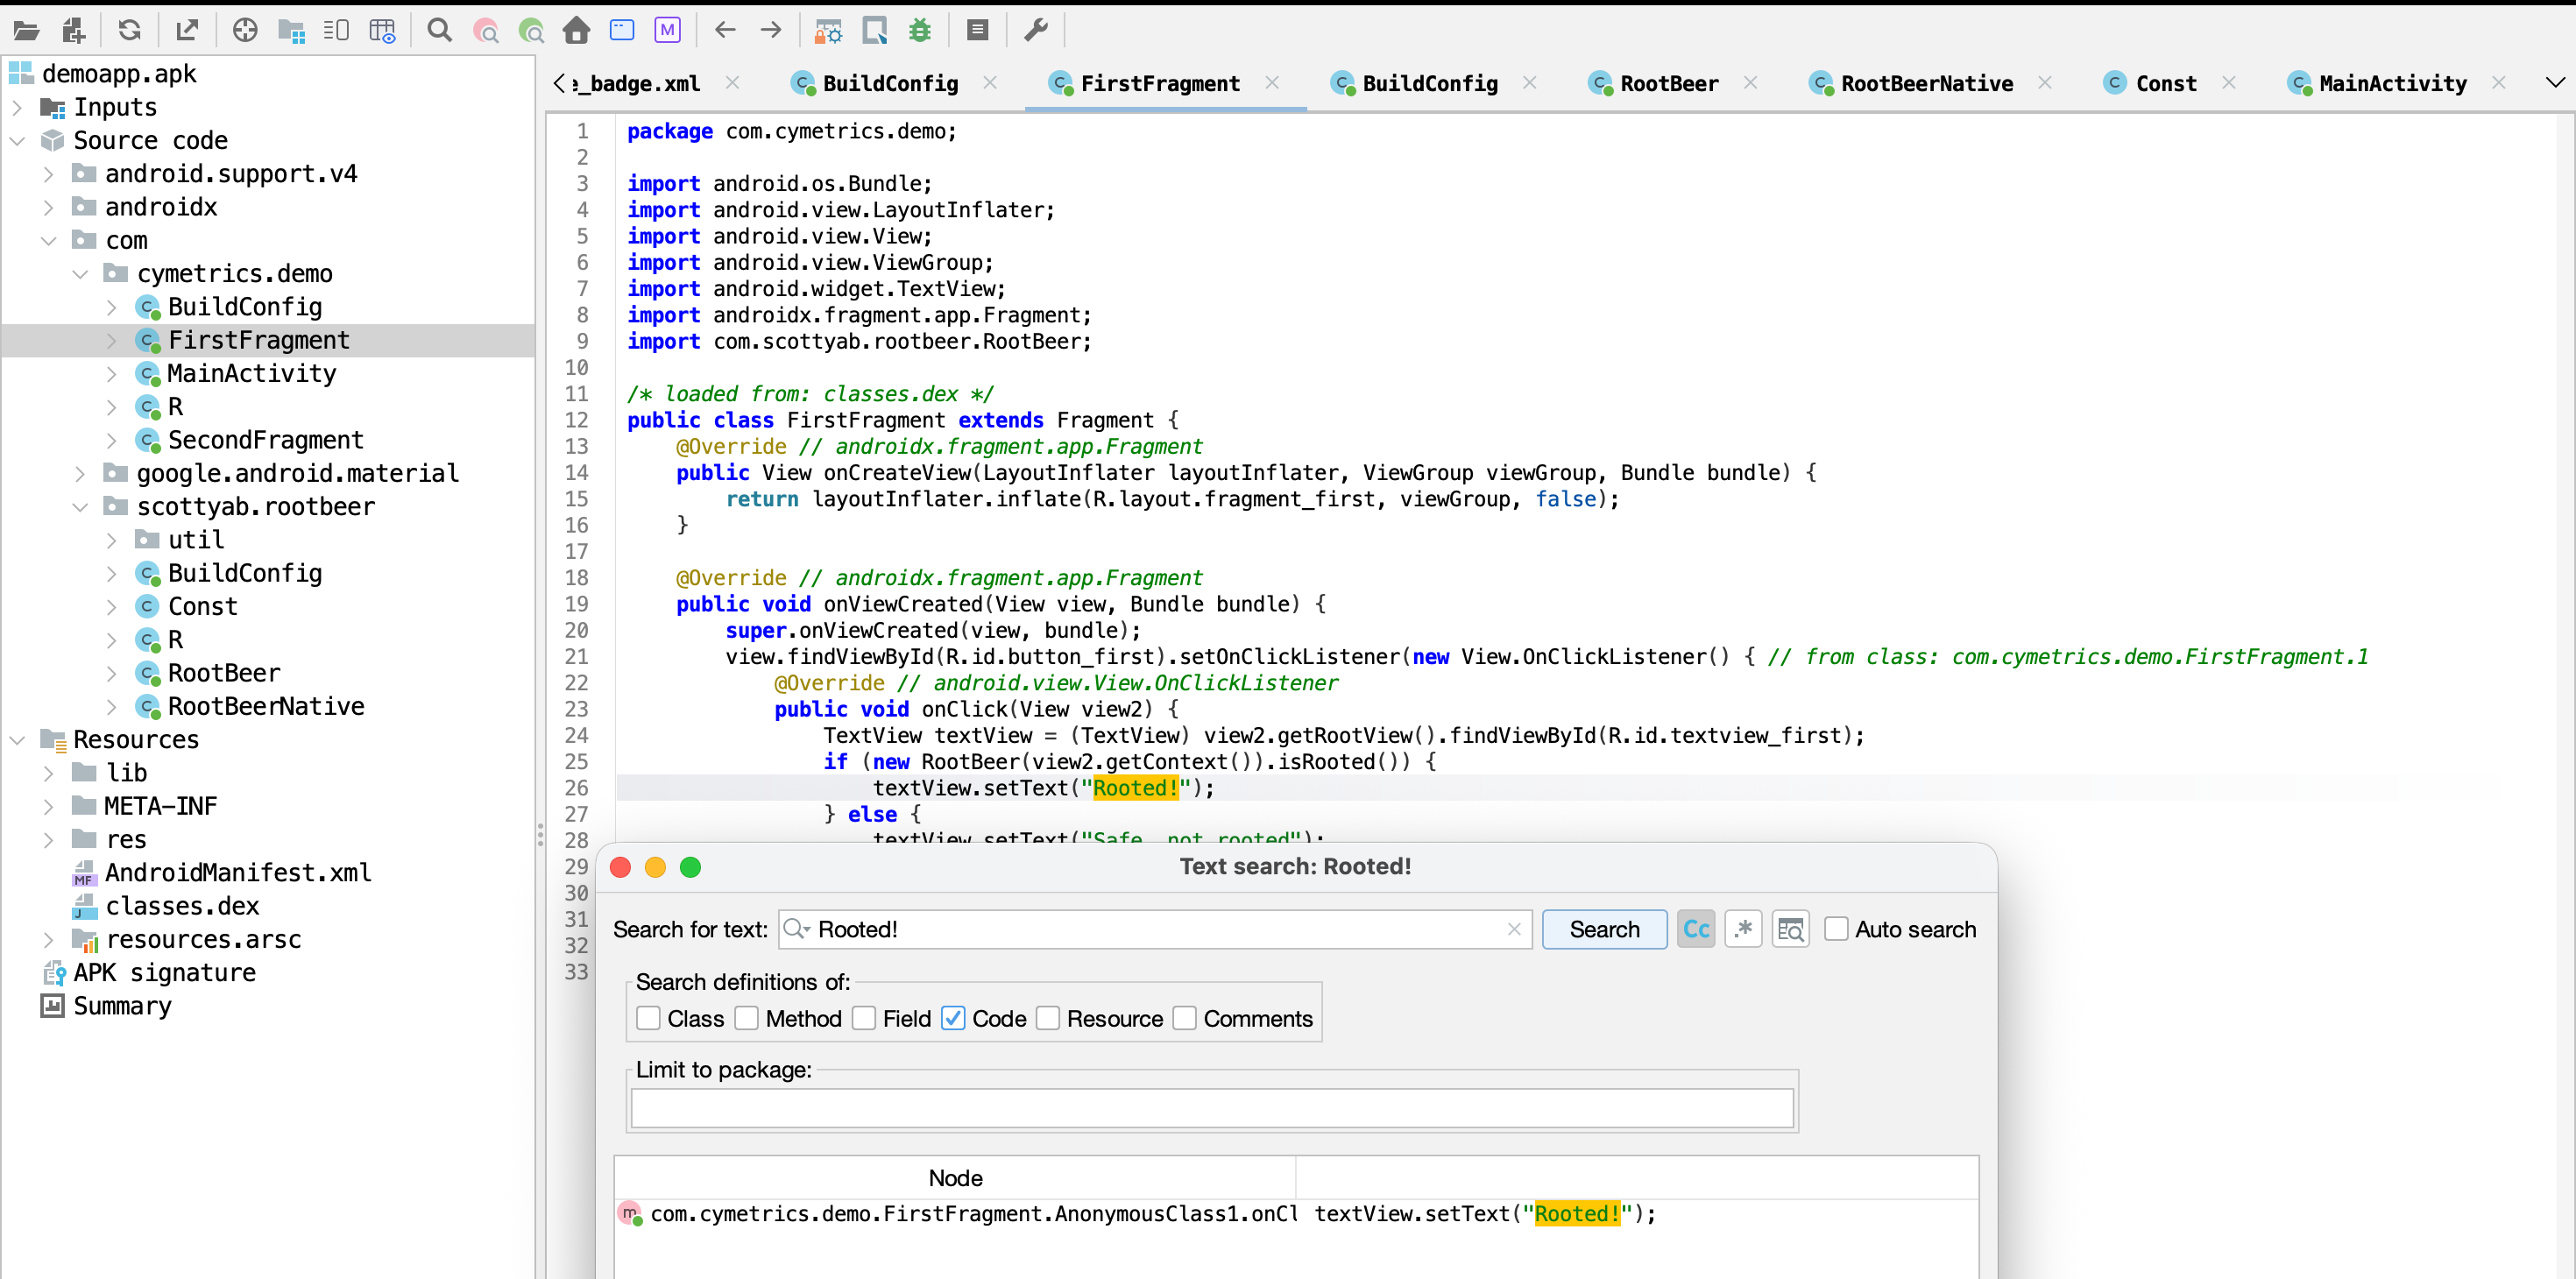
package com.cymetrics.demo;

import android.os.Bundle;
import android.view.LayoutInflater;
import android.view.View;
import android.view.ViewGroup;
import android.widget.TextView;
import androidx.fragment.app.Fragment;
import com.scottyab.rootbeer.RootBeer;

/* loaded from: classes.dex */
public class FirstFragment extends Fragment {
    @Override // androidx.fragment.app.Fragment
    public View onCreateView(LayoutInflater layoutInflater, ViewGroup viewGroup, Bundle bundle) {
        return layoutInflater.inflate(R.layout.fragment_first, viewGroup, false);
    }

    @Override // androidx.fragment.app.Fragment
    public void onViewCreated(View view, Bundle bundle) {
        super.onViewCreated(view, bundle);
        view.findViewById(R.id.button_first).setOnClickListener(new View.OnClickListener() { // from class: com.cymetrics.demo.FirstFragment.1
            @Override // android.view.View.OnClickListener
            public void onClick(View view2) {
                TextView textView = (TextView) view2.getRootView().findViewById(R.id.textview_first);
                if (new RootBeer(view2.getContext()).isRooted()) {
                    textView.setText("Rooted!");
                } else {
                    textView.setText("Safe, not rooted");
                }
            }
        });
    }
}
显然关键检测逻辑函数为RootBeer(view2.getContext()).isRooted(),我们找到对应的smail代码
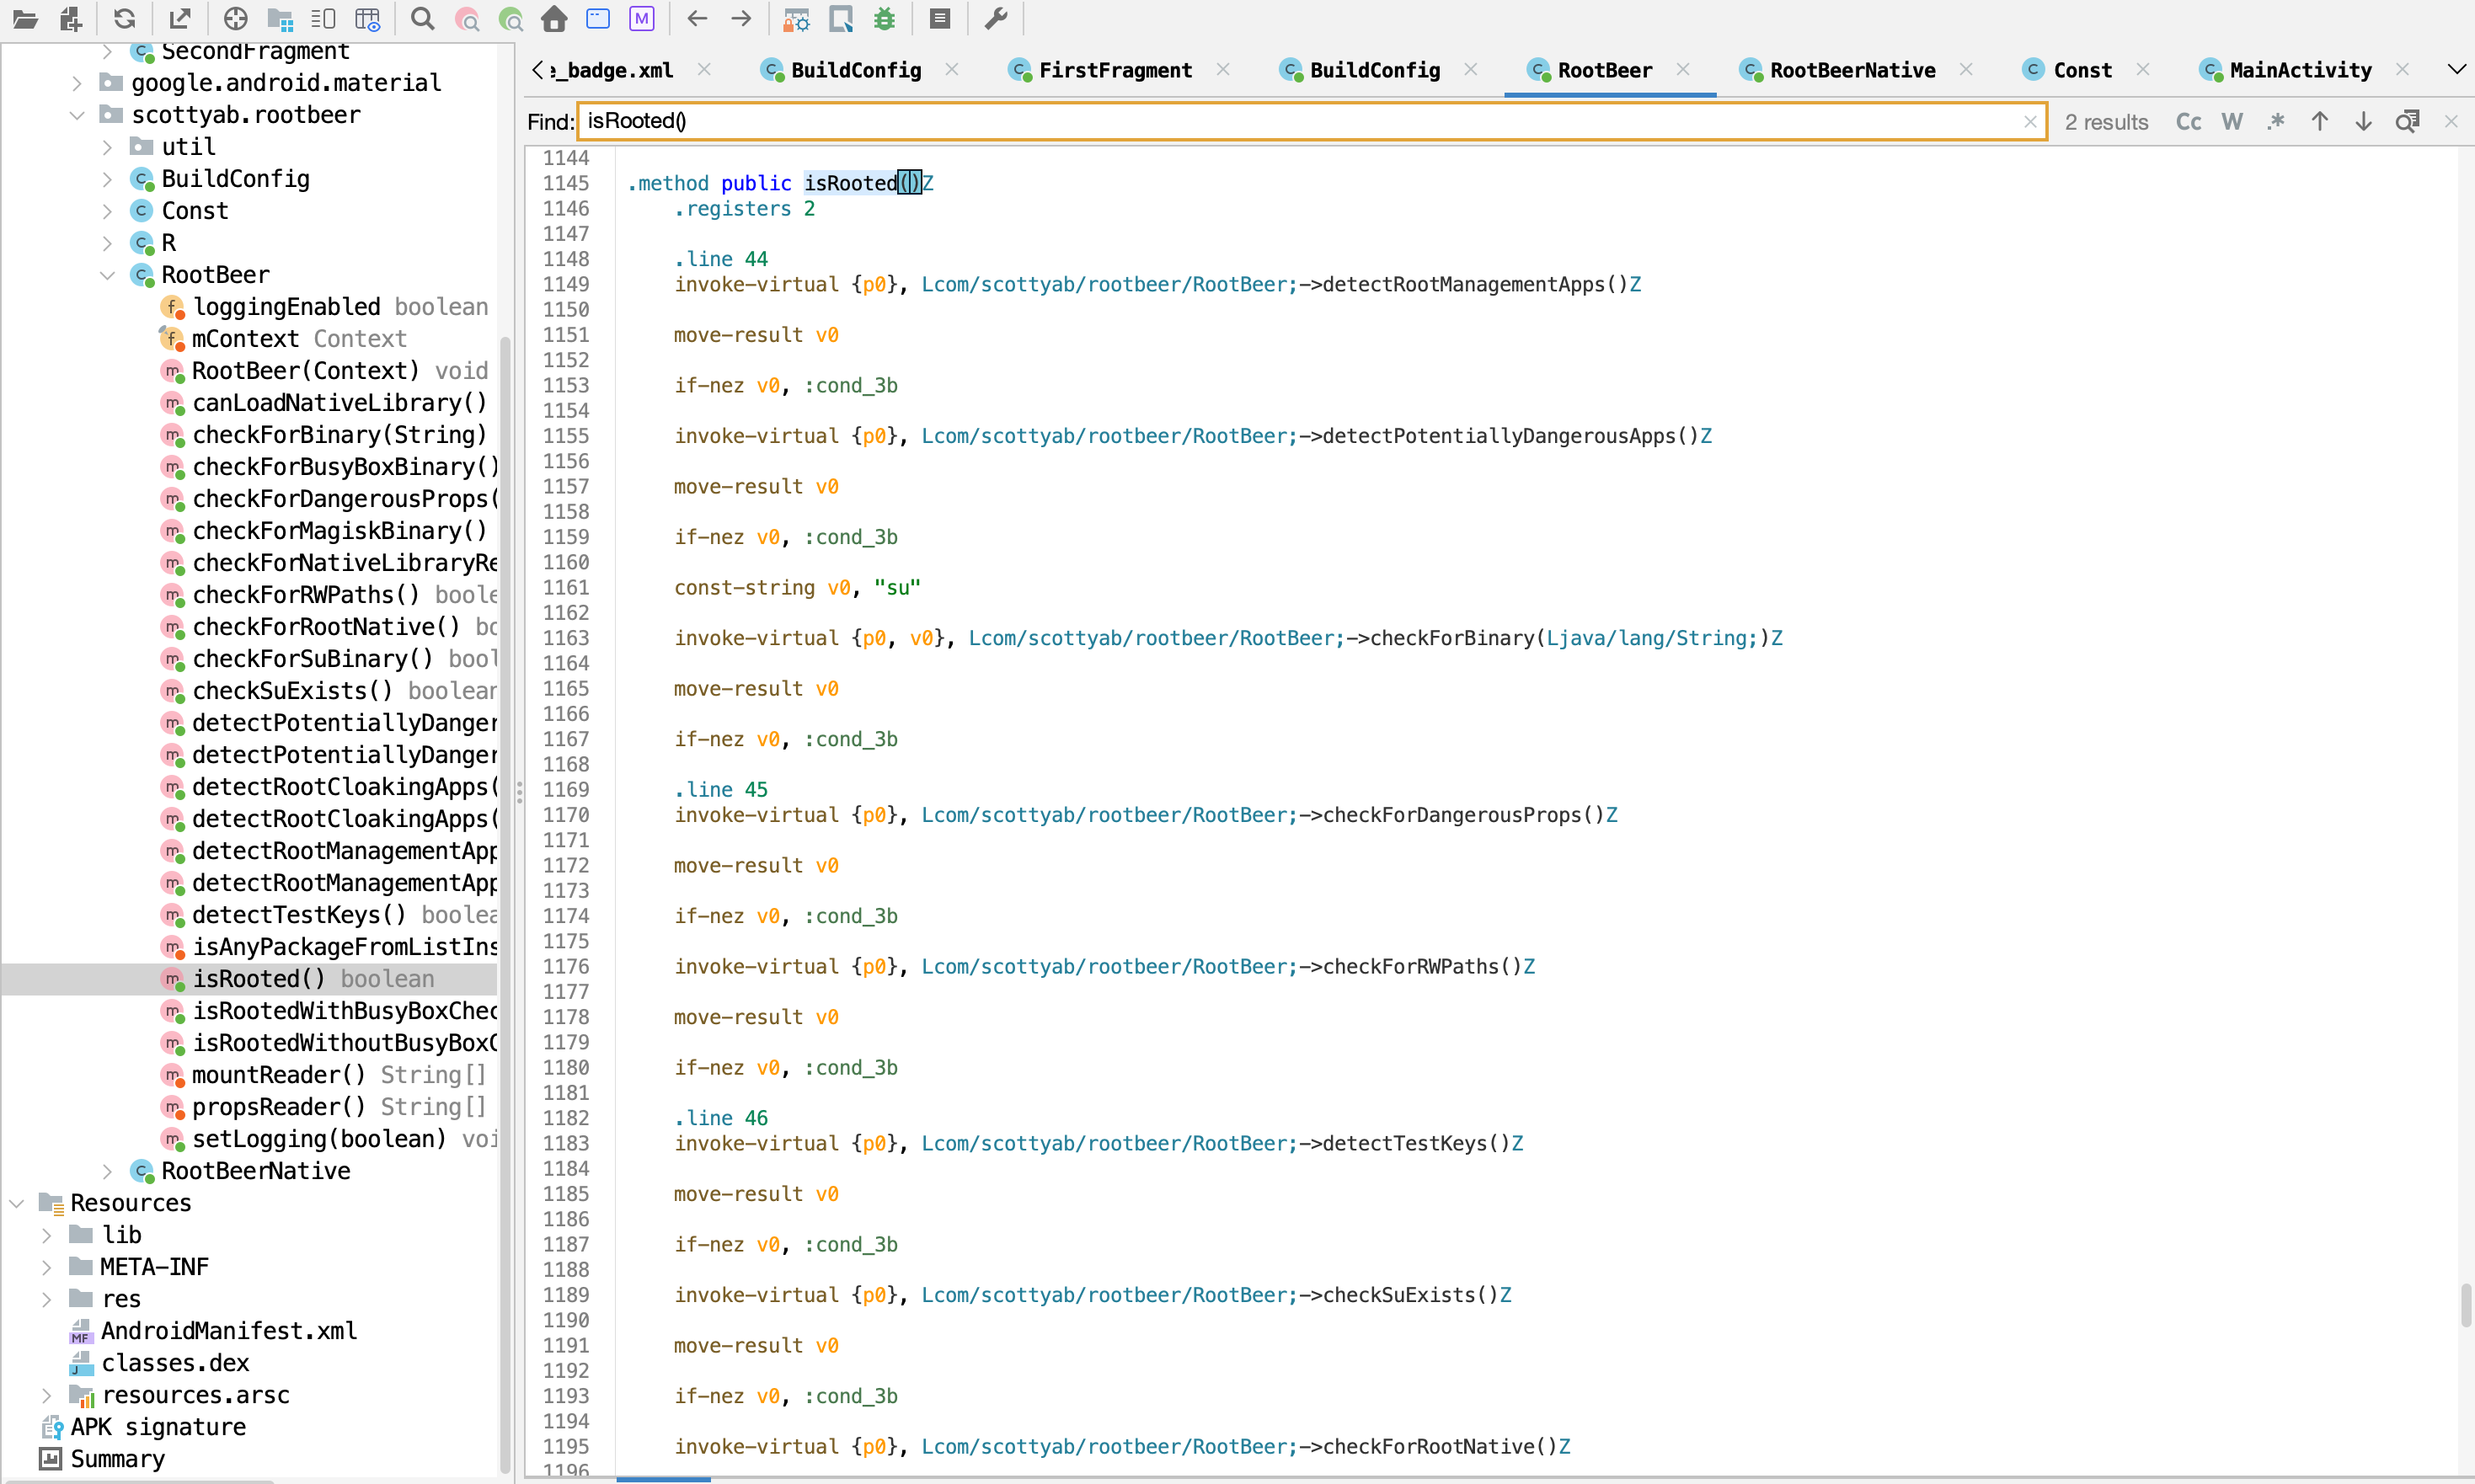
.method public isRooted()Z
    .registers 2

    .line 44
    invoke-virtual {p0}, Lcom/scottyab/rootbeer/RootBeer;->detectRootManagementApps()Z

    move-result v0

    if-nez v0, :cond_3b

    invoke-virtual {p0}, Lcom/scottyab/rootbeer/RootBeer;->detectPotentiallyDangerousApps()Z

    move-result v0

    if-nez v0, :cond_3b

    const-string v0, "su"

    invoke-virtual {p0, v0}, Lcom/scottyab/rootbeer/RootBeer;->checkForBinary(Ljava/lang/String;)Z

    move-result v0

    if-nez v0, :cond_3b

    .line 45
    invoke-virtual {p0}, Lcom/scottyab/rootbeer/RootBeer;->checkForDangerousProps()Z

    move-result v0

    if-nez v0, :cond_3b

    invoke-virtual {p0}, Lcom/scottyab/rootbeer/RootBeer;->checkForRWPaths()Z

    move-result v0

    if-nez v0, :cond_3b

    .line 46
    invoke-virtual {p0}, Lcom/scottyab/rootbeer/RootBeer;->detectTestKeys()Z

    move-result v0

    if-nez v0, :cond_3b

    invoke-virtual {p0}, Lcom/scottyab/rootbeer/RootBeer;->checkSuExists()Z

    move-result v0

    if-nez v0, :cond_3b

    invoke-virtual {p0}, Lcom/scottyab/rootbeer/RootBeer;->checkForRootNative()Z

    move-result v0

    if-nez v0, :cond_3b

    invoke-virtual {p0}, Lcom/scottyab/rootbeer/RootBeer;->checkForMagiskBinary()Z

    move-result v0

    if-eqz v0, :cond_39

    goto :goto_3b

    :cond_39
    const/4 v0, 0x0

    goto :goto_3c

    :cond_3b
    :goto_3b
    const/4 v0, 0x1

    :goto_3c
    return v0
.end method
其检测逻辑如下:
| 步骤 | 检测项 | 检测内容 |
|---|---|---|
| 1 | Root 管理应用 | 是否安装 SuperSU、Magisk Manager、KingRoot 等 Root 工具 |
| 2 | 危险应用 | 是否存在已知提权或恶意应用 |
| 3 | su 二进制文件 |
在系统路径(如 /system/bin、/xbin)中是否存在 su 可执行文件 |
| 4 | 危险系统属性 | 检查如 ro.secure=0、ro.debuggable=1 等表明系统不安全的 build.prop 属性 |
| 5 | 关键路径可写性 | 检测 /system 等本应只读的分区是否可写(Root 后常被 remount 为 rw) |
| 6 | 测试密钥(test-keys) | 判断系统是否使用非官方测试密钥编译(常见于自定义 ROM) |
| 7 | su 命令存在性 |
再次验证 su 是否可通过命令行调用(如 which su) |
| 8 | Native 层 Root 检测 | 通过 JNI 调用 C/C++ 代码,尝试执行 su 或检测底层 Root 痕迹(更难被 Hook) |
| 9 | Magisk 二进制文件 | 检查是否存在 magisk、magiskinit 等 Magisk 核心组件(针对现代 Root 方案) |
只要其中任意一项满足,则返回True,表示设备已Root,要绕过这一检测,我们可以让该函数提前返回False
.method public isRooted()Z
    .locals 1

    # 在開頭新增底下這兩行,永遠回傳 false
    const/4 v0, 0x0
    return v0

    # 以下省略...
.end method
重新打包看看效果
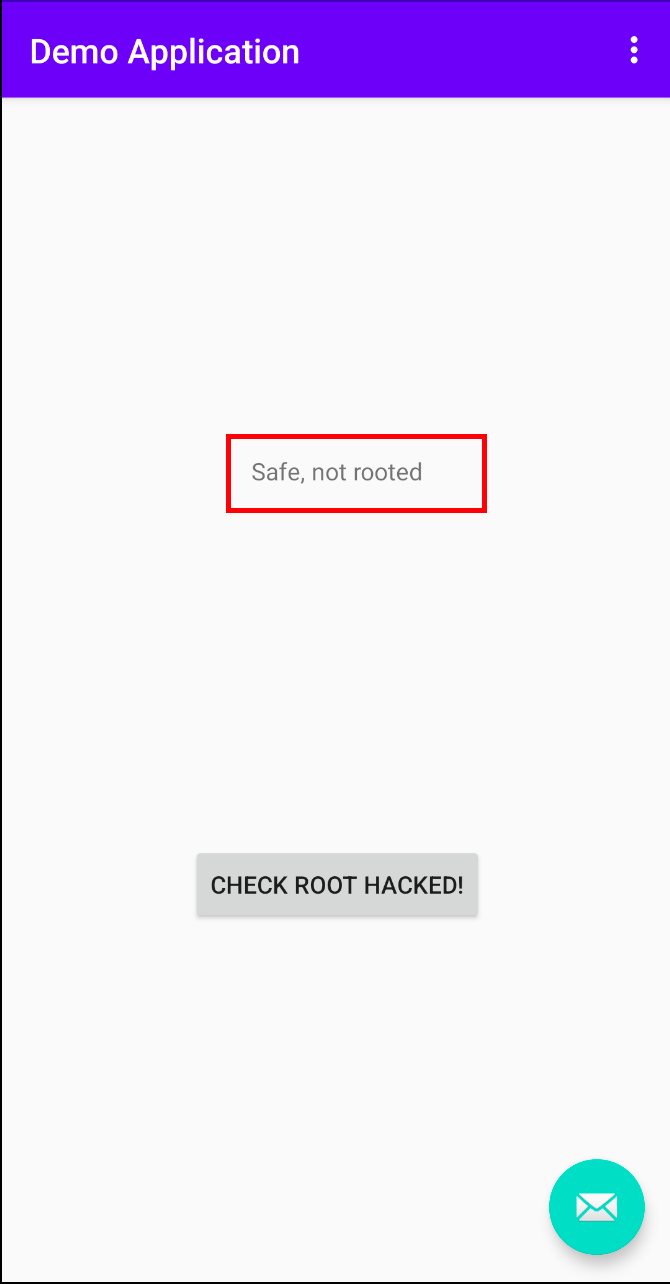
重打包
为了使我们的修改生效,还需要将修改后的文件重新打包为apk文件
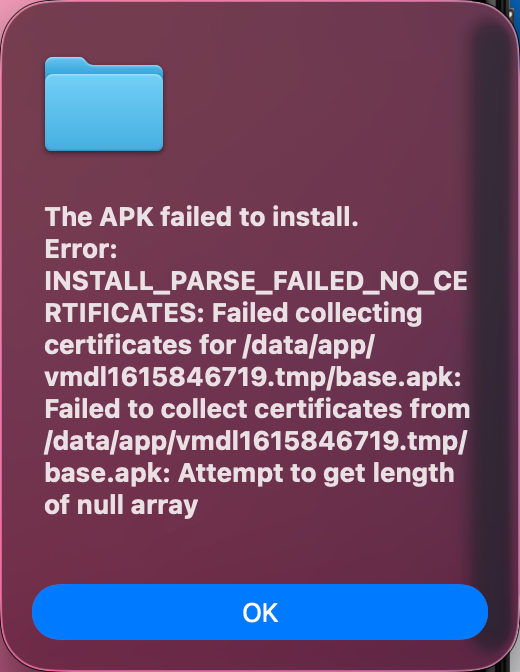
但此时我们安装demoapp2会失败,原因是修改后的apk文件与原apk文件的签名不一致
This is because after the APK file is packaged, it needs to go through two procedures: align and sign, before it can be installed on the phone.
Align is for performance considerations, and sign is for security.
我们首先创建新的签名
keytool -genkey -v -keystore my-release-key.jks -keyalg RSA -keysize 2048 -validity 10000 -alias my-alias
设置密钥口令为123456,生成jks证书,接下来进行重打包
# compile.sh

# remove old app
adb uninstall com.cymetrics.demo

# remove old apk
rm -f demoapp2.apk
rm -f demoapp2-final.apk
rm -f demoapp2-aligned.apk

# build
apktool b demoapp -o demoapp2.apk

# align
zipalign -v -p 4 demoapp2.apk demoapp2-aligned.apk
# -P <页面大小_kb>  将未压缩的 .so 文件对齐到指定的页面大小(以 KiB 为单位)。有效选项 为 4、16 和 64。<pagesize_kb>
# -p    4KiB 页面对齐未压缩的 .so 文件。建议使用 -P 16,因为 -p 已废弃。
# -v    详细输出。

# sign
apksigner sign --ks my-release-key.jks --ks-pass pass:123456 --out demoapp2-final.apk demoapp2-aligned.apk
adb install demoapp2-final.apk
zipalign和apksigner是android SDK自带的工具,路径通常为~/Library/Android/sdk/build-tools
打包好后我们再尝试安装APP
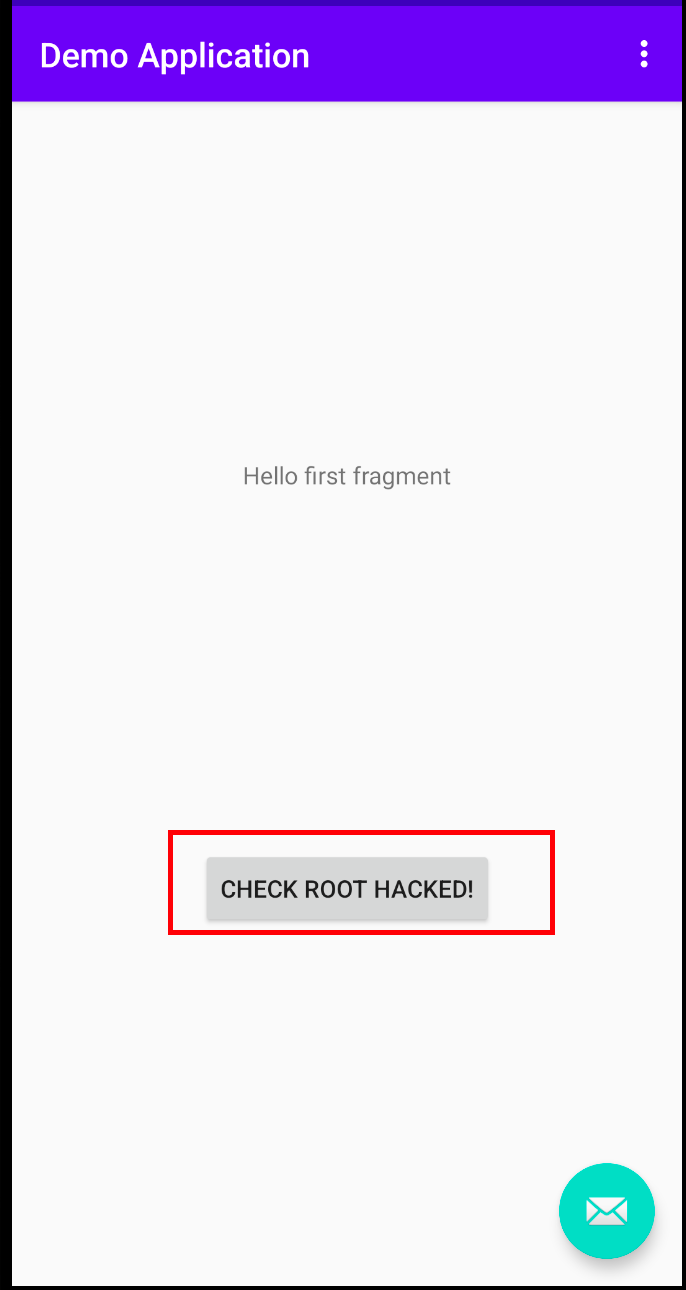
autorun
首先我们需要找到app的包名

app包名为com.example.omechallengehelper,窗口类名为com.example.autorun.ui.login.LoginActivity
查看是否加壳
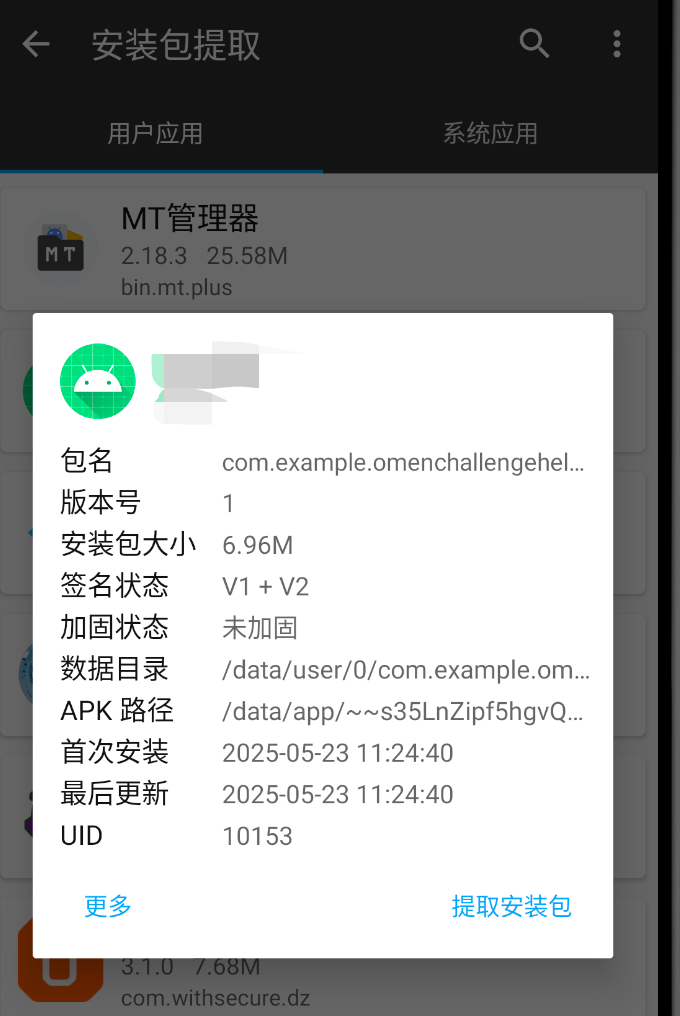
无壳
查看是否存在混淆
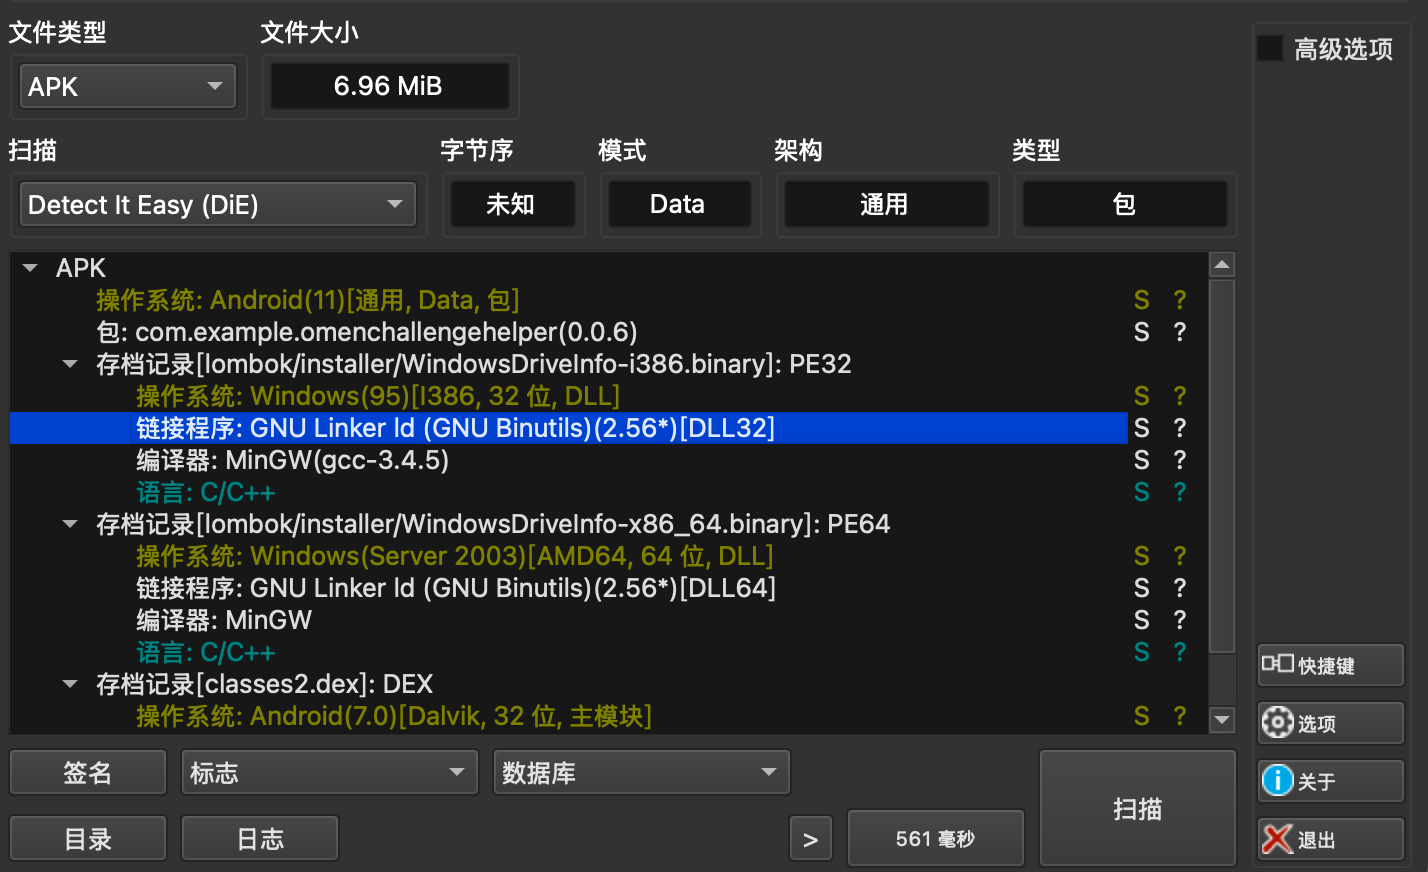
结果为无混淆
抓包查看
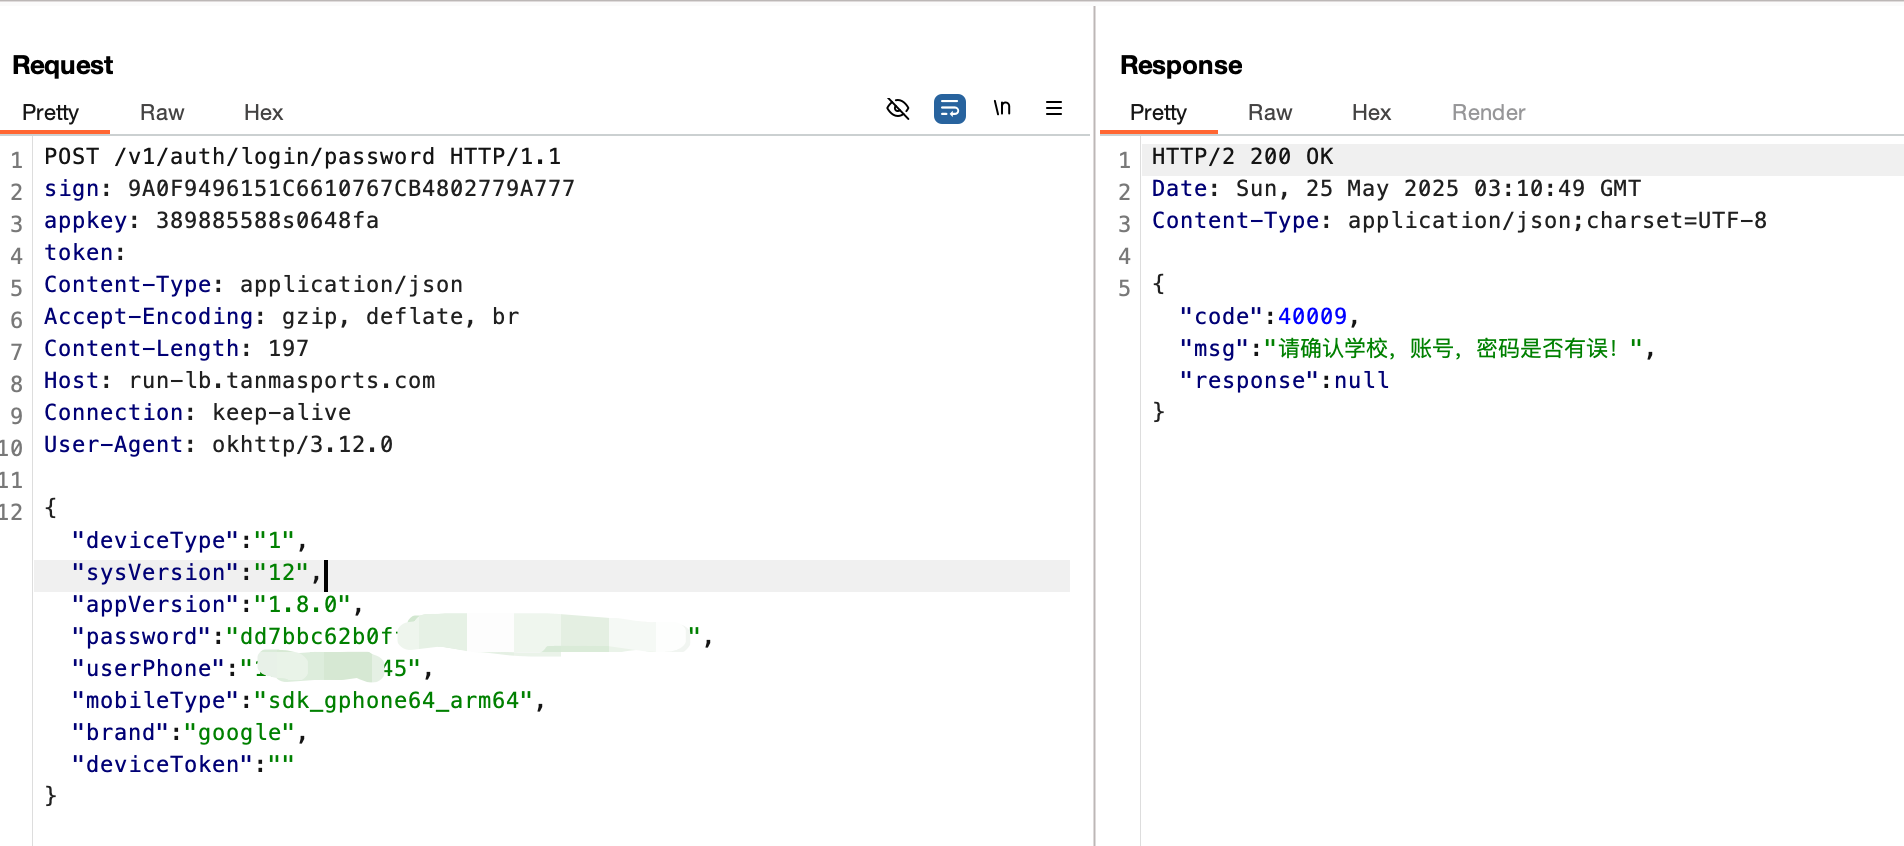
密码为加密传输、手机号为明文传输
静态分析
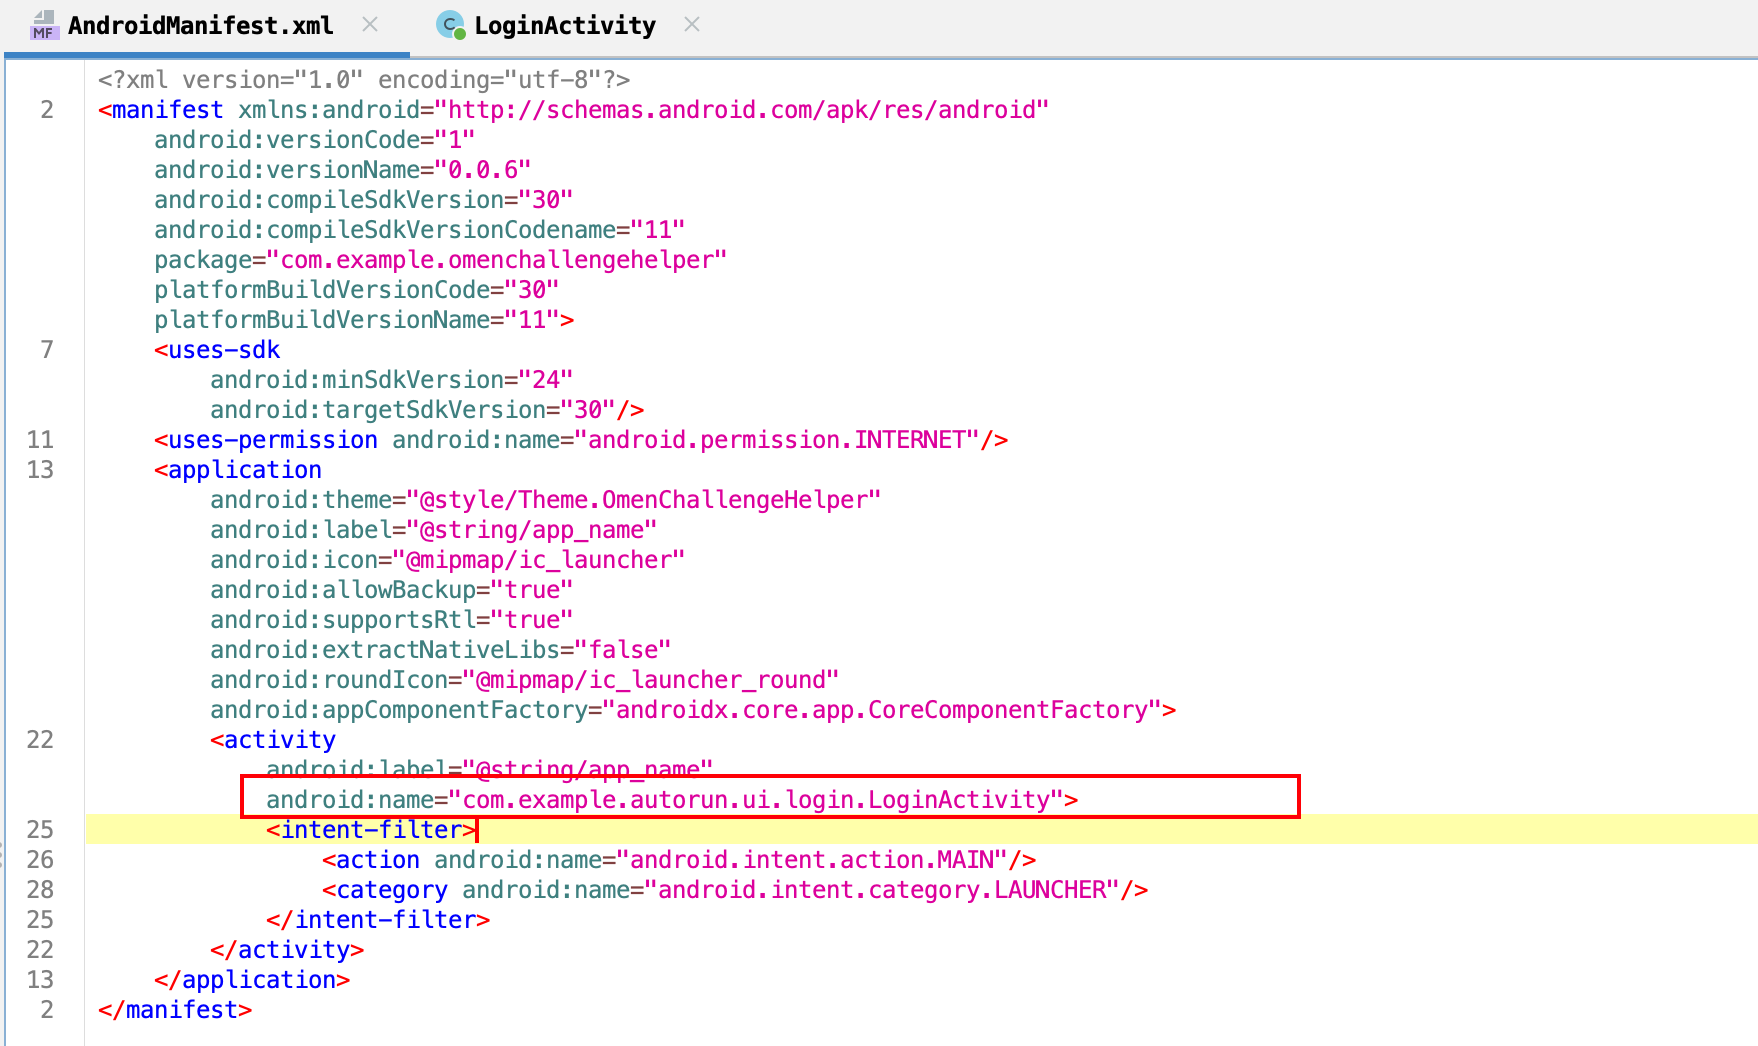
找到登录窗口类,关键代码如下:
editText2.setOnEditorActionListener(new TextView.OnEditorActionListener() { // from class: com.example.autorun.ui.login.LoginActivity.4
            @Override // android.widget.TextView.OnEditorActionListener
            public boolean onEditorAction(TextView v, int actionId, KeyEvent event) {
                if (actionId == 6) {
                    textView.setText("操作结果:");
                    progressBar.setVisibility(0);
                    AppConfig appConfig = new AppConfig();
                    appConfig.setPhone(editText.getText().toString());
                    appConfig.setPassword(editText2.getText().toString());
                    appConfig.setAppVersion(textInputEditText.getText().toString());
                    appConfig.setBrand(SystemUtil.getDeviceBrand());
                    appConfig.setMobileType(SystemUtil.getSystemModel());
                    appConfig.setSysVersion(SystemUtil.getSystemVersion());
                    String obj = textInputEditText2.getText().toString();
                    if (obj.length() > 0) {
                        appConfig.setDistance(Long.parseLong(obj));
                    }
                    if (textInputEditText3.getText().toString().length() > 0) {
                        appConfig.setRunTime(Integer.parseInt(textInputEditText3.getText().toString()));
                    }
                    System.out.println(appConfig);
                    App app = new App(appConfig);
                    app.setResultArea(textView);
                    app.setLoadingProgressBar(progressBar);
                    app.start();
                }
                return false;
            }
        });
        button.setOnClickListener(new View.OnClickListener() { // from class: com.example.autorun.ui.login.LoginActivity.5
            @Override // android.view.View.OnClickListener
            public void onClick(View v) {
                textView.setText("操作结果:");
                progressBar.setVisibility(0);
                AppConfig appConfig = new AppConfig();
                appConfig.setPhone(editText.getText().toString());
                appConfig.setPassword(editText2.getText().toString());
                appConfig.setAppVersion(textInputEditText.getText().toString());
                appConfig.setBrand(SystemUtil.getDeviceBrand());
                appConfig.setMobileType(SystemUtil.getSystemModel());
                appConfig.setSysVersion(SystemUtil.getSystemVersion());
                String obj = textInputEditText2.getText().toString();
                if (obj.length() > 0) {
                    appConfig.setDistance(Long.parseLong(obj));
                }
                if (textInputEditText3.getText().toString().length() > 0) {
                    appConfig.setRunTime(Integer.parseInt(textInputEditText3.getText().toString()));
                }
                System.out.println(appConfig);
                App app = new App(appConfig);
                app.setResultArea(textView);
                app.setLoadingProgressBar(progressBar);
                app.start();
            }
        });
    }
从中我们可以看到调用了AppConfig这个类,这个类负责处理输入的电话号码、密码等信息,随后调用了App这个类,这个类接收appconfig并进行处理,最后触发start方法,所以App应该是主类,我们分别进入AppConfig和App看看
- Appconfig
package org.example.entity;

/* loaded from: classes2.dex */
public class AppConfig {
    String appVersion;
    String brand;
    String deviceToken;
    String deviceType;
    long distance;
    String mobileType;
    String password;
    private String phone;
    int runTime;
    String sysVersion;

    protected boolean canEqual(final Object other) {
        return other instanceof AppConfig;
    }

    public boolean equals(final Object o) {
        if (o == this) {
            return true;
        }
        if (!(o instanceof AppConfig)) {
            return false;
        }
        AppConfig appConfig = (AppConfig) o;
        if (!appConfig.canEqual(this) || getDistance() != appConfig.getDistance() || getRunTime() != appConfig.getRunTime()) {
            return false;
        }
        String phone = getPhone();
        String phone2 = appConfig.getPhone();
        if (phone != null ? !phone.equals(phone2) : phone2 != null) {
            return false;
        }
        String password = getPassword();
        String password2 = appConfig.getPassword();
        if (password != null ? !password.equals(password2) : password2 != null) {
            return false;
        }
        String appVersion = getAppVersion();
        String appVersion2 = appConfig.getAppVersion();
        if (appVersion != null ? !appVersion.equals(appVersion2) : appVersion2 != null) {
            return false;
        }
        String brand = getBrand();
        String brand2 = appConfig.getBrand();
        if (brand != null ? !brand.equals(brand2) : brand2 != null) {
            return false;
        }
        String deviceToken = getDeviceToken();
        String deviceToken2 = appConfig.getDeviceToken();
        if (deviceToken != null ? !deviceToken.equals(deviceToken2) : deviceToken2 != null) {
            return false;
        }
        String deviceType = getDeviceType();
        String deviceType2 = appConfig.getDeviceType();
        if (deviceType != null ? !deviceType.equals(deviceType2) : deviceType2 != null) {
            return false;
        }
        String mobileType = getMobileType();
        String mobileType2 = appConfig.getMobileType();
        if (mobileType != null ? !mobileType.equals(mobileType2) : mobileType2 != null) {
            return false;
        }
        String sysVersion = getSysVersion();
        String sysVersion2 = appConfig.getSysVersion();
        return sysVersion != null ? sysVersion.equals(sysVersion2) : sysVersion2 == null;
    }

    public int hashCode() {
        long distance = getDistance();
        int runTime = ((((int) (distance ^ (distance >>> 32))) + 59) * 59) + getRunTime();
        String phone = getPhone();
        int hashCode = (runTime * 59) + (phone == null ? 43 : phone.hashCode());
        String password = getPassword();
        int hashCode2 = (hashCode * 59) + (password == null ? 43 : password.hashCode());
        String appVersion = getAppVersion();
        int hashCode3 = (hashCode2 * 59) + (appVersion == null ? 43 : appVersion.hashCode());
        String brand = getBrand();
        int hashCode4 = (hashCode3 * 59) + (brand == null ? 43 : brand.hashCode());
        String deviceToken = getDeviceToken();
        int hashCode5 = (hashCode4 * 59) + (deviceToken == null ? 43 : deviceToken.hashCode());
        String deviceType = getDeviceType();
        int hashCode6 = (hashCode5 * 59) + (deviceType == null ? 43 : deviceType.hashCode());
        String mobileType = getMobileType();
        int hashCode7 = (hashCode6 * 59) + (mobileType == null ? 43 : mobileType.hashCode());
        String sysVersion = getSysVersion();
        return (hashCode7 * 59) + (sysVersion != null ? sysVersion.hashCode() : 43);
    }

    public void setAppVersion(final String appVersion) {
        this.appVersion = appVersion;
    }

    public void setBrand(final String brand) {
        this.brand = brand;
    }

    public void setDeviceToken(final String deviceToken) {
        this.deviceToken = deviceToken;
    }

    public void setDeviceType(final String deviceType) {
        this.deviceType = deviceType;
    }

    public void setDistance(final long distance) {
        this.distance = distance;
    }

    public void setMobileType(final String mobileType) {
        this.mobileType = mobileType;
    }

    public void setPassword(final String password) {
        this.password = password;
    }

    public void setPhone(final String phone) {
        this.phone = phone;
    }

    public void setRunTime(final int runTime) {
        this.runTime = runTime;
    }

    public void setSysVersion(final String sysVersion) {
        this.sysVersion = sysVersion;
    }

    public String toString() {
        return "AppConfig(phone=" + getPhone() + ", password=" + getPassword() + ", distance=" + getDistance() + ", runTime=" + getRunTime() + ", appVersion=" + getAppVersion() + ", brand=" + getBrand() + ", deviceToken=" + getDeviceToken() + ", deviceType=" + getDeviceType() + ", mobileType=" + getMobileType() + ", sysVersion=" + getSysVersion() + ")";
    }

    public AppConfig(final String phone, final String password, final long distance, final int runTime, final String appVersion, final String brand, final String deviceToken, final String deviceType, final String mobileType, final String sysVersion) {
        this.deviceToken = "";
        this.deviceType = "1";
        this.phone = phone;
        this.password = password;
        this.distance = distance;
        this.runTime = runTime;
        this.appVersion = appVersion;
        this.brand = brand;
        this.deviceToken = deviceToken;
        this.deviceType = deviceType;
        this.mobileType = mobileType;
        this.sysVersion = sysVersion;
    }

    public AppConfig() {
        this.deviceToken = "";
        this.deviceType = "1";
    }

    public String getPhone() {
        return this.phone;
    }

    public String getPassword() {
        return this.password;
    }

    public long getDistance() {
        return this.distance;
    }

    public int getRunTime() {
        return this.runTime;
    }

    public String getAppVersion() {
        return this.appVersion;
    }

    public String getBrand() {
        return this.brand;
    }

    public String getDeviceToken() {
        return this.deviceToken;
    }

    public String getDeviceType() {
        return this.deviceType;
    }

    public String getMobileType() {
        return this.mobileType;
    }

    public String getSysVersion() {
        return this.sysVersion;
    }
}
我们可以看到Appconfig类主要属性的get和set方法,hashcode方法可能是用于其他地方,该类不是我们的主要目标
- App
package com.example.autorun.helper;

import android.app.Activity;
import android.content.Context;
import android.widget.ProgressBar;
import android.widget.TextView;
import androidx.appcompat.widget.TintContextWrapper;
import com.example.autorun.ui.login.LoginActivity;
import com.fasterxml.jackson.core.type.TypeReference;
import java.io.IOException;
import java.text.SimpleDateFormat;
import java.util.Date;
import org.apache.commons.lang3.StringUtils;
import org.apache.hc.core5.http.ParseException;
import org.example.entity.AppConfig;
import org.example.entity.Location;
import org.example.entity.NewRecordBody;
import org.example.entity.Response;
import org.example.entity.ResponseType.NewRecordResult;
import org.example.entity.ResponseType.RunStandard;
import org.example.entity.ResponseType.SchoolBound;
import org.example.entity.ResponseType.UserInfo;
import org.example.run.Request;
import org.example.utils.FileUtil;
import org.example.utils.JsonUtils;
import org.example.utils.TrackUtils;

/* loaded from: classes.dex */
public class App extends Thread {
    public static String ERROR;
    AppConfig config;
    ProgressBar loadingProgressBar;
    private TextView resultArea;

    public void setResultArea(final TextView resultArea) {
        this.resultArea = resultArea;
    }

    public void setLoadingProgressBar(final ProgressBar loadingProgressBar) {
        this.loadingProgressBar = loadingProgressBar;
    }

    public App(AppConfig config) {
        this.config = config;
    }

    public void runSub() throws IOException, ParseException {
        appendMsg("开始");
        String phone = this.config.getPhone();
        String password = this.config.getPassword();
        long distance = this.config.getDistance();
        int runTime = this.config.getRunTime();
        if (this.config.getBrand().length() == 0) {
            appendMsg("请配置手机型号信息");
            return;
        }
        double d = ((runTime * 1.0d) / distance) * 1000.0d;
        if (d < 6.0d) {
            appendMsg("八分是治愈,七分是自娱,六分是养身,五分是自伤,四分是自残,三分是自毁。");
            appendMsg(String.format("你的配速是:%.2f 分钟/公里, %s", Double.valueOf(d), new String[]{"我认为这种事情是不可能的", "太快了", "要死了", "你正在自毁", "你正在自残", "你得锻炼正造成身体上的损伤", "六分是养身", "七分是自娱", "八分是治愈"}[(int) d]));
            return;
        }
        appendMsg(String.format("平均配速:%.2f\n", Double.valueOf(d)));
        Request request = new Request("", this.config);
        appendMsg("开始登录");
        UserInfo login = request.login(phone, password);
        if (login == null) {
            appendMsg("登录失败");
            return;
        }
        long userId = login.getUserId();
        if (userId != -1) {
            appendMsg("获取跑步标准");
            RunStandard runStandard = request.getRunStandard();
            appendMsg("获取学校经纬度区域信息");
            SchoolBound[] schoolBound = request.getSchoolBound();
            appendMsg("生成跑步数据");
            NewRecordBody newRecordBody = new NewRecordBody();
            newRecordBody.setUserId(userId);
            newRecordBody.setAppVersions(this.config.getAppVersion());
            newRecordBody.setBrand(this.config.getBrand());
            newRecordBody.setMobileType(this.config.getMobileType());
            newRecordBody.setSysVersions(this.config.getSysVersion());
            newRecordBody.setRunDistance(distance);
            newRecordBody.setRunTime(runTime);
            newRecordBody.setYearSemester(runStandard.getSemesterYear());
            newRecordBody.setRealityTrackPoints(schoolBound[0].getSiteBound() + "--");
            SimpleDateFormat simpleDateFormat = new SimpleDateFormat();
            simpleDateFormat.applyPattern("yyyy-MM-dd");
            newRecordBody.setRecordDate(simpleDateFormat.format(new Date()));
            newRecordBody.setTrackPoints(genTack(distance));
            appendMsg("提交跑步数据");
            String recordNew = request.recordNew(newRecordBody);
            Response response = (Response) JsonUtils.string2Obj(recordNew, new TypeReference<Response<NewRecordResult>>() { // from class: com.example.autorun.helper.App.1
            });
            appendMsg("");
            appendMsg("返回原始数据:" + recordNew);
            appendMsg("解析数据:");
            appendMsg("跑步结果:" + response.getCode() + " - " + response.getMsg());
            NewRecordResult newRecordResult = (NewRecordResult) response.getResponse();
            appendMsg("生成的跑步ID:" + newRecordResult.getRecordId());
            appendMsg("结果状态:" + newRecordResult.getResultStatus());
            appendMsg("结果描述:" + newRecordResult.getResultDesc());
            appendMsg("超速警告次数:" + newRecordResult.getOverSpeedWarn());
            appendMsg("警告内容:" + newRecordResult.getWarnContent());
            return;
        }
        appendMsg("用户Id获取失败");
    }

    @Override // java.lang.Thread, java.lang.Runnable
    public void run() {
        String message;
        try {
            try {
                runSub();
            } catch (Exception e) {
                e.printStackTrace();
                if (e instanceof RuntimeException) {
                    StackTraceElement stackTraceElement = e.getStackTrace()[0];
                    message = e.getMessage() + "\n异常来源:" + stackTraceElement.getClassName() + " - line:" + stackTraceElement.getLineNumber();
                } else {
                    message = e.getMessage();
                }
                appendMsg(message);
            }
        } finally {
            stopLoading();
        }
    }

    public void appendMsg(final String msg) {
        Activity activity;
        Context context = this.resultArea.getContext();
        if (context instanceof LoginActivity) {
            activity = (Activity) context;
        } else {
            activity = context instanceof TintContextWrapper ? (Activity) ((TintContextWrapper) context).getBaseContext() : null;
        }
        if (activity != null) {
            activity.runOnUiThread(new Runnable() { // from class: com.example.autorun.helper.App.2
                @Override // java.lang.Runnable
                public void run() {
                    App.this.resultArea.append(StringUtils.LF + msg);
                }
            });
        }
    }

    public static String genTack(long distance) {
        String ReadFile = FileUtil.ReadFile(org.example.App.class.getResourceAsStream("/map.json"));
        if (ReadFile.length() == 0) {
            System.out.println("配置读取失败");
            return null;
        }
        return TrackUtils.gen(distance, (Location[]) JsonUtils.string2Obj(ReadFile, Location[].class));
    }

    public void stopLoading() {
        Activity activity;
        Context context = this.resultArea.getContext();
        if (context instanceof LoginActivity) {
            activity = (Activity) context;
        } else {
            activity = context instanceof TintContextWrapper ? (Activity) ((TintContextWrapper) context).getBaseContext() : null;
        }
        if (activity != null) {
            activity.runOnUiThread(new Runnable() { // from class: com.example.autorun.helper.App.3
                @Override // java.lang.Runnable
                public void run() {
                    App.this.loadingProgressBar.setVisibility(4);
                }
            });
        }
    }
}
通过分析上述代码,总结处理逻辑如下:
- 读取AppConfig类中存储的用户信息(电话、密码等)
- 调用org.example.run.Request.login方法登录,返回一个UserInfo类型
- 通过返回的UserInfo类型判断是否登录成功,成功时获取userId
-
获取userId成功后,通过调用Unirun的Api接口获取学校和跑步标准,随后通过org.example.entity生成跑步记录,其中跑步轨迹点存放在map.json中,最后通过org.example.entity.ResponseType.NewRecordResult获取跑步结果
-
Request
package org.example.run;

import com.fasterxml.jackson.core.type.TypeReference;
import java.io.IOException;
import java.util.HashMap;
import org.apache.hc.core5.http.ParseException;
import org.example.entity.AppConfig;
import org.example.entity.NewRecordBody;
import org.example.entity.Response;
import org.example.entity.ResponseType.RunStandard;
import org.example.entity.ResponseType.SchoolBound;
import org.example.entity.ResponseType.UserInfo;
import org.example.utils.HTTP.HttpUtil2;
import org.example.utils.JsonUtils;
import org.example.utils.MD5Utils;
import org.example.utils.SignUtils;

/* loaded from: classes2.dex */
public class Request {
    private static final HttpUtil2 http = new HttpUtil2();
    private final String appKey = "389885588s0648fa";
    private AppConfig config;
    private String token;

    public Request(String token, AppConfig config) {
        this.token = token;
        this.config = config;
    }

    public UserInfo login(String phone, String password) throws IOException {
        String stringToMD5 = MD5Utils.stringToMD5(password);
        try {
            HashMap hashMap = new HashMap();
            hashMap.put("appVersion", this.config.getAppVersion());
            hashMap.put("brand", this.config.getBrand());
            hashMap.put("deviceToken", this.config.getDeviceToken());
            hashMap.put("deviceType", this.config.getDeviceType());
            hashMap.put("mobileType", this.config.getMobileType());
            hashMap.put("password", stringToMD5);
            hashMap.put("sysVersion", this.config.getSysVersion());
            hashMap.put("userPhone", phone);
            HashMap hashMap2 = new HashMap();
            String obj2String = JsonUtils.obj2String(hashMap);
            hashMap2.put("sign", SignUtils.get(null, obj2String));
            hashMap2.put("token", this.token);
            hashMap2.put("appkey", "389885588s0648fa");
            hashMap2.put("Content-Type", "application/json; charset=UTF-8");
            Response response = (Response) JsonUtils.string2Obj(new String(http.doPostJson2Byte("https://run-lb.tanmasports.com/v1/auth/login/password", hashMap2, obj2String)), new TypeReference<Response<UserInfo>>() { // from class: org.example.run.Request.1
                AnonymousClass1() {
                }
            });
            if (response.getCode() == 10000) {
                UserInfo userInfo = (UserInfo) response.getResponse();
                this.token = userInfo.getOauthToken().getToken();
                return userInfo;
            }
            throw new RuntimeException(response.getMsg());
        } catch (IOException e) {
            e.printStackTrace();
            throw e;
        }
    }

    /* renamed from: org.example.run.Request$1 */
    class AnonymousClass1 extends TypeReference<Response<UserInfo>> {
        AnonymousClass1() {
        }
    }

    public long getUserId() {
        try {
            HashMap hashMap = new HashMap();
            hashMap.put("sign", SignUtils.get(null, null));
            hashMap.put("token", this.token);
            hashMap.put("appkey", "389885588s0648fa");
            hashMap.put("Content-Type", "application/json; charset=UTF-8");
            Response response = (Response) JsonUtils.string2Obj(http.doGet2("https://run-lb.tanmasports.com/v1/auth/query/token", hashMap), new TypeReference<Response<UserInfo>>() { // from class: org.example.run.Request.2
                AnonymousClass2() {
                }
            });
            if (response.getCode() == 10000) {
                return ((UserInfo) response.getResponse()).getUserId();
            }
            throw new RuntimeException(response.getMsg());
        } catch (IOException e) {
            e.printStackTrace();
            return -1L;
        } catch (ParseException e2) {
            e2.printStackTrace();
            return -1L;
        }
    }

    /* renamed from: org.example.run.Request$2 */
    class AnonymousClass2 extends TypeReference<Response<UserInfo>> {
        AnonymousClass2() {
        }
    }

    public SchoolBound[] getSchoolBound() {
        try {
            HashMap hashMap = new HashMap();
            HashMap hashMap2 = new HashMap();
            hashMap2.put("schoolId", "3680");
            hashMap.put("sign", SignUtils.get(hashMap2, null));
            hashMap.put("token", this.token);
            hashMap.put("appkey", "389885588s0648fa");
            hashMap.put("Content-Type", "application/json; charset=UTF-8");
            Response response = (Response) JsonUtils.string2Obj(http.doGet2("https://run-lb.tanmasports.com/v1/unirun/querySchoolBound?schoolId=3680", hashMap), new TypeReference<Response<SchoolBound[]>>() { // from class: org.example.run.Request.3
                AnonymousClass3() {
                }
            });
            if (response.getCode() != 10000) {
                throw new RuntimeException(response.getMsg());
            }
            return (SchoolBound[]) response.getResponse();
        } catch (IOException e) {
            e.printStackTrace();
            return null;
        } catch (ParseException e2) {
            e2.printStackTrace();
            return null;
        }
    }

    /* renamed from: org.example.run.Request$3 */
    class AnonymousClass3 extends TypeReference<Response<SchoolBound[]>> {
        AnonymousClass3() {
        }
    }

    public RunStandard getRunStandard() {
        try {
            HashMap hashMap = new HashMap();
            HashMap hashMap2 = new HashMap();
            hashMap2.put("schoolId", "3680");
            hashMap.put("sign", SignUtils.get(hashMap2, null));
            hashMap.put("token", this.token);
            hashMap.put("appkey", "389885588s0648fa");
            hashMap.put("Content-Type", "application/json; charset=UTF-8");
            Response response = (Response) JsonUtils.string2Obj(http.doGet2("https://run-lb.tanmasports.com/v1/unirun/query/runStandard?schoolId=3680", hashMap), new TypeReference<Response<RunStandard>>() { // from class: org.example.run.Request.4
                AnonymousClass4() {
                }
            });
            if (response.getCode() != 10000) {
                throw new RuntimeException(response.getMsg());
            }
            return (RunStandard) response.getResponse();
        } catch (IOException e) {
            e.printStackTrace();
            return null;
        } catch (ParseException e2) {
            e2.printStackTrace();
            return null;
        }
    }

    /* renamed from: org.example.run.Request$4 */
    class AnonymousClass4 extends TypeReference<Response<RunStandard>> {
        AnonymousClass4() {
        }
    }

    public String recordNew(NewRecordBody body) {
        try {
            HashMap hashMap = new HashMap();
            String obj2String = JsonUtils.obj2String(body);
            hashMap.put("sign", SignUtils.get(null, obj2String));
            hashMap.put("token", this.token);
            hashMap.put("appkey", "389885588s0648fa");
            hashMap.put("Content-Type", "application/json; charset=UTF-8");
            return new String(http.doPostJson2Byte("https://run-lb.tanmasports.com/v1/unirun/save/run/record/new", hashMap, obj2String));
        } catch (IOException e) {
            e.printStackTrace();
            return null;
        }
    }
}
从中我们可以知道密码是采用的md5加密,其他信息则是明文传输
Objection动态Hook
动态调试com.example.omenchallengehelper
通过前面的静态代码分析,我们知道主类为com.example.autorun.helper.App,处理登陆的类方法为org.example.run.Request.login,我们hook它
android hooking watch class_method org.example.run.Request.login --dump-args --dump-backtrace --dump-return
hook我们分析出来的login方法
- 登陆失败时

- 登陆成功时

无论登陆失败/成功,都能hook到明文的电话和密码,登陆成功时还能hook到login方法返回的UserInfo类型的信息
# hook获取跑步状态的org.example.entity.ResponseType.NewRecordResult类
android hooking watch class org.example.entity.ResponseType.NewRecordResult --dump-args --dump-backtrace --dump-return
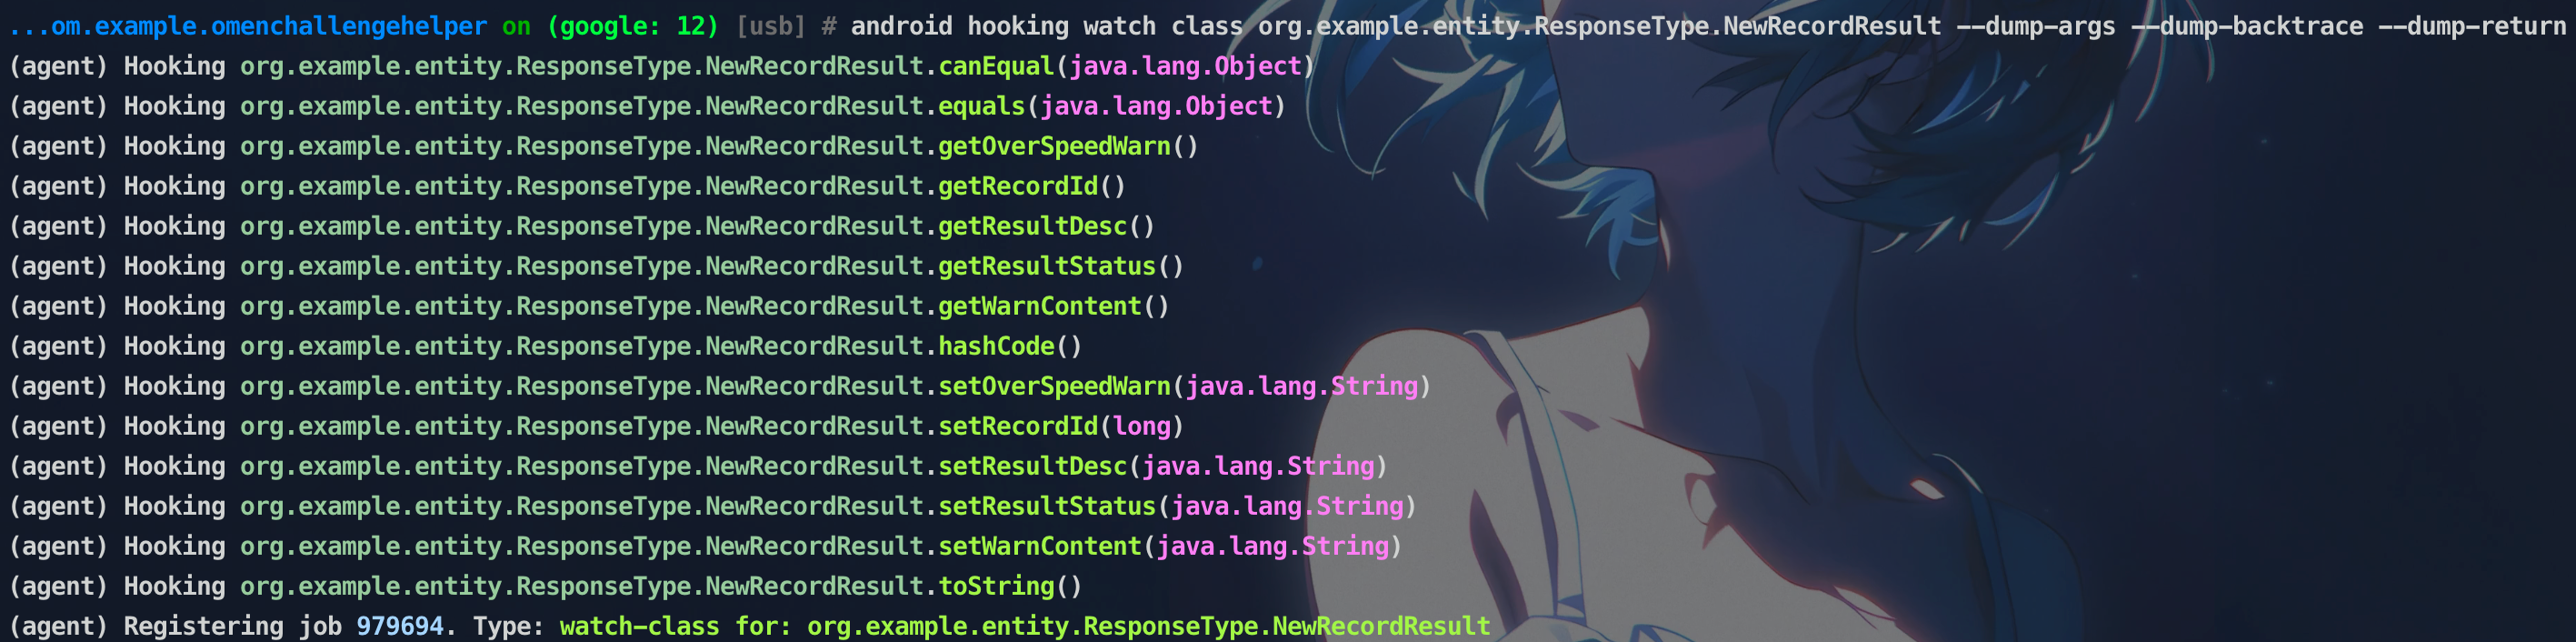
随后操作app执行登陆操作

事实上只调用这些方法,我们hook一下getResultDesc方法

步态综合评估
首先我们需要找到app的包名

包名为gait.app,登陆窗口为io.dcloud.PandoraEntryActivity
查看是否加壳
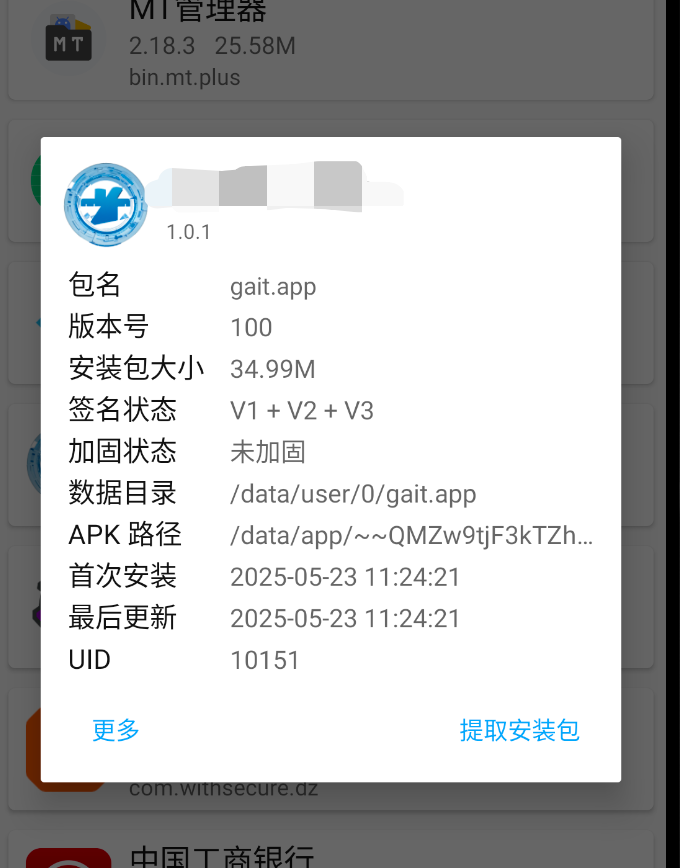
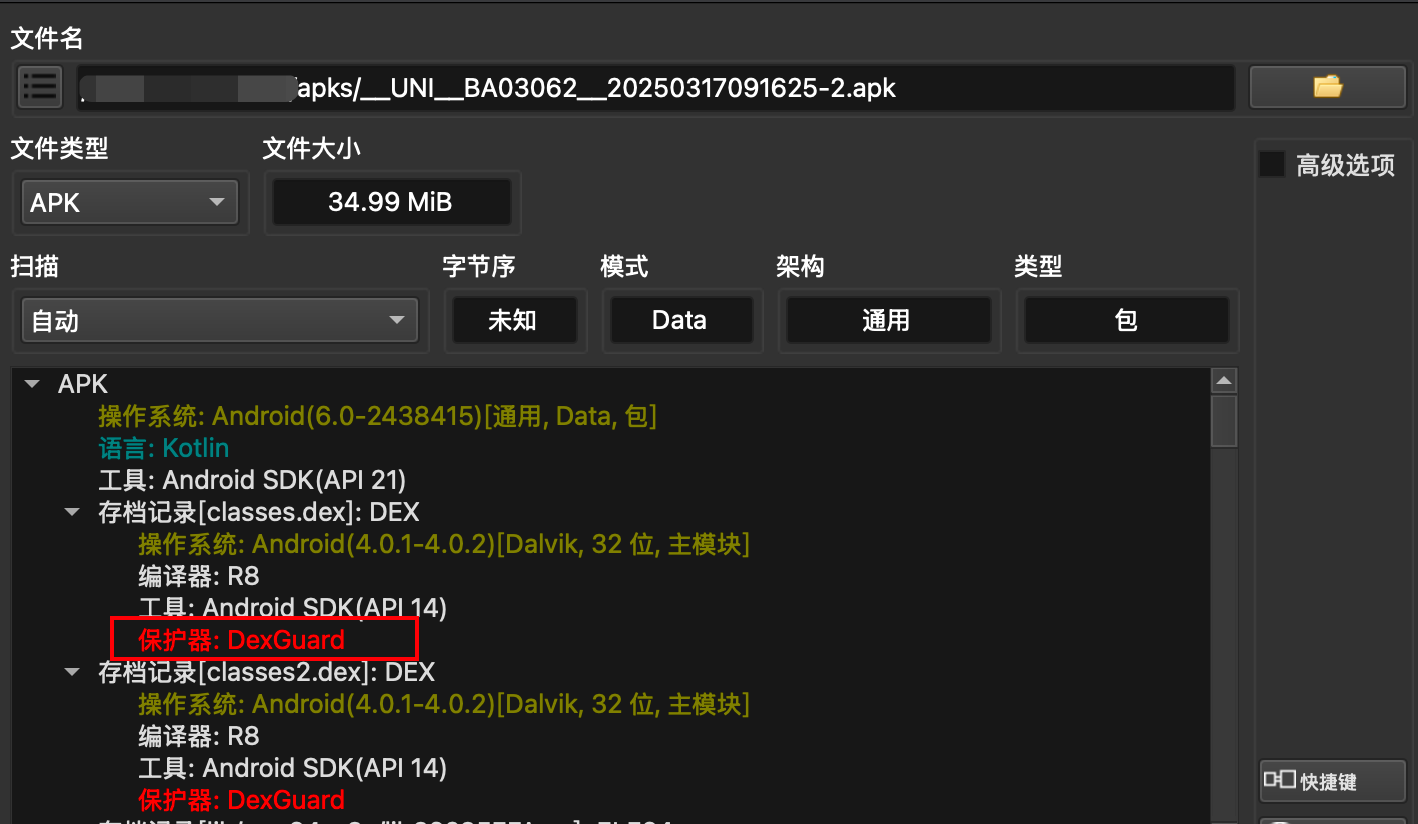
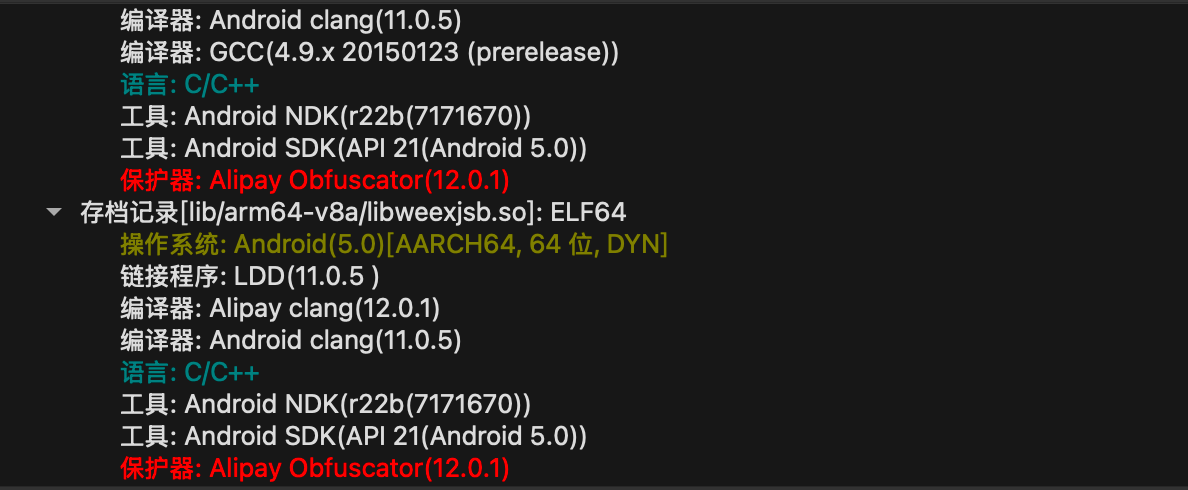
工具显示使用了DexGuard和Alipay Obfuscator,其中DexGuard是一个加固/加壳、混淆工具,Alipay Obfuscator也是一个混淆工具
脱壳
反混淆
抓包查看
这里注册一个账号:13587986589,123456@Y
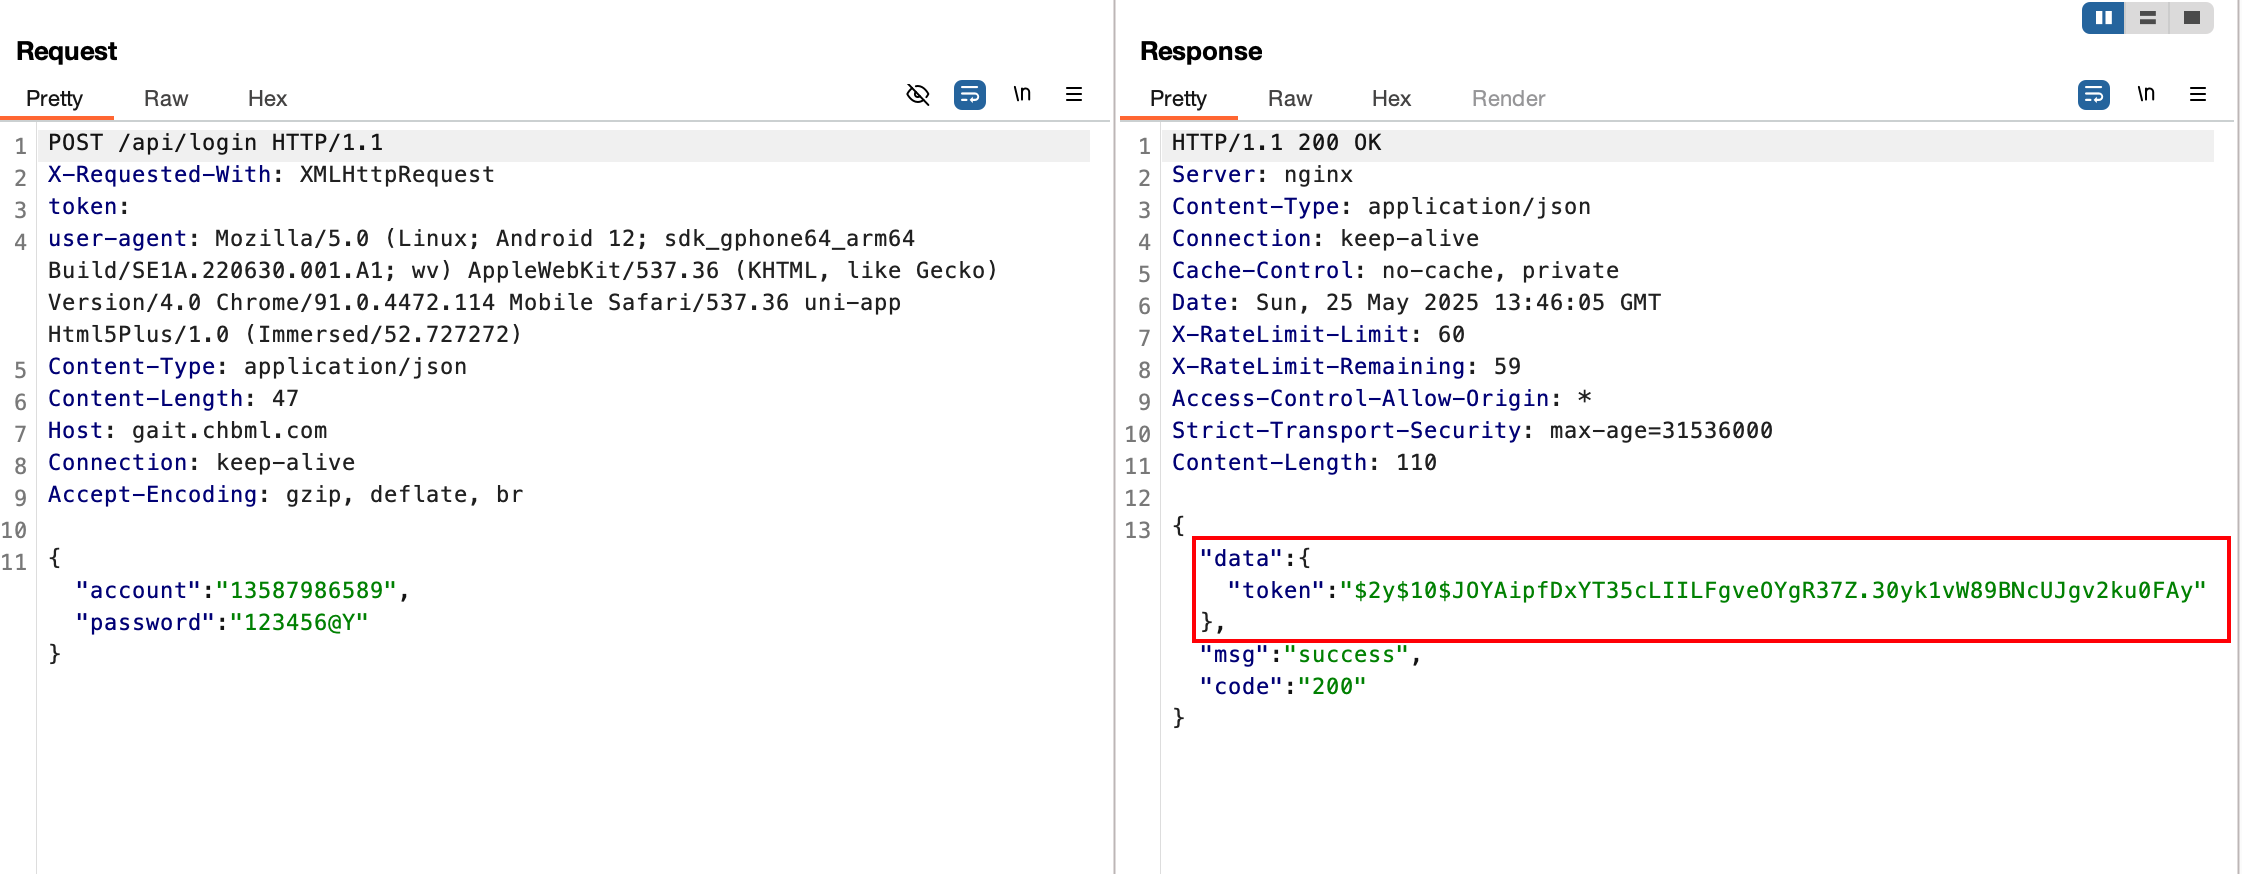
抓到登陆请求,可以看到返回一个token,这里我们就以找到token的生成逻辑为最终目标
静态分析/动态分析
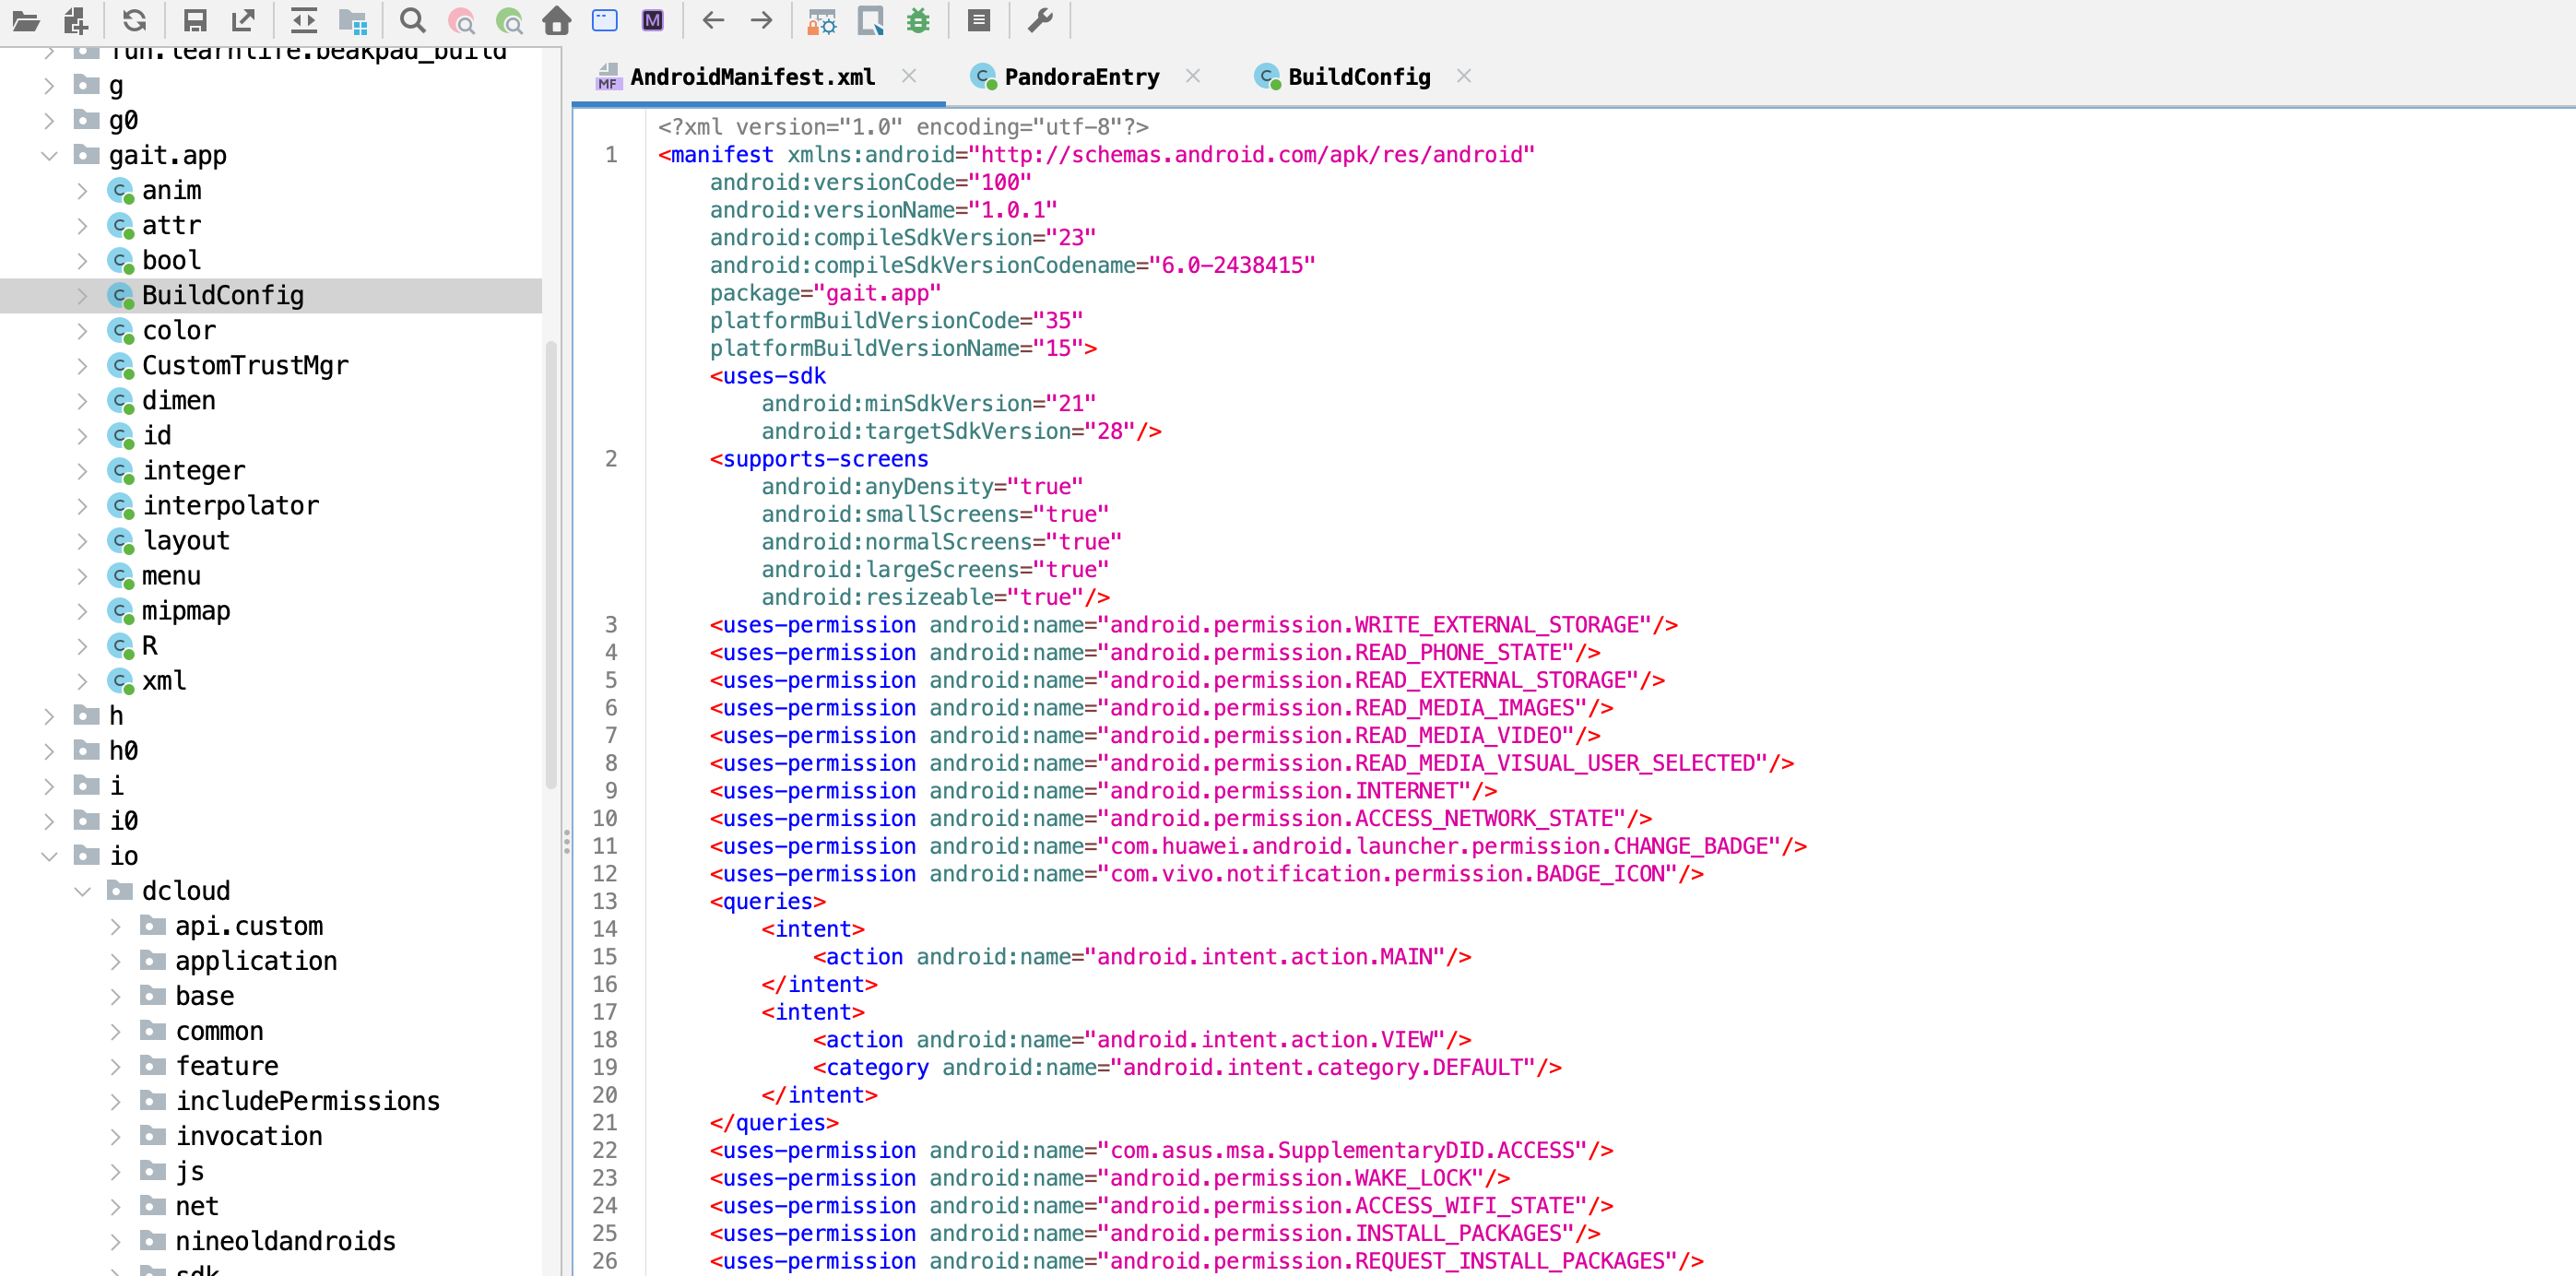
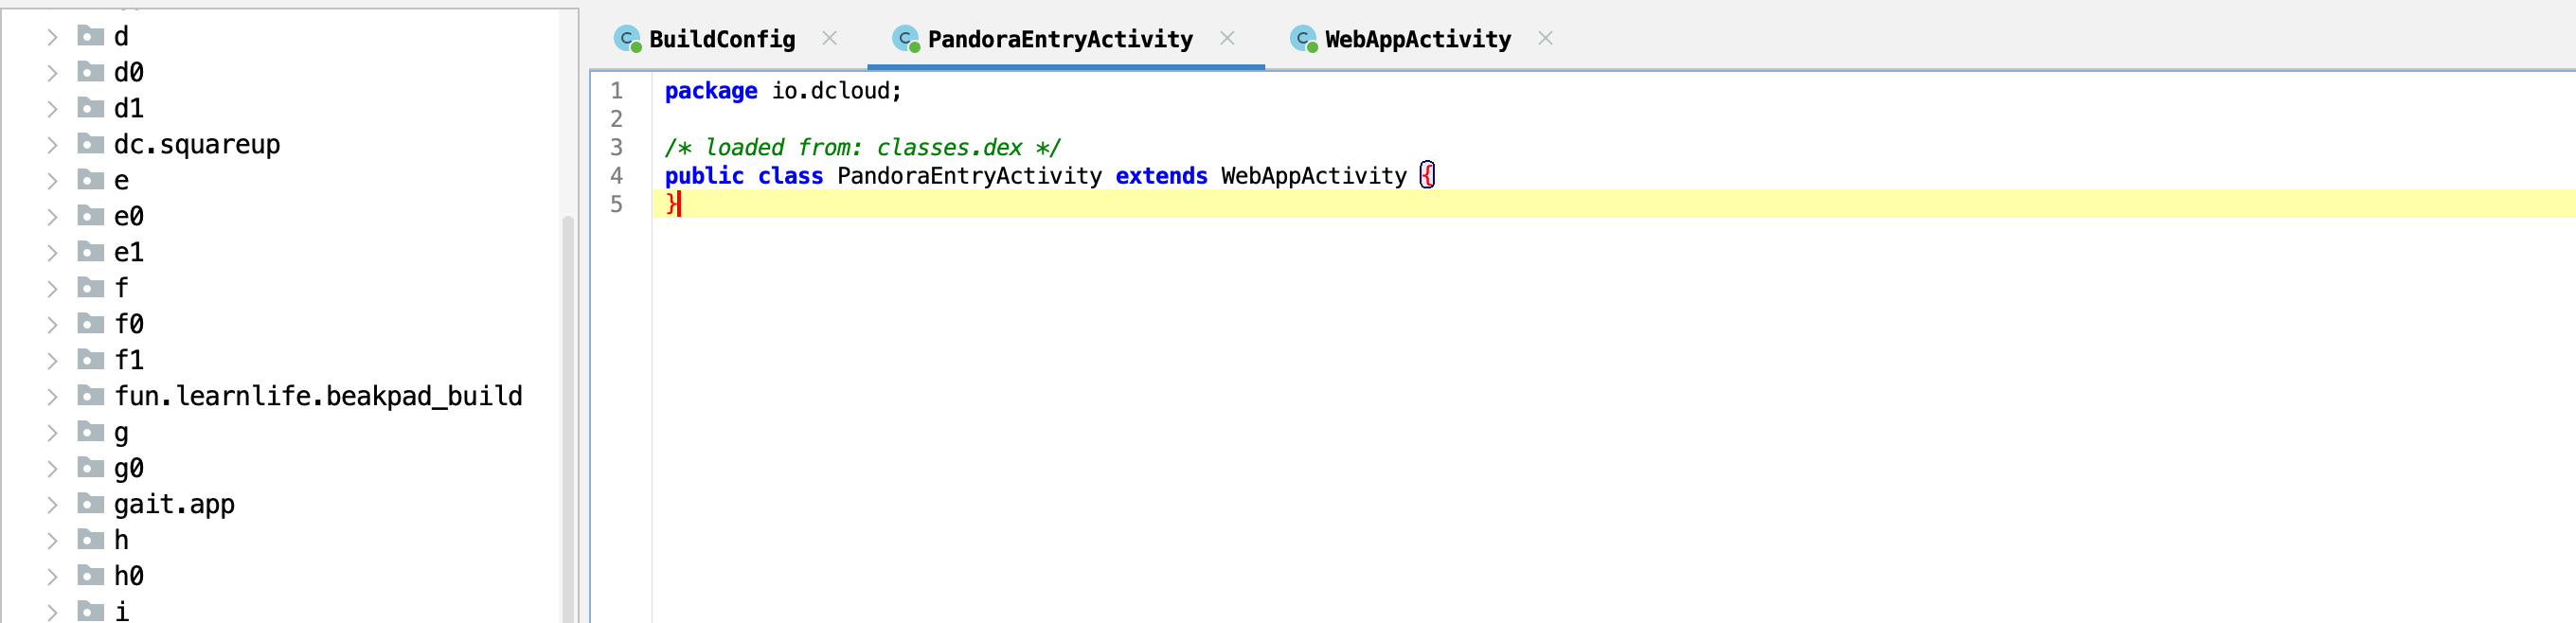
可以看到io.dcloud.PandoraEntryActivity什么都没有,这可能代码混淆/加壳的原因,也可能本来就是这样的,但WebAppActivity继承了WebAppActivity,WebAppActivity代码是存在混淆的